在 CollectionView 中控制捲動
.NET 多平臺應用程式 UI (.NET MAUI) CollectionView 定義兩 ScrollTo 種方法,將專案捲動到檢視中。 其中一個多載會將位於指定索引的專案卷動到檢視中,而另一個多載則會將指定的專案卷動到檢視中。 這兩個多載都有額外的自變數,可以指定來表示專案所屬的群組、捲動完成後專案的確切位置,以及是否要建立卷動的動畫。
CollectionView定義叫用其中ScrollTo一個ScrollToRequested方法時所引發的事件。 事件ScrollToRequestedEventArgs隨附ScrollToRequested的物件有許多屬性,包括 IsAnimated、 IndexItem和 ScrollToPosition。 這些屬性會從方法呼叫中指定的自變數進行 ScrollTo 設定。
此外, CollectionView 定義 Scrolled 引發的事件,以指出發生捲動。 事件 ItemsViewScrolledEventArgs 隨附 Scrolled 的物件有許多屬性。 如需詳細資訊,請參閱 偵測卷動。
CollectionView 也會定義 ItemsUpdatingScrollMode 屬性,這個屬性表示將新專案加入至其中時的捲動行為 CollectionView 。 如需此屬性的詳細資訊,請參閱 新增專案時控制卷動位置。
當使用者撥動以起始捲動時,可以控制卷動的結束位置,讓專案完全顯示。 這項功能稱為貼齊,因為專案在捲動停止時會貼齊位置。 如需詳細資訊,請參閱 貼齊點。
CollectionView 也可以在用戶捲動時以累加方式載入數據。 如需詳細資訊,請參閱 以累加方式載入數據。
提示
CollectionView將 放在 內VerticalStackLayout可以停止CollectionView捲動,而且可以限制顯示的項目數目。 在這裡情況下,請將 取代 VerticalStackLayout 為 Grid。
偵測卷動
CollectionView 定義 Scrolled 引發的事件,指出發生捲動。 類別 ItemsViewScrolledEventArgs ,表示事件隨附 Scrolled 的物件,會定義下列屬性:
HorizontalDelta型double別為 的 ,表示水平捲動量的變化。 這是向左卷動時的負值,在向右卷動時為正值。VerticalDelta型double別為 的 ,表示垂直捲動量的變化。 這是向上捲動時的負值,而向下捲動時為正值。HorizontalOffset型double別為 的 ,定義清單從其原點水準位移的量。VerticalOffset型double別為 的 ,定義清單從其原點垂直位移的量。FirstVisibleItemIndex類型int為的 ,是清單中可見之第一個專案的索引。CenterItemIndex類型int為的 ,是清單中可見之中心專案的索引。LastVisibleItemIndex類型int為的 ,是清單中最後一個專案的索引。
下列 XAML 範例顯示 CollectionView ,可設定 事件的事件處理程式 Scrolled :
<CollectionView Scrolled="OnCollectionViewScrolled">
    ...
</CollectionView>
對等的 C# 程式碼為:
CollectionView collectionView = new CollectionView();
collectionView.Scrolled += OnCollectionViewScrolled;
在此程式代碼範例中,當事件引發時Scrolled,OnCollectionViewScrolled會執行事件處理程式:
void OnCollectionViewScrolled(object sender, ItemsViewScrolledEventArgs e)
{
    // Custom logic
}
重要
會 Scrolled 針對使用者起始的捲動和程式設計卷動引發 事件。
將索引處的項目捲動至檢視
一個 ScrollTo 方法多載會將位於指定索引的項目捲動到檢視中。 假設有一CollectionView個名為 CollectionView 的物件,下列範例示範如何將索引 12 的專案卷動到檢視中:
collectionView.ScrollTo(12);
或者,可以藉由指定專案和群組索引,將群組數據中的專案卷動到檢視中。 下列範例示範如何將第二個群組中的第三個專案卷動到檢視中:
// Items and groups are indexed from zero.
collectionView.ScrollTo(2, 1);
注意
叫 ScrollToRequested 用 方法時 ScrollTo 會引發 事件。
將專案捲動至檢視
另一個 ScrollTo 方法多載會將指定的項目卷動到檢視中。 假設有名為 CollectionView CollectionView的物件,下列範例示範如何將 Proboscis Monkey 專案卷動到檢視中:
MonkeysViewModel viewModel = BindingContext as MonkeysViewModel;
Monkey monkey = viewModel.Monkeys.FirstOrDefault(m => m.Name == "Proboscis Monkey");
collectionView.ScrollTo(monkey);
或者,可以藉由指定專案和群組,將群組數據中的專案卷動到檢視中。 下列範例示範如何將 Monkeys 群組中的 Proboscis Monkey 專案捲動到檢視中:
GroupedAnimalsViewModel viewModel = BindingContext as GroupedAnimalsViewModel;
AnimalGroup group = viewModel.Animals.FirstOrDefault(a => a.Name == "Monkeys");
Animal monkey = group.FirstOrDefault(m => m.Name == "Proboscis Monkey");
collectionView.ScrollTo(monkey, group);
注意
叫 ScrollToRequested 用 方法時 ScrollTo 會引發 事件。
停用卷動動畫
捲動動畫會在將專案卷動至檢視時顯示。 不過,將方法的ScrollTo自變數設定animate為 false,即可停用此動畫:
collectionView.ScrollTo(monkey, animate: false);
控制卷動位置
將專案卷動至檢視時,可以使用 方法的ScrollTo自變數指定position卷動完成後專案的確切位置。 這個自變數接受 ScrollToPosition 列舉成員。
MakeVisible
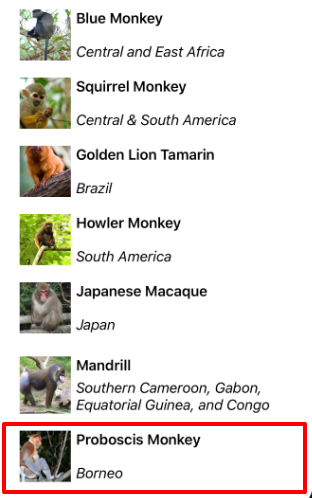
成員 ScrollToPosition.MakeVisible 表示項目應該捲動,直到檢視中可見為止:
collectionView.ScrollTo(monkey, position: ScrollToPosition.MakeVisible);
此範例程式代碼會產生將專案捲動至檢視所需的最小卷動:
注意
如果position呼叫 ScrollTo 方法時未指定自變數,則ScrollToPosition.MakeVisible預設會使用 成員。
Start
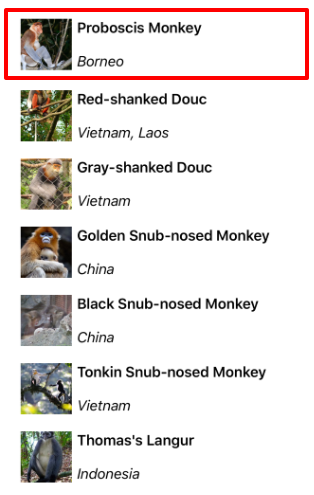
成員 ScrollToPosition.Start 表示項目應該捲動至檢視的開頭:
collectionView.ScrollTo(monkey, position: ScrollToPosition.Start);
此範例程式代碼會導致專案捲動至檢視的開頭:
置中
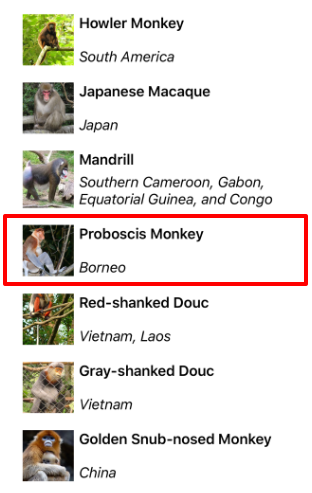
成員 ScrollToPosition.Center 表示項目應該捲動至檢視的中心:
collectionView.ScrollTo(monkey, position: ScrollToPosition.Center);
此範例程式代碼會導致專案捲動至檢視的中心:
結束
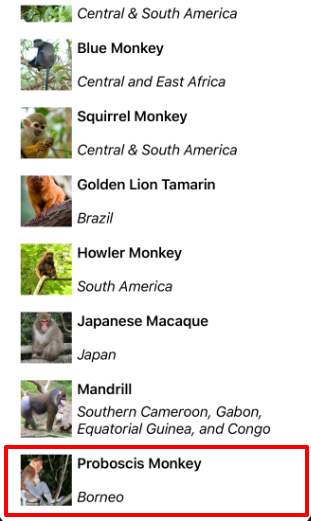
成員 ScrollToPosition.End 表示項目應該捲動至檢視的結尾:
collectionView.ScrollTo(monkey, position: ScrollToPosition.End);
此範例程式代碼會導致項目捲動至檢視的結尾:
新增專案時控制卷動位置
CollectionView 定義 ItemsUpdatingScrollMode 由可系結屬性所支持的屬性。 這個屬性會取得或設定 ItemsUpdatingScrollMode 列舉值,這個值表示將新專案加入至它時的捲動行為 CollectionView 。 ItemsUpdatingScrollMode 列舉會定義下列成員:
KeepItemsInView會在新增專案時,保留清單中顯示的第一個專案。KeepScrollOffset確保新增專案時會維護目前的捲動位置。KeepLastItemInView會調整滾動位移,以在新增專案時保留清單中顯示的最後一個專案。
屬性的 ItemsUpdatingScrollMode 預設值為 KeepItemsInView。 因此,當新專案新增至清單中的第一 CollectionView 個專案時,仍會顯示。 若要確保清單中最後一個專案會在新增項目時顯示,請將 屬性設定 ItemsUpdatingScrollMode 為 KeepLastItemInView:
<CollectionView ItemsUpdatingScrollMode="KeepLastItemInView">
    ...
</CollectionView>
對等的 C# 程式碼為:
CollectionView collectionView = new CollectionView
{
    ItemsUpdatingScrollMode = ItemsUpdatingScrollMode.KeepLastItemInView
};
滾動條可見性
CollectionView 定義 HorizontalScrollBarVisibility 和 VerticalScrollBarVisibility 屬性,這些屬性是由可系結屬性所支援。 這些屬性會取得或設定 ScrollBarVisibility 列舉值,代表當可見水準或垂直滾動條時。 ScrollBarVisibility 列舉會定義下列成員:
Default表示平臺的默認滾動條行為,而 是 和VerticalScrollBarVisibility屬性的HorizontalScrollBarVisibility預設值。Always表示即使內容符合檢視,也會顯示滾動條。Never表示即使內容不符合檢視,也不會顯示滾動條。
貼齊點
當使用者撥動以起始捲動時,可以控制卷動的結束位置,讓專案完全顯示。 這項功能稱為貼齊,因為專案在捲動停止時會貼齊位置,而且由 類別的下列屬性 ItemsLayout 控制:
SnapPointsType型SnapPointsType別為 的 ,指定卷動時貼齊點的行為。SnapPointsAlignment型SnapPointsAlignment別為 的 ,指定貼齊點與專案對齊的方式。
這些屬性是由 BindableProperty 物件所支援,這表示屬性可以是數據系結的目標。
注意
當貼齊發生時,它會以產生最少動作量的方向發生。
貼齊點類型
SnapPointsType 列舉會定義下列成員:
None表示卷動不會貼齊至專案。Mandatory表示內容一律會貼齊到最接近的貼齊點,而捲動會沿著慣性方向自然停止的位置。MandatorySingle表示與Mandatory相同的行為,但一次只會捲動一個專案。
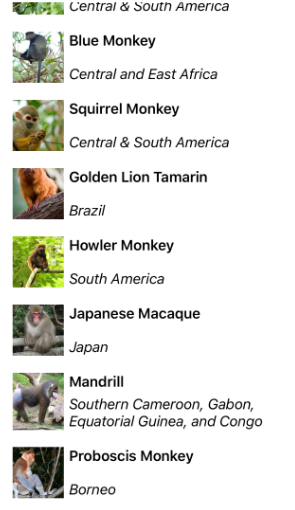
根據預設, SnapPointsType 屬性會設定為 SnapPointsType.None,以確保卷動不會貼齊專案,如下列螢幕快照所示:
貼齊點對齊方式
列舉 SnapPointsAlignment 會 Start定義、 Center和 End 成員。
重要
只有當 屬性設定為Mandatory、 或 MandatorySingle時SnapPointsType,才會遵守 屬性的值SnapPointsAlignment。
Start
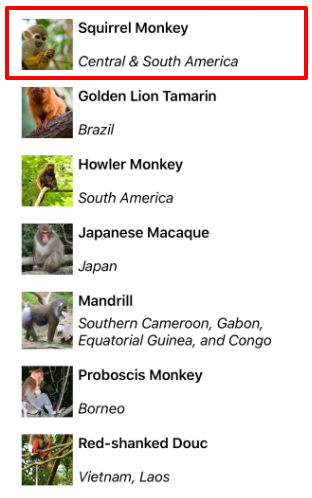
成員 SnapPointsAlignment.Start 表示貼齊點與專案的前置邊緣對齊。
預設的情況下,SnapPointsAlignment 屬性設定為 SnapPointsAlignment.Start。 不過,為了完整性,下列 XAML 範例示範如何設定這個列舉成員:
<CollectionView ItemsSource="{Binding Monkeys}">
    <CollectionView.ItemsLayout>
        <LinearItemsLayout Orientation="Vertical"
                           SnapPointsType="MandatorySingle"
                           SnapPointsAlignment="Start" />
    </CollectionView.ItemsLayout>
    ...
</CollectionView>
對等的 C# 程式碼為:
CollectionView collectionView = new CollectionView
{
    ItemsLayout = new LinearItemsLayout(ItemsLayoutOrientation.Vertical)
    {
        SnapPointsType = SnapPointsType.MandatorySingle,
        SnapPointsAlignment = SnapPointsAlignment.Start
    },
    // ...
};
當使用者撥動以起始捲動時,頂端專案會對齊檢視頂端:
置中
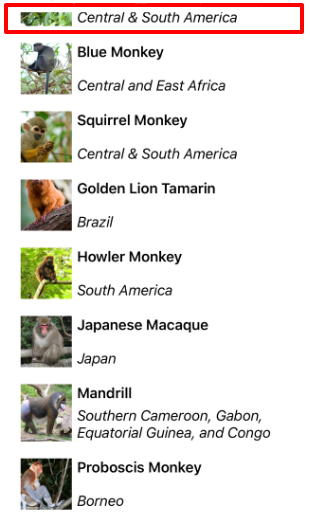
成員 SnapPointsAlignment.Center 表示貼齊點與專案中心對齊。 下列 XAML 範例示範如何設定此列舉成員:
<CollectionView ItemsSource="{Binding Monkeys}">
    <CollectionView.ItemsLayout>
        <LinearItemsLayout Orientation="Vertical"
                           SnapPointsType="MandatorySingle"
                           SnapPointsAlignment="Center" />
    </CollectionView.ItemsLayout>
    ...
</CollectionView>
對等的 C# 程式碼為:
CollectionView collectionView = new CollectionView
{
    ItemsLayout = new LinearItemsLayout(ItemsLayoutOrientation.Vertical)
    {
        SnapPointsType = SnapPointsType.MandatorySingle,
        SnapPointsAlignment = SnapPointsAlignment.Center
    },
    // ...
};
當使用者撥動以起始捲動時,頂端專案會置中對齊檢視頂端:
結束
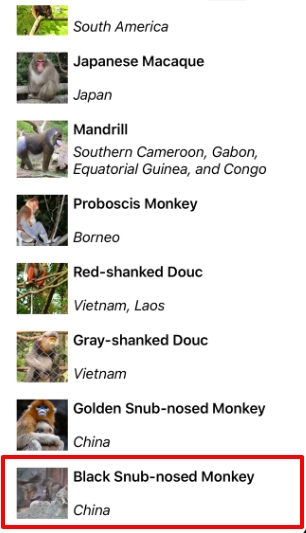
成員 SnapPointsAlignment.End 表示貼齊點與專案的尾端邊緣對齊。 下列 XAML 範例示範如何設定此列舉成員:
<CollectionView ItemsSource="{Binding Monkeys}">
    <CollectionView.ItemsLayout>
        <LinearItemsLayout Orientation="Vertical"
                           SnapPointsType="MandatorySingle"
                           SnapPointsAlignment="End" />
    </CollectionView.ItemsLayout>
    ...
</CollectionView>
對等的 C# 程式碼為:
CollectionView collectionView = new CollectionView
{
    ItemsLayout = new LinearItemsLayout(ItemsLayoutOrientation.Vertical)
    {
        SnapPointsType = SnapPointsType.MandatorySingle,
        SnapPointsAlignment = SnapPointsAlignment.End
    },
    // ...
};
當使用者撥動以起始捲動時,底部專案會對齊檢視底部:
 流覽範例
流覽範例