進出工作流程服務的異動流動
工作流程服務與用戶端都可以參與交易。 若要讓服務作業變成環境交易的一部分,請將 Receive 活動放在 TransactedReceiveScope 活動內。 Send 或 SendReply 活動在 TransactedReceiveScope 內所進行的任何呼叫也會在環境交易中進行。 工作流程用戶端應用程式可以使用 TransactionScope 活動建立環境異動,然後使用環境異動呼叫服務作業。 本主題逐步帶領您建立參與交易的工作流程服務和工作流程用戶端。
警告
如果工作流程服務執行個體是在異動內載入,且工作流程包含 Persist 活動,則工作流程執行個體將會阻塞,直到異動逾時為止。
重要
每當您使用 TransactedReceiveScope 時,建議您將工作流程中的所有 Receive 放在 TransactedReceiveScope 活動內。
重要
如果使用 TransactedReceiveScope 而且訊息按照錯誤的順序送達,工作流程就會在嘗試傳送第一則順序錯誤的訊息時中止。 當工作流程閒置時,您必須確定工作流程永遠位於一致的停止點。 萬一工作流程已中止,這樣做可讓您從上一個保存點重新啟動工作流程。
建立共用程式庫
建立一個新的空白 Visual Studio 方案。
加入稱為
Common的新類別庫專案。 加入下列組件的參考:System.Activities.dll
System.ServiceModel.dll
System.ServiceModel.Activities.dll
System.Transactions.dll
將稱為
PrintTransactionInfo的新類別加入至Common專案。 此類別衍生自 NativeActivity,而且會多載 Execute 方法。using System; using System; using System.Activities; using System.Transactions; namespace Common { public class PrintTransactionInfo : NativeActivity { protected override void Execute(NativeActivityContext context) { RuntimeTransactionHandle rth = context.Properties.Find(typeof(RuntimeTransactionHandle).FullName) as RuntimeTransactionHandle; if (rth == null) { Console.WriteLine("There is no ambient RuntimeTransactionHandle"); } Transaction t = rth.GetCurrentTransaction(context); if (t == null) { Console.WriteLine("There is no ambient transaction"); } else { Console.WriteLine("Transaction: {0} is {1}", t.TransactionInformation.DistributedIdentifier, t.TransactionInformation.Status); } } } }這是一種原生活動,該活動可顯示環境異動的相關資訊,而且可同時用於本主題中所使用的服務和用戶端工作流程。 建置解決方案可讓此活動在 [工具箱] 的 [通用] 區段中使用。
實作工作流程服務
將稱為
WorkflowService的新 WCF 工作流程服務新增至Common專案。 若要這樣做,請以滑鼠右鍵按一下Common專案、依序選取 [新增]、[新增項目]、[已安裝的範本] 底下的 [工作流程] 和 [WCF 工作流程服務]。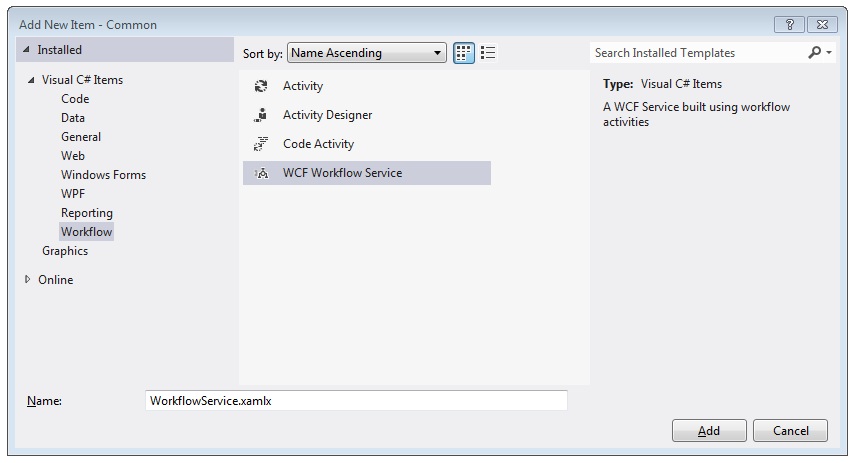
刪除預設的
ReceiveRequest和SendResponse活動。將 WriteLine 活動拖放到
Sequential Service活動中。 將文字屬性設定為"Workflow Service starting ...",如下列範例所示。![將 WriteLine 活動新增至循序服務活動(./media/flowing-transactions-into-and-out-of-workflow-services/add-writeline-sequential-service.jpg)
將 TransactedReceiveScope 拖放到 WriteLine 活動後面。 TransactedReceiveScope 活動可以在 [工具箱]Toolbox 的 [傳訊] 區段中找到。 TransactedReceiveScope 活動是由 [要求] 和 [主體] 兩個區段所組成。 [要求] 區段包含 Receive 活動。 [主體] 區段包含接收訊息後,要在異動內執行的活動。
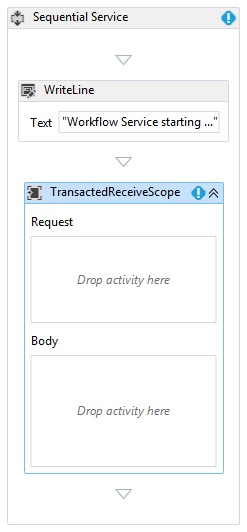
選取 TransactedReceiveScope 活動,然後按一下 [變數] 按鈕。 加入下列變數。

注意
根據預設,您可以刪除現有的資料變數。 您也可以使用現有的控制碼變數。
將 Receive 活動拖放到 TransactedReceiveScope 活動的 [要求] 區段內。 設定下列屬性:
屬性 值 CanCreateInstance True (核取此核取方塊) OperationName StartSample ServiceContractName ITransactionSample 工作流程的外觀應該如下圖所示:
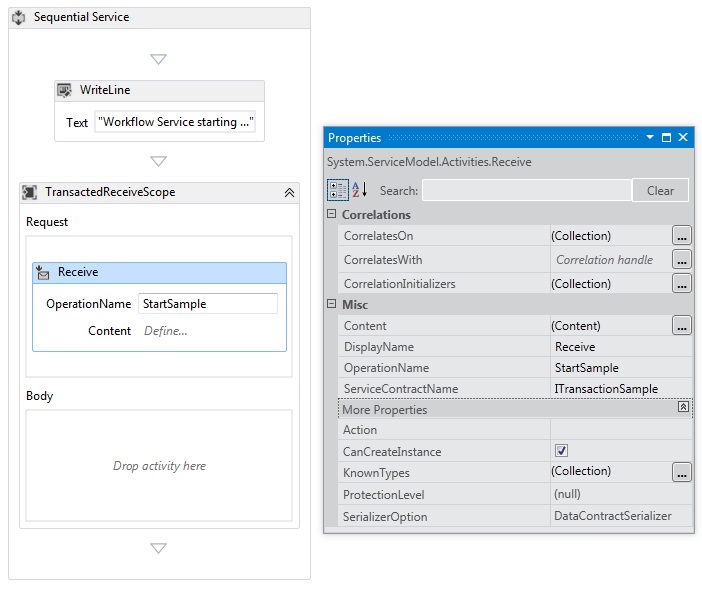
按一下 Receive 活動中的 [定義] 連結,然後進行下列設定:

將 Sequence 活動拖放到 TransactedReceiveScope 的 [主體] 區段內。 拖放 Sequence 活動內的兩個 WriteLine 活動,並設定 Text 屬性,如下列範例所示。
活動 值 第一個 WriteLine "Service: Receive Completed" 第二個 WriteLine "Service: Received = " + requestMessage 工作流程的外觀現在應該如下圖所示:
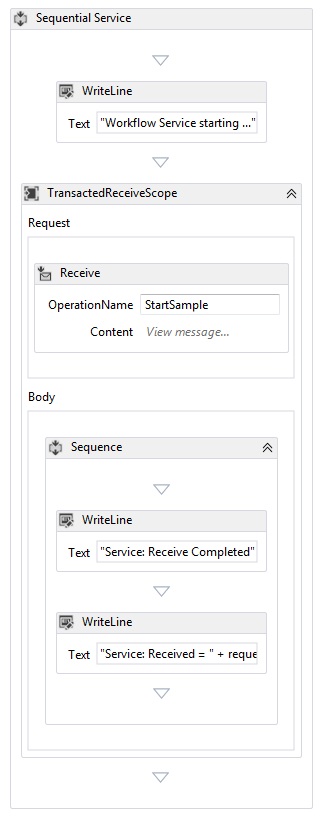
將
PrintTransactionInfo活動拖放到 TransactedReceiveScope 活動中 [主體] 的第二個 WriteLine 活動後面。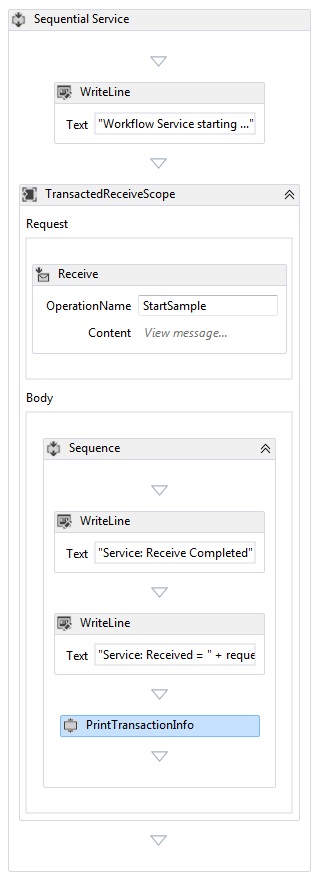
將 Assign 活動拖放到
PrintTransactionInfo活動後面,然後根據下表設定其屬性。屬性 值 至 replyMessage 值 "Service: Sending reply." 將 WriteLine 活動拖放到 Assign 活動後面,並將其 Text 屬性設定為 "Service: Begin reply"。
工作流程的外觀現在應該如下圖所示:

以滑鼠右鍵按一下 Receive 活動並選取 [建立 SendReply],然後將其貼在最後一個 WriteLine 活動後面。 按一下
SendReplyToReceive活動中的 [定義] 連結,然後進行下列設定。
將 WriteLine 活動拖放到
SendReplyToReceive活動後面,並將其 Text 屬性設定為 "Service: Reply sent”。將 WriteLine 活動拖放到工作流程的底部,然後將其 Text 屬性設定為 "Service: Workflow ends, press ENTER to exit"。
完成的服務工作流程外觀應該如下圖所示:

實作工作流程用戶端
將稱為
WorkflowClient的新 WCF 工作流程應用程式加入至Common專案。 若要這樣做,請以滑鼠右鍵按一下Common專案、依序選取 [新增]、[新增項目]、[已安裝的範本] 底下的 [工作流程] 和 [活動]。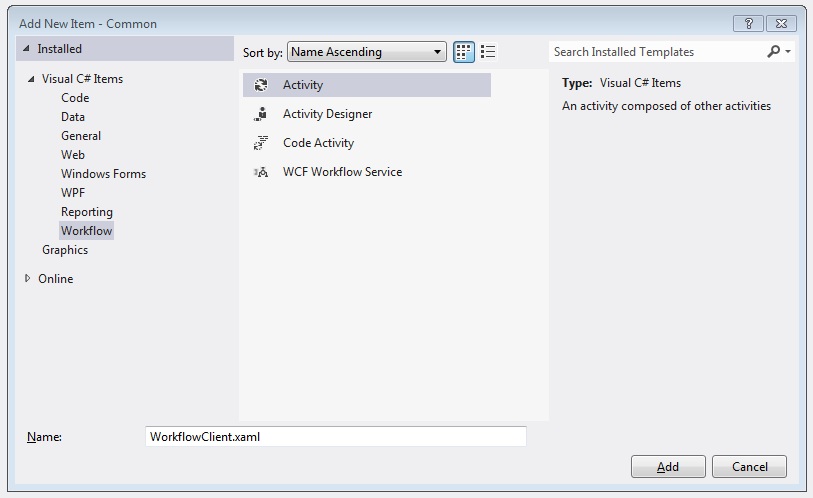
將 Sequence 活動拖放至設計介面上。
拖放 Sequence 活動內的 WriteLine 活動,並將其 Text 屬性設定為
"Client: Workflow starting"。 工作流程的外觀現在應該如下圖所示: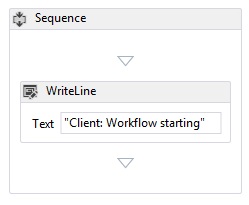
將 TransactionScope 活動拖放到 WriteLine 活動後面。 選取 TransactionScope 活動,按一下 [變數] 按鈕,然後加入下列變數。

將 Sequence 活動拖放到 TransactionScope 活動的主體內。
將
PrintTransactionInfo活動拖放到 Sequence 內將 WriteLine 活動拖放到
PrintTransactionInfo活動後面,並將其 Text 屬性設定為 “Client: Beginning Send”。 工作流程的外觀現在應該如下圖所示: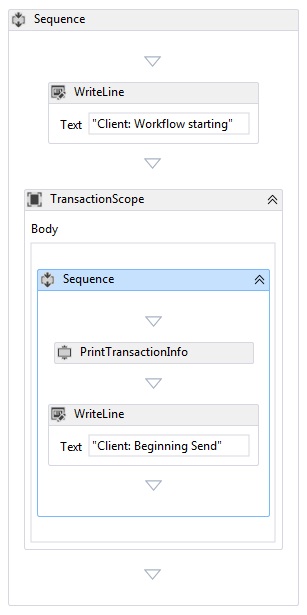
將 Send 活動拖放到 Assign 活動後面,然後設定下列屬性:
屬性 值 EndpointConfigurationName workflowServiceEndpoint OperationName StartSample ServiceContractName ITransactionSample 工作流程的外觀現在應該如下圖所示:
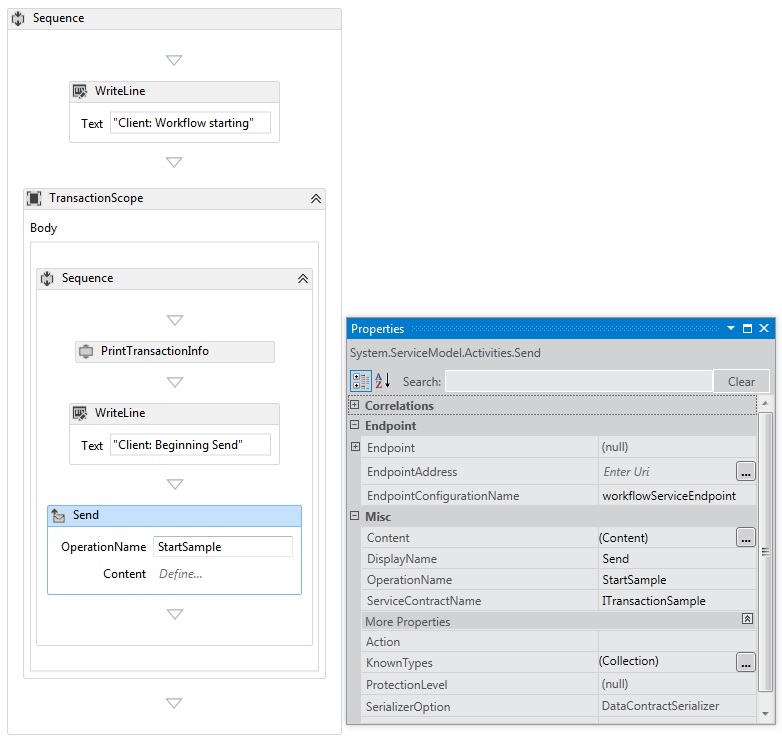
按一下 [定義] 連結,然後進行下列設定:

以滑鼠右鍵按一下 Send 活動,然後選取 [建立 ReceiveReply]。 ReceiveReply 活動將會自動放在 Send 活動後面。
按一下 ReceiveReplyForSend 活動中的 [定義] 連結,然後進行下列設定:

將 WriteLine 活動拖放到 Send 和 ReceiveReply 活動之間,然後將其 Text 屬性設定為 "Client: Send complete"。
將 WriteLine 活動拖放到 ReceiveReply 活動後面,並將其 Text 屬性設定為 "Client side: Reply received = " + replyMessage
將
PrintTransactionInfo活動拖放到 WriteLine 活動後面。將 WriteLine 活動拖放到工作流程的結尾,然後將其 Text 屬性設定為 "Client workflow ends"。完成的工作流程外觀應該如下圖所示。

建置方案。
建立服務應用程式
將稱為
Service的新主控台應用程式專案加入至方案。 加入下列組件的參考:System.Activities.dll
System.ServiceModel.dll
System.ServiceModel.Activities.dll
開啟產生的 Program.cs 檔案以及下列程式碼:
      static void Main()
      {
          Console.WriteLine("Building the server.");
          using (WorkflowServiceHost host = new WorkflowServiceHost(new DeclarativeServiceWorkflow(), new Uri("net.tcp://localhost:8000/TransactedReceiveService/Declarative")))
          {
              //Start the server
              host.Open();
              Console.WriteLine("Service started.");

              Console.WriteLine();
              Console.ReadLine();
              //Shutdown
              host.Close();
          };
      }
將下列 app.config 檔案加入至專案。
<?xml version="1.0" encoding="utf-8" ?>
<!-- Copyright © Microsoft Corporation.  All rights reserved. -->
<configuration>
    <system.serviceModel>
        <bindings>
            <netTcpBinding>
                <binding transactionFlow="true" />
            </netTcpBinding>
        </bindings>
    </system.serviceModel>
</configuration>
建立用戶端應用程式
將稱為
Client的新主控台應用程式專案加入至方案。 將參考加入到 System.Activities.dll。開啟 program.cs 檔案並加入下列程式碼。
class Program
{

    private static AutoResetEvent syncEvent = new AutoResetEvent(false);

    static void Main(string[] args)
    {
        //Build client
        Console.WriteLine("Building the client.");
        WorkflowApplication client = new WorkflowApplication(new DeclarativeClientWorkflow());
        client.Completed = Program.Completed;
        client.Aborted = Program.Aborted;
        client.OnUnhandledException = Program.OnUnhandledException;
        //Wait for service to start
        Console.WriteLine("Press ENTER once service is started.");
        Console.ReadLine();

        //Start the client
        Console.WriteLine("Starting the client.");
        client.Run();
        syncEvent.WaitOne();

        //Sample complete
        Console.WriteLine();
        Console.WriteLine("Client complete. Press ENTER to exit.");
        Console.ReadLine();
    }

    private static void Completed(WorkflowApplicationCompletedEventArgs e)
    {
        Program.syncEvent.Set();
    }

    private static void Aborted(WorkflowApplicationAbortedEventArgs e)
    {
        Console.WriteLine("Client Aborted: {0}", e.Reason);
        Program.syncEvent.Set();
    }

    private static UnhandledExceptionAction OnUnhandledException(WorkflowApplicationUnhandledExceptionEventArgs e)
    {
        Console.WriteLine("Client had an unhandled exception: {0}", e.UnhandledException);
        return UnhandledExceptionAction.Cancel;
    }
}