TileBrush 概觀
TileBrush 物件讓您對使用影像、Drawing 或 Visual 繪製區域的方式擁有更多的控制。 本主題描述如何使用 TileBrush 功能,以進一步控制 ImageBrush、DrawingBrush 或 VisualBrush 繪製區域的方式。
必要條件
若要了解本主題,了解如何使用 ImageBrush、DrawingBrush 或 VisualBrush 類別的基本功能會很有幫助。 如需這些類型的簡介,請參閱 使用影像、繪圖和視覺效果繪製。
以並排顯示繪製區域
ImageBrush、DrawingBrush 是 VisualBrush,是 TileBrush 物件的類型。 拼貼筆刷讓您對使用影像、繪圖或視覺效果繪製區域的方式擁有更多的控制。 例如,您可以用構成圖樣的一系列影像並排顯示來繪製區域,而不是只以單一自動縮放的影像來繪製區域。
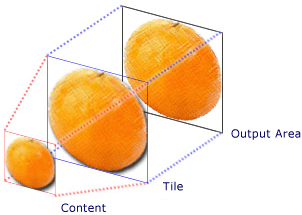
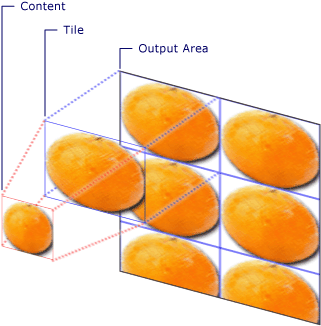
使用拼貼筆刷繪製區域會牽涉到三個元件:內容、基底並排顯示及輸出區域。
 TileBrush 元件wcpsdk_mmgraphics_defaultcontentprojection2
具有單一並排顯示之 TileBrush 的元件
 區塊式 TileBrush 的元件graphicsmm_tiledprojection
TileMode 為 Tile 之 TileBrush 的元件
輸出區域是繪製的區域,例如 Ellipse 的 Fill 或 Button 的 Background。 下一節將說明 TileBrush 的其他兩個元件。
筆刷內容
TileBrush 有三種不同的類型,且每個都會繪製不同類型的內容。
如果筆刷是 ImageBrush,則此內容為影像。ImageSource 屬性會指定 ImageBrush 的內容。
如果筆刷是 DrawingBrush,則此內容為繪圖。 Drawing 屬性會指定 DrawingBrush 的內容。
如果筆刷是 VisualBrush,則此內容為視覺效果。 Visual 屬性可指定 VisualBrush 的內容。
您可以使用 Viewbox 屬性來指定 TileBrush 內容的位置和維度,不過通常會保留 Viewbox 設定為其預設值。 根據預設,Viewbox 會設定為完全包含筆刷的內容。 如需設定 Viewbox 的詳細資訊,請參閱 Viewbox 屬性頁。
基底並排顯示
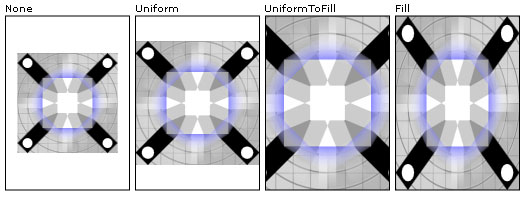
TileBrush 會將內容投影到基底並排顯示上。 Stretch 屬性會控制延展 TileBrush 內容以填滿基底並排顯示的方式。 Stretch 屬性接受 Stretch 列舉所定義的下列值:
None:筆刷的內容不會自動縮放以填滿並排顯示。
Fill:筆刷的內容會縮放以符合並排顯示的大小。 因為內容的高度和寬度會分開縮放,所以可能不會保留內容的原始外觀比例。 也就是說,筆刷的內容可能會變形以完全填滿輸出並排顯示。
Uniform:筆刷的內容會縮放以完全符合並排顯示的大小。 這會維持內容的外觀比例。
UniformToFill:筆刷的內容會縮放以完全填滿輸出區域,並同時維持內容的原始外觀比例。
下列影像說明不同的 Stretch 設定。
 不同的 TileBrush Stretch 設定img_mmgraphics_stretchenum
在下列範例中,ImageBrush 的內容會設定為不會自動縮放以填滿輸出區域。
<Rectangle
  Width="125" Height="175"
  Stroke="Black"
  StrokeThickness="1"
  Margin="0,0,5,0">
  <Rectangle.Fill>
    <ImageBrush
      Stretch="None"
      ImageSource="sampleImages\testImage.gif"/>
  </Rectangle.Fill>
</Rectangle>
// Create a rectangle.
Rectangle myRectangle = new Rectangle();
myRectangle.Width = 125;
myRectangle.Height = 175;
myRectangle.Stroke = Brushes.Black;
myRectangle.StrokeThickness = 1;
myRectangle.Margin = new Thickness(0,5,0,0);

// Load the image.
BitmapImage theImage =
    new BitmapImage(
        new Uri("sampleImages\\testImage.gif", UriKind.Relative));
ImageBrush myImageBrush = new ImageBrush(theImage);

// Configure the brush so that it
// doesn't stretch its image to fill
// the rectangle.
myImageBrush.Stretch = Stretch.None;

// Use the ImageBrush to paint the rectangle's background.
myRectangle.Fill = myImageBrush;
' Create a rectangle.
Dim myRectangle As New Rectangle()
With myRectangle
    .Width = 125
    .Height = 175
    .Stroke = Brushes.Black
    .StrokeThickness = 1
    .Margin = New Thickness(0, 5, 0, 0)
End With

' Load the image.
Dim theImage As New BitmapImage(New Uri("sampleImages\testImage.gif", UriKind.Relative))
Dim myImageBrush As New ImageBrush(theImage)

' Configure the brush so that it
' doesn't stretch its image to fill
' the rectangle.
myImageBrush.Stretch = Stretch.None

' Use the ImageBrush to paint the rectangle's background.
myRectangle.Fill = myImageBrush
根據預設,TileBrush 會產生單一並排顯示 (基底並排顯示),並自動縮放該並排顯示以完全填滿輸出區域。 您可以設定 Viewport 和 ViewportUnits 屬性來變更基底並排顯示的大小和位置。
基底並排顯示大小
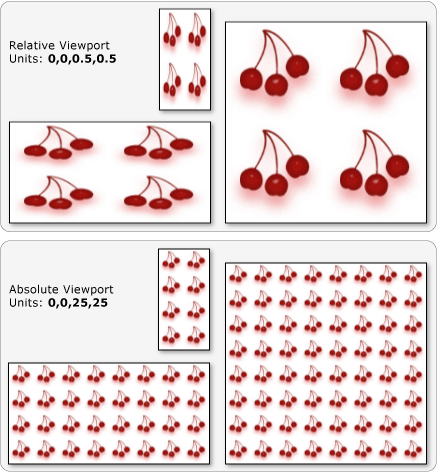
Viewport 屬性會決定基底並排顯示的大小和位置,而 ViewportUnits 屬性則會決定使用絕對座標還是相對座標來指定 Viewport。 如果是相對座標,則它們會相對於輸出區域的大小。 (0,0) 這個點表示輸出區域的左上角,而 (1,1) 則表示輸出區域的右下角。 若要指定 Viewport 屬性使用絕對座標,請將 ViewportUnits 屬性設定為 Absolute。
下圖顯示使用相對 TileBrush 與絕對 ViewportUnits 之間輸出的差異。 請注意,每個圖例都會顯示並排顯示圖樣,下一節會說明如何指定並排顯示圖樣。
 絕對和相對檢視區單位absolute_and_relative_viewports
在下列範例中,會使用影像建立 50% 寬度和高度的並排顯示。 基底並排顯示位於輸出區域的 (0,0)。
<Rectangle
 Width="50" Height="100">
  <Rectangle.Fill>

    <!-- Paints an area with 4 tiles. -->
    <ImageBrush ImageSource="sampleImages\cherries_larger.jpg"
      Viewport="0,0,0.5,0.5"
      ViewportUnits="RelativeToBoundingBox"
      TileMode="Tile" />
  </Rectangle.Fill>
</Rectangle>
// Create a rectangle.
Rectangle myRectangle = new Rectangle();
myRectangle.Width = 50;
myRectangle.Height = 100;

// Load the image.
BitmapImage theImage =
    new BitmapImage(
        new Uri("sampleImages\\cherries_larger.jpg", UriKind.Relative));
ImageBrush myImageBrush = new ImageBrush(theImage);

// Create tiles that are 1/4 the size of
// the output area.
myImageBrush.Viewport = new Rect(0,0,0.25,0.25);
myImageBrush.ViewportUnits = BrushMappingMode.RelativeToBoundingBox;

// Set the tile mode to Tile.
myImageBrush.TileMode = TileMode.Tile;

// Use the ImageBrush to paint the rectangle's background.
myRectangle.Fill = myImageBrush;
' Create a rectangle.
Dim myRectangle As New Rectangle()
myRectangle.Width = 50
myRectangle.Height = 100

' Load the image.
Dim theImage As New BitmapImage(New Uri("sampleImages\cherries_larger.jpg", UriKind.Relative))
Dim myImageBrush As New ImageBrush(theImage)

' Create tiles that are 1/4 the size of
' the output area.
myImageBrush.Viewport = New Rect(0, 0, 0.25, 0.25)
myImageBrush.ViewportUnits = BrushMappingMode.RelativeToBoundingBox

' Set the tile mode to Tile.
myImageBrush.TileMode = TileMode.Tile

' Use the ImageBrush to paint the rectangle's background.
myRectangle.Fill = myImageBrush
下一個範例會將 ImageBrush 的並排顯示設為 25 乘以 25 個裝置獨立像素。 因為 ViewportUnits 是絕對的,所以不論繪製的區域大小為何,ImageBrush 並排顯示一律為 25 乘以 25 像素。
<Rectangle
 Width="50" Height="100">
  <Rectangle.Fill>

    <!-- Paints an area with 25 x 25 tiles. -->
    <ImageBrush ImageSource="sampleImages\cherries_larger.jpg"
      Viewport="0,0,25,25"
      ViewportUnits="Absolute"
      TileMode="Tile" />
  </Rectangle.Fill>
</Rectangle>
// Create a rectangle.
Rectangle myRectangle = new Rectangle();
myRectangle.Width = 50;
myRectangle.Height = 100;

// Load the image.
BitmapImage theImage =
    new BitmapImage(
        new Uri("sampleImages\\cherries_larger.jpg", UriKind.Relative));
ImageBrush myImageBrush = new ImageBrush(theImage);

// Create tiles that are 25 x 25, regardless of the size
// of the output area.
myImageBrush.Viewport = new Rect(0, 0, 25, 25);
myImageBrush.ViewportUnits = BrushMappingMode.Absolute;

// Set the tile mode to Tile.
myImageBrush.TileMode = TileMode.Tile;

// Use the ImageBrush to paint the rectangle's background.
myRectangle.Fill = myImageBrush;
' Create a rectangle.
Dim myRectangle As New Rectangle()
myRectangle.Width = 50
myRectangle.Height = 100

' Load the image.
Dim theImage As New BitmapImage(New Uri("sampleImages\cherries_larger.jpg", UriKind.Relative))
Dim myImageBrush As New ImageBrush(theImage)

' Create tiles that are 25 x 25, regardless of the size
' of the output area.
myImageBrush.Viewport = New Rect(0, 0, 25, 25)
myImageBrush.ViewportUnits = BrushMappingMode.Absolute

' Set the tile mode to Tile.
myImageBrush.TileMode = TileMode.Tile

' Use the ImageBrush to paint the rectangle's background.
myRectangle.Fill = myImageBrush
並排顯示行為
當基底並排顯示不完全填滿輸出區域,而且指定的並排顯示模式不是 None 時,TileBrush 會產生並排顯示圖樣。 當並排顯示筆刷的並排顯示不完全填滿輸出區域時,其 TileMode 屬性會指定是否應該複製基底並排顯示以填滿輸出區域,若是如此,則指定應該如何複製基底並排顯示。 Stretch 屬性接受 Stretch 列舉所定義的下列值:
下列影像說明不同的並排顯示模式。
 不同的 TileBrush TileMode 設定img_mmgraphics_tilemodes
在下列範例中,會使用影像繪製 100 像素寬及 100 像素高的矩形。 將筆刷的 Viewport 設為 0,0,0.25,0.25,筆刷的基底並排顯示會佔輸出區域的 1/4。 筆刷的 TileMode 設定為 FlipXY。 所以會以並排顯示列填滿矩形。
<Rectangle
 Width="100" Height="100" >
  <Rectangle.Fill>
    <ImageBrush ImageSource="sampleImages\triangle.jpg"
      Viewport="0,0,0.25,0.25"
      TileMode="FlipXY"
      />
  </Rectangle.Fill>
</Rectangle>
// Create a rectangle.
Rectangle myRectangle = new Rectangle();
myRectangle.Width = 100;
myRectangle.Height = 100;

// Load the image.
BitmapImage theImage =
    new BitmapImage(
        new Uri("sampleImages\\triangle.jpg", UriKind.Relative));
ImageBrush myImageBrush = new ImageBrush(theImage);

// Create tiles that are 1/4 the size of
// the output area.
myImageBrush.Viewport = new Rect(0,0,0.25,0.25);

// Set the tile mode to FlipXY.
myImageBrush.TileMode = TileMode.FlipXY;

// Use the ImageBrush to paint the rectangle's background.
myRectangle.Fill = myImageBrush;
' Create a rectangle.
Dim myRectangle As New Rectangle()
myRectangle.Width = 100
myRectangle.Height = 100

' Load the image.
Dim theImage As New BitmapImage(New Uri("sampleImages\triangle.jpg", UriKind.Relative))
Dim myImageBrush As New ImageBrush(theImage)

' Create tiles that are 1/4 the size of
' the output area.
myImageBrush.Viewport = New Rect(0, 0, 0.25, 0.25)

' Set the tile mode to FlipXY.
myImageBrush.TileMode = TileMode.FlipXY

' Use the ImageBrush to paint the rectangle's background.
myRectangle.Fill = myImageBrush
