取得資料緩衝區的指標 (C++/CX)
在 Windows 執行階段中, Windows::Storage::Streams::IBuffer 介面提供以語言中性、資料流的方式存取資料緩衝區。 在 C++ 中,可以透過定義在 robuffer.h 中的 Windows 執行階段程式庫 IBufferByteAccess 介面,取得基礎位元組陣列的原始指標。 使用這種方法,可以就地修改位元組陣列,而不建立任何不必要的資料複本。
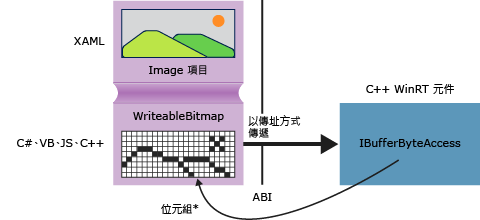
下圖顯示 XAML 影像項目,其來源為 Windows::UI::Xaml::Media::Imaging WriteableBitmap。 以任何語言撰寫的用戶端應用程式可以將 WriteableBitmap 的參考傳遞至 C++ 程式碼,然後 C++ 可以使用該參考到達基礎緩衝區。 在以 C++ 撰寫的 通用 Windows 平台 應用程式中,您可以直接在原始程式碼中使用 函式,而不需將其封裝在 Windows 執行階段元件中。

GetPointerToPixelData
下列方法會接受 Windows::Storage::Streams::IBuffer ,並傳回基礎位元組陣列的原始指標。 若要呼叫函式,請傳入 WriteableBitmap::PixelBuffer 屬性。
#include <wrl.h>
#include <robuffer.h>
using namespace Windows::Storage::Streams;
using namespace Microsoft::WRL;
typedef uint8 byte;
// Retrieves the raw pixel data from the provided IBuffer object.
// Warning: The lifetime of the returned buffer is controlled by
// the lifetime of the buffer object that's passed to this method.
// When the buffer has been released, the pointer becomes invalid
// and must not be used.
byte* Class1::GetPointerToPixelData(IBuffer^ pixelBuffer, unsigned int *length)
{
    if (length != nullptr)
    {
        *length = pixelBuffer ->Length;
    }
    // Query the IBufferByteAccess interface.
    ComPtr<IBufferByteAccess> bufferByteAccess;
    reinterpret_cast<IInspectable*>( pixelBuffer)->QueryInterface(IID_PPV_ARGS(&bufferByteAccess));

    // Retrieve the buffer data.
    byte* pixels = nullptr;
    bufferByteAccess->Buffer(&pixels);
    return pixels;
}
完整範例
下列步驟示範如何建立 C# 通用 Windows 平台 應用程式,將 傳遞WriteableBitmap至C++Windows 執行階段元件 DLL。 C++ 程式碼取得像素緩衝區的指標,並且在影像上執行簡單的就地修改。 或者,您可以使用 Visual Basic、JavaScript 或 C++ 而不使用 C#,建立用戶端應用程式 如果您使用 C++,則不需要元件 DLL,可以將這些方法直接加入至 MainPage 類別或您定義的其他類別。
建立用戶端
使用空白應用程式項目範本來建立 C# 通用 Windows 平台 應用程式。
在 MainPage.xaml 中
使用這個 XAML 取代
Grid項目:<Grid Background="{StaticResource ApplicationPageBackgroundThemeBrush}"> <StackPanel HorizontalAlignment="Left" Margin="176,110,0,0" VerticalAlignment="Top" Width="932"> <Image x:Name="Pic"/> <Button Content="Process Image" HorizontalAlignment="Stretch" VerticalAlignment="Stretch" Height="47" Click="Button_Click_1"/> </StackPanel> </Grid>
在 MainPage.xaml.cs 中
加入下列命名空間宣告:
using Windows.Storage;
using Windows.Storage.FileProperties;
using Windows.UI.Xaml.Media.Imaging;
using Windows.Storage.Streams;
using Windows.Storage.Pickers;
將
WriteableBitmap成員變數加入至MainPage類別並將它命名為m_bm。private WriteableBitmap m_bm;使用下列程式碼取代
OnNavigatedTo方法 Stub。 當應用程式啟動時,會開啟檔案選擇器 (請注意,async關鍵字加入至函式簽章)。async protected override void OnNavigatedTo(NavigationEventArgs e) { FileOpenPicker openPicker = new FileOpenPicker(); openPicker.ViewMode = PickerViewMode.Thumbnail; openPicker.SuggestedStartLocation = PickerLocationId.PicturesLibrary; openPicker.FileTypeFilter.Add(".jpg"); openPicker.FileTypeFilter.Add(".jpeg"); openPicker.FileTypeFilter.Add(".png"); StorageFile file = await openPicker.PickSingleFileAsync(); if (file != null) { // Get the size of the image for the WriteableBitmap constructor. ImageProperties props = await file.Properties.GetImagePropertiesAsync(); m_bm = new WriteableBitmap((int)props.Height, (int)props.Width); m_bm.SetSource(await file.OpenReadAsync()); Pic.Source = m_bm; } else { // Handle error... } }加入按一下按鈕事件的事件處理常式 (由於
ImageManipCPP命名空間參考尚未建立,在編輯器視窗中它可能會有波浪底線)。async private void Button_Click_1(object sender, RoutedEventArgs e) { ImageManipCPP.Class1 obj = new ImageManipCPP.Class1(); await obj.Negativize(m_bm); Pic.Source = m_bm; }
建立 C++ 元件
將新的C++Windows 執行階段元件新增至現有的方案,並將它命名為
ImageManipCPP。 在 C# 專案中新增參考,方法是以滑鼠右鍵按兩下 方案總管 中的該專案,然後選擇 [新增]、[參考]。在 Class1.h 中
在第二行,
typedef之後,加入這個#pragma once:typedef uint8 byte;在
WebHostHidden宣告的開頭上方,加入Class1屬性。[Windows::Foundation::Metadata::WebHostHidden]將這個公用方法簽章加入至
Class1:Windows::Foundation::IAsyncAction^ Negativize(Windows::UI::Xaml::Media::Imaging::WriteableBitmap^ bm);從先前程式碼片段顯示的
GetPointerToPixelData方法,加入簽章。 請確定這個方法是私用的。
在 Class1.cpp 中
加入這些
#include指示詞和命名空間宣告:#include <ppltasks.h> #include <wrl.h> #include <robuffer.h> using namespace Windows::Storage; using namespace Windows::UI::Xaml::Media::Imaging; using namespace Windows::Storage::Streams; using namespace Microsoft::WRL;從先前的程式碼片段,加入
GetPointerToPixelData的實作。加入
Negativize的實作。 這個方法會透過反轉像素的每個 RGB 值,建立類似於負片的效果。 因為在較大的影像上可能需要有感時間才能完成作業,我們將方法設為非同步。IAsyncAction^ Class1::Negativize(WriteableBitmap^ bm) { unsigned int length; byte* sourcePixels = GetPointerToPixelData(bm->PixelBuffer, &length); const unsigned int width = bm->PixelWidth; const unsigned int height = bm->PixelHeight; return create_async([this, width, height, sourcePixels] { byte* temp = sourcePixels; for(unsigned int k = 0; k < height; k++) { for (unsigned int i = 0; i < (width * 4); i += 4) { int pos = k * (width * 4) + (i); temp[pos] = ~temp[pos]; temp[pos + 1] = ~temp[pos + 1] / 3; temp[pos + 2] = ~temp[pos + 2] / 2; temp[pos + 3] = ~temp[pos + 3]; } } }); }注意
如果您使用 AMP 或平行模式程式庫來平行化作業,這個方法可能會更快速執行。
確定您的圖片資料夾中至少有一個圖片,然後按 F5 編譯和執行程式。