應用程式通常同時需要多個 Azure 服務之間的安全連線。 例如,企業 Azure App 服務 實例可能會連線到數個不同的記憶體帳戶、Azure SQL 資料庫實例、服務匯流排 等等。
受控識別是 Azure 資源之間安全無密碼連線的建議驗證選項。 開發人員不需要手動追蹤及管理受控識別的許多不同秘密,因為這些工作大部分都是由 Azure 內部處理。 本教學課程將探討如何使用受控識別和 Azure 身分識別用戶端程式庫來管理多個服務之間的連線。
比較受控識別的類型
Azure 提供下列類型的受控識別:
-
系統指派的受控識別直接繫結到單一 Azure 資源。 當您在服務上啟用系統指派的受控識別時,Azure 會建立連結的身分識別,並在內部處理該身分識別的系統管理工作。 刪除 Azure 資源時,也會刪除身分識別。
-
使用者指派的受控識別是由系統管理員所建立的獨立身分識別,可以與一或多個 Azure 資源相關聯。 身分識別的生命週期與這些資源無關。
您可以在受控識別最佳做法建議中使用 系統指派與使用者指派的受控識別時,深入瞭解最佳做法和時機。
探索 DefaultAzureCredential
受控識別最容易透過從 Azure 身分識別用戶端連結庫呼叫 DefaultAzureCredential 的類別,在應用程式程式代碼中實作。
DefaultAzureCredential 支援多個驗證機制,並自動判斷應該在運行時間使用哪些機制。 深入瞭解 DefaultAzureCredential 下列生態系統:
將 Azure 裝載的應用程式連線到多個 Azure 服務
假設您負責使用無密碼連線將現有的應用程式連線到多個 Azure 服務和資料庫。 應用程式是裝載在 Azure App 服務 上的 ASP.NET Core Web API,不過下列步驟也適用於其他 Azure 主控環境,例如 Azure Spring Apps、虛擬機器、Container Apps 和 AKS。
本教學課程適用於下列架構,但稍微變更一下設定,也可以運用在其他許多案例。
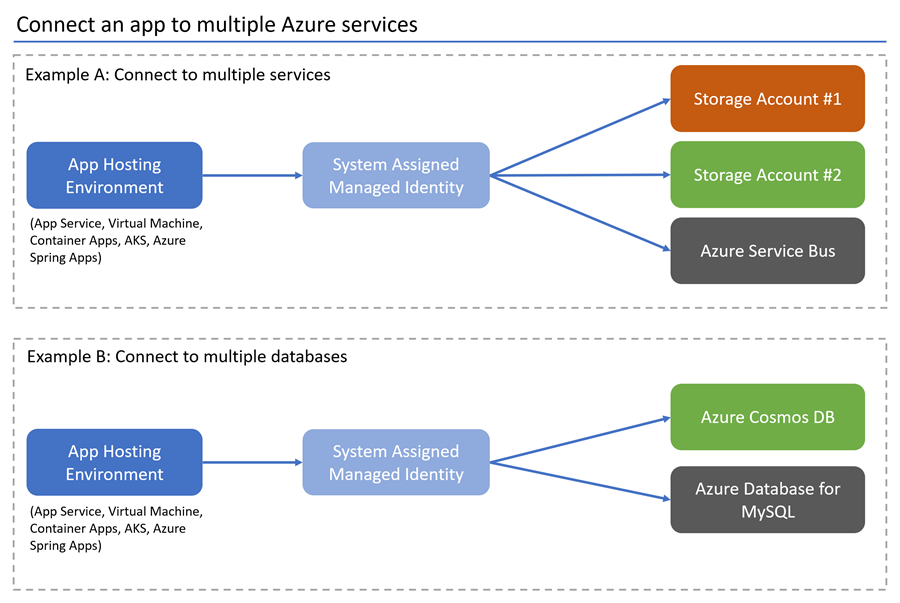
下列步驟示範如何設定應用程式,以使用系統指派的受控識別和本機開發帳戶來連線到多個 Azure 服務。
建立系統指派的受控識別
在 Azure 入口網站中,瀏覽至您想要連線到其他服務的託管應用程式。
在服務概觀頁面上,選取 [身分識別]。
將 [狀態] 設定切換為 [開啟],為服務啟用系統指派的受控識別。

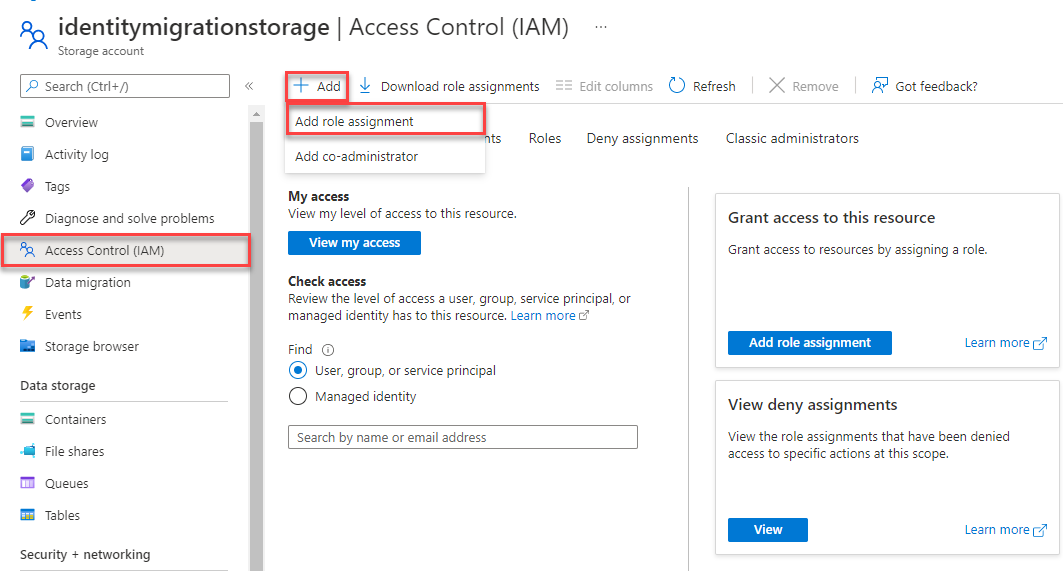
將角色指派給每個連線服務的受控識別
針對您想要授與身分識別存取的儲存體帳戶,瀏覽其概觀頁面。
從儲存體帳戶導覽中選取 [存取控制 (IAM)]。
選擇 [+新增],然後選擇 [新增角色指派]。
在 [角色] 搜尋方塊中,搜尋「儲存體 Blob 資料參與者」,以授權對 Blob 資料執行讀取和寫入作業。 根據您的使用案例,您可以指派任何適合的角色。 從清單中選取 [儲存體 Blob 資料參與者],然後選擇 [下一步]。
在 [新增角色指派] 畫面上,針對 [存取權指派對象為] 選項,選取 [受控識別]。 然後選擇 [+選取成員]。
在飛出視窗中,輸入 App Service 的名稱來搜尋您所建立的受控識別。 選取系統指派的身分識別,然後選擇 [ 選取 ] 以關閉飛出視窗功能表。
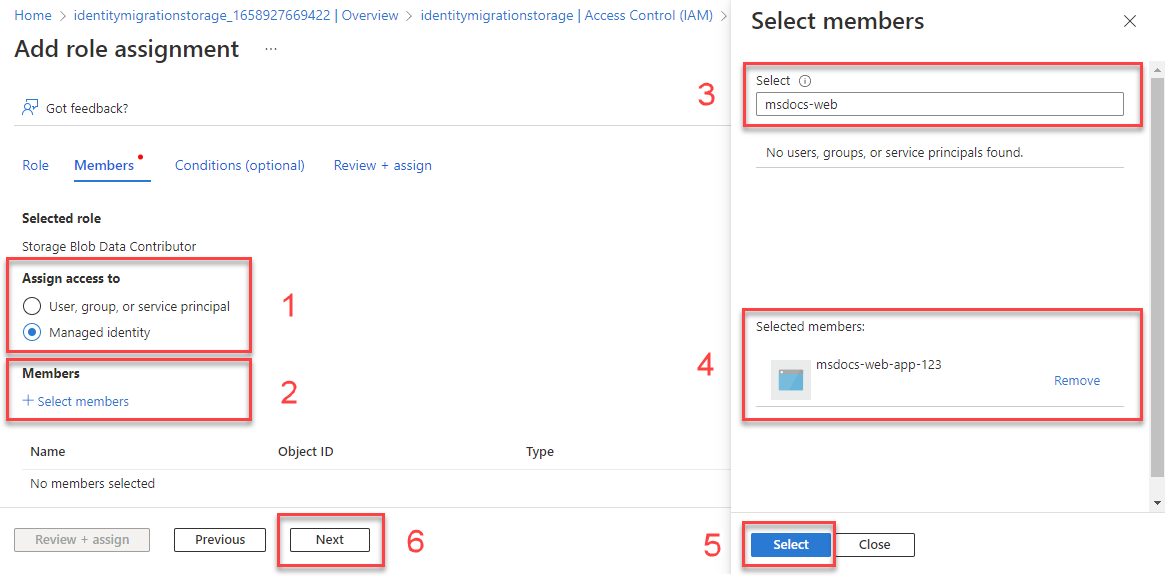
選取幾次 [下一步],直到能夠選取 [檢閱 + 指派] 來完成角色指派為止。
針對您想要連線的其他服務重複此程序。
本機開發考量
您也可以像指派角色給受控識別一樣,將角色指派給使用者帳戶,讓本機開發可以存取 Azure 資源。
將儲存體 Blob 資料參與者角色指派給受控識別之後,在 [存取權指派對象為] 下,這次選取 [使用者、群組或服務主體]。 選擇 [+ 選取成員] 再次開啟飛出視窗功能表。
搜尋並選取您想要依電子郵件地址或名稱授與存取權的 user@domain 帳戶或 Microsoft Entra 安全性群組。 這應該是您用來登入本機開發工具的相同帳戶,例如 Visual Studio 或 Azure CLI。
注意
如果您正在與多個開發人員合作,您也可以將這些角色指派給Microsoft Entra 安全組。 然後,您可以將需要存取權在本機開發應用程式的任何開發人員放入該群組內。
實作應用程式程式碼
在您的專案中,安裝 Azure.Identity 套件。 此連結庫提供 DefaultAzureCredential。 您也可以新增與應用程式相關的其他任何 Azure 程式庫。 在此範例中Azure.Storage.Blobs,會新增和 Azure.Messaging.ServiceBus 套件,以分別連線到 Blob 記憶體和 服務匯流排。
dotnet add package Azure.Identity
dotnet add package Azure.Messaging.ServiceBus
dotnet add package Azure.Storage.Blobs
具現化應用程式必須連線之 Azure 服務的服務用戶端。 下列程式代碼範例會與 Blob 記憶體互動,並使用對應的服務用戶端 服務匯流排。
using Azure.Identity;
using Azure.Messaging.ServiceBus;
using Azure.Storage.Blobs;

// Create DefaultAzureCredential instance that uses system-assigned managed identity
// in the underlying ManagedIdentityCredential.
DefaultAzureCredential credential = new();

BlobServiceClient blobServiceClient = new(
    new Uri("https://<your-storage-account>.blob.core.windows.net"),
    credential);

ServiceBusClient serviceBusClient = new("<your-namespace>", credential);
ServiceBusSender sender = serviceBusClient.CreateSender("producttracking");
在您的專案中,將 azure-identity 相依性新增至 pom.xml 檔案。 此連結庫提供 DefaultAzureCredential。 您也可以新增與應用程式相關的其他任何 Azure 相依性。 在此範例中,會azure-storage-blob新增和 azure-messaging-servicebus 相依性,以便與 Blob 記憶體和 服務匯流排 互動。
<dependencyManagement>
  <dependencies>
    <dependency>
      <groupId>com.azure</groupId>
      <artifactId>azure-sdk-bom</artifactId>
      <version>1.2.5</version>
      <type>pom</type>
      <scope>import</scope>
    </dependency>
  </dependencies>
</dependencyManagement>
<dependencies>
  <dependency>
    <groupId>com.azure</groupId>
    <artifactId>azure-identity</artifactId>
  </dependency>
  <dependency>
    <groupId>com.azure</groupId>
    <artifactId>azure-storage-blob</artifactId>
  </dependency>
  <dependency>
    <groupId>com.azure</groupId>
    <artifactId>azure-messaging-servicebus</artifactId>
  </dependency>
</dependencies>
具現化應用程式必須連線之 Azure 服務的服務用戶端。 下列程式代碼範例會與 Blob 記憶體互動,並使用對應的服務用戶端 服務匯流排。
class Demo {
    public static void main(String[] args) {
        // Create DefaultAzureCredential instance that uses system-assigned managed identity
        // in the underlying ManagedIdentityCredential.
        DefaultAzureCredential credential = new DefaultAzureCredentialBuilder()
            .build();

        BlobServiceClient blobServiceClient = new BlobServiceClientBuilder()
            .endpoint("https://<your-storage-account>.blob.core.windows.net")
            .credential(credential)
            .buildClient();

        ServiceBusClientBuilder clientBuilder = new ServiceBusClientBuilder()
            .credential(credential);
        ServiceBusSenderClient serviceBusSenderClient = clientBuilder.sender()
            .queueName("producttracking")
            .buildClient();
    }
}
在您的專案中,您只需要新增您使用的服務相依性。 在此範例中spring-cloud-azure-starter-storage-blob,會新增和 spring-cloud-azure-starter-servicebus 相依性,以聯機到 Blob 記憶體和 服務匯流排。
<dependencyManagement>
  <dependencies>
    <dependency>
      <groupId>com.azure.spring</groupId>
      <artifactId>spring-cloud-azure-dependencies</artifactId>
      <version>4.5.0</version>
      <type>pom</type>
      <scope>import</scope>
    </dependency>
  </dependencies>
</dependencyManagement>
<dependencies>
  <dependency>
    <groupId>com.azure.spring</groupId>
    <artifactId>spring-cloud-azure-starter-storage-blob</artifactId>
  </dependency>
  <dependency>
    <groupId>com.azure.spring</groupId>
    <artifactId>spring-cloud-azure-starter-servicebus</artifactId>
  </dependency>
</dependencies>
具現化應用程式必須連線之 Azure 服務的服務用戶端。 下列範例會使用對應的服務客戶端連線到 Blob 記憶體和 服務匯流排。
spring:
  cloud:
    azure:
      servicebus:
        namespace: <service-bus-name>
        entity-name: <service-bus-entity-name>
        entity-type: <service-bus-entity-type>
      storage:
        blob:
          account-name: <storage-account-name>
@Service
public class ExampleService {
    @Autowired
    private BlobServiceClient blobServiceClient;

    @Autowired
    private ServiceBusSenderClient serviceBusSenderClient;
}
在您的專案中,安裝 @azure/identity 套件。 此連結庫提供 DefaultAzureCredential。 在此範例中@azure/storage-blob,會安裝和 @azure/service-bus 套件來與 Blob 記憶體互動,並 服務匯流排。
npm install --save @azure/identity @azure/storage-blob @azure/service-bus
具現化應用程式必須連線之 Azure 服務的服務用戶端。 下列程式代碼範例會與 Blob 記憶體互動,並使用對應的服務用戶端 服務匯流排。
import { DefaultAzureCredential } from "@azure/identity";
import { BlobServiceClient } from "@azure/storage-blob";
import { ServiceBusClient } from "@azure/service-bus";

// Azure resource names
const storageAccount = process.env.AZURE_STORAGE_ACCOUNT_NAME;
const serviceBusNamespace = process.env.AZURE_SERVICE_BUS_NAMESPACE;

// Create DefaultAzureCredential instance that uses system-assigned managed identity
// in the underlying ManagedIdentityCredential.
const credential = new DefaultAzureCredential();

// Create client for Blob Storage
const blobServiceClient = new BlobServiceClient(
  `https://${storageAccount}.blob.core.windows.net`,
  credential
);

// Create client for Service Bus
const serviceBusClient = new ServiceBusClient(
  `https://${serviceBusNamespace}.servicebus.windows.net`,
  credential
);
在您的專案中,新增封裝的 azure-identity 參考。 此連結庫提供 DefaultAzureCredential。 您也可以新增與應用程式相關的其他任何 Azure 程式庫。 在此範例中azure-storage-blob,會新增和 azure-service-bus 套件,以分別連線到 Blob 記憶體和 服務匯流排。
pip install azure-identity azure-servicebus azure-storage-blob
具現化應用程式必須連線之 Azure 服務的服務用戶端。 下列程式代碼範例會與 Blob 記憶體互動,並使用對應的服務用戶端 服務匯流排。
from azure.identity import DefaultAzureCredential
from azure.servicebus import ServiceBusClient, ServiceBusMessage
from azure.storage.blob import BlobServiceClient
import os

# Create DefaultAzureCredential instance that uses system-assigned managed identity
# in the underlying ManagedIdentityCredential.
credential = DefaultAzureCredential()

blob_service_client = BlobServiceClient(
    account_url="https://<my-storage-account-name>.blob.core.windows.net/",
    credential=credential
)

fully_qualified_namespace = os.environ['SERVICEBUS_FULLY_QUALIFIED_NAMESPACE']
queue_name = os.environ['SERVICE_BUS_QUEUE_NAME']

with ServiceBusClient(fully_qualified_namespace, credential) as service_bus_client:
    with service_bus_client.get_queue_sender(queue_name) as sender:
        # Sending a single message
        single_message = ServiceBusMessage("Single message")
        sender.send_messages(single_message)
當此程式代碼在本機執行時, DefaultAzureCredential 搜尋其認證鏈結中是否有第一個可用的認證。 如果環境變數在本機為 Managed_Identity_Client_ID Null,則會使用對應至本機安裝開發人員工具的認證。 例如,Azure CLI 或 Visual Studio。 若要深入瞭解此程式,請參閱探索 DefaultAzureCredential 一節。
當應用程式部署至 Azure 時, DefaultAzureCredential 會自動從 App Service 環境擷取 Managed_Identity_Client_ID 變數。 當受控識別與您的應用程式相關聯時,該值就會變成可用。
此概觀程序可確保應用程式在本機和 Azure 中安全地執行,完全不需要變更程式碼。
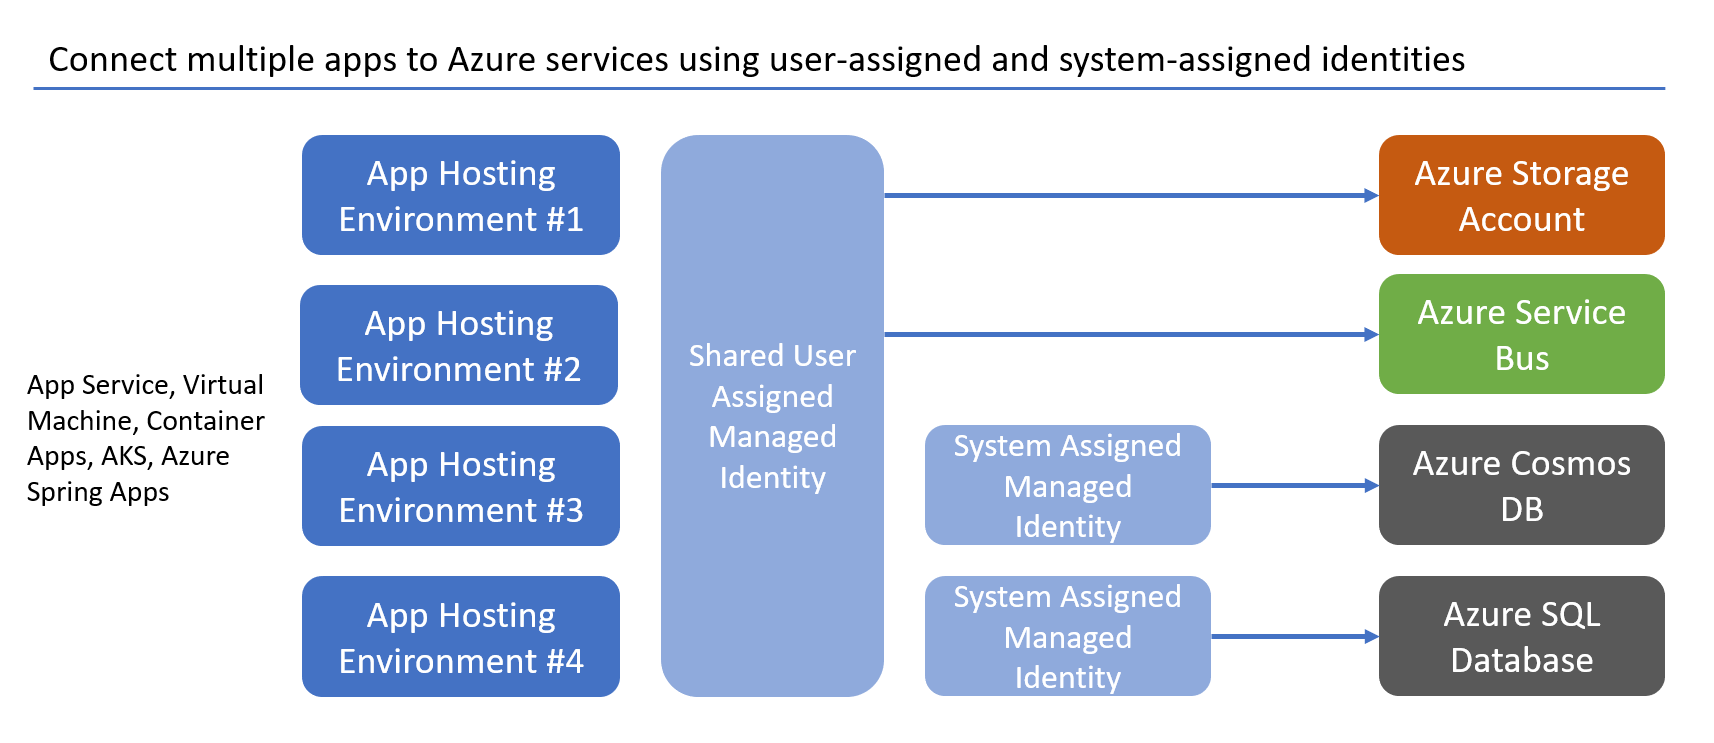
使用多個受控識別來連線多個應用程式
雖然上一個範例中的應用程式共用相同的服務存取需求,但真實世界的環境通常比較細微。 請考慮多個應用程式連線到相同記憶體帳戶的案例,但其中兩個應用程式也會存取不同的服務或資料庫。
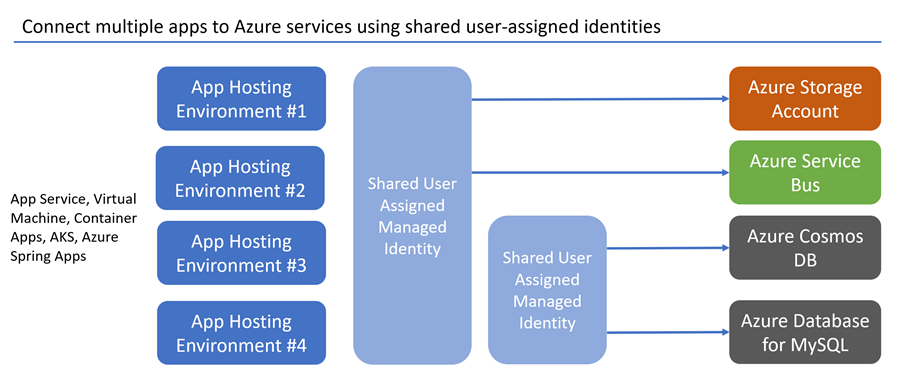
若要在程式代碼中設定此設定,請確定您的應用程式會註冊個別的服務用戶端,以連線到每個記憶體帳戶或資料庫。 設定 時 DefaultAzureCredential,參考每個服務的正確受控識別用戶端標識碼。 下列程式代碼範例會設定這些 Azure 服務連線:
- 使用共用使用者指派的受控識別連到不同儲存體帳戶的兩個連線
- 使用第二個使用者指派的受控識別來連線到 Azure Cosmos DB 和 Azure SQL 服務。 當 Azure SQL 用戶端驅動程式允許此身分識別時,就會共用此受控識別。 如需詳細資訊,請參閱程式代碼批注。
在您的專案中,安裝必要的套件。 Azure 身分識別連結庫提供 DefaultAzureCredential。
dotnet add package Azure.Identity
dotnet add package Azure.Storage.Blobs
dotnet add package Microsoft.Azure.Cosmos
dotnet add package Microsoft.Data.SqlClient
將下列內容新增至您的程式碼:
using Azure.Core;
using Azure.Identity;
using Azure.Storage.Blobs;
using Microsoft.Azure.Cosmos;
using Microsoft.Data.SqlClient;

string clientIdStorage =
    Environment.GetEnvironmentVariable("Managed_Identity_Client_ID_Storage")!;

// Create a DefaultAzureCredential instance that configures the underlying
// ManagedIdentityCredential to use a user-assigned managed identity.
DefaultAzureCredential credentialStorage = new(
    new DefaultAzureCredentialOptions
    {
        ManagedIdentityClientId = clientIdStorage,
    });

// First Blob Storage client
BlobServiceClient blobServiceClient1 = new(
    new Uri("https://<receipt-storage-account>.blob.core.windows.net"),
    credentialStorage);

// Second Blob Storage client
BlobServiceClient blobServiceClient2 = new(
    new Uri("https://<contract-storage-account>.blob.core.windows.net"),
    credentialStorage);

string clientIdDatabases =
    Environment.GetEnvironmentVariable("Managed_Identity_Client_ID_Databases")!;

// Create a DefaultAzureCredential instance that configures the underlying
// ManagedIdentityCredential to use a user-assigned managed identity.
DefaultAzureCredential credentialDatabases = new(
    new DefaultAzureCredentialOptions
    {
        ManagedIdentityClientId = clientIdDatabases,
    });

// Create an Azure Cosmos DB client
CosmosClient cosmosClient = new(
    Environment.GetEnvironmentVariable("COSMOS_ENDPOINT", EnvironmentVariableTarget.Process),
    credentialDatabases);

// Open a connection to Azure SQL
string connectionString =
    $"Server=<azure-sql-hostname>.database.windows.net;User Id={clientIdDatabases};Authentication=Active Directory Default;Database=<database-name>";

using (SqlConnection connection = new(connectionString)
{
    AccessTokenCallback = async (authParams, cancellationToken) =>
    {
        const string defaultScopeSuffix = "/.default";
        string scope = authParams.Resource.EndsWith(defaultScopeSuffix)
            ? authParams.Resource
            : $"{authParams.Resource}{defaultScopeSuffix}";
        AccessToken token = await credentialDatabases.GetTokenAsync(
            new TokenRequestContext([scope]),
            cancellationToken);

        return new SqlAuthenticationToken(token.Token, token.ExpiresOn);
    }
})
{
    connection.Open();
}
將下列程式碼新增至您的 pom.xml 檔案:
<dependencyManagement>
  <dependencies>
    <dependency>
      <groupId>com.azure</groupId>
      <artifactId>azure-sdk-bom</artifactId>
      <version>1.2.5</version>
      <type>pom</type>
      <scope>import</scope>
    </dependency>
  </dependencies>
</dependencyManagement>
<dependencies>
  <dependency>
    <groupId>com.azure</groupId>
    <artifactId>azure-identity</artifactId>
  </dependency>
  <dependency>
    <groupId>com.azure</groupId>
    <artifactId>azure-storage-blob</artifactId>
  </dependency>
  <dependency>
    <groupId>com.azure</groupId>
    <artifactId>azure-cosmos</artifactId>
  </dependency>
  <dependency>
    <groupId>com.microsoft.sqlserver</groupId>
    <artifactId>mssql-jdbc</artifactId>
    <version>11.2.1.jre17</version>
  </dependency>
</dependencies>
將下列內容新增至您的程式碼:
class Demo {
    public static void main(String[] args) {
        String clientIdStorage = System.getenv("Managed_Identity_Client_ID_Storage");

        // Create a DefaultAzureCredential instance that configures the underlying
        // ManagedIdentityCredential to use a user-assigned managed identity.
        DefaultAzureCredential credentialStorage = new DefaultAzureCredentialBuilder()
            .managedIdentityClientId(clientIdStorage)
            .build();

        // First Blob Storage client
        BlobServiceClient blobServiceClient1 = new BlobServiceClientBuilder()
            .endpoint("https://<receipt-storage-account>.blob.core.windows.net")
            .credential(credentialStorage)
            .buildClient();

        // Second Blob Storage client
        BlobServiceClient blobServiceClient2 = new BlobServiceClientBuilder()
            .endpoint("https://<contract-storage-account>.blob.core.windows.net")
            .credential(credentialStorage)
            .buildClient();

        String clientIdDatabases = System.getenv("Managed_Identity_Client_ID_Databases");

        // Create a DefaultAzureCredential instance that configures the underlying
        // ManagedIdentityCredential to use a user-assigned managed identity.
        DefaultAzureCredential credentialDatabases = new DefaultAzureCredentialBuilder()
            .managedIdentityClientId(clientIdDatabases)
            .build()

        // Create an Azure Cosmos DB client
        CosmosClient cosmosClient = new CosmosClientBuilder()
            .endpoint("https://<cosmos-db-account>.documents.azure.com:443/")
            .credential(credentialDatabases)
            .buildClient();

        // Open a connection to Azure SQL using a managed identity.
        // The DefaultAzureCredential instance stored in the credentialDatabases variable can't be
        // used here, so sharing isn't possible between Cosmos DB and Azure SQL.
        String connectionUrl = "jdbc:sqlserver://<azure-sql-hostname>.database.windows.net:1433;"
            + "database=<database-name>;encrypt=true;trustServerCertificate=false;hostNameInCertificate=*.database"
            + ".windows.net;loginTimeout=30;Authentication=ActiveDirectoryMSI;";
        try {
            Connection connection = DriverManager.getConnection(connectionUrl);
            Statement statement = connection.createStatement();
        } catch (SQLException e) {
            e.printStackTrace();
        }
    }
}
將下列程式碼新增至您的 pom.xml 檔案:
<dependencyManagement>
  <dependencies>
    <dependency>
      <groupId>com.azure.spring</groupId>
      <artifactId>spring-cloud-azure-dependencies</artifactId>
      <version>4.5.0</version>
      <type>pom</type>
      <scope>import</scope>
    </dependency>
  </dependencies>
</dependencyManagement>
<dependencies>
  <dependency>
    <groupId>com.azure.spring</groupId>
    <artifactId>spring-cloud-azure-starter-storage-blob</artifactId>
  </dependency>
  <dependency>
    <groupId>com.azure.spring</groupId>
    <artifactId>spring-cloud-azure-starter-cosmos</artifactId>
  </dependency>
  <dependency>
    <groupId>com.microsoft.sqlserver</groupId>
    <artifactId>mssql-jdbc</artifactId>
  </dependency>
  <dependency>
    <groupId>org.springframework.boot</groupId>
    <artifactId>spring-boot-starter-jdbc</artifactId>
  </dependency>
</dependencies>
將下列程式碼新增至您的 application.xml 檔案:
spring:
  cloud:
    azure:
      cosmos:
        endpoint: https://<cosmos-db-account>.documents.azure.com:443/
        credential:
          client-id: <Managed_Identity_Client_ID_Databases>
          managed-identity-enabled: true
      storage:
        blob:
          endpoint: https://<contract-storage-account>.blob.core.windows.net
          credential:
            client-id: <Managed_Identity_Client_ID_Storage>
            managed-identity-enabled: true
  datasource:
    url: jdbc:sqlserver://<azure-sql-hostname>.database.windows.net:1433;database=<database-name>;encrypt=true;trustServerCertificate=false;hostNameInCertificate=*.database.windows.net;loginTimeout=30;Authentication=ActiveDirectoryMSI;
將下列內容新增至您的程式碼:
注意
Spring Cloud Azure 不支援設定相同服務的多個用戶端,下列程式代碼範例會針對這種情況建立多個豆類。
@Configuration
public class AzureStorageConfiguration {
    @Bean("secondBlobServiceClient")
    public BlobServiceClient secondBlobServiceClient(BlobServiceClientBuilder builder) {
        return builder.endpoint("https://<receipt-storage-account>.blob.core.windows.net")
            .buildClient();
    }

    @Bean("firstBlobServiceClient")
    public BlobServiceClient firstBlobServiceClient(BlobServiceClientBuilder builder) {
        return builder.buildClient();
    }
}
@Service
public class ExampleService {
    @Autowired
    @Qualifier("firstBlobServiceClient")
    private BlobServiceClient blobServiceClient1;

    @Autowired
    @Qualifier("secondBlobServiceClient")
    private BlobServiceClient blobServiceClient2;

    @Autowired
    private CosmosClient cosmosClient;

    @Autowired
    private JdbcTemplate jdbcTemplate;
}
在您的專案中,安裝必要的套件。 Azure 身分識別連結庫提供 DefaultAzureCredential。
npm install --save @azure/identity @azure/storage-blob @azure/cosmos tedious
將下列內容新增至您的程式碼:
import { DefaultAzureCredential } from "@azure/identity";
import { BlobServiceClient } from "@azure/storage-blob";
import { CosmosClient } from "@azure/cosmos";
import { Connection } from "tedious";

// Create a DefaultAzureCredential instance that configures the underlying
// ManagedIdentityCredential to use a user-assigned managed identity.
const credentialStorage = new DefaultAzureCredential({
  managedIdentityClientId: process.env.MANAGED_IDENTITY_CLIENT_ID_STORAGE
});

// First Blob Storage client
const blobServiceClient1 = new BlobServiceClient(
  `https://${process.env.AZURE_STORAGE_ACCOUNT_NAME_1}.blob.core.windows.net`,
  credentialStorage
);

// Second Blob Storage client
const blobServiceClient2 = new BlobServiceClient(
  `https://${process.env.AZURE_STORAGE_ACCOUNT_NAME_2}.blob.core.windows.net`,
  credentialStorage
);

// Create a DefaultAzureCredential instance that configures the underlying
// ManagedIdentityCredential to use a user-assigned managed identity.
const credentialDatabases = new DefaultAzureCredential({
  managedIdentityClientId: process.env.MANAGED_IDENTITY_CLIENT_ID_DATABASES
});

// Create an Azure Cosmos DB client
const cosmosClient = new CosmosClient({
  endpoint: process.env.COSMOS_ENDPOINT,
  credential: credentialDatabases
});

// Configure connection and connect to Azure SQL
const config = {
  server: process.env.AZURE_SQL_SERVER,
  authentication: {
    type: 'azure-active-directory-access-token',
    options: {
      token: credentialDatabases.getToken("https://database.windows.net//.default").token
    }
  },
  options: {
    database: process.env.AZURE_SQL_DATABASE,
    encrypt: true
  }
};

const connection = new Connection(config);
connection.connect();
在您的專案中,安裝必要的套件。 Azure 身分識別連結庫提供 DefaultAzureCredential。
pip install azure-identity azure-storage-blob azure-cosmos pyodbc
將下列內容新增至您的程式碼:
from azure.cosmos import CosmosClient
from azure.identity import DefaultAzureCredential
from azure.storage.blob import BlobServiceClient
import os, pyodbc, struct

# Create a DefaultAzureCredential instance that configures the underlying
# ManagedIdentityCredential to use a user-assigned managed identity.
credential_storage = DefaultAzureCredential(
    managed_identity_client_id=os.environ['Managed_Identity_Client_ID_Storage']
)

# First Blob Storage client
blob_service_client_1 = BlobServiceClient(
    account_url="https://<receipt-storage-account>.blob.core.windows.net/",
    credential=credential_storage
)

# Second Blob Storage client
blob_service_client_2 = BlobServiceClient(
    account_url="https://<contract-storage-account>.blob.core.windows.net/",
    credential=credential_storage
)

# Create a DefaultAzureCredential instance that configures the underlying
# ManagedIdentityCredential to use a user-assigned managed identity.
credential_databases = DefaultAzureCredential(
    managed_identity_client_id=os.environ['Managed_Identity_Client_ID_Databases']
)

# Create an Azure Cosmos DB client
cosmos_client = CosmosClient(
    os.environ['COSMOS_ENDPOINT'],
    credential=credential_databases
)

# Connect to Azure SQL
token_bytes = credential_databases.get_token("https://database.windows.net/.default").token.encode("UTF-16-LE")
token_struct = struct.pack(f'<I{len(token_bytes)}s', len(token_bytes), token_bytes)
SQL_COPT_SS_ACCESS_TOKEN = 1256  # This connection option is defined by microsoft in msodbcsql.h
conn = pyodbc.connect(connection_string, attrs_before={SQL_COPT_SS_ACCESS_TOKEN: token_struct})
您也可以將使用者指派的受控識別和系統指派的受控識別同時關聯至資源。 這在所有應用程式都需要存取相同共用服務的案例中很有用,但其中一個應用程式也對其他服務有特定相依性。 使用系統指派的受控識別也可確保在刪除應用程式時,會刪除系結至該特定應用程式的身分識別,這有助於保持您的環境乾淨。
這些類型的案例會在受控識別最佳做法建議中更深入地探索。
下一步
在本教學課程中,您已了解如何將應用程式移轉為無密碼連線。 閱讀下列資源,以更深入地探索本文所討論的概念:


