本文說明如何使用已知的範例應用程式 PetClinic 將微服務應用程式部署至 Azure Spring Apps。
寵物診所範例示範微服務架構模式。 下圖顯示 Azure Spring Apps 企業版方案中 PetClinic 應用程式的架構。
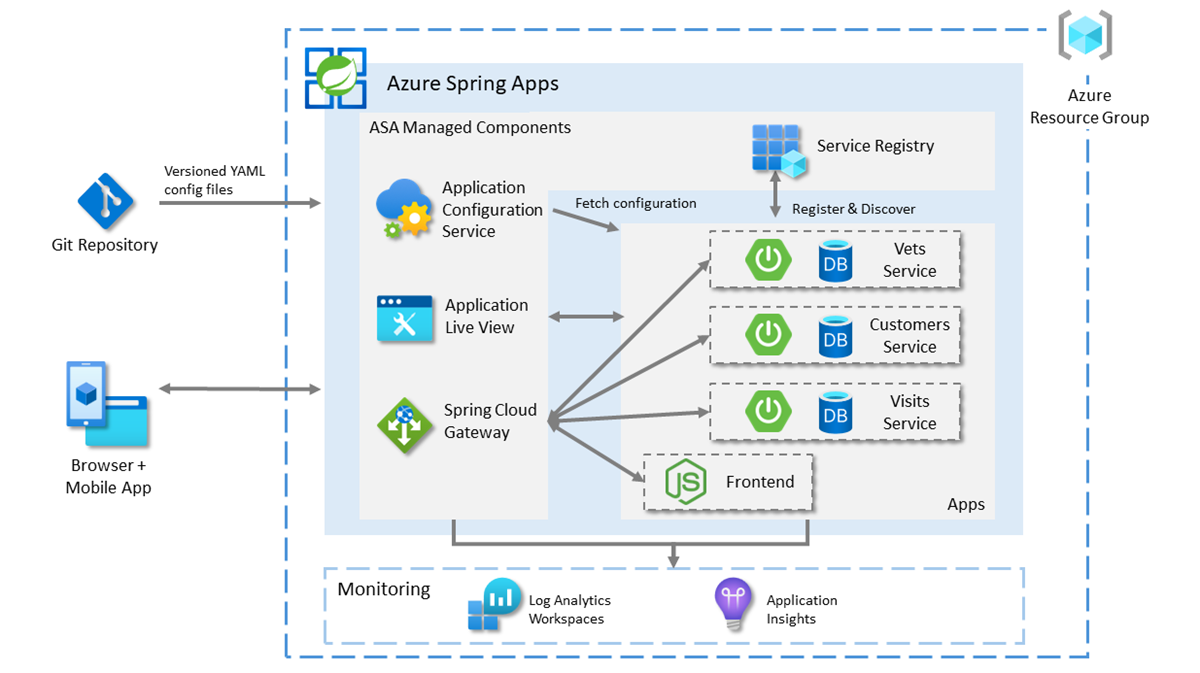
下圖顯示寵物診所範例的下列架構流程和關聯性:
- 使用 Azure Spring Apps 來管理前端和後端應用程式。 後端應用程式是使用 Spring Boot 所建置,而每個應用程式都會使用 HSQLDB 作為永續性存放區。 重新分叉的前端應用程式是以寵物診所 API 閘道應用程式為基礎,Node.js作為獨立前端 Web 應用程式。
- 使用 Azure Spring Apps 上的受控元件,包括服務登錄、應用程式組態服務、Spring Cloud 閘道和應用程式即時檢視。 應用程式組態服務會讀取 Git 存放庫組態。
- 公開 Spring Cloud 閘道的 URL 以將要求路由傳送至後端服務應用程式,並公開應用程式即時檢視的 URL 以監視後端應用程式。
- 使用 Log Analytics 工作區分析記錄。
- 使用 Application Insights 監視效能。
寵物診所範例示範微服務架構模式。 下圖顯示 Azure Spring Apps Standard 方案中 PetClinic 應用程式的架構。
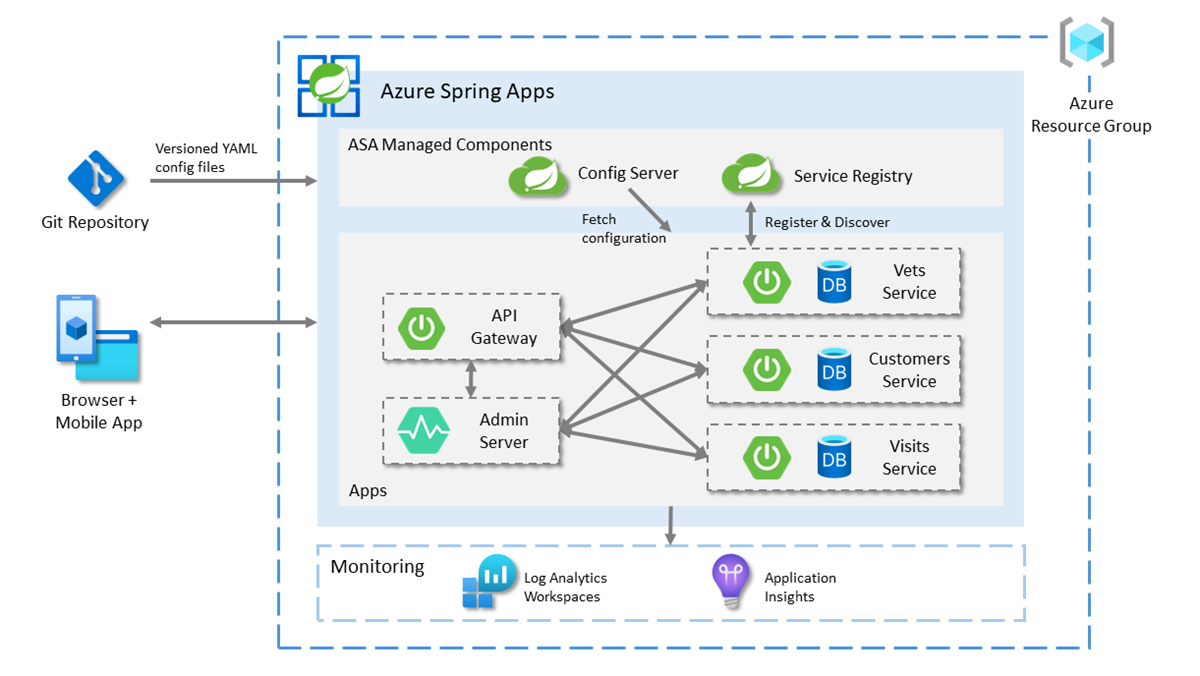
下圖顯示寵物診所範例的下列架構流程和關聯性:
- 使用 Azure Spring Apps 來管理 Spring Boot 應用程式。 每個應用程式都會使用 HSQLDB 作為永續性存放區。
- 在 Azure Spring Apps 上使用受控元件 Spring Cloud Config Server 和 Eureka Service Registry。 組態伺服器會讀取 Git 存放庫組態。
- 公開 API 閘道的 URL 以對服務應用程式的要求進行負載平衡,並公開管理伺服器的 URL 來管理應用程式。
- 使用 Log Analytics 工作區分析記錄。
- 使用 Application Insights 監視效能。
注意
本文使用簡化的 PetClinic 版本,其使用未準備好快速部署到 Azure Spring Apps 的記憶體內部資料庫。
已部署的應用程式 admin-server 會公開公用存取,這是風險點。 生產環境需要保護 Spring Boot Admin 應用程式。
本文提供下列部署至 Azure Spring Apps 的選項:
- [Azure 入口網站] 選項是建立資源和部署應用程式的最簡單且最快的方式,只需按兩下即可。 這個選項適用於想要將應用程式快速部署至 Azure 雲端服務的 Spring 開發人員。
-
Azure 入口網站 + Maven 外掛程式選項是建立資源和逐步部署應用程式的較傳統方式。 此選項適用於第一次使用 Azure 雲端服務的 Spring 開發人員。
-
Azure CLI 選項會使用功能強大的命令行工具來管理 Azure 資源。 此選項適用於熟悉 Azure 雲端服務的 Spring 開發人員。
-
Azure 入口網站 + Maven 外掛程式選項是建立資源並逐步部署應用程式的較傳統方式。 此選項適用於第一次使用 Azure 雲端服務的 Spring 開發人員。
- Azure 開發人員 CLI 選項是一種更有效率的方式,可透過簡單的命令自動建立資源及部署應用程式。 Azure 開發人員 CLI 會使用範本來布建所需的 Azure 資源,以及部署應用程式程式代碼。 此選項適用於熟悉 Azure 雲端服務的 Spring 開發人員。
1.Prerequisites
2. 準備 Spring 專案
使用下列步驟在本機準備範例:
使用下列命令複製範例專案:
git clone https://github.com/Azure-Samples/spring-petclinic-microservices.git
瀏覽至專案根目錄,然後使用下列命令在本機執行範例專案:
bash ./scripts/run_all_without_infra.sh
腳本成功完成之後,請移至 http://localhost:8080 瀏覽器中以存取 PetClinic 應用程式。
使用下列步驟,使用 Azure 開發人員 CLI 範本初始化 Pet Clinic 應用程式:
在Bash視窗中,建立新的空白資料夾,然後流覽至該資料夾。
使用下列命令來初始化專案:
azd init --template Azure-Samples/spring-petclinic-microservices
下列清單描述命令互動:
-
輸入新的環境名稱:提供環境名稱,以作為建立以保存所有 Azure 資源之資源群組的後綴。 此名稱應該在您的 Azure 訂用帳戶內是唯一的。
主控台會輸出類似下列範例的訊息:
Initializing a new project (azd init)

Downloading template code to: <your-local-path>
(✓) Done: Initialized git repository
Enter a new environment name: <your-env-name>

SUCCESS: New project initialized!
You can view the template code in your directory: <your-local-path>
Learn more about running 3rd party code on our DevHub: https://aka.ms/azd-third-party-code-notice
3.準備雲端環境
本節說明如何建立 Azure Spring Apps 服務實例並準備 Azure 雲端環境。
3.1. 登入 Azure 入口網站
移至 Azure 入口網站,輸入您的認證,然後登入入口網站。 預設檢視是您的服務儀表板。
3.2. 建立 Azure Spring Apps 執行個體
使用下列步驟來建立服務實例:
選取 [Azure 入口網站] 角落的 [建立資源]。
在 [Azure 服務] 索引標籤上,選取 [計算>Azure Spring Apps]。
![顯示醒目提示 Azure Spring Apps 的 [建立資源] 頁面 Azure 入口網站 螢幕快照。](media/quickstart-deploy-microservice-apps/create-azure-spring-apps.png)
在 [建立 Azure Spring Apps] 頁面上,填寫 [基本] 索引卷標上的窗體。
![顯示 [建立 Azure Spring Apps] 頁面的 Azure 入口網站 螢幕快照,其中已選取 [基本] 索引標籤。](media/quickstart-deploy-microservice-apps/create-basics.png)
使用下表作為完成表單的指南。 建議的方案是標準方案。
| 設定 |
建議的值 |
描述 |
|
訂用帳戶 |
您的訂閱名稱。 |
您要用於伺服器的 Azure 訂用帳戶。 如果您有多個訂用帳戶,請選擇您想要針對資源計費的訂用帳戶。 |
|
資源群組 |
myresourcegroup |
新的資源群組名稱,或您訂用帳戶中現有的資源群組名稱。 |
|
名稱 |
myasa |
識別 Azure Spring Apps 實例的唯一名稱。 名稱長度必須為 4 到 32 個字元,且只能包含小寫字母、數字及連字號。 服務名稱的第一個字元必須是字母,且最後一個字元必須是字母或數字。 |
|
計劃 |
標準 |
定價方案會決定與您的實例相關聯的資源和成本。 |
|
區域 |
最接近用戶的區域。 |
最靠近您使用者的位置。 |
|
區域備援 |
未選取 |
在 Azure 可用性區域中建立您的 Azure Spring Apps 服務。 所有區域目前不支援。 |
流覽至 [建立 Azure Spring Apps] 頁面上的 [診斷設定] 索引卷標,然後選取 [新建] 以建立新的 Log Analytics 工作區實例。 在 [建立新的 Log Analytics 工作區] 頁面上,視需要更新 Log Analytics 工作區的名稱,然後選取 [確定] 以確認建立。
![顯示 [建立 Azure Spring Apps] 頁面的 Azure 入口網站 螢幕快照,其中已選取 [診斷] 索引標籤,並醒目提示 [建立新] 按鈕。](media/quickstart-deploy-microservice-apps/diagnostic-settings.png)
流覽至 [建立 Azure Spring Apps] 頁面上的 [Application Insights] 索引卷標,然後選取 [新建] 以建立新的 Application Insights 實例。 在 [建立新的 Application Insights 資源] 頁面上,視需要更新 Application insights 名稱,選取 [以工作區為基礎的資源模式],然後選取 [確定] 以確認建立。
![顯示 [建立 Azure Spring Apps] 頁面的 Azure 入口網站 螢幕快照,其中顯示 [建立新的 Application Insights] 資源窗格。](media/quickstart-deploy-microservice-apps/application-insights-creation.png)
選取 [檢閱並建立] 以檢閱您的選取項目。 然後,選取 [建立] 以布建 Azure Spring Apps 實例。
選取 [ 通知] 圖示(鈴鐺),以監視部署程式。 部署完成之後,您可以選取 [釘選到儀錶板],以在 Azure 入口網站 儀錶板上建立快捷方式至服務的 [概觀] 頁面。
![Azure 入口網站 的螢幕快照,其中顯示資源的部署,以及 [通知] 窗格與 [移至資源] 和 [釘選到儀錶板] 按鈕。](media/quickstart-deploy-microservice-apps/azure-spring-apps-notifications.png)
選取 [移至資源 ] 以移至 [Azure Spring Apps 概觀 ] 頁面。
在瀏覽窗格中選取 [設定伺服器 ]。
在 [ 組態伺服器 ] 頁面上,針對 [URI],輸入 https://github.com/Azure-Samples/spring-petclinic-microservices-config.git ,然後選取 [ 驗證]。
![顯示 [設定伺服器] 頁面的 Azure 入口網站 螢幕快照,其中已醒目提示 [預設 URI] 和 [驗證] 按鈕。](media/quickstart-deploy-microservice-apps/validate-config-server.png)
驗證之後,選取 [ 套用 ] 以完成組態伺服器設定。
使用下列步驟來建立必要的資源:
使用下列命令以 OAuth2 登入 Azure。 如果您已經登入,請忽略此步驟。
azd auth login
主控台會輸出類似下列範例的訊息:
Logged in to Azure.
使用下列命令來封裝應用程式的可部署複本、將範本的基礎結構布建至 Azure,然後將應用程式程式代碼部署到那些新佈建的資源:
azd provision
下列清單描述命令互動:
-
選取要使用的 Azure 訂用帳戶:使用箭號移動、輸入篩選,然後按 Enter。
-
選取要使用的 Azure 位置:使用箭號移動、輸入篩選,然後按 Enter。
主控台會輸出類似下列範例的訊息:
SUCCESS: Your application was provisioned in Azure in xx minutes xx seconds.
You can view the resources created under the resource group rg-<your-environment-name> in Azure Portal:
https://portal.azure.com/#@/resource/subscriptions/<your-subscription-id>/resourceGroups/rg-<your-environment-name>/overview
注意
此命令可能需要一些時間才能完成。 布建 Azure 資源時,您會看到進度指示器。
4.將應用程式部署至 Azure Spring Apps
您現在可以將應用程式部署至 Azure Spring Apps。
使用下列步驟,使用適用於 Azure Spring Apps 的 Maven 外掛程式來部署微服務應用程式:
瀏覽至範例項目目錄,然後使用下列命令來設定 Azure Spring Apps 的應用程式:
./mvnw -P spring-apps com.microsoft.azure:azure-spring-apps-maven-plugin:1.17.0:config
下列清單描述命令互動:
-
選取要設定的子模組(輸入編號以逗號分隔,例如:[1-2,4,6],ENTER 以選取 ALL):按 Enter 鍵以選取全部。
-
OAuth2 登入:根據 OAuth2 通訊協定授權登入 Azure。
-
選取訂用帳戶:選取您所建立之 Azure Spring Apps 實例的訂用帳戶清單編號,預設為清單中的第一個訂用帳戶。 如果您使用預設號碼,請直接按 Enter 。
-
選取 [Azure Spring Apps 以進行部署:選取您所建立之 Azure Spring Apps 實例的清單編號。 如果您使用預設號碼,請直接按 Enter 。
-
選取應用程式以公開公用存取:(輸入編號以逗號分隔,例如:[1-2,4,6],ENTER 以選取 NONE):輸入 1,5 for
admin-server 和 api-gateway。
-
確認儲存上述所有組態 (Y/n):按 y。 如果您按下 n,則組態不會儲存在 POM 檔案中。
使用下列命令來建置和部署每個應用程式:
./mvnw azure-spring-apps:deploy
針對 OAuth2 登入提示,根據 OAuth2 通訊協定授權登入 Azure。
注意
部署至 Azure Spring Apps 最多可能需要 25 分鐘的時間。
執行命令之後,記錄會顯示類似下列範例的輸出,指出所有部署都成功:
[INFO] Deployment(default) is successfully updated.
[INFO] Deployment Status: Running
[INFO]   InstanceName:admin-server-default-xx-xx-xxx  Status:Running Reason:null       DiscoverStatus:UP
[INFO] Getting public url of app(admin-server)...
[INFO] Application url: https://<your-Azure-Spring-Apps-instance-name>-admin-server.azuremicroservices.io

...

[INFO] Getting public url of app(api-gateway)...
[INFO] Application url: https://<your-Azure-Spring-Apps-instance-name>-api-gateway.azuremicroservices.io
使用下列步驟來封裝應用程式、布建 Web 應用程式所需的 Azure 資源,然後部署至 Azure Spring Apps:
使用下列命令封裝應用程式的可部署複本:
azd package
主控台會輸出類似下列範例的訊息:
SUCCESS: Your application was packaged for Azure in xx minutes xx seconds.
使用下列命令,將應用程式程式代碼部署到那些新佈建的資源:
azd deploy
主控台會輸出類似下列範例的訊息:
Deploying services (azd deploy)

(✓) Done: Deploying service admin-server
- Endpoint: https://<your-Azure-Spring-Apps-instance-name>-admin-server.azuremicroservices.io

(✓) Done: Deploying service api-gateway
- Endpoint: https://<your-Azure-Spring-Apps-instance-name>-api-gateway.azuremicroservices.io

(✓) Done: Deploying service customers-service
- No endpoints were found

(✓) Done: Deploying service vets-service
- No endpoints were found

(✓) Done: Deploying service visits-service
- No endpoints were found


SUCCESS: Your application was deployed to Azure in xx minutes xx seconds.
You can view the resources created under the resource group rg-<your-environment-name> in Azure Portal:
https://portal.azure.com/#@/resource/subscriptions/<your-subscription-id>/resourceGroups/rg-<your-environment-name>/overview
2. 準備 Spring 專案
當您想要在應用程式部署到雲端之前,請在本機電腦上使用下列步驟:
使用下列命令從 GitHub 複製 Pet Clinic 應用程式 :
git clone https://github.com/Azure-Samples/spring-petclinic-microservices.git
瀏覽至專案根目錄,然後使用下列命令來建置專案:
./mvnw clean package -DskipTests
如果您想要在本機執行應用程式,請使用下列步驟。 否則,您可以略過這些步驟。
開啟新的 Bash 視窗,然後使用下列命令啟動 Config Server:
./mvnw spring-boot:run -pl spring-petclinic-config-server
開啟新的 Bash 視窗,然後使用下列命令啟動 Discovery Server:
./mvnw spring-boot:run -pl spring-petclinic-discovery-server
針對 Customers、Vets、Visits 和 Spring Cloud Gateway 服務,開啟新的 Bash 視窗,並使用下列命令啟動服務:
./mvnw spring-boot:run -pl spring-petclinic-customers-service
./mvnw spring-boot:run -pl spring-petclinic-vets-service
./mvnw spring-boot:run -pl spring-petclinic-visits-service
./mvnw spring-boot:run -Dspring-boot.run.profiles=default,development \
    -pl spring-petclinic-api-gateway
開啟新的 Bash 視窗,並瀏覽至項目 spring-petclinic-frontend 目錄。 使用下列命令來安裝相依性並執行前端應用程式:
npm install
npm run start
腳本成功完成之後,請移至 http://localhost:8080 瀏覽器中以存取 PetClinic 應用程式。
3.準備雲端環境
您需要執行此範例的主要資源是 Azure Spring Apps 實例。 本節說明如何建立此資源。
本節使用 [部署至 Azure] 按鈕來啟動 Azure 入口網站 中的部署體驗。 此體驗會使用 ARM範本 來建立 Azure 資源。
3.1. 登入 Azure 入口網站
移至 Azure 入口網站,輸入您的認證,然後登入入口網站。 預設檢視是您的服務儀表板。
3.2. 建立 Azure 資源
使用下列步驟來建立應用程式相依的所有 Azure 資源:
選取下列 [部署至 Azure] 按鈕,以在 Azure 入口網站 中啟動部署體驗:

填寫 [基本] 索引卷標上的窗體。使用下表做為完成窗體的指南:
| 設定 |
建議的值 |
描述 |
|
訂用帳戶 |
您的訂閱名稱。 |
您要用於伺服器的 Azure 訂用帳戶。 如果您有多個訂用帳戶,請選擇您想要針對資源計費的訂用帳戶。 |
|
資源群組 |
myresourcegroup |
新的資源群組名稱,或您訂用帳戶中現有的資源群組名稱。 |
|
區域 |
最接近用戶的區域。 |
區域可用來建立資源群組。 |
![顯示 [自定義部署] 頁面之 Azure 入口網站 的螢幕快照。](media/quickstart-deploy-microservice-apps/custom-deployment-microservice.png)
選取 [檢閱並建立] 以檢閱您的選取項目。 然後,選取 [建立] 將應用程式部署至 Azure Spring Apps。
在工具列上,選取 [通知] 圖示 (鈴鐺) 以監視部署程序。 部署完成之後,您可以選取 [釘選到儀錶板],這會在 Azure 入口網站 儀錶板上建立此服務的圖格,作為服務的 [概觀] 頁面的快捷方式。 選取 [移至資源 ] 以開啟服務的 [概 觀 ] 頁面。
![顯示 [概觀] 頁面並開啟 [自定義部署通知] 窗格之 Azure 入口網站 螢幕快照。](media/quickstart-deploy-microservice-apps/custom-deployment-notifications.png)
3.1. 登入 Azure 入口網站
移至 Azure 入口網站,然後輸入您的認證以登入入口網站。 預設檢視是您的服務儀表板。
3.2. 建立 Azure Spring Apps 執行個體
使用下列步驟來建立服務實例:
選取 Azure 入口網站 角落的 [建立資源]。
選取 [計算>Azure Spring Apps]。
填寫 [基本] 索引卷標上的窗體。使用下表做為完成窗體的指南:
| 設定 |
建議的值 |
描述 |
|
訂用帳戶 |
您的訂閱名稱。 |
您要用於伺服器的 Azure 訂用帳戶。 如果您有多個訂用帳戶,請選擇您想要針對資源計費的訂用帳戶。 |
|
資源群組 |
myresourcegroup |
新的資源群組名稱,或您訂用帳戶中現有的資源群組名稱。 |
|
名稱 |
myasa |
識別 Azure Spring Apps 服務的唯一名稱。 名稱長度必須為 4 到 32 個字元,且只能包含小寫字母、數字及連字號。 服務名稱的第一個字元必須是字母,且最後一個字元必須是字母或數字。 |
|
區域 |
最接近用戶的區域。 |
最靠近您使用者的位置。 |
|
裝載選項和方案 |
企業 |
決定與實例相關聯的資源和成本的定價方案。 |
|
區域備援 |
未選取 |
在 Azure 可用性區域中建立 Azure Spring Apps 服務的選項。 所有區域目前不支援此功能。 |
|
軟體IP方案 |
隨用隨付 |
可讓您隨用 Azure Spring Apps 隨用隨付的定價方案。 |
|
部署範例專案 |
未選取 |
使用內建範例應用程式的選項。 |
流覽至 [建立 Azure Spring Apps] 頁面上的 [診斷設定] 索引卷標,然後選取 [新建] 以建立新的 Log Analytics 工作區實例。 在 [建立新的 Log Analytics 工作區] 頁面上,視需要更新 Log Analytics 工作區的名稱,然後選取 [確定] 以確認建立。
流覽至 [建立 Azure Spring Apps] 頁面上的 [Application Insights] 索引卷標,然後選取 [新建] 以建立新的 Application Insights 實例。 在 [建立新的 Application Insights 資源] 頁面上,視需要更新 Application insights 名稱,選取 [以工作區為基礎的資源模式],然後選取 [確定] 以確認建立。
選取 [檢閱並建立] 以檢閱您的選取項目。 然後,選取 [建立] 以布建 Azure Spring Apps 實例。
選取 [ 通知] 圖示(鈴鐺),以監視部署程式。 部署完成之後,您可以選取 [釘選到儀錶板],以在 Azure 入口網站 儀錶板上建立快捷方式至服務的 [概觀] 頁面。
選取 [移至資源 ] 以移至 [Azure Spring Apps 概觀 ] 頁面。
下列各節說明如何設定服務實例。
建立應用程式
使用下列步驟來建立應用程式:
從瀏覽窗格中,選取 [應用程式 ],然後選取 [ 建立應用程式]。
在 [建立應用程式] 頁面上,針對 [應用程式名稱],使用前端,並將所有其他字段保留預設值。
使用下列每個應用程式名稱重複上一個步驟:
customers-servicevets-servicevisits-service
選取 [建立] 以完成應用程式建立。
![顯示 [建立應用程式] 頁面之 Azure 入口網站 的螢幕快照。](media/quickstart-deploy-microservice-apps/enterprise-app-creation.png)
使用下列步驟來設定 Service Registry:
從瀏覽窗格中,選取 [服務登錄]。
選取 [應用程式系結]、選取 [系結應用程式]、從列表中選取 customers-service ,然後選取 [ 套用]。
重複上一個步驟以繫結下列應用程式:
vets-servicevisits-service
![顯示 [服務登錄] 頁面的 Azure 入口網站 螢幕快照,其中已選取 [應用程式系結] 索引標籤。](media/quickstart-deploy-microservice-apps/enterprise-bind-registry.png)
使用下列步驟來設定應用程式組態服務:
從瀏覽窗格中,選取 [應用程式組態服務 ],然後選取 [ 設定]。
使用下列資訊填寫存放庫,然後選取 [ 驗證]:
![顯示 [應用程式組態服務設定] 索引標籤之 Azure 入口網站 的螢幕快照。](media/quickstart-deploy-microservice-apps/enterprise-validate-configuration-service.png)
驗證之後,選取 [ 套用 ] 以完成應用程式組態服務組態。
選取 [應用程式系結]、選取 [系結應用程式]、從列表中選取 customers-service ,然後選取 [ 套用]。
重複上一個步驟以繫結下列應用程式:
vets-servicevisits-service
![顯示 [應用程式組態服務] 頁面的 Azure 入口網站 螢幕快照,其中已選取 [應用程式系結] 索引標籤。](media/quickstart-deploy-microservice-apps/enterprise-bind-configuration.png)
設定應用程式的組態檔模式
使用下列步驟來設定組態檔模式:
從瀏覽窗格中,選取 [應用程式 ],然後選取 customers-service 應用程式。
在 [應用程式概觀] 頁面上,選取 [組態],在 [一般設定] 索引卷標中選取 [組態檔模式],然後選取 [應用程式和customers-service]。 選取 [ 儲存 ] 以設定組態檔模式。
重複上一個步驟,以儲存下列應用程式的組態檔模式:
-
vets-service:選取 應用程式和vets-service。
-
visits-service:選取 應用程式和visits-service。
本節說明如何設定 Spring Cloud Gateway。
首先,使用下列步驟來指派閘道存取的端點:
從瀏覽窗格中,選取 [Spring Cloud Gateway]。
在 [概 觀] 索引標籤上,選取 [ 是 ] 以指派端點。 儲存端點 URL 以供稍後使用。
接下來,設定 Spring Cloud Gateway 的路由。 因為 Azure 入口網站 目前不支援 Spring Cloud Gateway 的路由設定,請開啟 Bash 視窗,並使用下列 Azure CLI 步驟來設定路由:
使用下列命令登入 Azure CLI:
az login
使用下列命令來安裝 Azure CLI 的 Azure Spring Apps 擴充功能,並註冊 命名空間 Microsoft.SaaS:
az extension add --name spring --upgrade
az provider register --namespace Microsoft.SaaS
使用下列命令來接受法律條款和隱私聲明:
注意
只有在您的訂用帳戶從未用來建立 Azure Spring Apps 的企業方案實例時,才需要此步驟。
az term accept \
    --publisher vmware-inc \
    --product azure-spring-cloud-vmware-tanzu-2 \
    --plan asa-ent-hr-mtr
使用下列命令建立變數來保存資源名稱。 請務必將預留位置取代為您自己的值。
export SUBSCRIPTION_ID=<subscription-ID>
export RESOURCE_GROUP=<resource-group-name>
export SPRING_APPS_NAME=<Azure-Spring-Apps-instance-name>
export APP_CUSTOMERS_SERVICE=customers-service
export APP_VETS_SERVICE=vets-service
export APP_VISITS_SERVICE=visits-service
export APP_FRONTEND=frontend
使用下列命令來設定預設訂用帳戶:
az account set --subscription ${SUBSCRIPTION_ID}
使用下列命令來設定應用程式的路由 customers-service :
az spring gateway route-config create \
    --resource-group ${RESOURCE_GROUP} \
    --service ${SPRING_APPS_NAME} \
    --name ${APP_CUSTOMERS_SERVICE} \
    --app-name ${APP_CUSTOMERS_SERVICE} \
    --routes-json \
      '[
        {
          "predicates": [
            "Path=/api/customer/**"
          ],
          "filters": [
            "StripPrefix=2"
          ]
        }
      ]'
使用下列命令來設定應用程式的路由 vets-service :
az spring gateway route-config create \
    --resource-group ${RESOURCE_GROUP} \
    --service ${SPRING_APPS_NAME} \
    --name ${APP_VETS_SERVICE} \
    --app-name ${APP_VETS_SERVICE} \
    --routes-json \
      '[
         {
           "predicates": [
             "Path=/api/vet/**"
           ],
           "filters": [
             "StripPrefix=2"
           ]
         }
       ]'
使用下列命令來設定應用程式的路由 visits-service :
az spring gateway route-config create \
    --resource-group ${RESOURCE_GROUP} \
    --service ${SPRING_APPS_NAME} \
    --name ${APP_VISITS_SERVICE} \
    --app-name ${APP_VISITS_SERVICE} \
    --routes-json \
      '[
         {
           "predicates": [
             "Path=/api/visit/**"
           ],
           "filters": [
             "StripPrefix=2"
           ]
         }
       ]'
使用下列命令來設定前端應用程式的路由:
az spring gateway route-config create \
    --resource-group ${RESOURCE_GROUP} \
    --service ${SPRING_APPS_NAME} \
    --name ${APP_FRONTEND} \
    --app-name ${APP_FRONTEND} \
    --routes-json \
      '[
         {
           "predicates": [
             "Path=/**"
           ],
           "filters": [
             "StripPrefix=0"
           ],
           "order": 1000
         }
       ]'
使用下列步驟來設定開發人員工具。
從瀏覽窗格中,選取 [ 開發人員工具]。
選取 [指派端點] 以指派開發人員工具的端點。
儲存應用程式即時檢視的端點,以供稍後使用。
3.1. 提供每個資源的名稱
使用下列命令建立變數來保存資源名稱。 請務必將預留位置取代為您自己的值。
export LOCATION=<location>
export RESOURCE_GROUP=myresourcegroup
export SPRING_APPS=myasa
export APP_FRONTEND=frontend
export APP_CUSTOMERS_SERVICE=customers-service
export APP_VETS_SERVICE=vets-service
export APP_VISITS_SERVICE=visits-service
export GIT_CONFIG_REPO=default
3.2. 登入 Azure CLI
使用下列步驟登入:
使用下列命令登入 Azure CLI:
az login
使用下列命令來列出所有可用的訂用帳戶,以判斷要使用的訂用帳戶識別碼:
az account list --output table
使用下列命令來設定預設訂用帳戶:
az account set --subscription <subscription-ID>
3.3. 建立新的資源群組
使用下列步驟來建立新的資源群組:
使用下列命令來設定預設位置:
az configure --defaults location=${LOCATION}
請使用下列命令來建立資源群組:
az group create --resource-group ${RESOURCE_GROUP}
使用下列命令,將新建立的資源群組設定為預設資源群組:
az configure --defaults group=${RESOURCE_GROUP}
3.4. 安裝擴充功能和註冊命名空間
使用下列命令來安裝 Azure CLI 的 Azure Spring Apps 擴充功能,並註冊 Microsoft.SaaS 命名空間:
az extension add --name spring --upgrade
az provider register --namespace Microsoft.SaaS
3.5. 建立 Azure Spring Apps 執行個體
使用下列步驟來建立服務實例:
使用下列命令來接受企業方案的法律條款和隱私聲明:
注意
只有在您的訂用帳戶從未用來建立 Azure Spring Apps 的企業方案實例時,才需要此步驟。
az term accept \
    --publisher vmware-inc \
    --product azure-spring-cloud-vmware-tanzu-2 \
    --plan asa-ent-hr-mtr
使用下列命令來建立具有必要 Tanzu 元件的 Azure Spring Apps 服務實例:
az spring create \
    --name ${SPRING_APPS} \
    --sku Enterprise \
    --enable-application-configuration-service \
    --enable-service-registry \
    --enable-gateway \
    --enable-application-live-view
使用下列步驟來設定服務實例:
使用下列命令來設定 Azure Spring Apps 實例的診斷設定:
export SPRING_APPS_RESOURCE_ID=$(az spring show \
    --name ${SPRING_APPS} \
    --query id \
    --output tsv)
az monitor diagnostic-settings create \
    --resource ${SPRING_APPS_RESOURCE_ID} \
    --name logs-and-metrics \
    --workspace ${SPRING_APPS} \
    --logs '[
      {
        "category": "ApplicationConsole",
        "enabled": true,
        "retentionPolicy": {
          "enabled": false,
          "days": 0
        }
      },
      {
         "category": "SystemLogs",
         "enabled": true,
         "retentionPolicy": {
           "enabled": false,
           "days": 0
         }
      },
      {
         "category": "IngressLogs",
         "enabled": true,
         "retentionPolicy": {
           "enabled": false,
           "days": 0
          }
      }
    ]' \
    --metrics '[
      {
        "category": "AllMetrics",
        "enabled": true,
        "retentionPolicy": {
          "enabled": false,
          "days": 0
        }
      }
    ]'
使用下列命令來建立 Azure Spring Apps 實例的應用程式:
az spring app create --service ${SPRING_APPS} --name ${APP_FRONTEND}
az spring app create --service ${SPRING_APPS} --name ${APP_CUSTOMERS_SERVICE}
az spring app create --service ${SPRING_APPS} --name ${APP_VETS_SERVICE}
az spring app create --service ${SPRING_APPS} --name ${APP_VISITS_SERVICE}
使用下列命令來系結 Service Registry 的應用程式:
az spring service-registry bind --service ${SPRING_APPS} --app ${APP_CUSTOMERS_SERVICE}
az spring service-registry bind --service ${SPRING_APPS} --app ${APP_VETS_SERVICE}
az spring service-registry bind --service ${SPRING_APPS} --app ${APP_VISITS_SERVICE}
使用下列指令建立應用程式群組態服務的組態存放庫:
az spring application-configuration-service git repo add \
    --service ${SPRING_APPS} \
    --name ${GIT_CONFIG_REPO} \
    --patterns application,api-gateway,customers-service,vets-service,visits-service \
    --uri https://github.com/Azure-Samples/spring-petclinic-microservices-config.git \
    --label master
使用下列命令將應用程式系結至應用程式組態服務:
az spring application-configuration-service bind \
    --service ${SPRING_APPS} \
    --app ${APP_CUSTOMERS_SERVICE}
az spring application-configuration-service bind \
    --service ${SPRING_APPS} \
    --app ${APP_VETS_SERVICE}
az spring application-configuration-service bind \
    --service ${SPRING_APPS} \
    --app ${APP_VISITS_SERVICE}
使用下列命令將端點指派給 Spring Cloud Gateway:
az spring gateway update --service ${SPRING_APPS} --assign-endpoint
使用下列命令來設定應用程式的路由 customers-service :
az spring gateway route-config create \
    --service ${SPRING_APPS} \
    --name ${APP_CUSTOMERS_SERVICE} \
    --app-name ${APP_CUSTOMERS_SERVICE} \
    --routes-json '[
      {
        "predicates": [
          "Path=/api/customer/**"
        ],
        "filters": [
          "StripPrefix=2"
        ]
      }
   ]'
使用下列命令來設定應用程式的路由 vets-service :
az spring gateway route-config create \
    --service ${SPRING_APPS} \
    --name ${APP_VETS_SERVICE} \
    --app-name ${APP_VETS_SERVICE} \
    --routes-json '[
      {
        "predicates": [
          "Path=/api/vet/**"
        ],
        "filters": [
          "StripPrefix=2"
        ]
      }
    ]'
使用下列命令來設定應用程式的路由 visits-service :
az spring gateway route-config create \
    --service ${SPRING_APPS} \
    --name ${APP_VISITS_SERVICE} \
    --app-name ${APP_VISITS_SERVICE} \
    --routes-json '[
      {
        "predicates": [
          "Path=/api/visit/**"
        ],
        "filters": [
          "StripPrefix=2"
        ]
      }
    ]'
使用下列命令來設定應用程式的路由 frontend :
az spring gateway route-config create \
    --service ${SPRING_APPS} \
    --name ${APP_FRONTEND} \
    --app-name ${APP_FRONTEND} \
    --routes-json '[
      {
        "predicates": [
          "Path=/**"
        ],
        "filters": [
          "StripPrefix=0"
        ],
        "order": 1000
      }
    ]'
使用下列命令將端點指派給應用程式即時檢視:
az spring dev-tool update --service ${SPRING_APPS} --assign-endpoint
4.將應用程式部署至 Azure Spring Apps
上一節中的 [部署至 Azure] 按鈕會啟動包含應用程式部署的 Azure 入口網站 體驗,因此不需要其他任何專案。
使用下列步驟來部署使用適用於 Azure Spring Apps 的 Maven 外掛程式:
瀏覽至專案根目錄,然後執行下列命令以在 Azure Spring Apps 中設定應用程式:
./mvnw -P spring-apps-enterprise com.microsoft.azure:azure-spring-apps-maven-plugin:1.19.0:config
下列清單描述命令互動:
-
選取要設定的子模組:按 Enter 鍵以選取全部。
-
選取訂用帳戶:選取您所建立之 Azure Spring Apps 實例的訂用帳戶清單編號,預設為清單中的第一個訂用帳戶。 如果您使用預設號碼,請直接按 Enter 。
-
在 Azure 中使用現有的 Azure Spring Apps:按 y 以使用現有的 Azure Spring Apps 實例。
-
選取要公開公用存取的應用程式:按 Enter 鍵以選取 [無]。
-
確認儲存上述所有組態:按 y。 如果您按下 n,則組態不會儲存在 POM 檔案中。
使用下列命令來部署後端應用程式:
./mvnw azure-spring-apps:deploy
在命令執行之後,您可以從下列記錄訊息中看到部署成功:
[INFO] Start deploying artifact(customers-service-3.0.1.jar) to deployment(default) of app(customers-service)...
[INFO] Artifact(customers-service-3.0.1.jar) is successfully deployed to deployment(default) of app(customers-service).
[INFO] Starting Spring App after deploying artifacts...
[INFO] Deployment Status: Running

...

[INFO] Start deploying artifact(vets-service-3.0.1.jar) to deployment(default) of app(vets-service)...
[INFO] Artifact(vets-service-3.0.1.jar) is successfully deployed to deployment(default) of app(vets-service).
[INFO] Starting Spring App after deploying artifacts...
[INFO] Deployment Status: Running

...

[INFO] Start deploying artifact(visits-service-3.0.1.jar) to deployment(default) of app(visits-service)...
[INFO] Artifact(visits-service-3.0.1.jar) is successfully deployed to deployment(default) of app(visits-service).
[INFO] Starting Spring App after deploying artifacts...
[INFO] Deployment Status: Running
Azure 入口網站 不支援部署前端應用程式,因此請使用下列 Azure CLI 命令來部署前端應用程式:
az spring app deploy \
    --resource-group ${RESOURCE_GROUP} \
    --service ${SPRING_APPS_NAME} \
    --name ${APP_FRONTEND} \
    --source-path spring-petclinic-frontend \
    --build-env BP_WEB_SERVER=nginx
在命令執行之後,您可以從下列記錄訊息中看到部署成功:
[5/5] Updating deployment in app "frontend" (this operation can take a while to complete)
Azure Spring Apps will use rolling upgrade to update your deployment, you have 1 instance, Azure Spring Apps will update the deployment in 1 round.
The deployment is in round 1, 1 old instance is deleted/deleting and 1 new instance is started/starting
Your application is successfully deployed.
使用下列步驟來部署應用程式:
輸入專案根目錄,並使用下列命令來建置及部署前端應用程式:
az spring app deploy \
    --service ${SPRING_APPS} \
    --name ${APP_FRONTEND} \
    --build-env BP_WEB_SERVER=nginx \
    --source-path ./spring-petclinic-frontend
使用下列命令來建置和部署 customers-service 應用程式:
az spring app deploy \
    --service ${SPRING_APPS} \
    --name ${APP_CUSTOMERS_SERVICE} \
    --source-path \
    --config-file-pattern application,customers-service \
    --build-env \
        BP_MAVEN_BUILT_MODULE=spring-petclinic-customers-service \
        BP_JVM_VERSION=17
使用下列命令來建置和部署 vets-service 應用程式:
az spring app deploy \
    --service ${SPRING_APPS} \
    --name ${APP_VETS_SERVICE} \
    --source-path \
    --config-file-pattern application,vets-service \
    --build-env \
        BP_MAVEN_BUILT_MODULE=spring-petclinic-vets-service \
        BP_JVM_VERSION=17
使用下列命令來建置和部署 visits-service 應用程式:
az spring app deploy \
    --service ${SPRING_APPS} \
    --name ${APP_VISITS_SERVICE} \
    --source-path \
    --config-file-pattern application,visits-service \
    --build-env \
        BP_MAVEN_BUILT_MODULE=spring-petclinic-visits-service \
        BP_JVM_VERSION=17
5.驗證應用程式
下列各節說明如何驗證部署。
5.1. 存取應用程式
部署完成之後,您可以從部署輸出找到 Spring Cloud Gateway URL,如下列螢幕快照所示:
![顯示 [部署輸出] 頁面之 Azure 入口網站 的螢幕快照。](media/quickstart-deploy-microservice-apps/deployment-output-enterprise-plan.png)
開啟閘道 URL。 應用程式看起來應該類似下列螢幕快照:
5.2. 查詢應用程式記錄
瀏覽寵物診所的每個功能之後,Log Analytics 工作區會收集每個應用程式的記錄。 您可以使用自訂查詢來檢查記錄,如下列螢幕快照所示:
![Azure 入口網站的螢幕快照,其中顯示 PetClinic 應用程式查詢的 [記錄] 頁面,以及企業方案的結果。](media/quickstart-deploy-microservice-apps/azure-spring-apps-log-query-enterprise.png)
5.3. 監視應用程式
Application Insights 會監視應用程式相依性,如下列應用程式追蹤對應所示:
![Azure 入口網站 的螢幕快照,其中顯示 Azure Spring Apps 企業版方案的 [應用程式對應] 頁面。](media/quickstart-deploy-microservice-apps/enterprise-application-insights-map.png)
您可以從部署輸出找到應用程式即時檢視 URL。 開啟 [應用程式實時檢視 URL] 來監視應用程式執行時間,如下列螢幕快照所示:

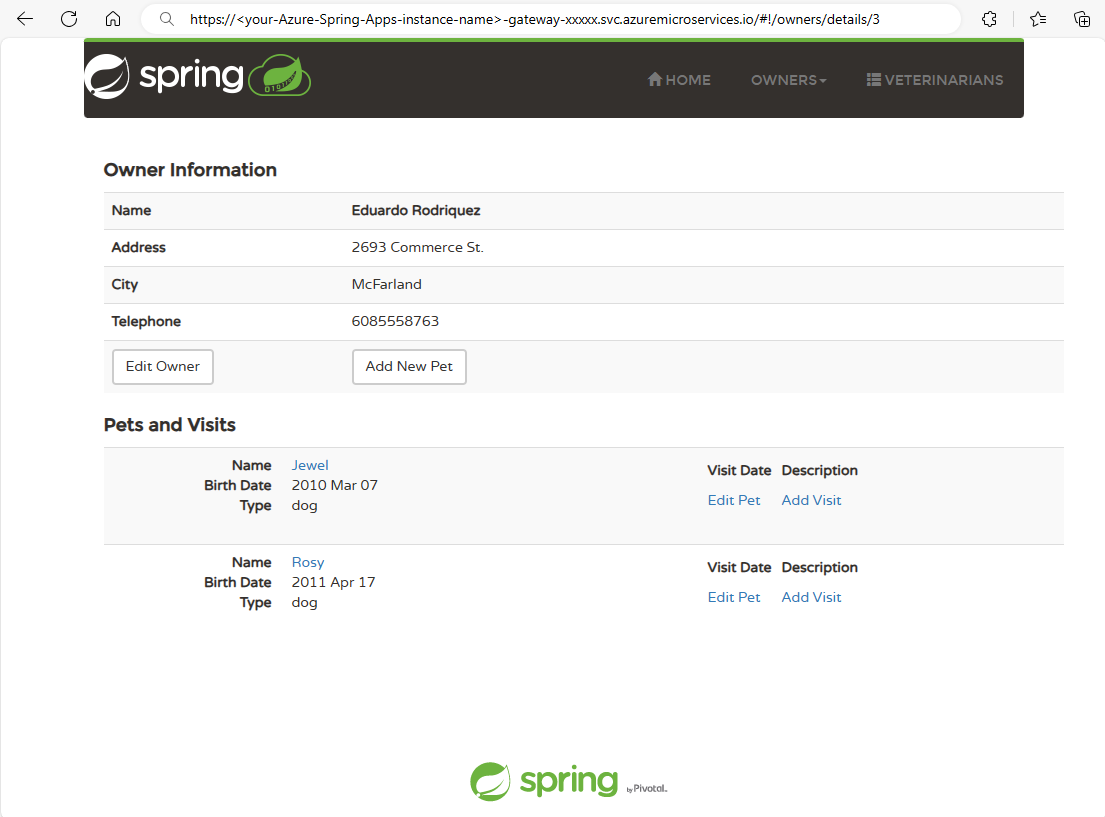
5.1. 存取應用程式
使用從 Spring Cloud Gateway 指派的端點 ,例如 https://<your-Azure-Spring-Apps-instance-name>-gateway-xxxxx.svc.azuremicroservices.io。 應用程式看起來應該類似下列螢幕快照:
5.2. 查詢應用程式記錄
瀏覽寵物診所的每個功能之後,Log Analytics 工作區會收集每個應用程式的記錄。 您可以使用自訂查詢來檢查記錄,如下列螢幕快照所示:
5.3. 監視應用程式
Application Insights 會監視應用程式相依性,如下列應用程式追蹤對應所示:
開啟開發人員工具公開以監視應用程式運行時間的應用程式即時檢視 URL,如下列螢幕快照所示:
5.1. 存取應用程式
使用下列命令來擷取 Spring Cloud Gateway 的 URL:
export GATEWAY_URL=$(az spring gateway show \
    --service ${SPRING_APPS} \
    --query properties.url \
    --output tsv)
echo "https://${GATEWAY_URL}"
應用程式看起來應該類似下列螢幕快照:
5.2. 查詢應用程式記錄
瀏覽寵物診所的每個功能之後,Log Analytics 工作區會收集每個應用程式的記錄。 您可以使用自訂查詢來檢查記錄,如下列螢幕快照所示:
5.3. 監視應用程式
Application Insights 會監視應用程式相依性,如下列應用程式追蹤對應所示:
使用下列命令來擷取應用程式即時檢視的網址:
export DEV_TOOL_URL=$(az spring dev-tool show \
    --service ${SPRING_APPS} \
    --query properties.url \
    --output tsv)
echo "https://${DEV_TOOL_URL}/app-live-view"
開啟 [應用程式實時檢視 URL] 來監視應用程式執行時間,如下列螢幕快照所示:
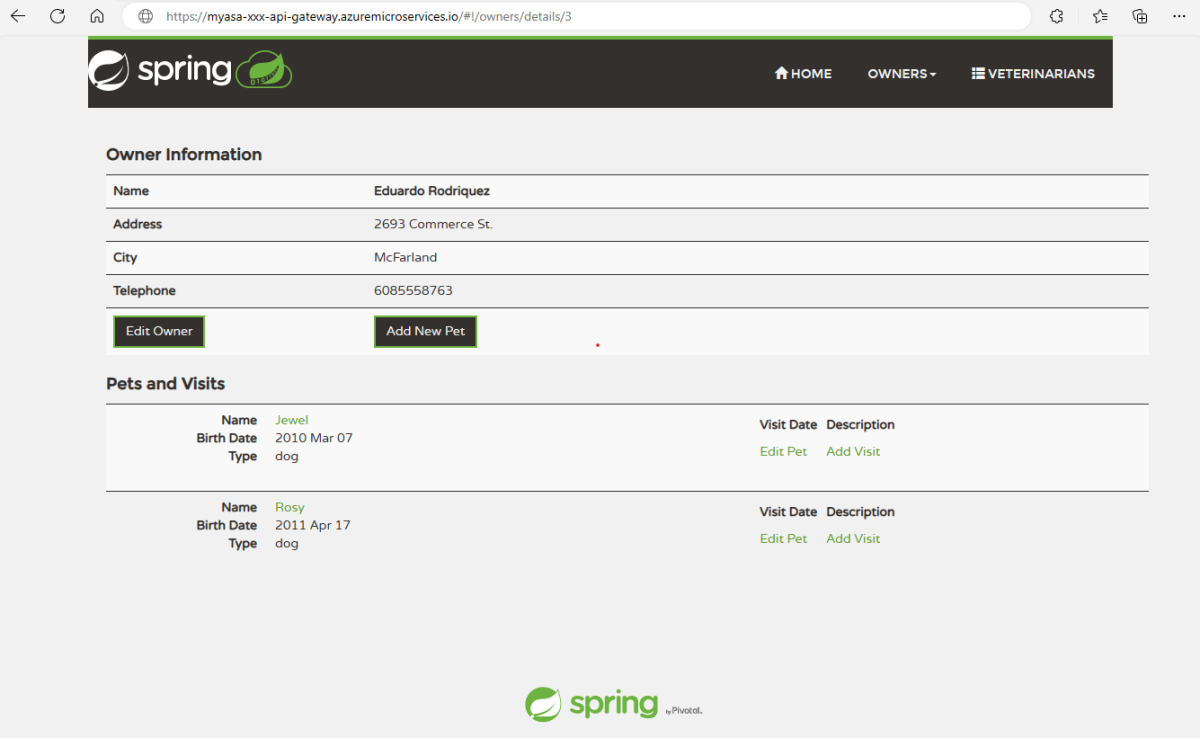
5.1. 存取應用程式
使用部署記錄輸出中的網址資訊,開啟名為 api-gateway 的應用程式公開的網址, https://<your-Azure-Spring-Apps-instance-name>-api-gateway.azuremicroservices.io例如 。 應用程式看起來應該類似下列螢幕快照:
5.2. 查詢應用程式記錄
瀏覽寵物診所的每個功能之後,Log Analytics 工作區會收集每個應用程式的記錄。 您可以使用自訂查詢來檢查記錄,如下列螢幕快照所示:
![Azure 入口網站 的螢幕快照,其中顯示 PetClinic 應用程式和結果上查詢的 [記錄] 頁面。](media/quickstart-deploy-microservice-apps/azure-spring-apps-log-query.png)
5.3. 監視應用程式
Application Insights 會監視應用程式相依性,如下列應用程式追蹤對應所示:
![Azure 入口網站 的螢幕快照,其中顯示Application Insights 實例的[應用程式對應] 頁面。](media/quickstart-deploy-microservice-apps/application-insights-map.png)
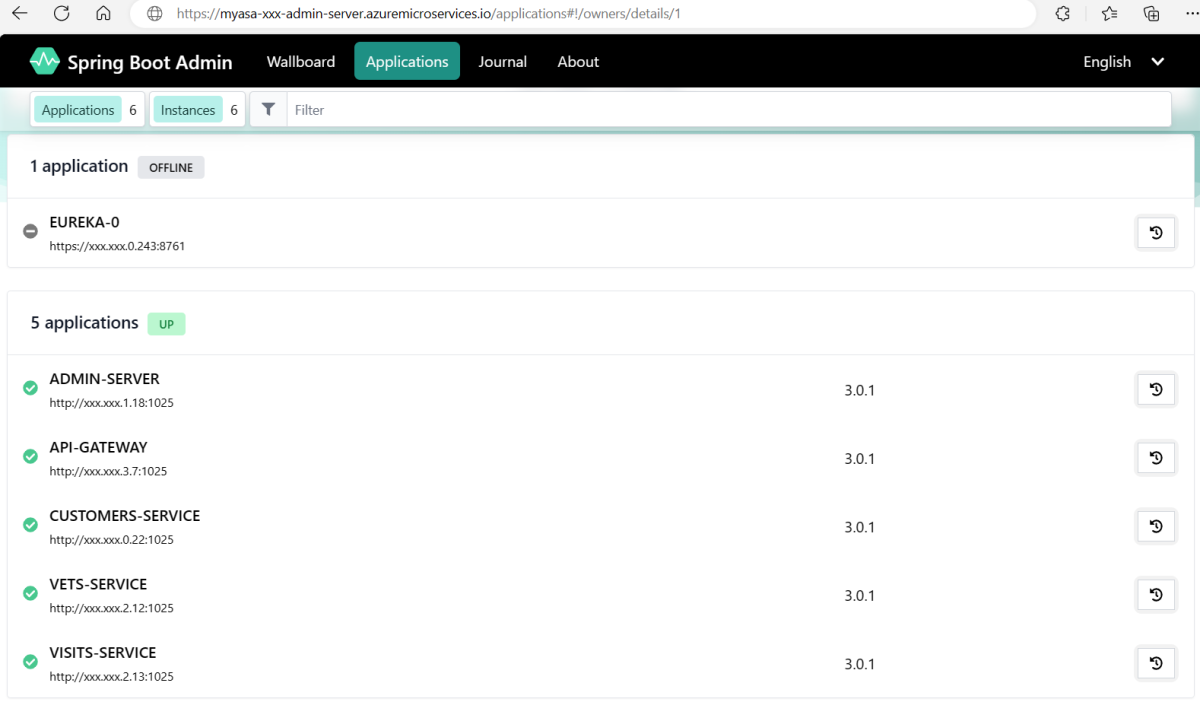
開啟應用程式 admin-server 公開的 URL,以透過 Spring Boot Admin Server 管理應用程式,如下列螢幕快照所示:
6.清除資源
如果您打算繼續進行後續的快速入門和教學課程,您可以讓這些資源留在原處。 當您不再需要資源時,可以清除不必要的資源,以避免 Azure 費用。
使用下列步驟來刪除整個資源群組,包括新建立的服務實例:
在 Azure 入口網站中找出您的資源群組。 在導覽功能表上,選取 [資源群組],然後選取資源群組的名稱。
在 [ 資源群組] 頁面上,選取 [ 刪除]。 在文字框中輸入資源群組的名稱以確認刪除,然後選取 [ 刪除]。
使用下列命令來移除此範例應用程式中使用的所有 Azure 資源:
azd down
下列清單描述命令互動:
-
要刪除的資源總數: <resources-total>,您確定要繼續嗎?:按 y。
主控台會輸出類似下列範例的訊息:
SUCCESS: Your application was removed from Azure in xx minutes xx seconds.
當您不再需要資源時,請務必刪除您在本文中建立的資源。 您可以刪除 Azure 資源群組,其中包括資源群組中的所有資源。
使用下列步驟來移除整個資源群組:
在 Azure 入口網站中找出您的資源群組。 在導覽功能表上,選取 [資源群組],然後選取資源群組的名稱。
在 [ 資源群組] 頁面上,選取 [ 刪除]。 在文字框中輸入資源群組的名稱以確認刪除,然後選取 [ 刪除]。
使用下列步驟來移除整個資源群組:
在 Azure 入口網站中找出您的資源群組。 在導覽功能表上,選取 [資源群組],然後選取資源群組的名稱。
在 [ 資源群組] 頁面上,選取 [ 刪除]。 在文字框中輸入資源群組的名稱以確認刪除,然後選取 [ 刪除]。
使用下列命令來移除資源群組:
az group delete --name ${RESOURCE_GROUP}
7. 後續步驟
如需詳細資訊,請參閱下列文章:


![顯示醒目提示 Azure Spring Apps 的 [建立資源] 頁面 Azure 入口網站 螢幕快照。](media/quickstart-deploy-microservice-apps/create-azure-spring-apps.png#lightbox)
![顯示 [建立 Azure Spring Apps] 頁面的 Azure 入口網站 螢幕快照,其中已選取 [基本] 索引標籤。](media/quickstart-deploy-microservice-apps/create-basics.png#lightbox)
![顯示 [建立 Azure Spring Apps] 頁面的 Azure 入口網站 螢幕快照,其中已選取 [診斷] 索引標籤,並醒目提示 [建立新] 按鈕。](media/quickstart-deploy-microservice-apps/diagnostic-settings.png#lightbox)
![顯示 [建立 Azure Spring Apps] 頁面的 Azure 入口網站 螢幕快照,其中顯示 [建立新的 Application Insights] 資源窗格。](media/quickstart-deploy-microservice-apps/application-insights-creation.png#lightbox)
![Azure 入口網站 的螢幕快照,其中顯示資源的部署,以及 [通知] 窗格與 [移至資源] 和 [釘選到儀錶板] 按鈕。](media/quickstart-deploy-microservice-apps/azure-spring-apps-notifications.png#lightbox)
![顯示 [設定伺服器] 頁面的 Azure 入口網站 螢幕快照,其中已醒目提示 [預設 URI] 和 [驗證] 按鈕。](media/quickstart-deploy-microservice-apps/validate-config-server.png#lightbox)
![顯示 [自定義部署] 頁面之 Azure 入口網站 的螢幕快照。](media/quickstart-deploy-microservice-apps/custom-deployment-microservice.png#lightbox)
![顯示 [概觀] 頁面並開啟 [自定義部署通知] 窗格之 Azure 入口網站 螢幕快照。](media/quickstart-deploy-microservice-apps/custom-deployment-notifications.png#lightbox)
![顯示 [建立應用程式] 頁面之 Azure 入口網站 的螢幕快照。](media/quickstart-deploy-microservice-apps/enterprise-app-creation.png#lightbox)
![顯示 [服務登錄] 頁面的 Azure 入口網站 螢幕快照,其中已選取 [應用程式系結] 索引標籤。](media/quickstart-deploy-microservice-apps/enterprise-bind-registry.png#lightbox)
![顯示 [應用程式組態服務設定] 索引標籤之 Azure 入口網站 的螢幕快照。](media/quickstart-deploy-microservice-apps/enterprise-validate-configuration-service.png#lightbox)
![顯示 [應用程式組態服務] 頁面的 Azure 入口網站 螢幕快照,其中已選取 [應用程式系結] 索引標籤。](media/quickstart-deploy-microservice-apps/enterprise-bind-configuration.png#lightbox)
![顯示 [部署輸出] 頁面之 Azure 入口網站 的螢幕快照。](media/quickstart-deploy-microservice-apps/deployment-output-enterprise-plan.png#lightbox)

![Azure 入口網站的螢幕快照,其中顯示 PetClinic 應用程式查詢的 [記錄] 頁面,以及企業方案的結果。](media/quickstart-deploy-microservice-apps/azure-spring-apps-log-query-enterprise.png#lightbox)
![Azure 入口網站 的螢幕快照,其中顯示 Azure Spring Apps 企業版方案的 [應用程式對應] 頁面。](media/quickstart-deploy-microservice-apps/enterprise-application-insights-map.png#lightbox)


![Azure 入口網站 的螢幕快照,其中顯示 PetClinic 應用程式和結果上查詢的 [記錄] 頁面。](media/quickstart-deploy-microservice-apps/azure-spring-apps-log-query.png#lightbox)
![Azure 入口網站 的螢幕快照,其中顯示Application Insights 實例的[應用程式對應] 頁面。](media/quickstart-deploy-microservice-apps/application-insights-map.png#lightbox)
