教學課程:將記憶體和成本降至最低(Azure AI 搜尋中的RAG)
Azure AI 搜尋提供數種方法來減少向量索引的大小。 這些方法的範圍從向量壓縮,到比您在搜尋服務上儲存的內容更具選擇性。
在本教學課程中,您會修改現有的搜尋索引以使用:
- 精簡資料類型
- 純量量化
- 退出退出搜尋結果中的向量來減少儲存空間
本教學課程會報復索引管線所建立的搜尋索引。 所有這些更新都會影響現有的內容,要求您重新執行索引器。 不過,您不需要刪除搜尋索引,而是建立第二個索引,以便在新增新功能之後比較向量索引大小的縮減。
本教學課程中說明的技術可減少約一半的向量儲存。
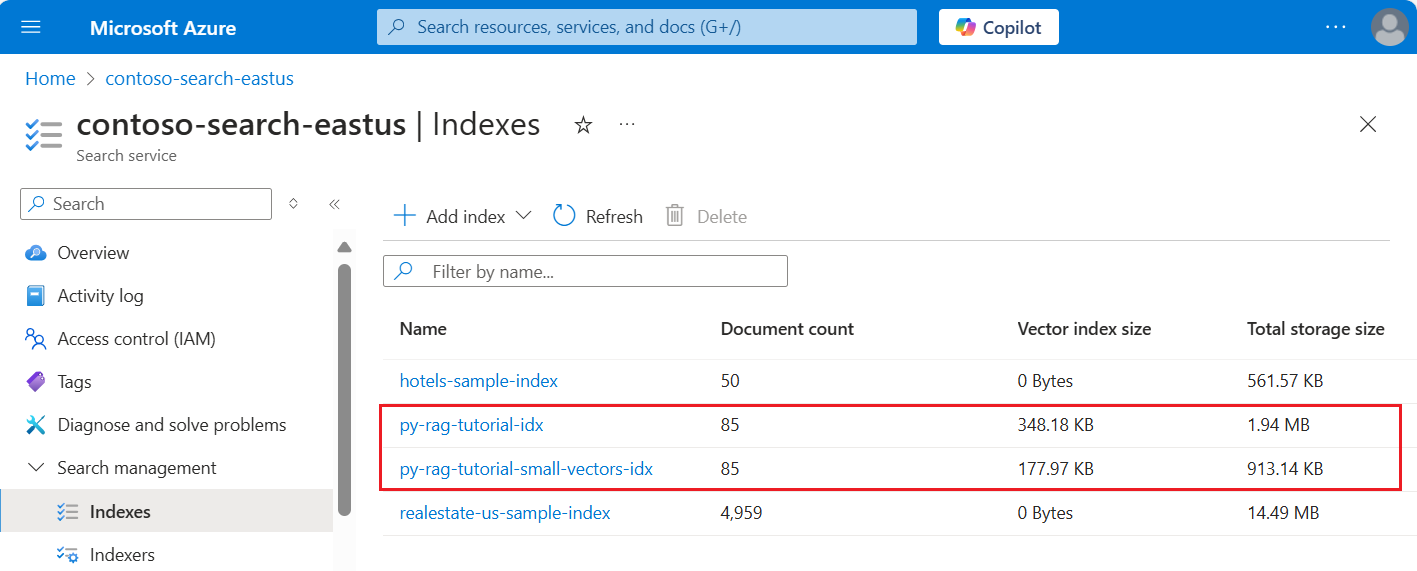
下列螢幕快照會將 上一個教學課程中的第一個索引 與此教學課程中內建的索引進行比較。
必要條件
本教學課程基本上是重新執行 索引管線。 您需要該教學課程中所述的所有 Azure 資源和許可權。
為了進行比較,您應該在 Azure AI 搜尋服務 上擁有現有的 py-rag-tutorial-idx 索引。 其大小應接近 2 MB,向量索引部分應為 348 KB。
您也應該有下列物件:
py-rag-tutorial-ds (數據源)
py-rag-tutorial-ss (技能集)
下載範例
從 GitHub 下載 Jupyter Notebook,以將要求傳送至 Azure AI 搜尋服務。 如需相關資訊,請參閱從 GitHub 下載檔案。
更新已減少記憶體的索引
Azure AI 搜尋有多個方法來減少向量大小,進而降低向量工作負載的成本。 在此步驟中,建立使用下列功能的新索引:
向量壓縮。 純量量化提供這項功能。
排除選擇性記憶體。 如果您只需要查詢的向量,而不是在響應承載中,您可以卸載用於搜尋結果的向量複本。
縮小數據類型。 您可以在 [text_vector] 字段上指定
Collection(Edm.Half),將傳入 float32 維度儲存為 float16,這會佔用索引中較少的空間。
所有這些功能都會在搜尋索引中指定。 載入索引之後,請比較原始索引與新索引之間的差異。
將新索引
py-rag-tutorial-small-vectors-idx命名為 。針對新的索引使用下列定義。 此架構與最大化相關性中先前的架構更新之間的差異,是純量量化的新類別和新的壓縮區段、text_vector 欄位的新數據類型 (
Collection(Edm.Half)),以及設定為 false 的新屬性stored。from azure.identity import DefaultAzureCredential from azure.identity import get_bearer_token_provider from azure.search.documents.indexes import SearchIndexClient from azure.search.documents.indexes.models import ( SearchField, SearchFieldDataType, VectorSearch, HnswAlgorithmConfiguration, VectorSearchProfile, AzureOpenAIVectorizer, AzureOpenAIVectorizerParameters, ScalarQuantizationCompression, ScalarQuantizationParameters, SearchIndex, SemanticConfiguration, SemanticPrioritizedFields, SemanticField, SemanticSearch, ScoringProfile, TagScoringFunction, TagScoringParameters ) credential = DefaultAzureCredential() index_name = "py-rag-tutorial-small-vectors-idx" index_client = SearchIndexClient(endpoint=AZURE_SEARCH_SERVICE, credential=credential) fields = [ SearchField(name="parent_id", type=SearchFieldDataType.String), SearchField(name="title", type=SearchFieldDataType.String), SearchField(name="locations", type=SearchFieldDataType.Collection(SearchFieldDataType.String), filterable=True), SearchField(name="chunk_id", type=SearchFieldDataType.String, key=True, sortable=True, filterable=True, facetable=True, analyzer_name="keyword"), SearchField(name="chunk", type=SearchFieldDataType.String, sortable=False, filterable=False, facetable=False), SearchField(name="text_vector", type="Collection(Edm.Half)", vector_search_dimensions=1024, vector_search_profile_name="myHnswProfile", stored= False) ] # Configure the vector search configuration vector_search = VectorSearch( algorithms=[ HnswAlgorithmConfiguration(name="myHnsw"), ], profiles=[ VectorSearchProfile( name="myHnswProfile", algorithm_configuration_name="myHnsw", compression_name="myScalarQuantization", vectorizer_name="myOpenAI", ) ], vectorizers=[ AzureOpenAIVectorizer( vectorizer_name="myOpenAI", kind="azureOpenAI", parameters=AzureOpenAIVectorizerParameters( resource_url=AZURE_OPENAI_ACCOUNT, deployment_name="text-embedding-3-large", model_name="text-embedding-3-large" ), ), ], compressions=[ ScalarQuantizationCompression( compression_name="myScalarQuantization", rerank_with_original_vectors=True, default_oversampling=10, parameters=ScalarQuantizationParameters(quantized_data_type="int8"), ) ] ) semantic_config = SemanticConfiguration( name="my-semantic-config", prioritized_fields=SemanticPrioritizedFields( title_field=SemanticField(field_name="title"), keywords_fields=[SemanticField(field_name="locations")], content_fields=[SemanticField(field_name="chunk")] ) ) semantic_search = SemanticSearch(configurations=[semantic_config]) scoring_profiles = [ ScoringProfile( name="my-scoring-profile", functions=[ TagScoringFunction( field_name="locations", boost=5.0, parameters=TagScoringParameters( tags_parameter="tags", ), ) ] ) ] index = SearchIndex(name=index_name, fields=fields, vector_search=vector_search, semantic_search=semantic_search, scoring_profiles=scoring_profiles) result = index_client.create_or_update_index(index) print(f"{result.name} created")
建立或重複使用數據源
以下是上一個教學課程中數據源的定義。 如果您已在搜尋服務上擁有此數據源,您可以略過建立新的數據源。
from azure.search.documents.indexes import SearchIndexerClient
from azure.search.documents.indexes.models import (
    SearchIndexerDataContainer,
    SearchIndexerDataSourceConnection
)

# Create a data source
indexer_client = SearchIndexerClient(endpoint=AZURE_SEARCH_SERVICE, credential=credential)
container = SearchIndexerDataContainer(name="nasa-ebooks-pdfs-all")
data_source_connection = SearchIndexerDataSourceConnection(
    name="py-rag-tutorial-ds",
    type="azureblob",
    connection_string=AZURE_STORAGE_CONNECTION,
    container=container
)
data_source = indexer_client.create_or_update_data_source_connection(data_source_connection)

print(f"Data source '{data_source.name}' created or updated")
建立或重複使用技能集
技能集與上一個教學課程相同。 在這裡,您可以再次檢閱它。
from azure.search.documents.indexes.models import (
    SplitSkill,
    InputFieldMappingEntry,
    OutputFieldMappingEntry,
    AzureOpenAIEmbeddingSkill,
    EntityRecognitionSkill,
    SearchIndexerIndexProjection,
    SearchIndexerIndexProjectionSelector,
    SearchIndexerIndexProjectionsParameters,
    IndexProjectionMode,
    SearchIndexerSkillset,
    CognitiveServicesAccountKey
)

# Create a skillset
skillset_name = "py-rag-tutorial-ss"

split_skill = SplitSkill(
    description="Split skill to chunk documents",
    text_split_mode="pages",
    context="/document",
    maximum_page_length=2000,
    page_overlap_length=500,
    inputs=[
        InputFieldMappingEntry(name="text", source="/document/content"),
    ],
    outputs=[
        OutputFieldMappingEntry(name="textItems", target_name="pages")
    ],
)

embedding_skill = AzureOpenAIEmbeddingSkill(
    description="Skill to generate embeddings via Azure OpenAI",
    context="/document/pages/*",
    resource_url=AZURE_OPENAI_ACCOUNT,
    deployment_name="text-embedding-3-large",
    model_name="text-embedding-3-large",
    dimensions=1536,
    inputs=[
        InputFieldMappingEntry(name="text", source="/document/pages/*"),
    ],
    outputs=[
        OutputFieldMappingEntry(name="embedding", target_name="text_vector")
    ],
)

entity_skill = EntityRecognitionSkill(
    description="Skill to recognize entities in text",
    context="/document/pages/*",
    categories=["Location"],
    default_language_code="en",
    inputs=[
        InputFieldMappingEntry(name="text", source="/document/pages/*")
    ],
    outputs=[
        OutputFieldMappingEntry(name="locations", target_name="locations")
    ]
)

index_projections = SearchIndexerIndexProjection(
    selectors=[
        SearchIndexerIndexProjectionSelector(
            target_index_name=index_name,
            parent_key_field_name="parent_id",
            source_context="/document/pages/*",
            mappings=[
                InputFieldMappingEntry(name="chunk", source="/document/pages/*"),
                InputFieldMappingEntry(name="text_vector", source="/document/pages/*/text_vector"),
                InputFieldMappingEntry(name="locations", source="/document/pages/*/locations"),
                InputFieldMappingEntry(name="title", source="/document/metadata_storage_name"),
            ],
        ),
    ],
    parameters=SearchIndexerIndexProjectionsParameters(
        projection_mode=IndexProjectionMode.SKIP_INDEXING_PARENT_DOCUMENTS
    ),
)

cognitive_services_account = CognitiveServicesAccountKey(key=AZURE_AI_MULTISERVICE_KEY)

skills = [split_skill, embedding_skill, entity_skill]

skillset = SearchIndexerSkillset(
    name=skillset_name,
    description="Skillset to chunk documents and generating embeddings",
    skills=skills,
    index_projection=index_projections,
    cognitive_services_account=cognitive_services_account
)

client = SearchIndexerClient(endpoint=AZURE_SEARCH_SERVICE, credential=credential)
client.create_or_update_skillset(skillset)
print(f"{skillset.name} created")
建立新的索引器並載入索引
雖然您可以使用新的索引來重設並重新執行現有的索引器,但建立新的索引器也一樣容易。 有兩個索引和索引器會保留執行歷程記錄,並允許更緊密的比較。
這個索引器與先前的索引器相同,不同之處在於它會指定本教學課程中的新索引。
from azure.search.documents.indexes.models import (
    SearchIndexer
)

# Create an indexer
indexer_name = "py-rag-tutorial-small-vectors-idxr"

indexer_parameters = None

indexer = SearchIndexer(
    name=indexer_name,
    description="Indexer to index documents and generate embeddings",
    target_index_name="py-rag-tutorial-small-vectors-idx",
    skillset_name="py-rag-tutorial-ss",
    data_source_name="py-rag-tutorial-ds",
    parameters=indexer_parameters
)

# Create and run the indexer
indexer_client = SearchIndexerClient(endpoint=AZURE_SEARCH_SERVICE, credential=credential)
indexer_result = indexer_client.create_or_update_indexer(indexer)

print(f' {indexer_name} is created and running. Give the indexer a few minutes before running a query.')
最後一個步驟是切換至 Azure 入口網站,以比較兩個索引的向量儲存需求。 您應該會產生類似下列螢幕快照的結果。
本教學課程中建立的索引會針對文字向量使用半精確度浮點數 (float16)。 相較於使用單精度浮點數的先前索引,這會將向量儲存需求減少一半(float32)。 純量壓縮和遺漏一組向量,可節省剩餘的記憶體費用。 如需減少向量大小的詳細資訊,請參閱 選擇優化向量儲存和處理的方法。
請考慮重新流覽 上一個教學課程 中的查詢,以便比較查詢速度和公用程式。 每當重複查詢時,您應該預期 LLM 輸出會有一些變化,但一般而言,您實作的儲存技術不應該降低搜尋結果的品質。
後續步驟
所有 Azure SDK 都有程式碼範例,可提供 Azure AI 搜尋程式性。 您也可以檢閱向量範例程序代碼,以取得特定使用案例和技術組合。
