快速入門:使用ARM範本指派 Azure 角色
Azure 角色型存取控制 (Azure RBAC) 是您可用來管理 Azure 資源存取權的方法。 在本快速入門中,您會建立資源群組,並授與使用者建立和管理資源群組中虛擬機的存取權。 本快速入門使用 Azure Resource Manager 範本 (ARM 範本) 來授與存取權。
Azure Resource Manager 範本是一個 JavaScript 物件標記法 (JSON) 檔案,會定義專案的基礎結構和設定。 範本使用宣告式語法。 您可以描述預期的部署,而不需要撰寫程式設計命令順序來建立部署。
如果您的環境符合必要條件,而且您很熟悉 ARM 範本,請選取 [部署至 Azure] 按鈕。 範本會在 Azure 入口網站中開啟。
必要條件
若要指派 Azure 角色並移除角色指派,您必須具備:
- 如尚未擁有 Azure 訂用帳戶,請在開始之前先建立免費帳戶。
Microsoft.Authorization/roleAssignments/write和Microsoft.Authorization/roleAssignments/delete許可權,例如角色型 存取控制 系統管理員- 若要指派角色,您必須指定三個元素:安全性主體、角色定義和範圍。 在本快速入門中,安全性主體是您或目錄中的另一位使用者,角色定義是 虛擬機參與者,而範圍是您指定的資源群組。
檢閱範本
本快速入門中使用的範本是來自 Azure 快速入門範本。 範本有兩個參數和資源區段。 在 [資源] 區段中,請注意其具有角色指派的三個元素:安全性主體、角色定義和範圍。
{
  "$schema": "https://schema.management.azure.com/schemas/2019-04-01/deploymentTemplate.json#",
  "contentVersion": "1.0.0.0",
  "metadata": {
    "_generator": {
      "name": "bicep",
      "version": "0.25.53.49325",
      "templateHash": "15160858749942476090"
    }
  },
  "parameters": {
    "roleDefinitionID": {
      "type": "string",
      "metadata": {
        "description": "Specifies the role definition ID used in the role assignment."
      }
    },
    "principalId": {
      "type": "string",
      "metadata": {
        "description": "Specifies the principal ID assigned to the role."
      }
    }
  },
  "variables": {
    "roleAssignmentName": "[guid(parameters('principalId'), parameters('roleDefinitionID'), resourceGroup().id)]"
  },
  "resources": [
    {
      "type": "Microsoft.Authorization/roleAssignments",
      "apiVersion": "2022-04-01",
      "name": "[variables('roleAssignmentName')]",
      "properties": {
        "roleDefinitionId": "[resourceId('Microsoft.Authorization/roleDefinitions', parameters('roleDefinitionID'))]",
        "principalId": "[parameters('principalId')]"
      }
    }
  ],
  "outputs": {
    "name": {
      "type": "string",
      "value": "[variables('roleAssignmentName')]"
    },
    "resourceGroupName": {
      "type": "string",
      "value": "[resourceGroup().name]"
    },
    "resourceId": {
      "type": "string",
      "value": "[resourceId('Microsoft.Authorization/roleAssignments', variables('roleAssignmentName'))]"
    }
  }
}
範本中定義的資源為:
部署範本
登入 Azure 入口網站。
判斷與 Azure 訂用帳戶相關聯的電子郵件位址。 或決定目錄中其他使用者的電子郵件位址。
開啟適用於 PowerShell 的 Azure Cloud Shell。
將下列腳本複製並貼到 Cloud Shell 中。
$resourceGroupName = Read-Host -Prompt "Enter a resource group name (i.e. ExampleGrouprg)"
$emailAddress = Read-Host -Prompt "Enter an email address for a user in your directory"
$location = Read-Host -Prompt "Enter a location (i.e. centralus)"

$roleAssignmentName = New-Guid
$principalId = (Get-AzAdUser -Mail $emailAddress).id
$roleDefinitionId = (Get-AzRoleDefinition -name "Virtual Machine Contributor").id
$templateUri = "https://raw.githubusercontent.com/Azure/azure-quickstart-templates/master/quickstarts/microsoft.authorization/rbac-builtinrole-resourcegroup/azuredeploy.json"

New-AzResourceGroup -Name $resourceGroupName -Location $location
New-AzResourceGroupDeployment -ResourceGroupName $resourceGroupName -TemplateUri $templateUri -roleDefinitionID $roleDefinitionId -principalId $principalId
輸入資源組名,例如 ExampleGrouprg。
在目錄中輸入您自己或其他使用者的電子郵件位址。
輸入資源群組的位置,例如centralus。
如有必要,請按 Enter 以執行 New-AzResourceGroupDeployment 命令。
New-AzResourceGroup 命令會建立新的資源群組,而 New-AzResourceGroupDeployment 命令會部署範本以新增角色指派。
您應該會看到如下輸出:
PS> New-AzResourceGroupDeployment -ResourceGroupName $resourceGroupName -TemplateUri $templateUri -roleAssignmentName $roleAssignmentName -roleDefinitionID $roleDefinitionId -principalId $principalId

DeploymentName          : azuredeploy
ResourceGroupName       : ExampleGrouprg
ProvisioningState       : Succeeded
Timestamp               : 5/22/2020 9:01:30 PM
Mode                    : Incremental
TemplateLink            :
                          Uri            : https://raw.githubusercontent.com/Azure/azure-quickstart-templates/master/quickstarts/microsoft.authorization/rbac-builtinrole-resourcegroup/azuredeploy.json
                          ContentVersion : 1.0.0.0

Parameters              :
                          Name                  Type                       Value
                          ====================  =========================  ==========
                          roleDefinitionID      String                     9980e02c-c2be-4d73-94e8-173b1dc7cf3c
                          principalId           String                     {principalId}

Outputs                 :
DeploymentDebugLogLevel :
檢閱已部署的資源
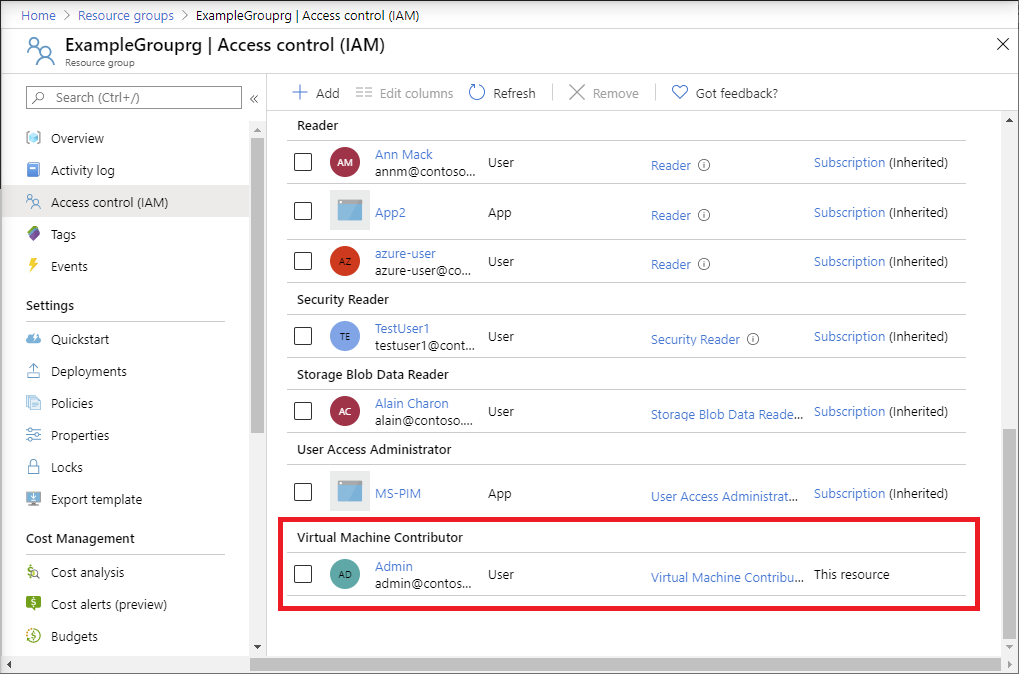
在 Azure 入口網站 中,開啟您建立的資源群組。
在左側功能表中,按兩下 [存取控制] [IAM]。
按一下 [角色指派] 索引標籤。
確認 虛擬機參與者 角色已指派給您指定的使用者。

清除資源
若要移除您所建立的角色指派和資源群組,請遵循下列步驟。
將下列腳本複製並貼到 Cloud Shell 中。
$emailAddress = Read-Host -Prompt "Enter the email address of the user with the role assignment to remove"
$resourceGroupName = Read-Host -Prompt "Enter the resource group name to remove (i.e. ExampleGrouprg)"

$principalId = (Get-AzAdUser -Mail $emailAddress).id

Remove-AzRoleAssignment -ObjectId $principalId -RoleDefinitionName "Virtual Machine Contributor" -ResourceGroupName $resourceGroupName
Remove-AzResourceGroup -Name $resourceGroupName
輸入要移除之角色指派的用戶電子郵件位址。
輸入要移除的資源組名,例如 ExampleGrouprg。
如有必要,請按 Enter 以執行 Remove-AzResourceGroup 命令。
輸入 Y 以確認您想要移除資源群組。
