教學課程 1:使用受管理的功能存放區開發及註冊功能集
本教學課程系列會示範功能如何順暢地整合機器學習生命週期的所有階段:原型設計、定型和運算化。
您可以使用 Azure Machine Learning 受管理的功能存放區來進行功能的探索、建立及運算化。 機器學習生命週期包含原型設計階段,在這個階段,您可以實驗各種功能。 機器學習生命週期也牽涉到運算化階段,在這個階段,模型會完成部署,推斷步驟則會查閱功能資料。 功能可作為機器學習生命週期中的結締組織。 若要深入瞭解 受管理的功能存放區 的基本概念,請瀏覽什麼是 受管理的功能存放區?和瞭解 受管理的功能存放區 資源中的最上層實體。
本教學課程說明如何使用自訂轉換來建立功能集規格。 然後,使用該功能集來產生定型資料、啟用具體化,以及執行回填。 具體化會計算功能時段的功能值,然後將這些值儲存在具體化存放區中。 接著,所有功能查詢都可以使用具體化存放區中的這些值。
沒有具體化時,功能集查詢會即時將轉換套用至來源,先計算功能再傳回值。 此程序適用於原型設計階段。 不過,對於生產環境中的定型和推斷作業,建議您將功能具體化,以提升可靠性和可用性。
本教學課程是受管理的功能存放區教學課程系列的第一個部分。 在這裡,您會了解如何:
- 建立新的最小功能存放區資源。
- 開發和本機測試具有功能轉換能力的功能集。
- 使用功能存放區註冊功能存放區實體。
- 使用功能存放區註冊您開發的功能集。
- 使用您建立的功能產生範例定型 DataFrame。
- 在功能集上啟用離線具體化,並回填功能資料。
本教學課程系列有兩個思路:
- 僅 SDK 的思路只會使用 Python SDK。 若為純 Python 型的開發和部署,請選擇此思路。
- SDK 和 CLI 思路只會使用 Python SDK 來進行功能集的開發和測試,並使用 CLI 來進行 CRUD (建立、讀取、更新和刪除) 作業。 此思路適用於持續整合與持續傳遞 (CI/CD) 或 GitOps 案例,因為這些案例偏好使用 CLI/YAML。
必要條件
在繼續進行本教學課程之前,請務必滿足下列必要條件:
Azure Machine Learning 工作區。 如需建立工作區的詳細資訊,請流覽 快速入門:建立工作區資源。
在您的使用者帳戶上,您需要建立功能存放區之資源群組的擁有者角色。
如果您選擇使用新的資源群組來進行本教學課程,則可以藉由刪除資源群組輕鬆地刪除所有資源。
準備筆記本環境
本教學課程使用 Azure Machine Learning Spark 筆記本來進行開發。
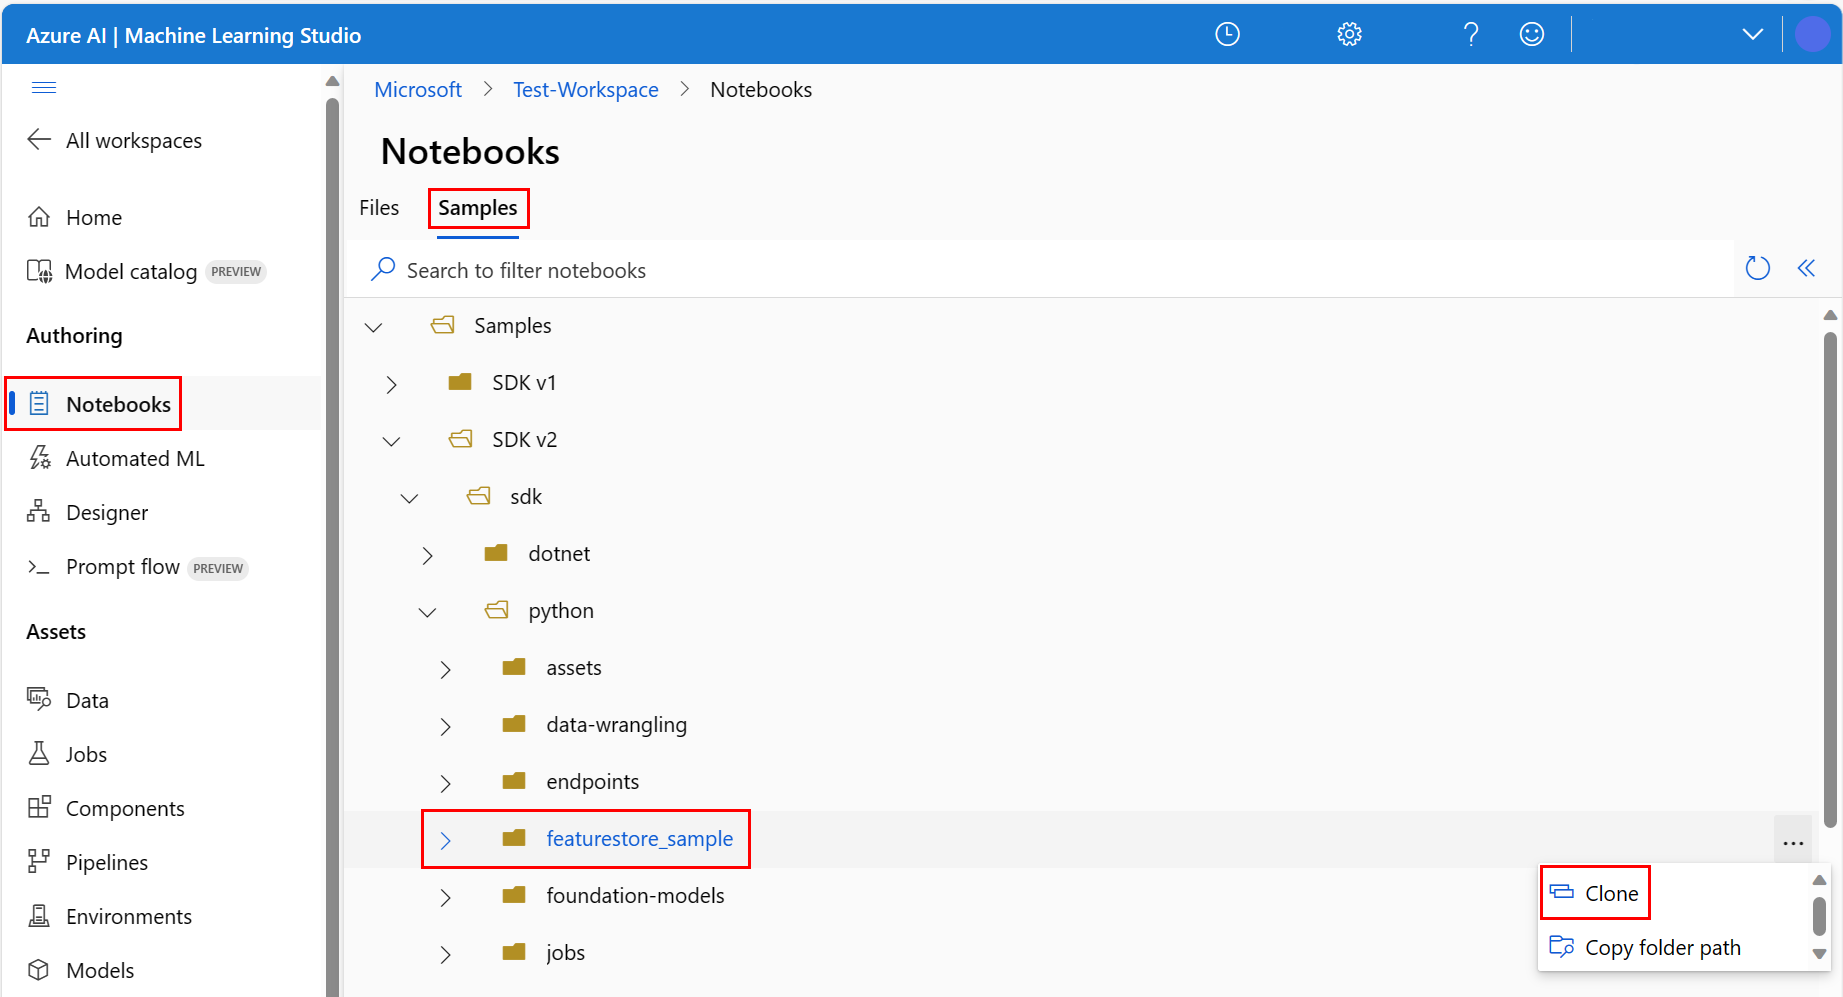
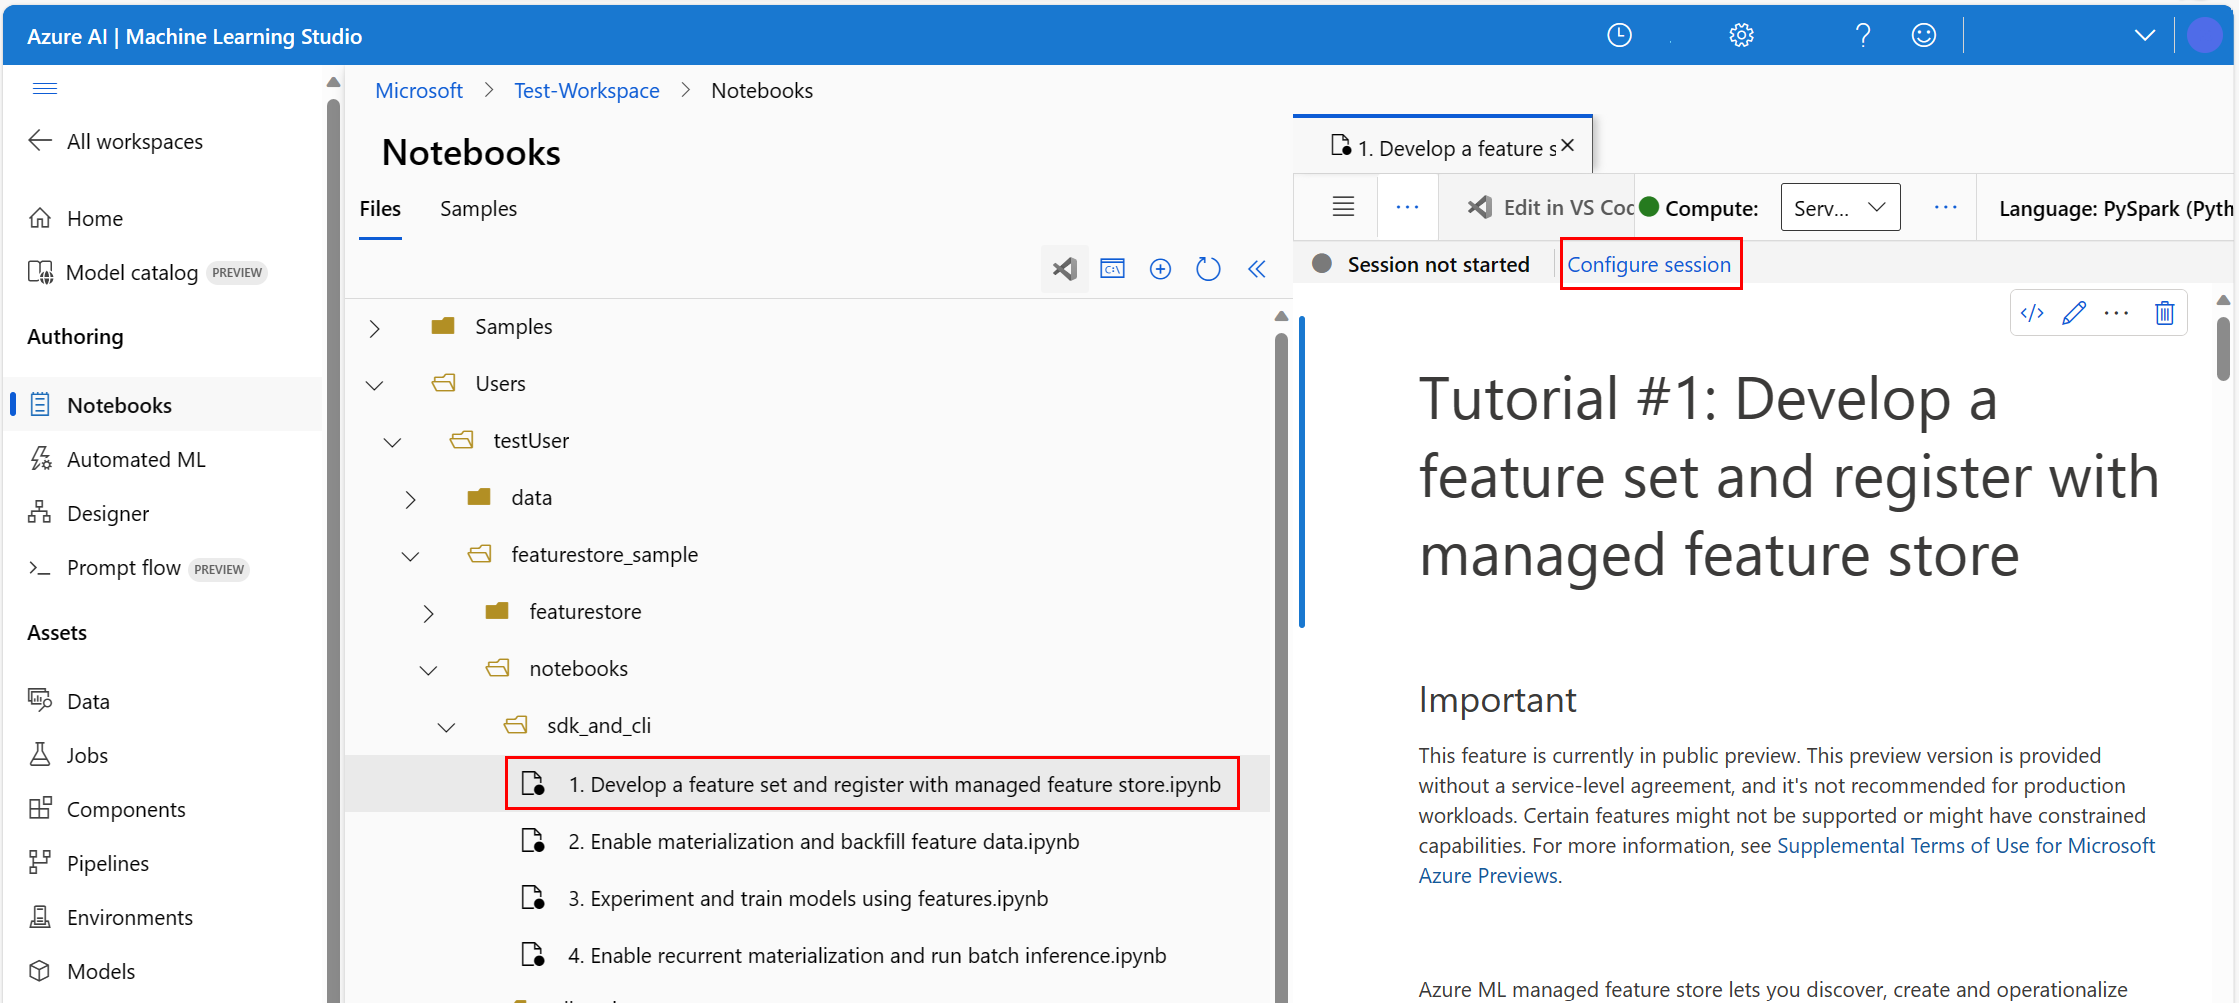
在 Azure Machine Learning 工作室環境中,選取左窗格上的 [筆記本],然後選取 [範例] 索引標籤。
瀏覽至 [featurestore_sample] 目錄 (選取 [範例]>[SDK v2]>[sdk]>[python]>[featurestore_sample]),然後選取 [複製]。
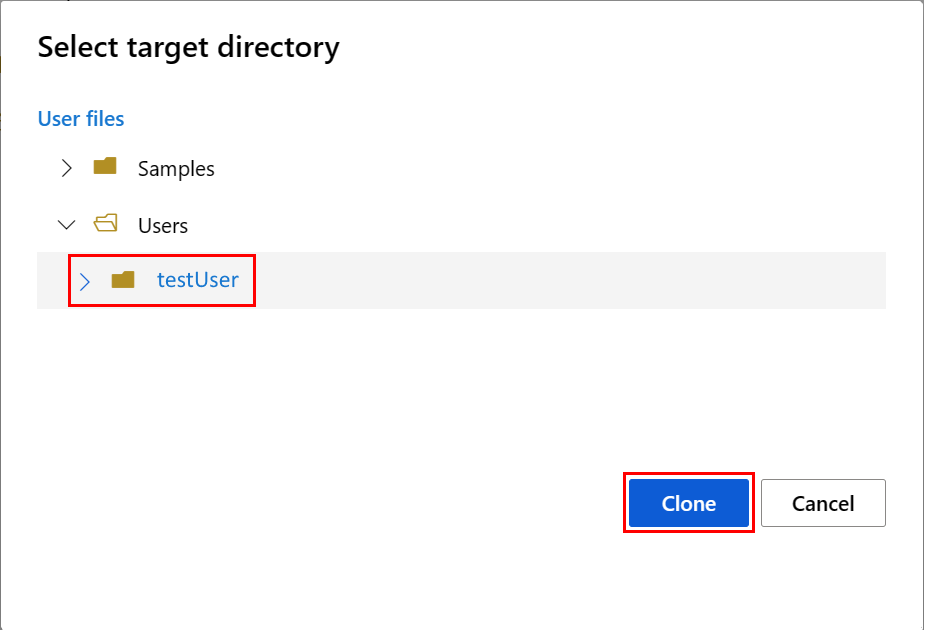
[選取目標目錄] 面板隨即開啟。 選取 [使用者] 目錄,然後選取「您的使用者名稱」,最後選取 [複製]。
若要設定筆記本環境,您必須上傳「conda.yml」檔案:
- 選取左窗格上的 [筆記本],然後選取 [檔案] 索引標籤。
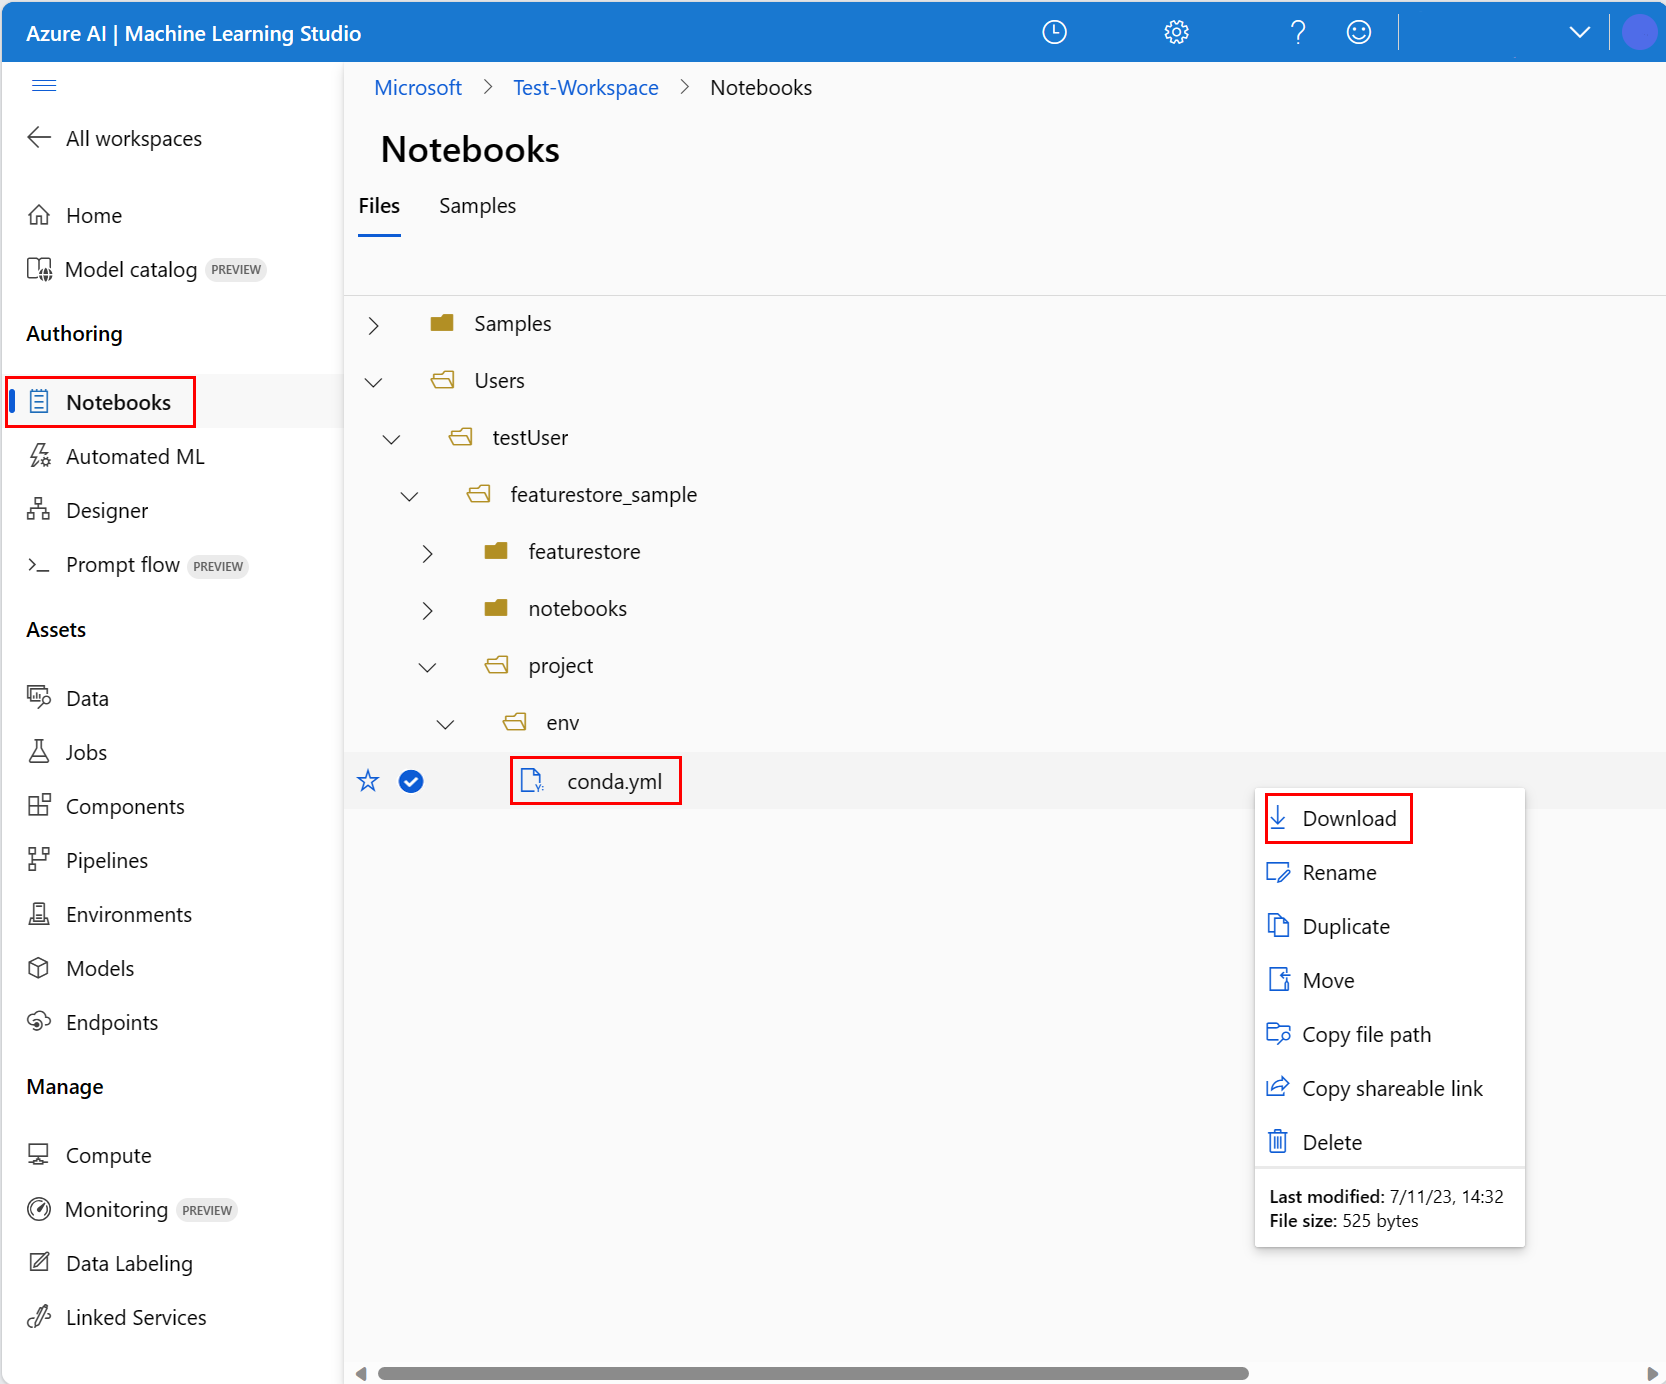
- 瀏覽至 [env] 目錄 (選取 [使用者]>[your_user_name]>[featurestore_sample]>[專案]>[env]),然後選取 [conda.yml] 檔案。
- 選取 [下載]。
- 在頂端導覽 [計算] 下拉式清單中選取 [無伺服器 Spark 計算]。 這項作業可能需要一到兩分鐘的時間。 等候頂端的狀態列顯示 [設定工作階段]。
- 選取頂端狀態列中的 [設定工作階段]。
- 選取 [Python 套件]。
- 選取 [上傳 conda 檔案]。
- 選取您下載至本機裝置的
conda.yml檔案。 - (選擇性) 增加工作階段逾時 (以分鐘為單位的閒置時間),以減少無伺服器 Spark 叢集的啟動時間。
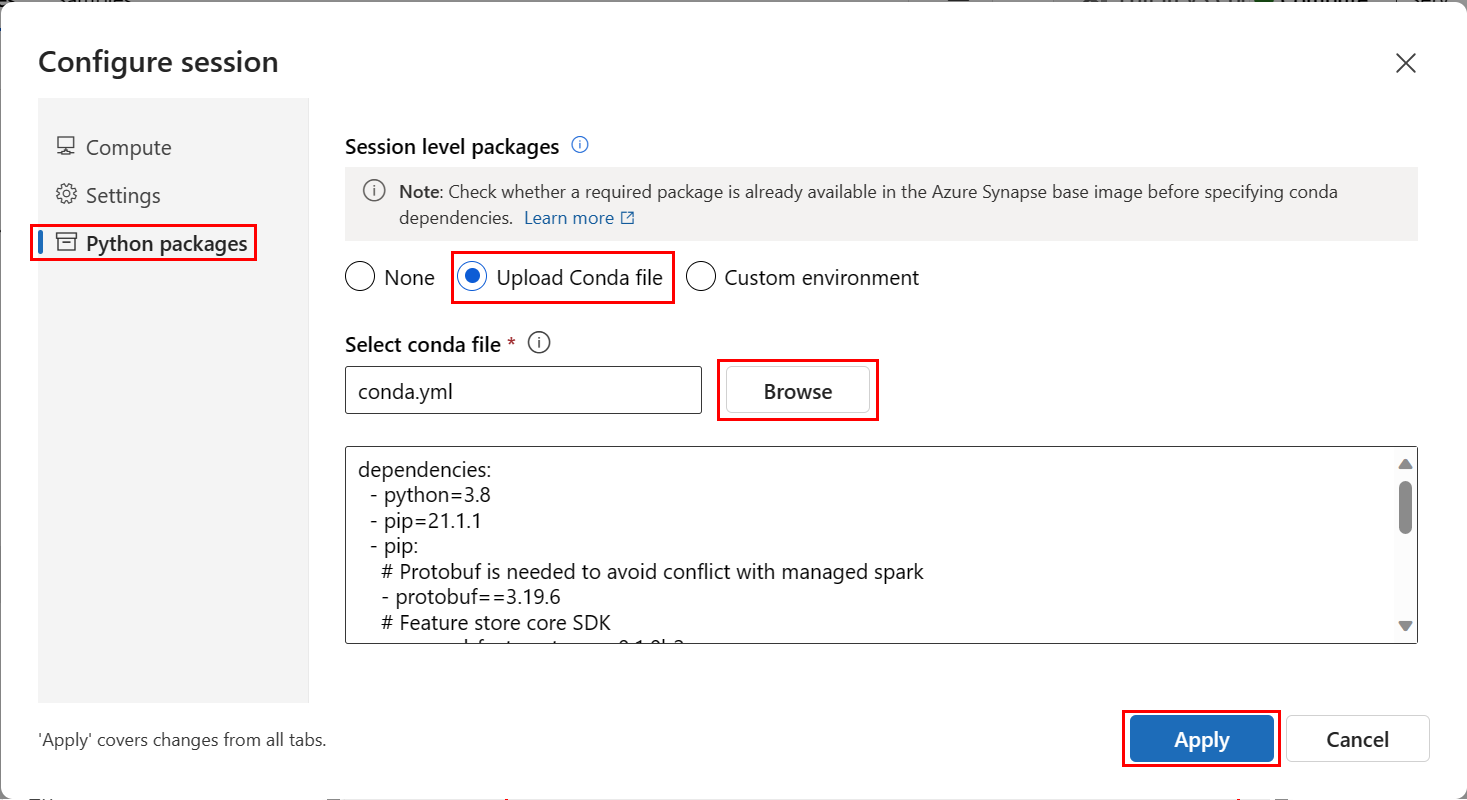
在 Azure Machine Learning 環境中,開啟筆記本,然後選取 [設定工作階段]。
在 [設定工作階段] 面板上,選取 [Python 套件]。
上傳 Conda 檔案:
- 在 [Python 套件] 索引標籤上,選取 [上傳 Conda 檔案]。
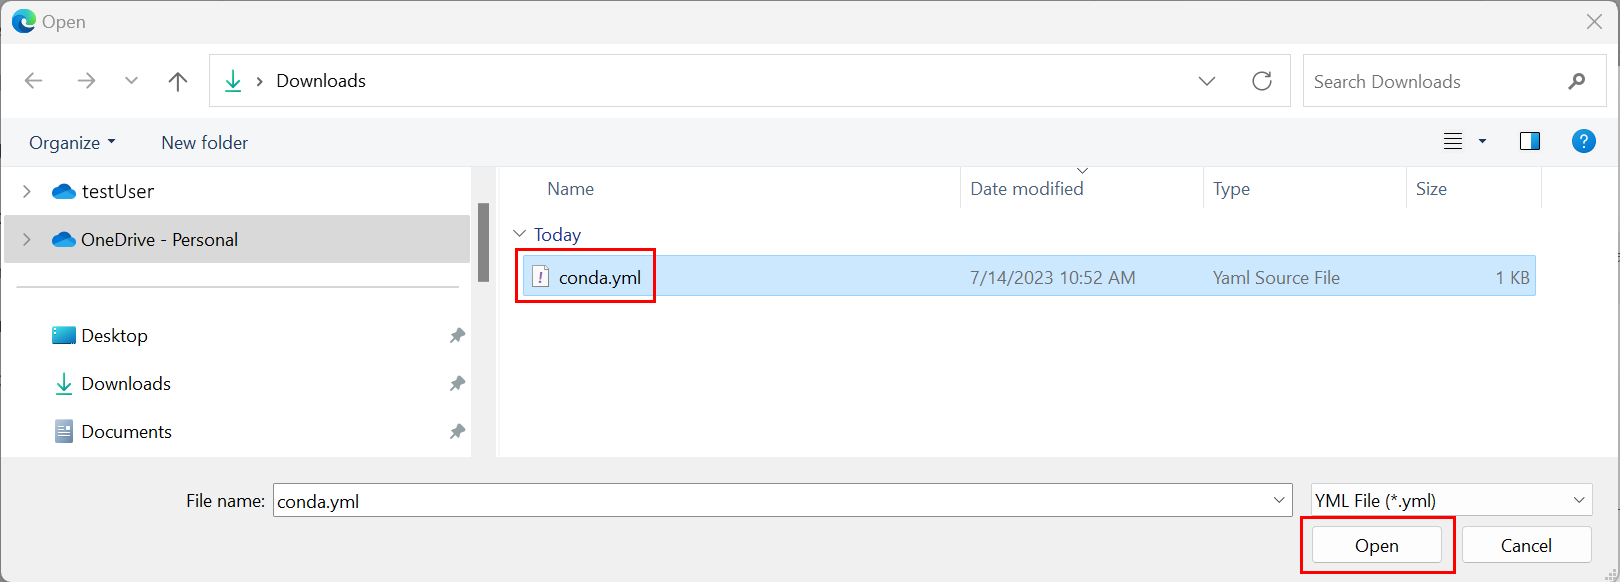
- 瀏覽至裝載了 Conda 檔案的目錄。
- 選取 [conda.yml],然後選取 [開啟]。
選取套用。
啟動 Spark 工作階段
# Run this cell to start the spark session (any code block will start the session ). This can take around 10 mins.
print("start spark session")
設定範例的根目錄
import os

# Please update <your_user_alias> below (or any custom directory you uploaded the samples to).
# You can find the name from the directory structure in the left navigation panel.
root_dir = "./Users/<your_user_alias>/featurestore_sample"

if os.path.isdir(root_dir):
    print("The folder exists.")
else:
    print("The folder does not exist. Please create or fix the path")
設定 CLI
不適用。
注意
請使用功能存放區來跨專案重複使用功能。 請使用專案工作區 (Azure Machine Learning 工作區),利用功能存放區的功能來定型推斷模型。 許多專案工作區可以共用並重複使用相同的功能存放區。
本教學課程使用兩個 SDK:
功能存放區 CRUD SDK
您可以使用與 Azure Machine Learning 工作區搭配使用的相同
MLClient(套件名稱azure-ai-ml) SDK。 功能存放區會實作為某個工作區類型。 因此,此 SDK 會用於功能存放區、功能集和功能存放區實體的 CRUD 作業。功能存放區核心 SDK
此 SDK (
azureml-featurestore) 適用於功能集的開發和取用。 本教學課程稍後的步驟會說明這些作業:- 開發功能集規格。
- 擷取功能資料。
- 列出或取得已註冊的功能集。
- 產生並解析功能擷取規格。
- 使用時間點聯結產生定型和推斷資料。
本教學課程不需要明確安裝這些 SDK,因為先前的「conda.yml」指示會涵蓋此步驟。
建立最小功能存放區
設定功能存放區參數,包括名稱、位置和其他值。
# We use the subscription, resource group, region of this active project workspace.
# You can optionally replace them to create the resources in a different subsciprtion/resource group, or use existing resources.
import os

featurestore_name = "<FEATURESTORE_NAME>"
featurestore_location = "eastus"
featurestore_subscription_id = os.environ["AZUREML_ARM_SUBSCRIPTION"]
featurestore_resource_group_name = os.environ["AZUREML_ARM_RESOURCEGROUP"]
建立功能存放區。
from azure.ai.ml import MLClient from azure.ai.ml.entities import ( FeatureStore, FeatureStoreEntity, FeatureSet, ) from azure.ai.ml.identity import AzureMLOnBehalfOfCredential ml_client = MLClient( AzureMLOnBehalfOfCredential(), subscription_id=featurestore_subscription_id, resource_group_name=featurestore_resource_group_name, ) fs = FeatureStore(name=featurestore_name, location=featurestore_location) # wait for feature store creation fs_poller = ml_client.feature_stores.begin_create(fs) print(fs_poller.result())初始化 Azure Machine Learning 的功能存放區核心 SDK 用戶端。
如本教學課程稍早所述,功能存放區核心 SDK 用戶端會用來開發和取用功能。
# feature store client
from azureml.featurestore import FeatureStoreClient
from azure.ai.ml.identity import AzureMLOnBehalfOfCredential

featurestore = FeatureStoreClient(
    credential=AzureMLOnBehalfOfCredential(),
    subscription_id=featurestore_subscription_id,
    resource_group_name=featurestore_resource_group_name,
    name=featurestore_name,
)
向使用者身分識別授與功能存放區上的「Azure Machine Learning 資料科學家」角色。 從 Azure 入口網站取得您的 Microsoft Entra 物件識別碼值,如尋找使用者物件識別碼所述。
將 AzureML 資料科學家角色指派給您的使用者身分識別,使其可以在功能存放區工作區中建立資源。 權限可能需要一些時間的傳播。
如需訪問控制的詳細資訊,請流覽管理 受管理的功能存放區 資源的訪問控制。
your_aad_objectid = "<USER_AAD_OBJECTID>"

!az role assignment create --role "AzureML Data Scientist" --assignee-object-id $your_aad_objectid --assignee-principal-type User --scope $feature_store_arm_id
功能集的原型設計和開發
在這些步驟中,您會建置名為 transactions 的功能集,其具有滾動時段彙總型功能:
探索
transactions來源資料。此筆記本會使用裝載在可公開存取的 Blob 容器中的範例資料。 其只能透過
wasbs驅動程式讀取至 Spark。 當您使用自己的來源資料建立功能集時,請將功能集裝載在 Azure Data Lake Storage Gen2 帳戶中,並在資料路徑中使用abfss驅動程式。# remove the "." in the roor directory path as we need to generate absolute path to read from spark transactions_source_data_path = "wasbs://data@azuremlexampledata.blob.core.windows.net/feature-store-prp/datasources/transactions-source/*.parquet" transactions_src_df = spark.read.parquet(transactions_source_data_path) display(transactions_src_df.head(5)) # Note: display(training_df.head(5)) displays the timestamp column in a different format. You can can call transactions_src_df.show() to see correctly formatted value在本機開發功能集。
功能集規格是可在本機開發和測試之功能集的獨立式定義。 在這裡,您會建立這些滾動時段彙總功能:
transactions three-day counttransactions amount three-day avgtransactions amount three-day sumtransactions seven-day counttransactions amount seven-day avgtransactions amount seven-day sum
檢閱功能轉換程式碼檔案:featurestore/featuresets/transactions/transformation_code/transaction_transform.py。 請注意針對功能所定義的滾動彙總。 這是 Spark 轉換器。
若要深入瞭解功能集和轉換,請瀏覽什麼是 受管理的功能存放區?資源。
from azureml.featurestore import create_feature_set_spec
from azureml.featurestore.contracts import (
    DateTimeOffset,
    TransformationCode,
    Column,
    ColumnType,
    SourceType,
    TimestampColumn,
)
from azureml.featurestore.feature_source import ParquetFeatureSource

transactions_featureset_code_path = (
    root_dir + "/featurestore/featuresets/transactions/transformation_code"
)

transactions_featureset_spec = create_feature_set_spec(
    source=ParquetFeatureSource(
        path="wasbs://data@azuremlexampledata.blob.core.windows.net/feature-store-prp/datasources/transactions-source/*.parquet",
        timestamp_column=TimestampColumn(name="timestamp"),
        source_delay=DateTimeOffset(days=0, hours=0, minutes=20),
    ),
    feature_transformation=TransformationCode(
        path=transactions_featureset_code_path,
        transformer_class="transaction_transform.TransactionFeatureTransformer",
    ),
    index_columns=[Column(name="accountID", type=ColumnType.string)],
    source_lookback=DateTimeOffset(days=7, hours=0, minutes=0),
    temporal_join_lookback=DateTimeOffset(days=1, hours=0, minutes=0),
    infer_schema=True,
)
匯出為功能集規格。
若要使用功能存放區註冊功能集規格,您必須以特定格式儲存該規格。
檢閱產生的
transactions功能集規格。 從檔案樹狀目錄開啟此檔案,以查看 featurestore/featuresets/accounts/spec/FeaturesetSpec.yaml 規格。規格包含下列元素:
source:儲存體資源的參考。 在此情況下,它是 Blob 記憶體資源中的 parquet 檔案。features:功能及其資料類型的清單。 如果您提供轉換程式碼,程式碼必須傳回對應至功能和資料類型的 DataFrame。index_columns:要從功能集存取值所需的聯結索引鍵。
若要深入瞭解規格,請瀏覽瞭解 受管理的功能存放區 和 CLI (v2) 功能集 YAML 架構資源中的最上層實體。
保存功能集規格提供另一個優點:功能集規格支援原始檔控制。
import os

# Create a new folder to dump the feature set specification.
transactions_featureset_spec_folder = (
    root_dir + "/featurestore/featuresets/transactions/spec"
)

# Check if the folder exists, create one if it does not exist.
if not os.path.exists(transactions_featureset_spec_folder):
    os.makedirs(transactions_featureset_spec_folder)

transactions_featureset_spec.dump(transactions_featureset_spec_folder, overwrite=True)
註冊功能存放區實體
最佳做法是,實體可協助在使用相同邏輯實體的功能集之間強制執行使用相同的聯結密鑰定義。 實體的範例包括帳戶和客戶。 一般會建立一次實體,然後跨功能集重複使用。 若要深入瞭解,請瀏覽瞭解 受管理的功能存放區 中的最上層實體。
初始化功能存放區 CRUD 用戶端。
如本教學課程稍早所述,
MLClient用來建立、讀取、更新和刪除功能存放區資產。 此處顯示的筆記本程式碼資料格範例會搜尋您在先前步驟中建立的功能存放區。 在此,您無法重複使用您稍早在本教學課程中使用的相同ml_client值,因為該值的範圍在資源群組層級。 適當的範圍限制是建立功能存放區時的必要條件。在此程式碼範例中,用戶端的範圍限制在功能存放區層級。
# MLClient for feature store.
fs_client = MLClient(
    AzureMLOnBehalfOfCredential(),
    featurestore_subscription_id,
    featurestore_resource_group_name,
    featurestore_name,
)
使用功能存放區註冊
account實體。建立
account實體,這個實體要具有string類型的聯結索引鍵accountID。from azure.ai.ml.entities import DataColumn, DataColumnType account_entity_config = FeatureStoreEntity( name="account", version="1", index_columns=[DataColumn(name="accountID", type=DataColumnType.STRING)], stage="Development", description="This entity represents user account index key accountID.", tags={"data_typ": "nonPII"}, ) poller = fs_client.feature_store_entities.begin_create_or_update(account_entity_config) print(poller.result())
使用功能存放區註冊交易功能集
使用此程式碼以功能存放區註冊功能集資產。 然後,您便可以重複使用該資產,並輕鬆地共用該資產。 註冊功能集資產可提供受管理的能力,包括版本設定和具體化。 本教學課程系列稍後的步驟會涵蓋受管理的能力。
from azure.ai.ml.entities import FeatureSetSpecification

transaction_fset_config = FeatureSet(
    name="transactions",
    version="1",
    description="7-day and 3-day rolling aggregation of transactions featureset",
    entities=[f"azureml:account:1"],
    stage="Development",
    specification=FeatureSetSpecification(path=transactions_featureset_spec_folder),
    tags={"data_type": "nonPII"},
)

poller = fs_client.feature_sets.begin_create_or_update(transaction_fset_config)
print(poller.result())探索功能存放區 UI
功能存放區資產的建立和更新只能透過 SDK 和 CLI 來進行。 您可以使用 UI 來搜尋或瀏覽功能存放區:
- 開啟 Azure Machine Learning 全域登陸頁面。
- 選取左窗格上的 [功能存放區]。
- 從可存取的功能存放區清單中,選取您稍早在本教學課程中建立的功能存放區。
向儲存體 Blob 資料讀者角色授與離線存放區中使用者帳戶的存取權
必須將儲存體 Blob 資料讀者角色指派給離線存放區上的使用者帳戶。 這可確保使用者帳戶可以從離線具體化存放區讀取具體化的功能資料。
從 Azure 入口網站取得您的 Microsoft Entra 物件識別碼值,如尋找使用者物件識別碼所述。
從功能存放區 UI 中的功能存放區 [概觀] 頁面取得離線具體化存放區的相關資訊。 您可以在 [離線具體化存放區] 卡片中,找到離線具體化存放區的儲存體帳戶訂用帳戶識別碼、儲存體帳戶資源群組名稱和儲存體帳戶名稱的值。
如需訪問控制的詳細資訊,請流覽管理 受管理的功能存放區 資源的訪問控制。
執行此程式碼資料格以進行角色指派。 權限可能需要一些時間的傳播。
# This utility function is created for ease of use in the docs tutorials. It uses standard azure API's.
# You can optionally inspect it `featurestore/setup/setup_storage_uai.py`.
import sys

sys.path.insert(0, root_dir + "/featurestore/setup")
from setup_storage_uai import grant_user_aad_storage_data_reader_role

your_aad_objectid = "<USER_AAD_OBJECTID>"
storage_subscription_id = "<SUBSCRIPTION_ID>"
storage_resource_group_name = "<RESOURCE_GROUP>"
storage_account_name = "<STORAGE_ACCOUNT_NAME>"

grant_user_aad_storage_data_reader_role(
    AzureMLOnBehalfOfCredential(),
    your_aad_objectid,
    storage_subscription_id,
    storage_resource_group_name,
    storage_account_name,
)
使用已註冊的功能集來產生定型資料 DataFrame
載入觀察資料。
觀察資料通常牽涉到用於定型和推斷的核心資料。 此資料會與功能資料聯結,以建立完整的定型資料資源。
觀察資料是在事件發生期間擷取的資料。 在這裡,其具有核心交易資料,包括交易識別碼、帳戶識別碼和交易金額值。 因為您將其用於定型,所以其也有附加的目標變數 (is_fraud)。
observation_data_path = "wasbs://data@azuremlexampledata.blob.core.windows.net/feature-store-prp/observation_data/train/*.parquet"
observation_data_df = spark.read.parquet(observation_data_path)
obs_data_timestamp_column = "timestamp"

display(observation_data_df)
# Note: the timestamp column is displayed in a different format. Optionally, you can can call training_df.show() to see correctly formatted value
取得已註冊的功能集,並列出其功能。
# Look up the featureset by providing a name and a version.
transactions_featureset = featurestore.feature_sets.get("transactions", "1")
# List its features.
transactions_featureset.features
# Print sample values. display(transactions_featureset.to_spark_dataframe().head(5))選取成為定型資料一部分的功能。 然後,使用功能存放區 SDK 來產生定型資料本身。
from azureml.featurestore import get_offline_features

# You can select features in pythonic way.
features = [
    transactions_featureset.get_feature("transaction_amount_7d_sum"),
    transactions_featureset.get_feature("transaction_amount_7d_avg"),
]

# You can also specify features in string form: featureset:version:feature.
more_features = [
    f"transactions:1:transaction_3d_count",
    f"transactions:1:transaction_amount_3d_avg",
]

more_features = featurestore.resolve_feature_uri(more_features)
features.extend(more_features)

# Generate training dataframe by using feature data and observation data.
training_df = get_offline_features(
    features=features,
    observation_data=observation_data_df,
    timestamp_column=obs_data_timestamp_column,
)

# Ignore the message that says feature set is not materialized (materialization is optional). We will enable materialization in the subsequent part of the tutorial.
display(training_df)
# Note: the timestamp column is displayed in a different format. Optionally, you can can call training_df.show() to see correctly formatted value
時間點聯結會將功能附加至定型資料。
在 transactions 功能集上啟用離線具體化
在啟用功能集具體化後,您可以執行回填。 您也可以排程週期性的具體化作業。 如需詳細資訊,請流覽系列資源中的第三個教學課程。
根據功能資料大小在 yaml 檔案中設定 spark.sql.shuffle.partitions
Spark 設定 spark.sql.shuffle.partitions 是 OPTIONAL 參數,當功能集具體化到離線存放區時,此參數可能會影響 (每天) 產生的 Parquet 檔案數目。 此參數的預設值為 200。 最佳做法是避免產生許多小型的 Parquet 檔案。 如果將功能集具體化後,離線功能的擷取速度變慢,請移至離線存放區中的對應資料夾,檢查問題是否涉及 (每天) 太多小型的 Parquet 檔案,並據以調整此參數的值。
注意
此筆記本中使用的範例資料很小。 因此,在 featureset_asset_offline_enabled.yaml 檔案中,此參數會設定為 1。
from azure.ai.ml.entities import (
    MaterializationSettings,
    MaterializationComputeResource,
)

transactions_fset_config = fs_client._featuresets.get(name="transactions", version="1")

transactions_fset_config.materialization_settings = MaterializationSettings(
    offline_enabled=True,
    resource=MaterializationComputeResource(instance_type="standard_e8s_v3"),
    spark_configuration={
        "spark.driver.cores": 4,
        "spark.driver.memory": "36g",
        "spark.executor.cores": 4,
        "spark.executor.memory": "36g",
        "spark.executor.instances": 2,
        "spark.sql.shuffle.partitions": 1,
    },
    schedule=None,
)

fs_poller = fs_client.feature_sets.begin_create_or_update(transactions_fset_config)
print(fs_poller.result())您也可以將功能集資產儲存為 YAML 資源。
## uncomment to run
transactions_fset_config.dump(
    root_dir
    + "/featurestore/featuresets/transactions/featureset_asset_offline_enabled.yaml"
)回填 transactions 功能集的資料
如先前所述,具體化會計算功能時段的功能值,然後將這些計算值儲存在具體化存放區中。 功能具體化會增加計算值的可靠性與可用性。 所有功能查詢現在都會使用具體化存放區中的這些值。 此步驟會針對 18 個月的功能時段執行一次性回填。
注意
您可能需要判斷回填資料時段值。 這個時段必須符合定型資料的時段。 例如,若要使用 18 個月的資料進行定型,就必須擷取 18 個月的功能。 這表示您應該回填 18 個月的時段。
此程式碼資料格會針對所定義的功能時段,依目前狀態「無」或「未完成」將資料具體化。
from datetime import datetime
from azure.ai.ml.entities import DataAvailabilityStatus

st = datetime(2022, 1, 1, 0, 0, 0, 0)
et = datetime(2023, 6, 30, 0, 0, 0, 0)

poller = fs_client.feature_sets.begin_backfill(
    name="transactions",
    version="1",
    feature_window_start_time=st,
    feature_window_end_time=et,
    data_status=[DataAvailabilityStatus.NONE],
)
print(poller.result().job_ids)
# Get the job URL, and stream the job logs.
fs_client.jobs.stream(poller.result().job_ids[0])提示
timestamp資料行應遵循yyyy-MM-ddTHH:mm:ss.fffZ格式。feature_window_start_time和feature_window_end_time細微性會限制為秒。 在datetime物件中提供的任何毫秒都會遭到忽略。- 只有在功能時段中的資料符合提交回填作業時所定義的
data_status時,才會提交具體化作業。
從功能集列印範例資料。 輸出資訊會顯示從具體化存放區中擷取的資料。 get_offline_features() 方法會擷取訓練和推斷資料。 其預設也會使用具體化存放區。
# Look up the feature set by providing a name and a version and display few records.
transactions_featureset = featurestore.feature_sets.get("transactions", "1")
display(transactions_featureset.to_spark_dataframe().head(5))
進一步探索離線功能具體化
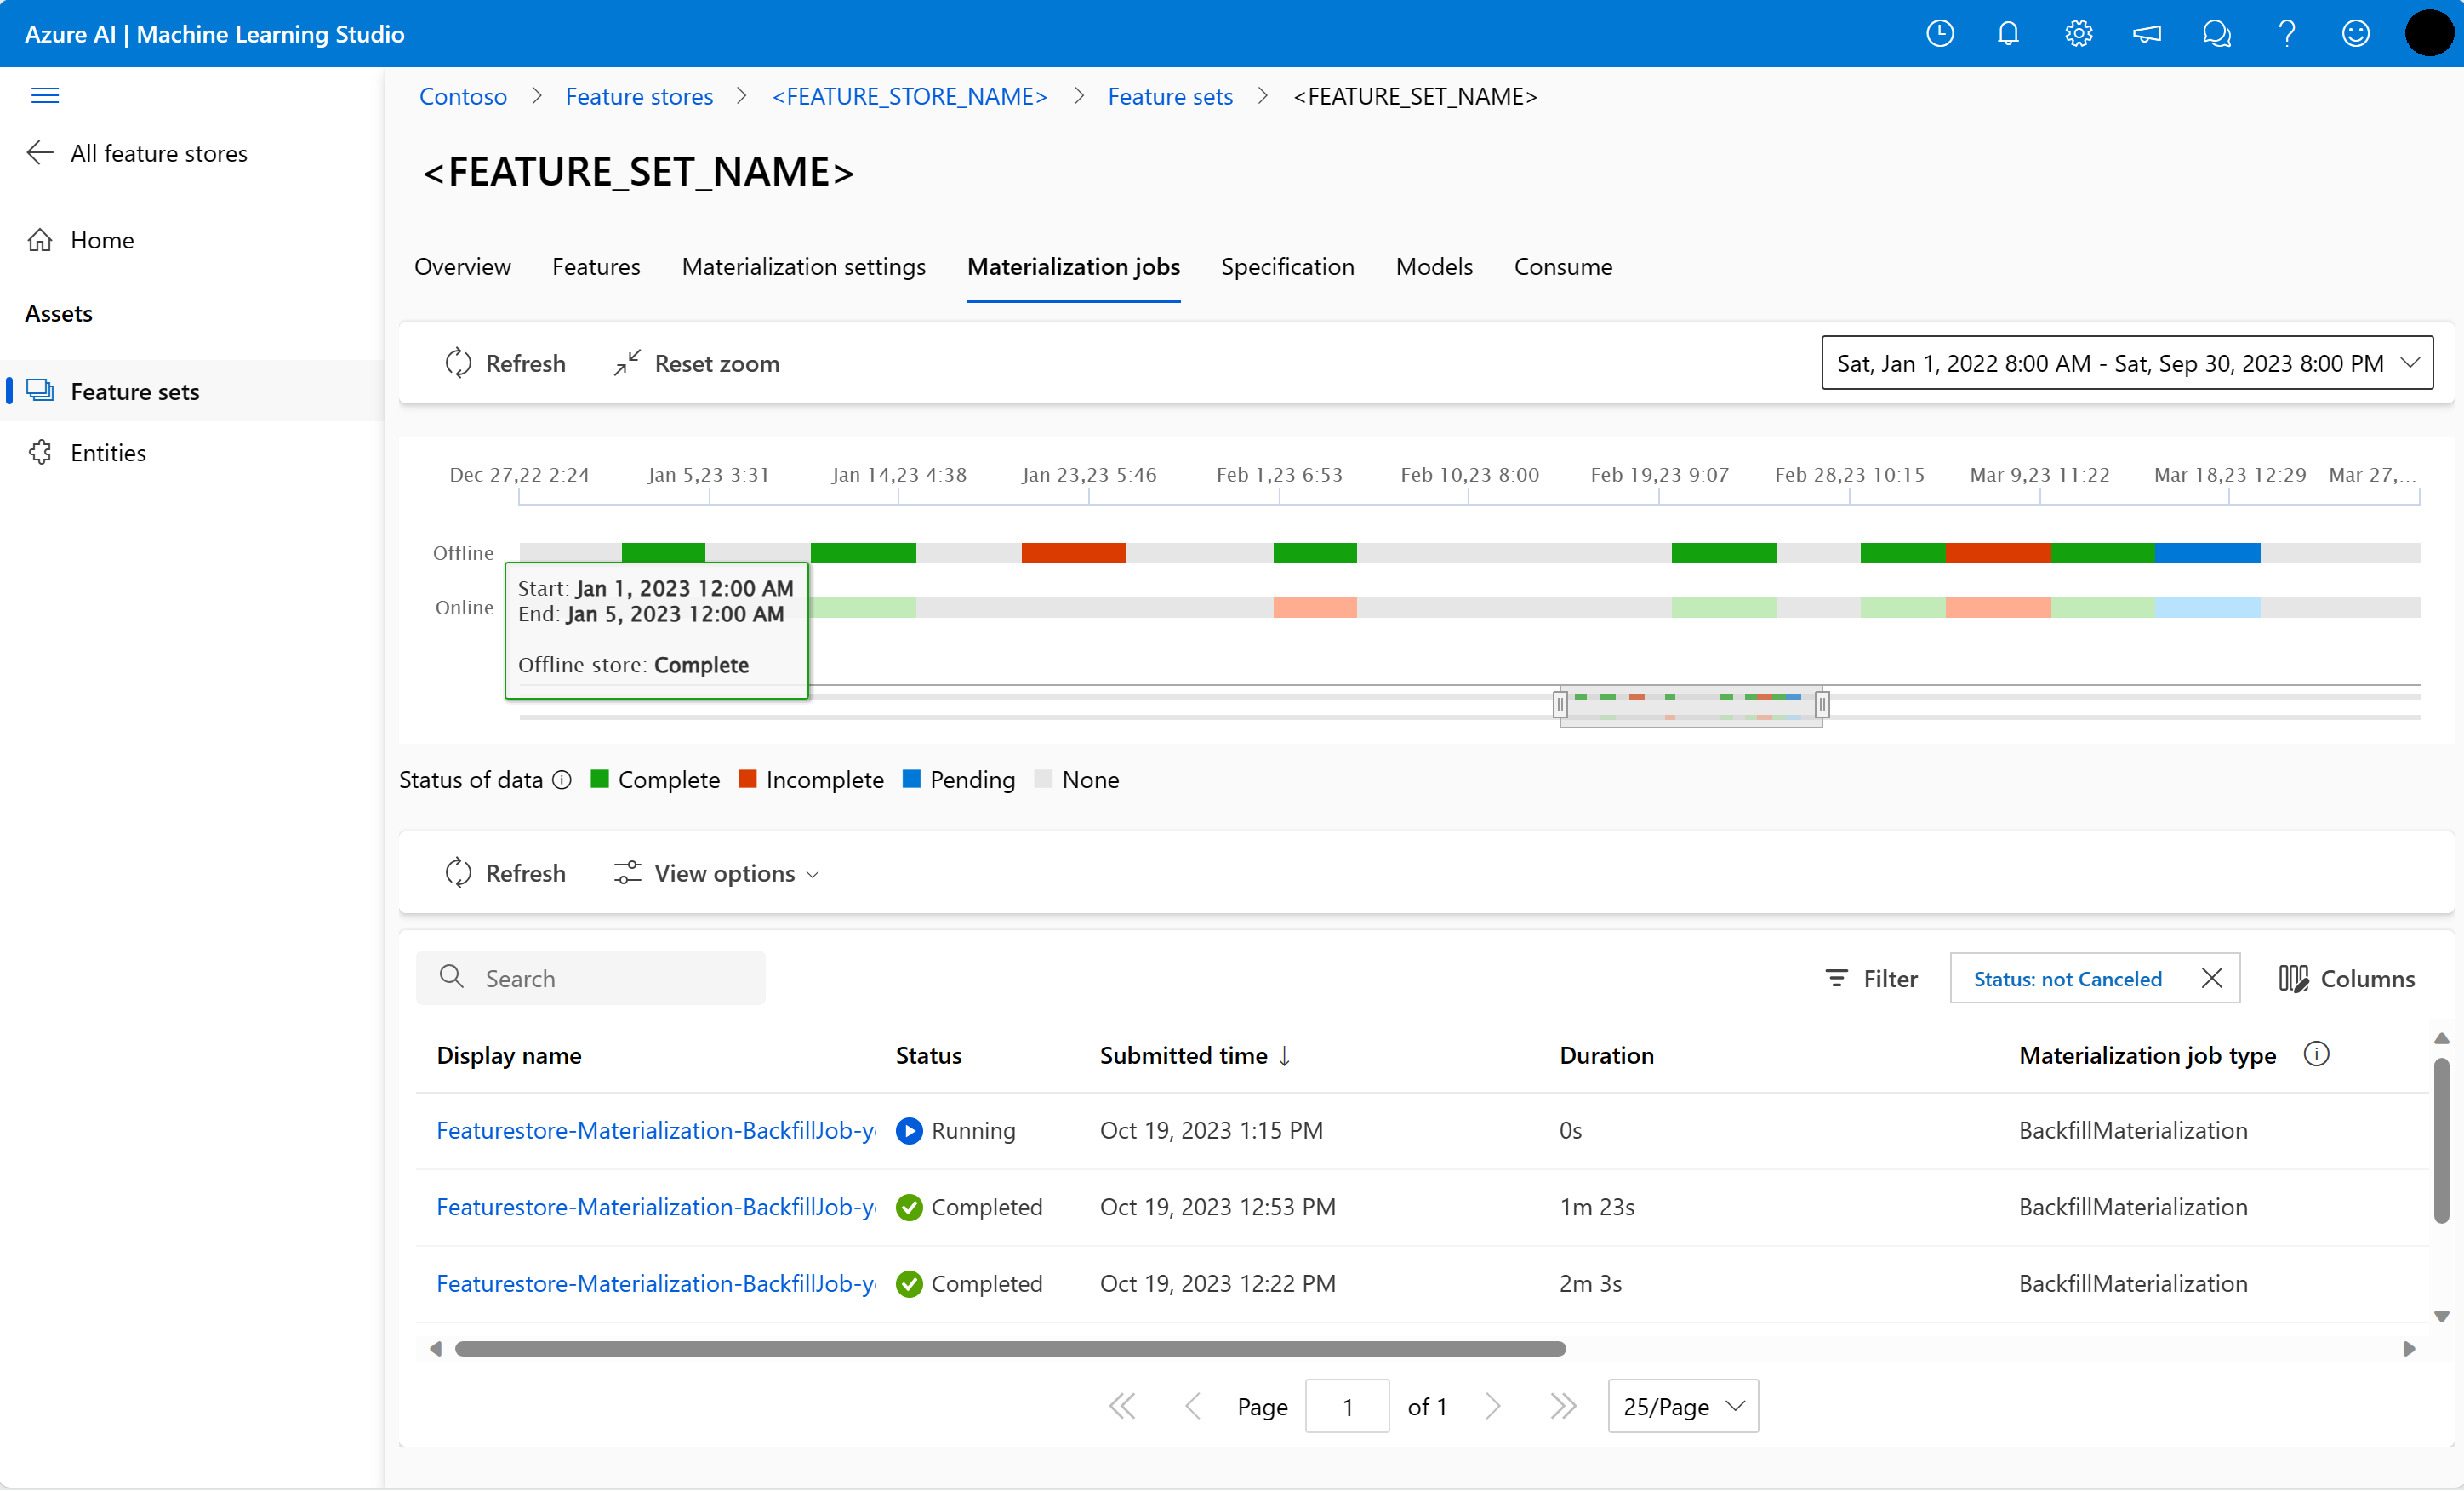
您可以在 [具體化作業] UI 中探索功能集的功能具體化狀態。
選取左窗格上的 [功能存放區]。
從可存取的功能存放區清單中,選取為其執行了回填的功能存放區。
選取 [具體化作業] 索引標籤。
資料具體化狀態可以是
- 完成 (綠色)
- 未完成 (紅色)
- 擱置中 (藍色)
- 無 (灰色)
「資料間隔」代表具有相同資料具體化狀態的連續資料部分。 例如,先前的快照集在離線具體化存放區中有 16 個「資料間隔」。
資料最多可以有 2,000 個「資料間隔」。 如果您的資料包含超過 2,000 個「資料間隔」,請建立新的功能集版本。
您可以在單一回填作業中提供超過一個資料狀態的清單 (例如
["None", "Incomplete"])。在回填期間,會針對落在所定義功能時段內的每個「資料間隔」提交新的具體化作業。
如果具體化作業擱置中,或該作業是針對尚未回填的「資料間隔」來執行的,則不會針對該「資料間隔」提交新作業。
您可以重試失敗的具體化作業。
注意
若要取得失敗具體化作業的作業識別碼:
- 瀏覽至功能集的 [具體化作業] UI。
- 選取 [狀態] 為 [失敗] 之特定作業的 [顯示名稱]。
- 在作業 [概觀] 頁面上找到的 [名稱] 屬性下,找出作業識別碼。 其開頭為
Featurestore-Materialization-。
poller = fs_client.feature_sets.begin_backfill(
    name="transactions",
    version=version,
    job_id="<JOB_ID_OF_FAILED_MATERIALIZATION_JOB>",
)
print(poller.result().job_ids)
更新離線具體化存放區
- 如果必須在功能存放區層級更新離線具體化存放區,則功能存放區中的所有功能集都應該停用離線具體化。
- 如果功能集上已停用離線具體化,則離線具體化存放區中已具體化資料的具體化狀態會重設。 重設會將已具體化的資料轉譯為無法使用。 您必須在啟用離線具體化後,重新提交具體化作業。
本教學課程使用功能存放區中的功能建置定型資料、在離線功能存放區上啟用具體化,並執行了回填。 接下來,您會使用這些功能來執行模型定型。
清理
本系列的第五個教學課程會說明如何刪除資源。
下一步
- 請參閱系列中的下一個教學課程:使用功能來實驗和定型模型。
- 了解功能存放區概念和受管理的功能存放區中的最上層實體。
- 了解受管理的功能存放區的身分識別與存取控制。
- 檢視受管理功能存放區的疑難解答指南。
- 檢視 YAML 參考。
![螢幕擷取畫面,顯示功能存放區 [概觀] 頁面上的離線存放區帳戶資訊。](media/tutorial-get-started-with-feature-store/offline-store-information.png?view=azureml-api-2)
