快速入門:使用 ARM 範本來建立 Ubuntu 資料科學虛擬機器
本快速入門說明如何使用 Azure Resource Manager 範本 (ARM 範本) 來建立 Ubuntu 資料科學虛擬機器 (DSVM)。 資料科學虛擬機器 是雲端式資源,預先載入了一套數據科學和機器學習架構和工具。 當部署了支援 GPU 的計算資源之後,所有工具與程式庫將會設定為使用該 GPU。
Azure Resource Manager 範本是一個 JavaScript 物件標記法 (JSON) 檔案,會定義專案的基礎結構和設定。 範本使用宣告式語法。 您可以描述預期的部署,而不需要撰寫程式設計命令順序來建立部署。
如果您的環境符合必要條件,而且您知道如何使用 ARM 範本,請選取 [部署至 Azure] 按鈕。 此動作會在 Azure 入口網站中開啟範本。
必要條件
Azure 訂用帳戶。 如果您沒有 Azure 訂用帳戶,請在開始前建立免費帳戶。
您需要 Azure CLI,才能從本機環境使用本檔中的 CLI 命令。
檢閱範本
您可以在 Azure 快速入門範本資源中找到本快速入門所使用的範本。
{
  "$schema": "https://schema.management.azure.com/schemas/2019-04-01/deploymentTemplate.json#",
  "contentVersion": "1.0.0.0",
  "metadata": {
    "_generator": {
      "name": "bicep",
      "version": "0.8.9.13224",
      "templateHash": "4895680407304578048"
    }
  },
  "parameters": {
    "adminUsername": {
      "type": "string",
      "metadata": {
        "description": "Username for Administrator Account"
      }
    },
    "vmName": {
      "type": "string",
      "defaultValue": "vmName",
      "metadata": {
        "description": "The name of you Virtual Machine."
      }
    },
    "location": {
      "type": "string",
      "defaultValue": "[resourceGroup().location]",
      "metadata": {
        "description": "Location for all resources."
      }
    },
    "cpu_gpu": {
      "type": "string",
      "defaultValue": "CPU-4GB",
      "allowedValues": [
        "CPU-4GB",
        "CPU-7GB",
        "CPU-8GB",
        "CPU-14GB",
        "CPU-16GB",
        "GPU-56GB"
      ],
      "metadata": {
        "description": "Choose between CPU or GPU processing"
      }
    },
    "virtualNetworkName": {
      "type": "string",
      "defaultValue": "vNet",
      "metadata": {
        "description": "Name of the VNET"
      }
    },
    "subnetName": {
      "type": "string",
      "defaultValue": "subnet",
      "metadata": {
        "description": "Name of the subnet in the virtual network"
      }
    },
    "networkSecurityGroupName": {
      "type": "string",
      "defaultValue": "SecGroupNet",
      "metadata": {
        "description": "Name of the Network Security Group"
      }
    },
    "authenticationType": {
      "type": "string",
      "defaultValue": "sshPublicKey",
      "allowedValues": [
        "sshPublicKey",
        "password"
      ],
      "metadata": {
        "description": "Type of authentication to use on the Virtual Machine. SSH key is recommended."
      }
    },
    "adminPasswordOrKey": {
      "type": "secureString",
      "metadata": {
        "description": "SSH Key or password for the Virtual Machine. SSH key is recommended."
      }
    }
  },
  "variables": {
    "networkInterfaceName": "[format('{0}NetInt', parameters('vmName'))]",
    "virtualMachineName": "[parameters('vmName')]",
    "publicIpAddressName": "[format('{0}PublicIP', parameters('vmName'))]",
    "subnetRef": "[resourceId('Microsoft.Network/virtualNetworks/subnets', parameters('virtualNetworkName'), parameters('subnetName'))]",
    "nsgId": "[resourceId('Microsoft.Network/networkSecurityGroups', parameters('networkSecurityGroupName'))]",
    "osDiskType": "StandardSSD_LRS",
    "storageAccountName": "[format('storage{0}', uniqueString(resourceGroup().id))]",
    "storageAccountType": "Standard_LRS",
    "storageAccountKind": "Storage",
    "vmSize": {
      "CPU-4GB": "Standard_B2s",
      "CPU-7GB": "Standard_D2s_v3",
      "CPU-8GB": "Standard_D2s_v3",
      "CPU-14GB": "Standard_D4s_v3",
      "CPU-16GB": "Standard_D4s_v3",
      "GPU-56GB": "Standard_NC6_Promo"
    },
    "linuxConfiguration": {
      "disablePasswordAuthentication": true,
      "ssh": {
        "publicKeys": [
          {
            "path": "[format('/home/{0}/.ssh/authorized_keys', parameters('adminUsername'))]",
            "keyData": "[parameters('adminPasswordOrKey')]"
          }
        ]
      }
    }
  },
  "resources": [
    {
      "type": "Microsoft.Network/networkInterfaces",
      "apiVersion": "2021-05-01",
      "name": "[variables('networkInterfaceName')]",
      "location": "[parameters('location')]",
      "properties": {
        "ipConfigurations": [
          {
            "name": "ipconfig1",
            "properties": {
              "subnet": {
                "id": "[variables('subnetRef')]"
              },
              "privateIPAllocationMethod": "Dynamic",
              "publicIPAddress": {
                "id": "[resourceId('Microsoft.Network/publicIPAddresses', variables('publicIpAddressName'))]"
              }
            }
          }
        ],
        "networkSecurityGroup": {
          "id": "[variables('nsgId')]"
        }
      },
      "dependsOn": [
        "[resourceId('Microsoft.Network/networkSecurityGroups', parameters('networkSecurityGroupName'))]",
        "[resourceId('Microsoft.Network/publicIPAddresses', variables('publicIpAddressName'))]",
        "[resourceId('Microsoft.Network/virtualNetworks', parameters('virtualNetworkName'))]"
      ]
    },
    {
      "type": "Microsoft.Network/networkSecurityGroups",
      "apiVersion": "2021-05-01",
      "name": "[parameters('networkSecurityGroupName')]",
      "location": "[parameters('location')]",
      "properties": {
        "securityRules": [
          {
            "name": "JupyterHub",
            "properties": {
              "priority": 1010,
              "protocol": "Tcp",
              "access": "Allow",
              "direction": "Inbound",
              "sourceAddressPrefix": "*",
              "sourcePortRange": "*",
              "destinationAddressPrefix": "*",
              "destinationPortRange": "8000"
            }
          },
          {
            "name": "RStudioServer",
            "properties": {
              "priority": 1020,
              "protocol": "Tcp",
              "access": "Allow",
              "direction": "Inbound",
              "sourceAddressPrefix": "*",
              "sourcePortRange": "*",
              "destinationAddressPrefix": "*",
              "destinationPortRange": "8787"
            }
          },
          {
            "name": "SSH",
            "properties": {
              "priority": 1030,
              "protocol": "Tcp",
              "access": "Allow",
              "direction": "Inbound",
              "sourceAddressPrefix": "*",
              "sourcePortRange": "*",
              "destinationAddressPrefix": "*",
              "destinationPortRange": "22"
            }
          }
        ]
      }
    },
    {
      "type": "Microsoft.Network/virtualNetworks",
      "apiVersion": "2021-05-01",
      "name": "[parameters('virtualNetworkName')]",
      "location": "[parameters('location')]",
      "properties": {
        "addressSpace": {
          "addressPrefixes": [
            "10.0.0.0/24"
          ]
        },
        "subnets": [
          {
            "name": "[parameters('subnetName')]",
            "properties": {
              "addressPrefix": "10.0.0.0/24",
              "privateEndpointNetworkPolicies": "Enabled",
              "privateLinkServiceNetworkPolicies": "Enabled"
            }
          }
        ]
      }
    },
    {
      "type": "Microsoft.Network/publicIPAddresses",
      "apiVersion": "2021-05-01",
      "name": "[variables('publicIpAddressName')]",
      "location": "[parameters('location')]",
      "sku": {
        "name": "Basic",
        "tier": "Regional"
      },
      "properties": {
        "publicIPAllocationMethod": "Dynamic"
      }
    },
    {
      "type": "Microsoft.Storage/storageAccounts",
      "apiVersion": "2021-08-01",
      "name": "[variables('storageAccountName')]",
      "location": "[parameters('location')]",
      "sku": {
        "name": "[variables('storageAccountType')]"
      },
      "kind": "[variables('storageAccountKind')]"
    },
    {
      "type": "Microsoft.Compute/virtualMachines",
      "apiVersion": "2021-11-01",
      "name": "[format('{0}-{1}', variables('virtualMachineName'), parameters('cpu_gpu'))]",
      "location": "[parameters('location')]",
      "properties": {
        "hardwareProfile": {
          "vmSize": "[variables('vmSize')[parameters('cpu_gpu')]]"
        },
        "storageProfile": {
          "osDisk": {
            "createOption": "FromImage",
            "managedDisk": {
              "storageAccountType": "[variables('osDiskType')]"
            }
          },
          "imageReference": {
            "publisher": "microsoft-dsvm",
            "offer": "ubuntu-1804",
            "sku": "1804-gen2",
            "version": "latest"
          }
        },
        "networkProfile": {
          "networkInterfaces": [
            {
              "id": "[resourceId('Microsoft.Network/networkInterfaces', variables('networkInterfaceName'))]"
            }
          ]
        },
        "osProfile": {
          "computerName": "[variables('virtualMachineName')]",
          "adminUsername": "[parameters('adminUsername')]",
          "adminPassword": "[parameters('adminPasswordOrKey')]",
          "linuxConfiguration": "[if(equals(parameters('authenticationType'), 'password'), json('null'), variables('linuxConfiguration'))]"
        }
      },
      "dependsOn": [
        "[resourceId('Microsoft.Network/networkInterfaces', variables('networkInterfaceName'))]"
      ]
    }
  ],
  "outputs": {
    "adminUsername": {
      "type": "string",
      "value": "[parameters('adminUsername')]"
    }
  }
}
範本會定義這些資源:
- Microsoft.Network/networkInterfaces
- Microsoft.Network/networkSecurityGroups
- Microsoft.Network/virtualNetworks
- Microsoft.Network/publicIPAddresses
- Microsoft.Storage/storageAccounts
- Microsoft.Compute/virtualMachines:建立雲端式虛擬機器。 在此範本中,已將虛擬機器設定為執行 Ubuntu 的資料科學虛擬機器。
部署範本
若要使用 Azure CLI 中的範本,請登入並選擇您的訂用帳戶。 如需詳細資訊,請流覽 使用 Azure CLI 登入。 然後執行:
read -p "Enter the name of the resource group to create:" resourceGroupName &&
read -p "Enter the Azure location (e.g., centralus):" location &&
read -p "Enter the authentication type (must be 'password' or 'sshPublicKey') :" authenticationType &&
read -p "Enter the login name for the administrator account (may not be 'admin'):" adminUsername &&
read -p "Enter administrator account secure string (value of password or ssh public key):" adminPasswordOrKey &&
templateUri="https://raw.githubusercontent.com/Azure/azure-quickstart-templates/master/application-workloads/datascience/vm-ubuntu-DSVM-GPU-or-CPU/azuredeploy.json" &&
az group create --name $resourceGroupName --location "$location" &&
az deployment group create --resource-group $resourceGroupName --template-uri $templateUri --parameters adminUsername=$adminUsername authenticationType=$authenticationType adminPasswordOrKey=$adminPasswordOrKey &&
echo "Press [ENTER] to continue ..." &&
read
當您執行此程式碼時,請輸入:
- 資源群組名稱,此資源群組將用來包含您要建立的 DSVM 與相關資源
- 您要進行部署的 Azure 位置
- 您要使用的驗證類型 (輸入字串
password或sshPublicKey) - 系統管理員帳戶的登入名稱 (此值不得為
admin) - 帳戶密碼或 SSH 公開金鑰的值
檢閱已部署的資源
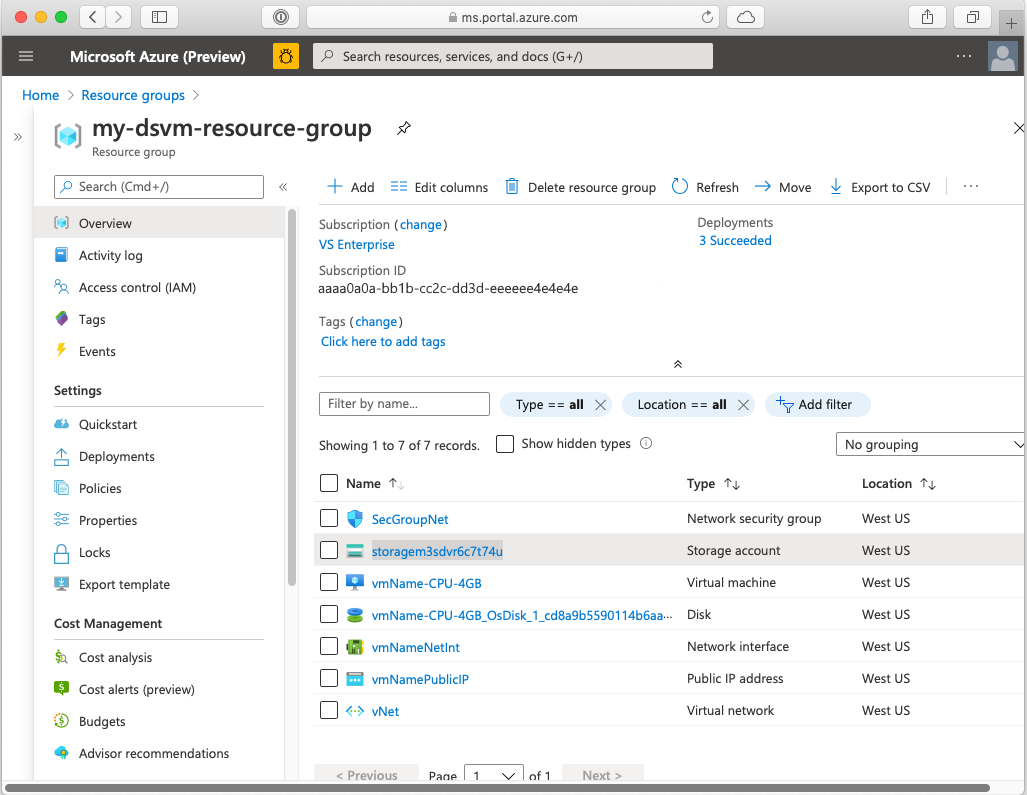
若要顯示您的資料科學虛擬機器:
- 移至 Azure 入口網站
- 登入
- 選擇您剛才所建立的資源群組
這會顯示資源群組資訊:

選取虛擬機器資源,移至其資訊頁面。 您可以在這裡找到 VM 的相關信息,包括連線詳細數據。
清除資源
若不想使用此虛擬機器,應加以刪除。 因為 DSVM 會與其他資源 (例如儲存體帳戶) 相關聯,您可以刪除先前建立的整個資源群組。 使用入口網站時,您可以刪除資源群組。 選取 [刪除] 按鈕,然後確認您的選擇。 您也可以從 CLI 刪除資源群組,如下所示:
echo "Enter the Resource Group name:" &&
read resourceGroupName &&
az group delete --name $resourceGroupName &&
echo "Press [ENTER] to continue ..."
下一步
在此快速入門中,您使用了 ARM 範本,建立資料科學虛擬機器。
