執行 R 文稿元件
本文說明如何使用執行 R 文稿元件,在 Azure 機器學習 設計工具管線中執行 R 程序代碼。
使用 R,您可以執行現有元件不支援的工作,例如:
- 建立自訂數據轉換
- 使用您自己的計量來評估預測
- 使用未在設計工具中實作為獨立元件的演算法建置模型
R 版本支援
Azure 機器學習 設計工具會使用 R 的 CRAN(完整 R 封存網路)散發。目前使用的版本是CRAN 3.5.1。
支援的 R 套件
R 環境已預安裝超過 100 個套件。 如需完整清單,請參閱預安裝 R 套件一節。
您也可以將下列程式代碼新增至任何執行 R 腳稿元件,以查看已安裝的套件。
azureml_main <- function(dataframe1, dataframe2){
  print("R script run.")
  dataframe1 <- data.frame(installed.packages())
  return(list(dataset1=dataframe1, dataset2=dataframe2))
}
注意
如果您的管線包含多個執行 R 腳稿元件,這些元件需要不在預安裝清單中的套件,請在每個元件中安裝套件。
安裝 R 套件
若要安裝其他 R 套件,請使用 install.packages() 方法。 每個執行 R 文稿元件都會安裝套件。 它們不會在其他執行 R 腳本元件之間共用。
注意
不建議從腳本套件組合安裝 R 套件。 建議您直接在文稿編輯器中安裝套件。
當您安裝套件時,請指定 CRAN 存放庫,例如 install.packages("zoo",repos = "https://cloud.r-project.org")。
警告
Excute R 腳本元件不支援安裝需要原生編譯的套件,例如 qdap 需要 JAVA 的套件和 drc 需要C++的套件。 這是因為此元件是在具有非系統管理員許可權的預安裝環境中執行。
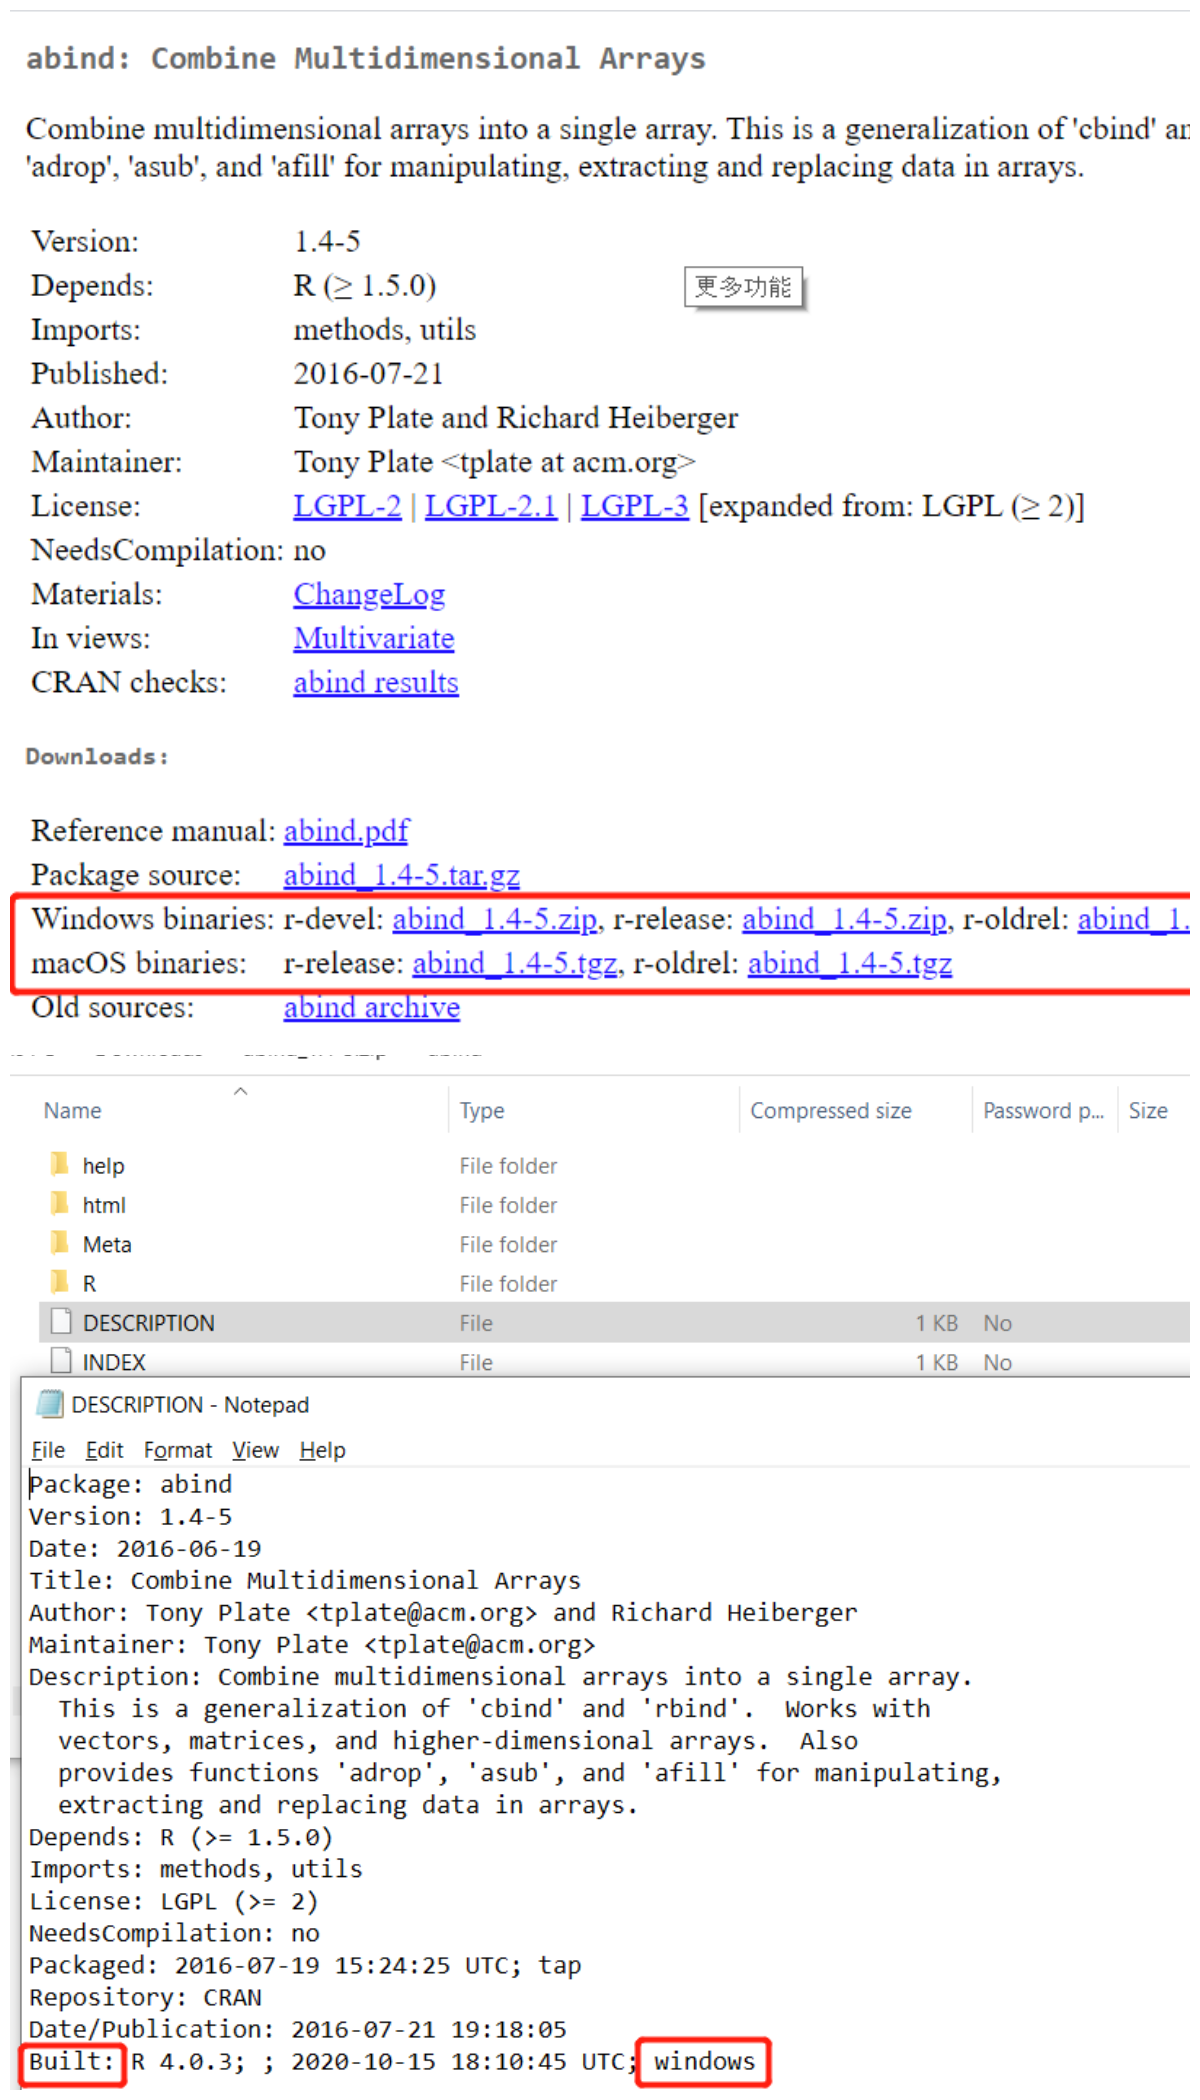
請勿安裝預先建置於/for Windows 的套件,因為設計工具元件是在Ubuntu上執行。 若要檢查套件是否在 Windows 上預先建置,您可以移至 CRAN 並搜尋您的套件、根據您的 OS 下載一個二進位檔,然後檢查 DESCRIPTION 檔案中的 Built:part。 以下是範例: 
此範例示範如何安裝 Zoo:
# R version: 3.5.1
# The script MUST contain a function named azureml_main,
# which is the entry point for this component.

# Note that functions dependent on the X11 library,
# such as "View," are not supported because the X11 library
# is not preinstalled.

# The entry point function MUST have two input arguments.
# If the input port is not connected, the corresponding
# dataframe argument will be null.
#   Param<dataframe1>: a R DataFrame
#   Param<dataframe2>: a R DataFrame
azureml_main <- function(dataframe1, dataframe2){
  print("R script run.")

  if(!require(zoo)) install.packages("zoo",repos = "https://cloud.r-project.org")
  library(zoo)
  # Return datasets as a Named List
  return(list(dataset1=dataframe1, dataset2=dataframe2))
}
注意
安裝套件之前,請先檢查它是否已存在,以免重複安裝。 重複安裝可能會導致 Web 服務要求逾時。
存取已註冊的數據集
您可以參考下列範例程式代碼,以存取 工作區中已註冊的 資料集:
azureml_main <- function(dataframe1, dataframe2){
  print("R script run.")
  run = get_current_run()
  ws = run$experiment$workspace
  dataset = azureml$core$dataset$Dataset$get_by_name(ws, "YOUR DATASET NAME")
  dataframe2 <- dataset$to_pandas_dataframe()
  # Return datasets as a Named List
  return(list(dataset1=dataframe1, dataset2=dataframe2))
}
如何設定執行 R 腳稿
執行 R 文稿元件包含範例程式代碼作為起點。

當使用此元件載入時,儲存在設計工具中的數據集會自動轉換成 R 資料框架。
將 執行 R 文稿 元件新增至管線。
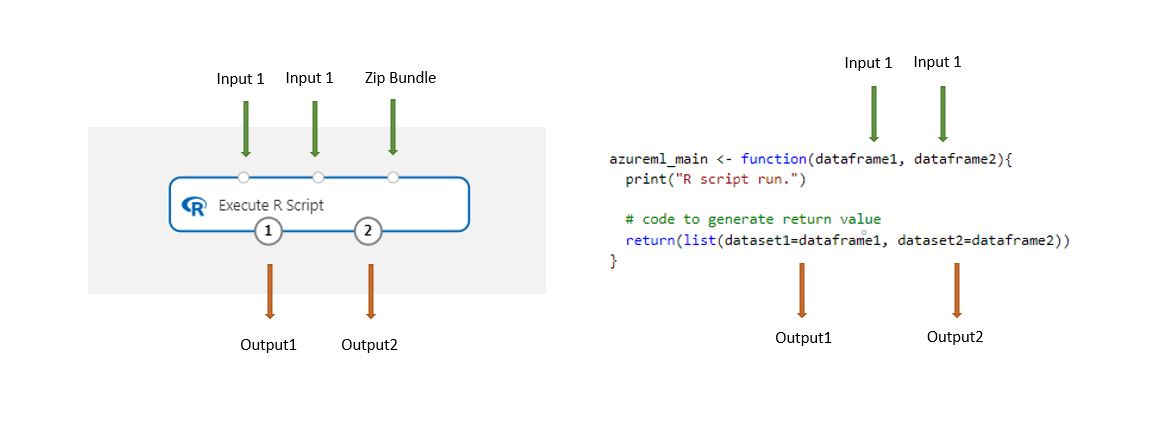
連接文本所需的任何輸入。 輸入是選擇性的,可以包含數據和額外的 R 程式代碼。
Dataset1:將第一個輸入參考為
dataframe1。 輸入數據集必須格式化為 CSV、TSV 或 ARFF 檔案。 或者,您可以連線 Azure 機器學習 數據集。Dataset2:將第二個輸入參考為
dataframe2。 此數據集也必須格式化為 CSV、TSV 或 ARFF 檔案,或設定為 Azure 機器學習 資料集。腳本組合:第三個輸入接受.zip檔案。 壓縮檔可以包含多個檔案和多個文件類型。
在 [ R 文稿] 文字框中,輸入或貼上有效的 R 腳稿。
注意
撰寫腳本時請小心。 請確定沒有語法錯誤,例如使用未宣告的變數或未匯入的元件或函式。 請特別注意本文結尾的預安裝套件清單。 若要使用未列出的套件,請在您的腳本中安裝它們。 例如
install.packages("zoo",repos = "https://cloud.r-project.org")。為了協助您開始使用, [R 腳本] 文字框會預先填入您可以編輯或取代的範例程式代碼。
# R version: 3.5.1
# The script MUST contain a function named azureml_main,
# which is the entry point for this component.

# Note that functions dependent on the X11 library,
# such as "View," are not supported because the X11 library
# is not preinstalled.

# The entry point function MUST have two input arguments.
# If the input port is not connected, the corresponding
# dataframe argument will be null.
#   Param<dataframe1>: a R DataFrame
#   Param<dataframe2>: a R DataFrame
azureml_main <- function(dataframe1, dataframe2){
print("R script run.")

# If a .zip file is connected to the third input port, it's
# unzipped under "./Script Bundle". This directory is added
# to sys.path.

# Return datasets as a Named List
return(list(dataset1=dataframe1, dataset2=dataframe2))
}
進入點函式必須具有輸入自變數
Param<dataframe1>和Param<dataframe2>,即使函式中未使用這些自變數也一樣。注意
傳遞至執行 R 腳稿元件的數據會參考為
dataframe1和dataframe2,這與 Azure 機器學習 設計工具不同(設計工具參考為dataset1、dataset2)。 請確定文稿中正確參考輸入數據。注意
現有的 R 程式代碼可能需要稍微變更,才能在設計工具管線中執行。 例如,您以 CSV 格式提供的輸入資料應該明確地轉換成數據集,才能在程式碼中使用。 R 語言中使用的數據和數據行類型也在某些方面與設計工具中使用的數據和數據行類型不同。
如果您的腳本大於 16 KB,請使用 腳本套件組合 埠以避免 CommandLine 等 錯誤超過 16597 個字元的限制。
- 將腳本和其他自定義資源組合至 zip 檔案。
- 將 zip 檔案上傳為 檔案數據集 至 Studio。
- 從 設計工具撰寫頁面左元件窗格中的 [資料集 ] 清單拖曳數據集元件。
- 將數據集元件連接到執行 R 腳稿元件的腳稿套件組合埠。
以下是使用文稿套件組合中文稿的範例程式代碼:
azureml_main <- function(dataframe1, dataframe2){
# Source the custom R script: my_script.R
source("./Script Bundle/my_script.R")

# Use the function that defined in my_script.R
dataframe1 <- my_func(dataframe1)

sample <- readLines("./Script Bundle/my_sample.txt")
return (list(dataset1=dataframe1, dataset2=data.frame("Sample"=sample)))
}
針對 [隨機種子],輸入 R 環境中要使用的值做為隨機種子值。 這個參數相當於在 R 程式代碼中呼叫
set.seed(value)。提交管線。
結果
執行 R 文稿元件可以傳回多個輸出,但必須以 R 數據框架的形式提供它們。 設計工具會自動將數據框架轉換成數據集,以與其他元件相容。
來自 R 的標準訊息和錯誤會傳回至元件的記錄檔。
如果您需要在 R 文稿中列印結果,您可以在元件右面板中的 [輸出+ 記錄] 索引標籤下,找到70_driver_log列印的結果。
範例指令碼
有許多方式可以使用自定義 R 腳本來擴充管線。 本節提供常見工作的範例程序代碼。
將 R 文稿新增為輸入
執行 R 文稿元件支援任意 R 腳稿檔案做為輸入。 若要使用它們,您必須將它們上傳至工作區,作為.zip檔案的一部分。
若要將包含 R 程式代碼的.zip檔案上傳至您的工作區,請移至 [數據集 資產] 頁面。 選取 [建立數據集],然後選取 [從本機檔案 ] 和 [ 檔案 數據集類型] 選項。
確認壓縮檔出現在左元件樹狀目錄中 [數據集] 類別下的 [我的數據集] 中。
將數據集連線到 文稿組合 輸入埠。
.zip檔案中的所有檔案都可在管線運行時間期間使用。
如果腳本套件組合檔案包含目錄結構,則會保留 結構。 但您必須將程式代碼變更為將目錄 ./Script Bundle 前面加上路徑。
處理資料
下列範例示範如何調整和正規化輸入數據:
# R version: 3.5.1
# The script MUST contain a function named azureml_main,
# which is the entry point for this component.

# Note that functions dependent on the X11 library,
# such as "View," are not supported because the X11 library
# is not preinstalled.

# The entry point function MUST have two input arguments.
# If the input port is not connected, the corresponding
# dataframe argument will be null.
#   Param<dataframe1>: a R DataFrame
#   Param<dataframe2>: a R DataFrame
azureml_main <- function(dataframe1, dataframe2){
  print("R script run.")
  # If a .zip file is connected to the third input port, it's
  # unzipped under "./Script Bundle". This directory is added
  # to sys.path.
  series <- dataframe1$width
  # Find the maximum and minimum values of the width column in dataframe1
  max_v <- max(series)
  min_v <- min(series)
  # Calculate the scale and bias
  scale <- max_v - min_v
  bias <- min_v / dis
  # Apply min-max normalizing
  dataframe1$width <- dataframe1$width / scale - bias
  dataframe2$width <- dataframe2$width / scale - bias
  # Return datasets as a Named List
  return(list(dataset1=dataframe1, dataset2=dataframe2))
}
讀取.zip檔案作為輸入
此範例示範如何在.zip檔案中使用數據集作為執行 R 腳本元件的輸入。
- 以 CSV 格式建立資料檔,並將其命名 為mydatafile.csv。
- 建立.zip檔案,並將 CSV 檔案新增至封存。
- 將壓縮檔上傳至 Azure 機器學習 工作區。
- 將產生的數據集連接到執行 R 腳本元件的 ScriptBundle 輸入。
- 使用下列程式代碼從壓縮檔讀取 CSV 數據。
azureml_main <- function(dataframe1, dataframe2){
  print("R script run.")
  mydataset<-read.csv("./Script Bundle/mydatafile.csv",encoding="UTF-8");
  # Return datasets as a Named List
  return(list(dataset1=mydataset, dataset2=dataframe2))
}
複寫數據列
此範例示範如何復寫數據集中的正記錄,以平衡範例:
azureml_main <- function(dataframe1, dataframe2){
  data.set <- dataframe1[dataframe1[,1]==-1,]
  # positions of the positive samples
  pos <- dataframe1[dataframe1[,1]==1,]
  # replicate the positive samples to balance the sample
  for (i in 1:20) data.set <- rbind(data.set,pos)
  row.names(data.set) <- NULL
  # Return datasets as a Named List
  return(list(dataset1=data.set, dataset2=dataframe2))
}
在執行 R 文稿元件之間傳遞 R 物件
您可以使用內部串行化機制,在執行 R 腳稿元件的實體之間傳遞 R 物件。 此範例假設您想要在兩個執行 R 腳稿元件之間移動名為 的 A R 物件。
將第一個 執行 R 腳本 元件新增至管線。 然後在 [ R 文稿] 文字框中輸入下列程式代碼,以在元件的輸出資料表中建立串行化物件
A作為資料行:azureml_main <- function(dataframe1, dataframe2){ print("R script run.") # some codes generated A serialized <- as.integer(serialize(A,NULL)) data.set <- data.frame(serialized,stringsAsFactors=FALSE) return(list(dataset1=data.set, dataset2=dataframe2)) }明確轉換成整數類型是因為串行化函式會輸出 R
Raw格式的數據,設計工具不支援這些數據。新增執行 R 文稿元件的第二個實例,並將它連接到上一個元件的輸出埠。
在 [R 文稿] 文字框中輸入下列程式代碼,以從輸入數據表擷取物件
A。azureml_main <- function(dataframe1, dataframe2){ print("R script run.") A <- unserialize(as.raw(dataframe1$serialized)) # Return datasets as a Named List return(list(dataset1=dataframe1, dataset2=dataframe2)) }
預安裝 R 套件
目前有下列預安裝 R 套件可用:
| 套件 | 版本 |
|---|---|
| askpass | 1.1 |
| assertthat | 0.2.1 |
| backports | 1.1.4 |
| base | 3.5.1 |
| base64enc | 0.1-3 |
| BH | 1.69.0-1 |
| bindr | 0.1.1 |
| bindrcpp | 0.2.2 |
| bitops | 1.0-6 |
| boot | 1.3-22 |
| broom | 0.5.2 |
| callr | 3.2.0 |
| caret | 6.0-84 |
| caTools | 1.17.1.2 |
| cellranger | 1.1.0 |
| class | 7.3-15 |
| cli | 1.1.0 |
| clipr | 0.6.0 |
| 叢集 | 2.0.7-1 |
| codetools | 0.2-16 |
| colorspace | 1.4-1 |
| compiler | 3.5.1 |
| crayon | 1.3.4 |
| curl | 3.3 |
| data.table | 1.12.2 |
| datasets | 3.5.1 |
| DBI | 1.0.0 |
| dbplyr | 1.4.1 |
| digest | 0.6.19 |
| dplyr | 0.7.6 |
| e1071 | 1.7-2 |
| evaluate | 0.14 |
| fansi | 0.4.0 |
| forcats | 0.3.0 |
| foreach | 1.4.4 |
| foreign | 0.8-71 |
| fs | 1.3.1 |
| gdata | 2.18.0 |
| 泛型 | 0.0.2 |
| ggplot2 | 3.2.0 |
| glmnet | 2.0-18 |
| glue | 1.3.1 |
| gower | 0.2.1 |
| gplots | 3.0.1.1 |
| graphics | 3.5.1 |
| grDevices | 3.5.1 |
| grid | 3.5.1 |
| gtable | 0.3.0 |
| gtools | 3.8.1 |
| haven | 2.1.0 |
| highr | 0.8 |
| hms | 0.4.2 |
| htmltools | 0.3.6 |
| httr | 1.4.0 |
| ipred | 0.9-9 |
| iterators | 1.0.10 |
| jsonlite | 1.6 |
| KernSmooth | 2.23-15 |
| knitr | 1.23 |
| labeling | 0.3 |
| lattice | 0.20-38 |
| Lava | 1.6.5 |
| lazyeval | 0.2.2 |
| lubridate | 1.7.4 |
| magrittr | 1.5 |
| markdown | 1 |
| MASS | 7.3-51.4 |
| 矩陣 | 1.2-17 |
| 方法 | 3.5.1 |
| mgcv | 1.8-28 |
| mime | 0.7 |
| ModelMetrics | 1.2.2 |
| modelr | 0.1.4 |
| munsell | 0.5.0 |
| nlme | 3.1-140 |
| nnet | 7.3-12 |
| numDeriv | 2016.8-1.1 |
| openssl | 1.4 |
| parallel | 3.5.1 |
| pillar | 1.4.1 |
| pkgconfig | 2.0.2 |
| plogr | 0.2.0 |
| plyr | 1.8.4 |
| prettyunits | 1.0.2 |
| processx | 3.3.1 |
| prodlim | 2018.04.18 |
| 進度 | 1.2.2 |
| ps | 1.3.0 |
| purrr | 0.3.2 |
| quadprog | 1.5-7 |
| quantmod | 0.4-15 |
| R6 | 2.4.0 |
| randomForest | 4.6-14 |
| RColorBrewer | 1.1-2 |
| Rcpp | 1.0.1 |
| RcppRoll | 0.3.0 |
| readr | 1.3.1 |
| readxl | 1.3.1 |
| recipes | 0.1.5 |
| rematch | 1.0.1 |
| reprex | 0.3.0 |
| reshape2 | 1.4.3 |
| reticulate | 1.12 |
| rlang | 0.4.0 |
| rmarkdown | 1.13 |
| ROCR | 1.0-7 |
| rpart | 4.1-15 |
| rstudioapi | 0.1 |
| rvest | 0.3.4 |
| scales | 1.0.0 |
| selectr | 0.4-1 |
| spatial | 7.3-11 |
| splines | 3.5.1 |
| SQUAREM | 2017.10-1 |
| stats | 3.5.1 |
| stats4 | 3.5.1 |
| stringi | 1.4.3 |
| stringr | 1.3.1 |
| survival | 2.44-1.1 |
| sys | 3.2 |
| tcltk | 3.5.1 |
| tibble | 2.1.3 |
| tidyr | 0.8.3 |
| tidyselect | 0.2.5 |
| tidyverse | 1.2.1 |
| timeDate | 3043.102 |
| tinytex | 0.13 |
| tools | 3.5.1 |
| tseries | 0.10-47 |
| TTR | 0.23-4 |
| utf8 | 1.1.4 |
| utils | 3.5.1 |
| vctrs | 0.1.0 |
| viridisLite | 0.3.0 |
| whisker | 0.3-2 |
| withr | 2.1.2 |
| xfun | 0.8 |
| xml2 | 1.2.0 |
| xts | 0.11-2 |
| yaml | 2.2.0 |
| zeallot | 0.1.0 |
| zoo | 1.8-6 |