教學課程:使用 Azure IoT Operations MQTT 訊息代理程式的 TLS、X.509 用戶端驗證和屬性型訪問控制 (ABAC) 授權
本教學課程會引導您使用 TLS 加密和 X.509 用戶端驗證來設定 Azure IoT Operations MQTT 訊息代理程式。 其中包含建立訊息代理程式和客戶端憑證的逐步指示和腳本。 本教學課程說明如何為用戶端和訊息代理程式設定具有不同跟證書授權單位 (CA) 的 MQTT 訊息代理程式。 它也涵蓋根據客戶端憑證鏈結來設定屬性型訪問控制 (ABAC) 授權原則。 最後,本教學課程會使用蚊子客戶端來測試各種案例,以確保安裝程式正常運作。
本教學課程會模擬在 Contoso Factory 中安裝 Azure IoT 作業的環境,以及 Fabrikam 製造的裝置。 若要讓 TLS 和 X.509 驗證運作:
- 安裝在 Contoso Factory 中的 Azure IoT Operations MQTT 訊息代理程式必須信任 Fabrikam 根 CA
- Fabrikam 感測器,例如控溫器,必須信任 Contoso 根 CA
- 每個實體都必須有自己的分葉憑證,由正確的根 CA 發行
必要條件
為了依循本教學課程進行操作,需要滿足以下條件:
- 已啟用埠 8883 埠轉送的 Kubernetes 叢集。
- 未部署現有負載平衡器接聽程式的 Azure IoT 作業。
- Kubectl 存取叢集以建立 Kubernetes 秘密和設定對應。
-
Mosquitto 用戶端 ,用來發佈和訂閱與 Kubernetes 叢集相同的電腦上執行的 MQTT 訊息以進行
localhost存取。 若要不使用localhost,請參閱 選擇性:使用實際的主機名或IP位址,localhost而不是區段。 - 建立憑證的步驟 CLI 。
提示
若要符合這些需求,請使用 快速入門 codespace。 快速入門程式代碼空間可透過現用提供這些元件來簡化設定程式。
此外,熟悉公鑰密碼編譯和根 CA、私鑰和中繼憑證等詞彙相當實用。
選擇性:使用實際的主機名或IP位址,而不是 localhost
為了簡化本教學課程,我們會使用 localhost 來存取 MQTT 訊息代理程式。 此方法可確保訊息代理程式的伺服器憑證具有符合用來存取訊息代理程式之主機名的主體別名 (SAN)。 使用 localhost 可簡化設定,因為 SAN 已正確設定。
在真實世界的案例中,您會使用訊息代理程式的主機名或外部IP,而不是 localhost 從網路上的另一部裝置連線到它。 在此情況下,您必須判斷正確的主機名或IP位址,並在建立伺服器證書時使用它作為 SAN:
- 如果已經知道主機名或IP位址(例如透過 DNS 記錄或靜態IP),請在建立伺服器證書時使用它作為 SAN。 然後,使用該主機名稱或 IP 連線到訊息代理程式,而不是
localhost。 - 如果尚未知道主機名或IP位址,您可以使用佔位元服務來判斷外部IP位址:
- 在未使用的埠上建立LoadBalancer服務(例如8080):
kubectl create service loadbalancer placeholder-service --tcp=8080:8080 - 擷取外部IP:
kubectl get svc placeholder-service - 如果外部IP:
- 顯示類似
192.168.X.X的值 - 在建立伺服器證書和秘密時使用該 IP 作為 SAN。 然後,使用該 IP 連線到訊息代理程式,localhost而不是 。 - 顯示
<pending>- 您使用的 Kubernetes 散發套件可能不支援自動指派外部 IP。 若要尋找外部IP,請遵循發佈和主機環境的 Kubernetes 檔中的步驟。 根據網路設定,您可能也需要設定 埠轉送 或 VPN。
- 顯示類似
- 判斷外部IP之後,請刪除佔位元服務:
kubectl delete svc placeholder-service
- 在未使用的埠上建立LoadBalancer服務(例如8080):
此方法可確保伺服器證書符合外部IP位址,允許安全存取 MQTT 訊息代理程式。
準備伺服器端憑證和完整鏈結
首先,建立伺服器端根 CA。 此 CA 與稍後建立的用戶端根 CA 不同。 為了清楚區分,我們會將所有伺服器端命名為 「Contoso」。。 為了簡化後續步驟,我們會略過密碼來加密私鑰。 只有在教學課程設定中,才能接受這種做法。
step certificate create "Contoso Root CA" \
contoso_root_ca.crt contoso_root_ca.key \
--profile root-ca \
--no-password --insecure
然後,建立由這個根 CA 簽署的中繼 CA。
step certificate create "Contoso Intermediate CA 1" \
contoso_intermediate_ca.crt contoso_intermediate_ca.key \
--profile intermediate-ca \
--ca ./contoso_root_ca.crt --ca-key ./contoso_root_ca.key \
--no-password --insecure
最後,使用此中繼 CA 簽署 MQTT 訊息代理程式前端的伺服器證書。
localhost以下是本教學課程所使用的主體別名(SAN)。
step certificate create mqtts-endpoint \
mqtts-endpoint.crt mqtts-endpoint.key \
--profile leaf \
--ca ./contoso_intermediate_ca.crt --ca-key ./contoso_intermediate_ca.key \
--bundle \
--san localhost \
--not-after 2400h --no-password --insecure
--bundle使用旗標時,伺服器證書會與簽署中繼憑證搭配使用。 TLS 交握需要套件組合來驗證完整鏈結。
準備客戶端憑證和完整鏈結
同樣地,建立 Fabrikam 和中繼 CA 的根 CA。
step certificate create --profile root-ca "Fabrikam Root CA" \
fabrikam_root_ca.crt fabrikam_root_ca.key \
--no-password --insecure
step certificate create "Fabrikam Intermediate CA 1" \
fabrikam_intermediate_ca.crt fabrikam_intermediate_ca.key \
--profile intermediate-ca \
--ca ./fabrikam_root_ca.crt --ca-key ./fabrikam_root_ca.key \
--no-password --insecure
然後,為控溫器、濕度計、熱水器和燈泡產生客戶端憑證。
# Create a client certificate for the thermostat
step certificate create thermostat thermostat.crt thermostat.key \
--ca ./fabrikam_intermediate_ca.crt --ca-key ./fabrikam_intermediate_ca.key --bundle \
--not-after 2400h --no-password --insecure

# Create a client certificate for the hygrometer
step certificate create hygrometer hygrometer.crt hygrometer.key \
--ca ./fabrikam_intermediate_ca.crt --ca-key ./fabrikam_intermediate_ca.key --bundle \
--not-after 2400h --no-password --insecure

# Create a client certificate for the heater
step certificate create heater heater.crt heater.key \
--ca ./fabrikam_intermediate_ca.crt --ca-key ./fabrikam_intermediate_ca.key --bundle \
--not-after 2400h --no-password --insecure

# Create a client certificate for the lightbulb
step certificate create lightbulb lightbulb.crt lightbulb.key \
--ca ./fabrikam_intermediate_ca.crt --ca-key ./fabrikam_intermediate_ca.key --bundle \
--not-after 2400h --no-password --insecure
設定 Kubernetes
將新產生的伺服器證書和私鑰匯入 Kubernetes 秘密。 此秘密稍後會用來設定 MQTT 訊息代理程式的 TLS 接聽程式。
kubectl create secret tls broker-server-cert -n azure-iot-operations \
--cert mqtts-endpoint.crt \
--key mqtts-endpoint.key
此外,建立組態對應以包含 Fabrikam (用戶端) 根 CA。 MQTT 訊息代理程式需要此設定對應,才能信任 X.509 驗證。
kubectl create configmap fabrikam-ca -n azure-iot-operations \
--from-file=client_ca.pem=fabrikam_root_ca.crt
設定 MQTT 訊息代理程式
後續步驟會使用 TLS 加密和 X.509 用戶端驗證來設定 MQTT 訊息代理程式。 本教學課程會使用 Azure 入口網站 來設定 MQTT 訊息代理程式。
驗證
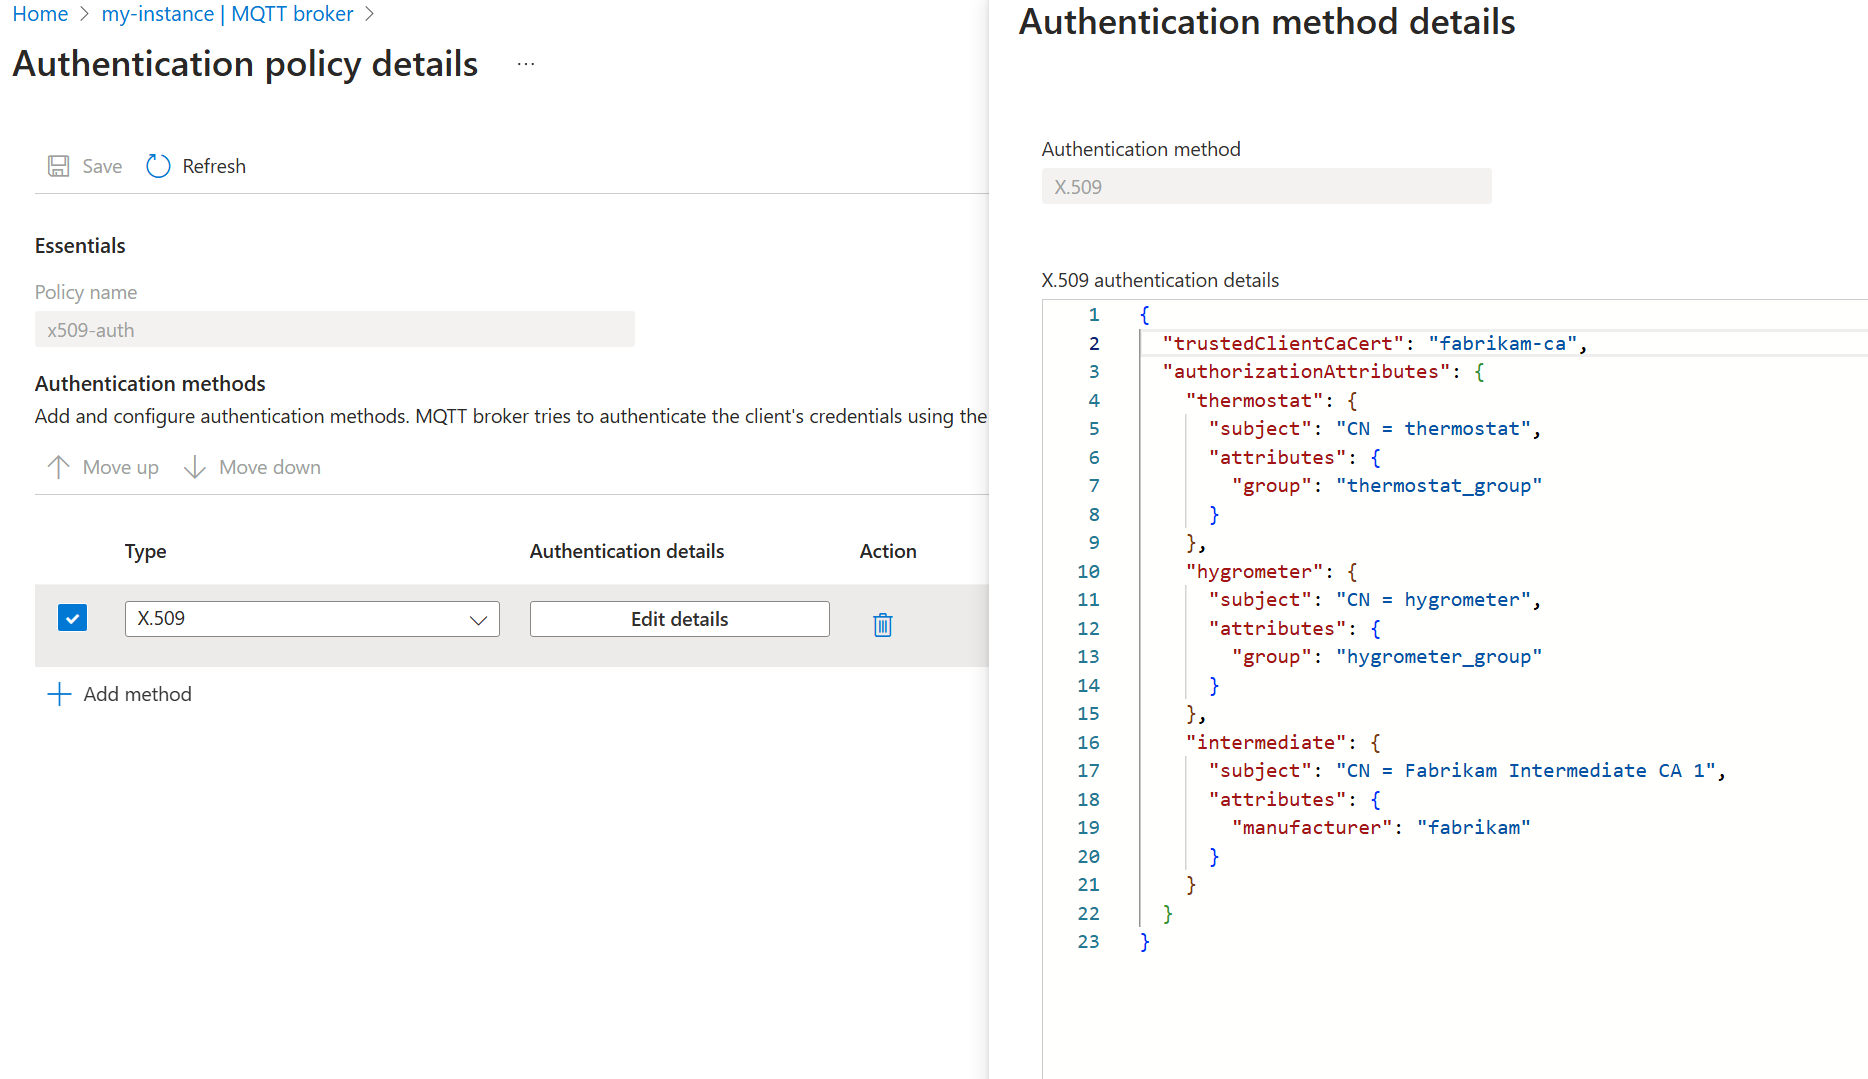
若要允許用戶端使用 Fabrikam 根 CA 所簽發的 X.509 憑證進行驗證,請建立驗證原則來信任 Fabrikam 根 CA 憑證,並將用戶端憑證對應至 ABAC 的授權屬性。
在 Azure 入口網站 中,流覽至您的IoT作業實例。
在 [元件] 底下,選取 [MQTT Broker]。
選取 [驗證] 索引標籤。
選取 [ 建立驗證原則]。
針對 [ 原則名稱],輸入
x509-auth。選取 [新增方法] 以新增方法。
從下拉式清單中選擇方法類型 X.509 ,然後選取 [ 新增詳細數據 ] 以設定方法。
在 [X.509 驗證詳細數據 ] 窗格中,指定 Fabrikam 受信任的 CA 憑證 ConfigMap 名稱和
fabrikam-ca屬性。{ "trustedClientCaCert": "fabrikam-ca", "authorizationAttributes": { "thermostat": { "subject": "CN = thermostat", "attributes": { "group": "thermostat_group" } }, "hygrometer": { "subject": "CN = hygrometer", "attributes": { "group": "hygrometer_group" } }, "intermediate": { "subject": "CN = Fabrikam Intermediate CA 1", "attributes": { "manufacturer": "fabrikam" } } } }選取 [套用],然後選取 [新增] 以儲存變更。

接聽程式
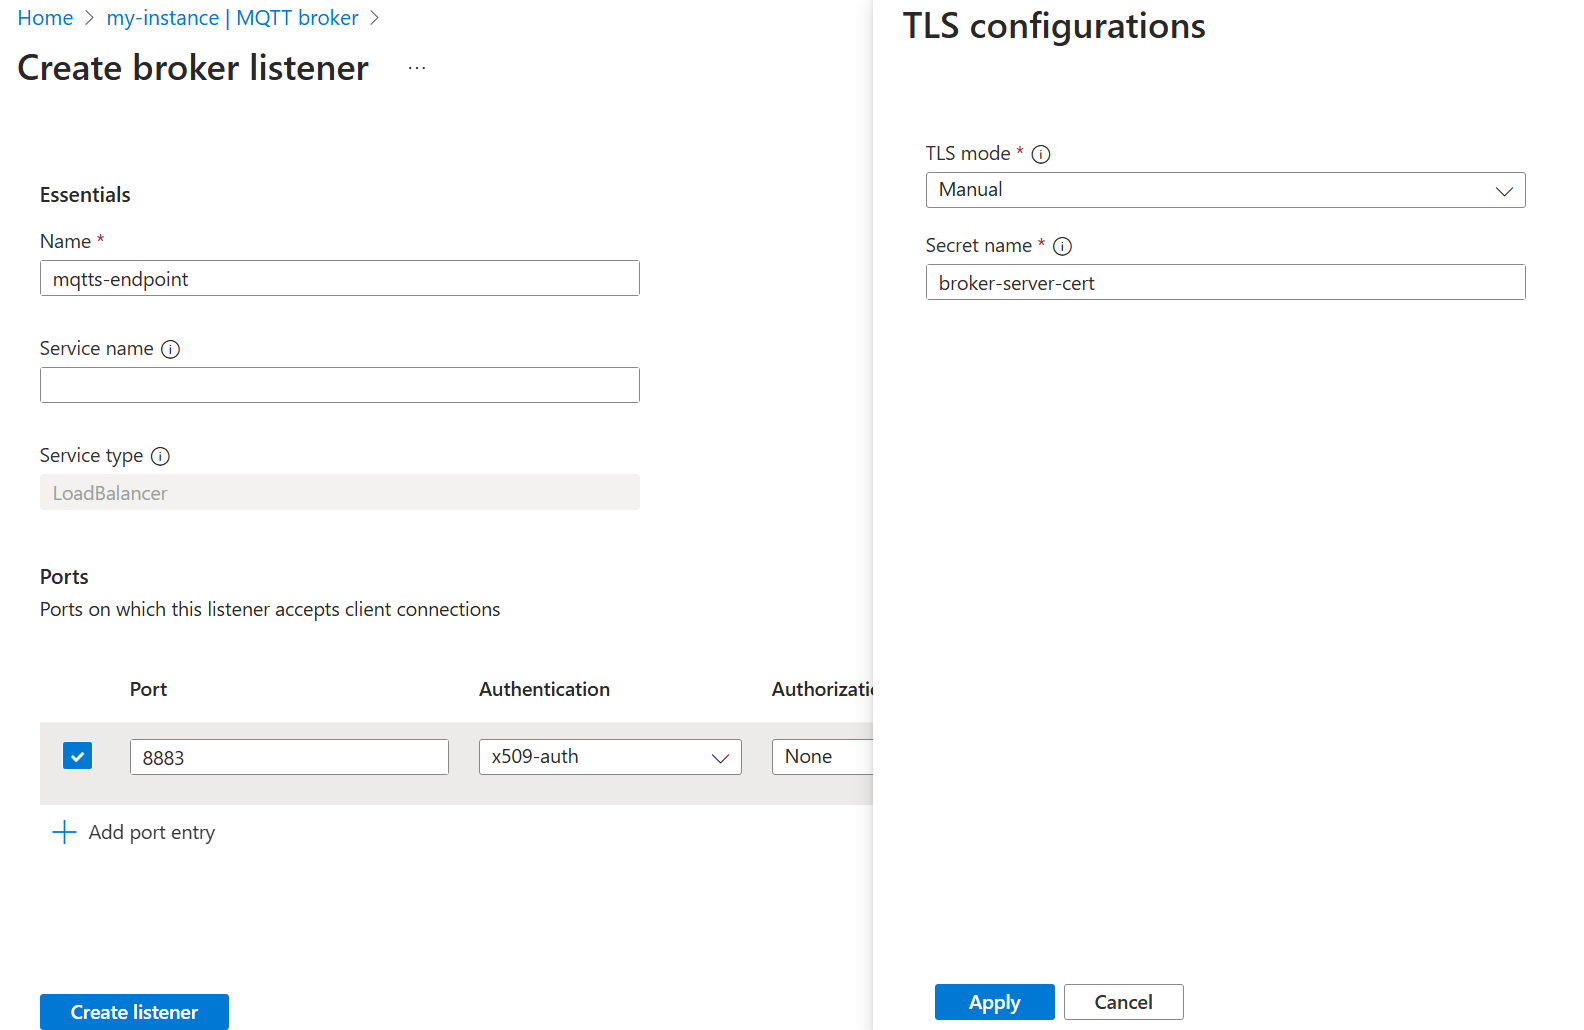
使用驗證原則,建立使用 X.509 驗證原則的接聽程式。 此外,由於 X.509 驗證需要 TLS,請設定接聽程式以使用稍早建立的 Contoso 伺服器證書和私鑰。
在 Azure 入口網站 中,流覽至您的IoT作業實例。
在 [元件] 底下,選取 [MQTT Broker]。
針對 LoadBalancer Create 選取 MQTT 訊息代理程式接聽程式。> 輸入下列設定:
設定 描述 名稱 輸入 mqtts-endpoint。服務名稱 Kubernetes 服務的名稱。 保留空白,以使用接聽程式名稱 mqtts-endpoint做為服務名稱。服務類型 LoadBalancer 已選取。 在 [埠] 下,輸入第一個埠的下列設定:
設定 描述 連接埠 輸入8883 驗證 選擇 x509-auth 授權 選擇 [無] 通訊協定 選擇 MQTT TLS 選取新增 在 [ TLS 組態 ] 窗格中,輸入下列設定:
設定 描述 TLS 模式 選擇 手動 簽發者名稱 輸入 broker-server-cert選取 [ 套用 ] 和 [建立接聽程式]。

在一兩分鐘之後, mqtts-endpoint 會建立LoadBalancer服務。
$ kubectl get service mqtts-endpoint -n azure-iot-operations
NAME             TYPE           CLUSTER-IP     EXTERNAL-IP   PORT(S)          AGE
mqtts-endpoint   LoadBalancer   10.43.28.140   XXX.XX.X.X    8883:30988/TCP   104s
我們不會使用外部IP,而是 localhost 用於教學課程。
提示
Codespace 組態會自動設定 8883 的埠轉送。 若要設定其他環境,請參閱 使用埠轉送。
使用單一蚊子用戶端透過 TLS 發佈訊息
從與憑證檔案相同的資料夾中: contoso_root_ca.crt、 thermostat.crt和 thermostat.key,使用蚊子用戶端發佈訊息。 旗 --cafile contoso_root_ca.crt 標是讓蚊子執行伺服器證書驗證。
mosquitto_pub -t "example/topic" -m "example temperature measurement" -i thermostat \
-q 1 -V mqttv5 -d \
-h localhost \
--key thermostat.key \
--cert thermostat.crt \
--cafile contoso_root_ca.crt
發行成功,因為蚊子會使用根目錄在 中的 fabrikam_root_ca.crt客戶端憑證。 MQTT 訊息代理程式會信任此憑證,因為稍早建立的 x509-auth 驗證原則。 此外,MQTT 訊息代理程式目前允許已驗證的用戶端發佈至任何主題。
Client thermostat sending CONNECT
Client thermostat received CONNACK (0)
Client thermostat sending PUBLISH (d0, q1, r0, m1, 'example/topic', ... (31 bytes))
Client thermostat received PUBACK (Mid: 1, RC:0)
Client thermostat sending DISCONNECT
使用 X.509 為多個用戶端設定 MQTT 主題的授權
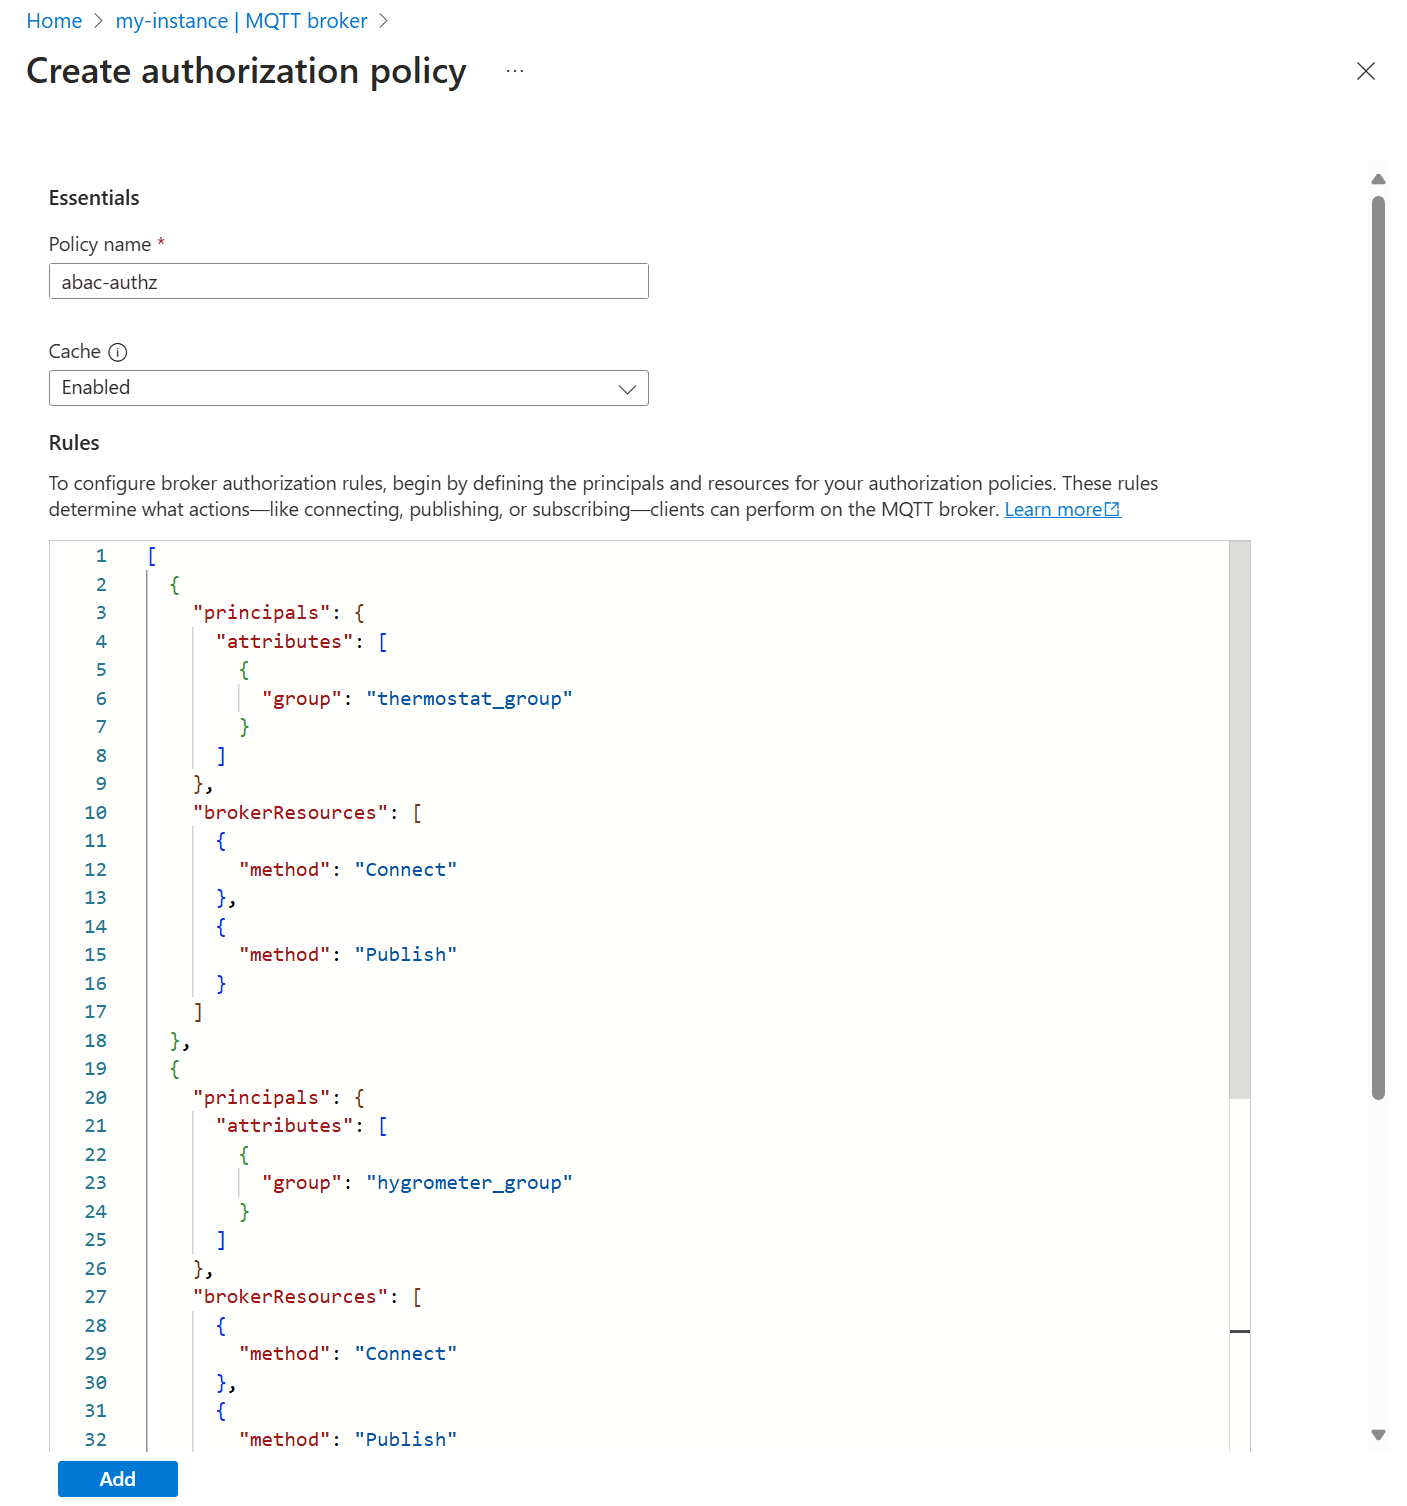
若要根據用戶端憑證屬性限制對 MQTT 主題的存取,請建立授權原則,將客戶端憑證屬性對應至特定主題上允許的動作。
在 Azure 入口網站 中,流覽至您的IoT作業實例。
在 [元件] 底下,選取 [MQTT Broker]。
選取 [授權] 索引標籤。
選取 [ 建立授權原則]。
針對 [ 原則名稱],輸入
abac-authz。在 [規則] 底下,輸入下列規則:
[
  {
    "principals": {
      "attributes": [
        {
          "group": "thermostat_group"
        }
      ]
    },
    "brokerResources": [
      {
        "method": "Connect"
      },
      {
        "method": "Publish",
        "topics": [
          "telemetry/temperature"
        ]
      }
    ]
  },
  {
    "principals": {
      "attributes": [
        {
          "group": "hygrometer_group"
        }
      ]
    },
    "brokerResources": [
      {
        "method": "Connect"
      },
      {
        "method": "Publish",
        "topics": [
          "telemetry/humidity"
        ]
      }
    ]
  },
  {
    "principals": {
      "attributes": [
        {
          "manufacturer": "fabrikam"
        }
      ]
    },
    "brokerResources": [
      {
        "method": "Connect"
      },
      {
        "method": "Publish",
        "topics": [
          "health/heartbeat"
        ]
      }
    ]
  },
  {
    "principals": {
      "usernames": [
        "heater"
      ]
    },
    "brokerResources": [
      {
        "method": "Connect"
      },
      {
        "method": "Subscribe",
        "topics": [
          "telemetry/temperature",
          "telemetry/humidity"
        ]
      }
    ]
  }
]
選取 [新增] 以儲存變更。

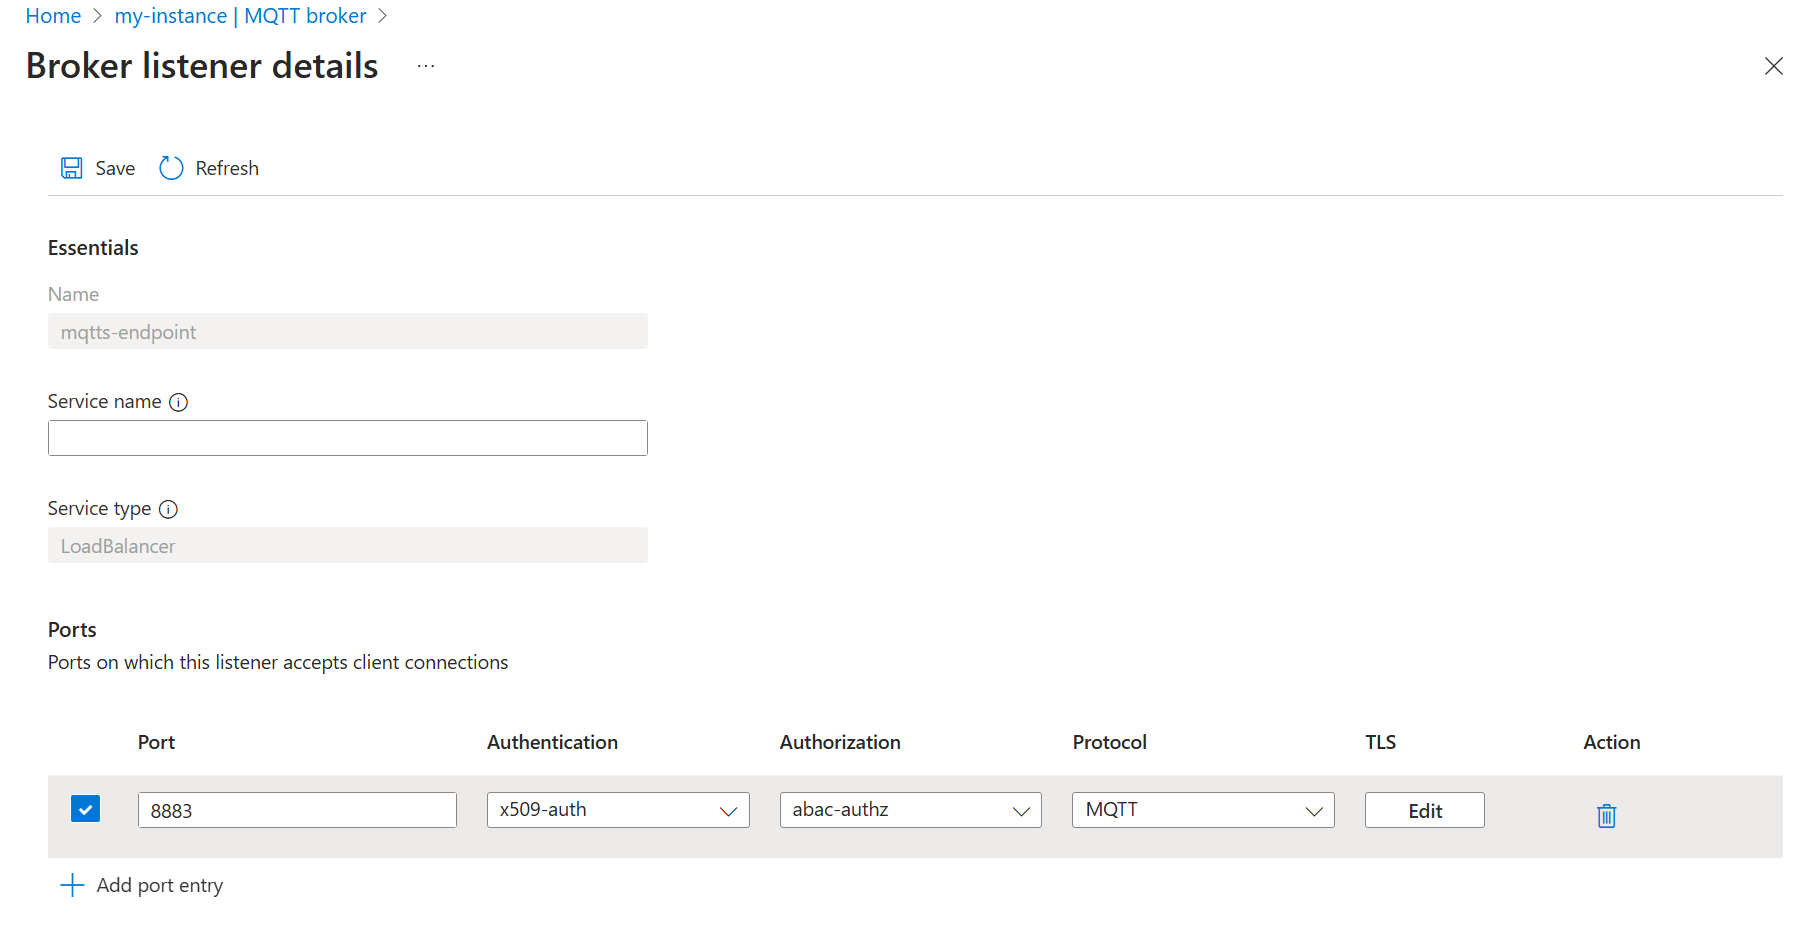
然後,更新 MQTT 訊息代理程式接聽程式以使用新的授權原則。
- 選取 [接聽程式] 索引標籤。
- 選取 mqtts-endpoint 接聽程式。
- 在 [埠>8883>授權] 下,選擇 abac-authz。
- 選取儲存。

將訊息發佈至受限制的主題
在本節中,我們會測試新套用的授權原則。
首先,使用 連線 thermostat 並嘗試在主題 telemetry/humidity上發佈 :
mosquitto_pub -t "telemetry/humidity" -m "example temperature measurement" -i thermostat \
-q 1 -V mqttv5 -d \
-h localhost \
--key thermostat.key \
--cert thermostat.crt \
--cafile contoso_root_ca.crt
由於 thermostat 是的一 thermostat_group部分,因此不允許發佈至濕度主題,因此發佈會失敗。
Client thermostat sending CONNECT
Client thermostat received CONNACK (0)
Client thermostat sending PUBLISH (d0, q1, r0, m1, 'telemetry/humidity', ... (6 bytes))
Client thermostat received PUBACK (Mid: 1, RC:135)
Warning: Publish 1 failed: Not authorized.
將 變更為 telemetry/temperature,這是允許且發行成功。 讓命令保持執行狀態。
mosquitto_pub -t "telemetry/temperature" -m "example temperature measurement" -i thermostat \
-q 1 -V mqttv5 -d \
-h localhost \
--repeat 10000 \
--repeat-delay 3 \
--key thermostat.key \
--cert thermostat.crt \
--cafile contoso_root_ca.crt
訂閱受限制主題的訊息
在個別的終端機會話中,與連線 heater 以訂閱 health/heartbeat。
mosquitto_sub -q 1 -t "health/heartbeat" -d -V mqttv5 \
-i heater \
-h localhost \
--key heater.key \
--cert heater.crt \
--cafile contoso_root_ca.crt
由於 heater 未獲授權訂閱活動訊號主題,因此訂用帳戶會失敗。 在這裡,程式代碼 135 表示 未獲得授權。
Client heater sending CONNECT
Client heater received CONNACK (0)
Client heater sending SUBSCRIBE (Mid: 1, Topic: health/heartbeat, QoS: 1, Options: 0x00)
Client heater received SUBACK
Subscribed (mid: 1): 135
將訂用帳戶主題切換至 telemetry/temperature,該 thermostat 主題仍在傳送訊息。
mosquitto_sub -q 1 -t "telemetry/temperature" -d -V mqttv5 \
-i heater \
-h localhost \
--key heater.key \
--cert heater.crt \
--cafile contoso_root_ca.crt
現在 heater 會開始接收訊息,因為它已獲得其 使用者名稱的授權。
在另一個不同的終端機會話中,使用 lightbulb將訊息發佈至 health/heartbeat :
mosquitto_pub -q 1 -t "health/heartbeat" -m "example heartbeat" -d -V mqttv5 \
-i lightbulb \
-h localhost \
--repeat 100 \
--repeat-delay 3 \
--key lightbulb.key \
--cert lightbulb.crt \
--cafile contoso_root_ca.crt
發行成功,因為 lightbulb 具有的 CN = Fabrikam Intermediate CA 1中繼憑證,其對應至 屬性 manufacturer=fabrikam。 具有該屬性的用戶端可以在 上 health/heartbeat發佈。 當客戶端開始傳送訊息時, heater 先前啟動並不會收到任何訊息。
清除資源
若要清除本教學課程中建立的資源,請刪除接聽程式和驗證和授權原則。
- 在 Azure 入口網站 中,流覽至您的IoT作業實例。
- 在 [元件] 底下,選取 [MQTT Broker]。
- 選取 [接聽程式] 索引標籤。
- 選取 mqtts-endpoint 接聽程式旁的複選框。
- 選取刪除。
- 確認刪除。
- 選取 [驗證] 索引標籤。
- 選取 x509-auth 旁的複選框。
- 選取刪除。
- 確認刪除。
- 選取 [授權] 索引標籤。
- 選取 abac-authz 旁的複選框。
- 選取刪除。
- 確認刪除。
此外,請刪除 Kubernetes 秘密和設定對應。
kubectl delete secret broker-server-cert -n azure-iot-operations
kubectl delete configmap fabrikam-ca -n azure-iot-operations
最後,刪除稍早產生的憑證和密鑰。
rm contoso_root_ca.crt contoso_root_ca.key contoso_intermediate_ca.crt contoso_intermediate_ca.key mqtts-endpoint.crt mqtts-endpoint.key
rm fabrikam_root_ca.crt fabrikam_root_ca.key fabrikam_intermediate_ca.crt fabrikam_intermediate_ca.key thermostat.crt thermostat.key hygrometer.crt hygrometer.key heater.crt heater.key lightbulb.crt lightbulb.key