移轉應用程式對 Azure 事件中樞使用無密碼連線
您必須使用帳戶存取金鑰或無密碼連線等設定來驗證應用程式對 Azure 服務的要求。 不過,您應該盡可能在應用程式中排定無密碼連線的優先順序。 使用密碼或祕密金鑰的傳統驗證方法會產生安全性風險和複雜度。 請造訪 Azure 服務中樞的無密碼連線,以深入了解移至無密碼連線的優點。
下列教學課程說明如何將現有的應用程式移轉成使用無密碼連線。 不論您是使用存取金鑰、連接字串或其他秘密型的方式,這些相同的移轉步驟都應該適用。
您可以將無密碼連線設定為同時適用於本機和 Azure 主機的環境。 在本節中,您會套用設定以允許個別使用者向 Azure 事件中樞進行驗證,以進行本機開發。
指派使用者角色
在本機開發時,請確定目前存取 Azure 事件中樞的使用者帳戶具有正確的權限。 您需要 Azure 事件中樞資料接收者和 Azure 事件中樞資料傳送者角色,才能讀取和寫入訊息資料。 若要指派此角色給您自己,您需要被指派使用者存取管理員角色,或另一個包含 Microsoft.Authorization/roleAssignments/write 動作的角色。 您可以使用 Azure 入口網站、Azure CLI 或 Azure PowerShell,將 Azure RBAC 角色指派給使用者。 您可以在 [範圍概觀] 頁面上,深入了解角色指派的可用範圍。
下列範例會將 Azure 事件中樞資料傳送者和 Azure 事件中樞資料接收者角色指派給您的用戶帳戶。 這些角色會授與事件中樞訊息的讀取和寫入存取權。
在 Azure 入口網站中,使用主要搜尋列或左側導覽找出您的事件中樞。
在事件中樞概觀頁面上,從左側功能表中選取 [存取控制 (IAM)]。
在 [存取控制 (IAM)] 頁面上,選取 [角色指派] 索引標籤。
從頂端功能表選取 [+ 新增],然後從產生的下拉功能表中選取 [新增角色指派]。
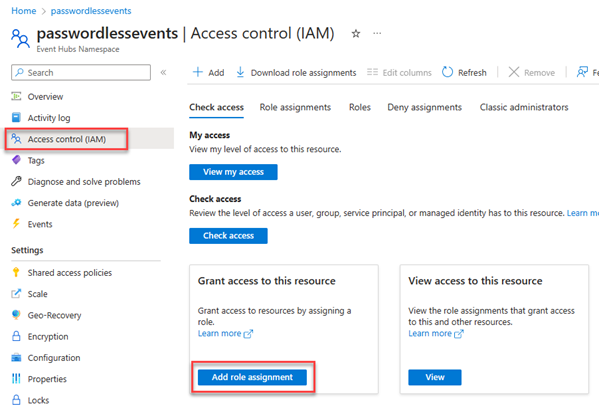
使用搜尋方塊,從結果篩選出所需的角色。 在此範例中,搜尋「Azure 事件中樞資料傳送者」選取相符的結果,然後選擇 [下一步]。
在 [存取權指派對象為] 下,選取 [使用者、群組或服務主體],然後選擇 [+ 選取成員]。
在對話方塊中,搜尋 Microsoft Entra 使用者名稱 (通常是您的 user@domain 電子郵件地址),然後在對話方塊底部選擇 [選取]。
選取 [檢閱 + 指派] 以移至最終頁面,然後再次選取 [檢閱 + 指派] 以完成此程序。
針對 Azure 事件中樞資料接收者角色重複這些步驟,以允許帳戶傳送和接收訊息。
若要使用 Azure CLI 在資源層級指派角色,您必須先使用 az eventhubs eventhub show 命令擷取資源識別碼。 您可以使用 --query 參數來篩選輸出屬性。
az eventhubs eventhub show \
    --resource-group '<your-resource-group-name>' \
    --namespace-name '<your-event-hubs-namespace>' \
    --name '<your-event-hub-name>' \
    --query id
複製上述命令的輸出 Id。 接著,您可以使用 Azure CLI 的 az role 命令來指派角色。
az role assignment create --assignee "<user@domain>" \
    --role "Azure Event Hubs Data Receiver" \
    --scope "<your-resource-id>"

az role assignment create --assignee "<user@domain>" \
    --role "Azure Event Hubs Data Sender" \
    --scope "<your-resource-id>"
若要使用 Azure PowerShell 在資源層級指派角色,您必須先使用 Get-AzResource 命令擷取資源識別碼。
Get-AzResource -ResourceGroupName "<yourResourceGroupname>" -Name "<yourEventHubsNamespace>"
複製上述命令輸出的 Id 值。 接著,您可以在 PowerShell 中使用 New-AzRoleAssignment 命令來指派角色。
New-AzRoleAssignment -SignInName <user@domain> `
    -RoleDefinitionName "Azure Event Hubs Data Receiver" `
    -Scope <yourEventHubsId>

New-AzRoleAssignment -SignInName <user@domain> `
    -RoleDefinitionName "Azure Event Hubs Data Sender" `
    -Scope <yourEventHubsId>
重要
在大部分情況下,角色指派在 Azure 中傳播只需要一兩分鐘,但在罕見情況下,可能需要長達八分鐘。 如果您第一次執行程式碼時收到驗證錯誤,請稍候片刻再試一次。
在本機登入 Azure
針對本機開發,請確定使用您指派角色的相同 Microsoft Entra 帳戶進行驗證。 您可以透過 Azure CLI 或 Azure PowerShell 這類熱門開發工具來進行驗證。 您可以用來驗證的開發工具會因語言而異。
使用下列命令透過 Azure CLI 登入 Azure:
az login
選取 Visual Studio 右上角的 [登入] 按鈕。
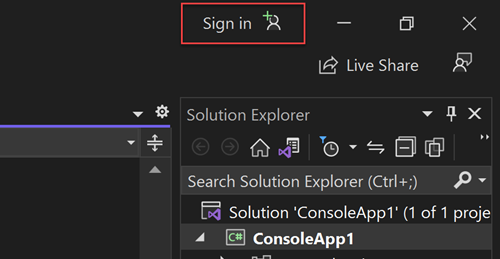
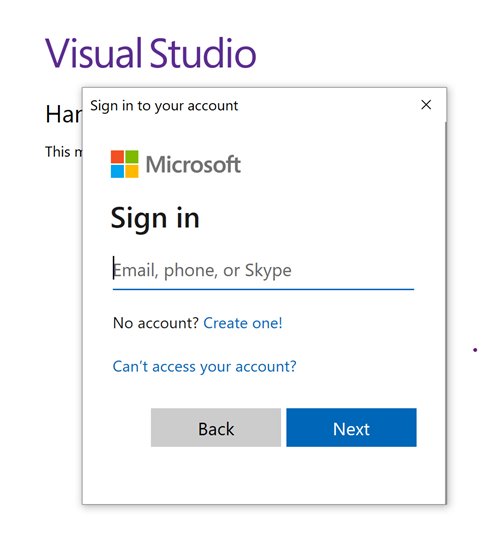
使用您先前指派角色的 Microsoft Entra 帳戶來登入。
必須安裝 Azure CLI,才能透過 Visual Studio Code 使用 DefaultAzureCredential。
在 Visual Studio Code 的主功能表上,瀏覽至 [終端機] > [新增終端機]。
使用下列命令透過 Azure CLI 登入 Azure:
az login
使用 PowerShell 透過下列命令登入 Azure:
Connect-AzAccount
使用無密碼連線更新應用程式碼
下列每個生態系統的 Azure 身分識別用戶端程式庫,都會提供處理 Azure 無密碼驗證的 DefaultAzureCredential 類別:
DefaultAzureCredential 支援多重驗證方法。 使用的方法取決於流程執行。 此方法可讓您的應用程式在不同的環境中 (本機或實際執行環境) 使用不同的驗證方法,而不需要實作環境特有的程式碼。 如需 DefaultAzureCredential 尋找認證的順序和位置,請參閱上述連結。
若要在 .NET 應用程式中使用 DefaultAzureCredential,請安裝 Azure.Identity 套件:
dotnet add package Azure.Identity
在檔案頂端,新增下列程式碼:
using Azure.Identity;
在程式碼中找出哪些位置建立 EventHubProducerClient 或 EventProcessorClient 物件以連線至 Azure 事件中樞。 將程式碼更新為符合下列範例:
DefaultAzureCredential credential = new();
var eventHubNamespace = $"https://{namespace}.servicebus.windows.net";

// Event Hubs producer
EventHubProducerClient producerClient = new(
    eventHubNamespace,
    eventHubName,
    credential);

// Event Hubs processor
EventProcessorClient processorClient = new(
    storageClient,
    EventHubConsumerClient.DefaultConsumerGroupName,
    eventHubNamespace,
    eventHubName,
    credential);
若要在 Go 應用程式中使用 DefaultAzureCredential,請安裝 azidentity 模組:
go get -u github.com/Azure/azure-sdk-for-go/sdk/azidentity
在檔案頂端,新增下列程式碼:
import (
    "github.com/Azure/azure-sdk-for-go/sdk/azidentity"
)
在程式碼中找出哪些位置建立 ProducerClient 或 ConsumerClient 執行個體以連線至 Azure 事件中樞。 將程式碼更新為符合下列範例:
credential, err := azidentity.NewDefaultAzureCredential(nil)
eventHubNamespace := fmt.Sprintf(
    "https://%s.servicebus.windows.net",
    namespace)

if err != nil {
    // handle error
}

// Event Hubs producer
producerClient, err = azeventhubs.NewProducerClient(
    eventHubNamespace,
    eventHubName,
    credential,
    nil)

if err != nil {
    // handle error
}

// Event Hubs processor
processorClient, err = azeventhubs.NewConsumerClient(
    eventHubNamespace,
    eventHubName,
    azeventhubs.DefaultConsumerGroup,
    credential,
    nil)

if err != nil {
    // handle error
}
若要在 Java 應用程式中使用 DefaultAzureCredential,請透過下列其中一種方式來安裝 azure-identity 套件:
- 包括 BOM 檔案。
- 包括直接相依性。
在檔案頂端,新增下列程式碼:
import com.azure.identity.DefaultAzureCredentialBuilder;
在程式碼中找出哪些位置建立 EventHubProducerClient 或 EventProcessorClient 物件以連線至 Azure 事件中樞。 將程式碼更新為符合下列範例:
DefaultAzureCredential credential = new DefaultAzureCredentialBuilder()
    .build();
String eventHubNamespace = "https://" + namespace + ".servicebus.windows.net";

// Event Hubs producer
EventHubProducerClient producerClient = new EventHubClientBuilder()
    .credential(eventHubNamespace, eventHubName, credential)
    .buildProducerClient();

// Event Hubs processor
EventProcessorClient processorClient = new EventProcessorClientBuilder()
    .consumerGroup(consumerGroupName)
    .credential(eventHubNamespace, eventHubName, credential)
    .checkpointStore(new SampleCheckpointStore())
    .processEvent(eventContext -> {
        System.out.println(
            "Partition ID = " +
            eventContext.getPartitionContext().getPartitionId() +
            " and sequence number of event = " +
            eventContext.getEventData().getSequenceNumber());
    })
    .processError(errorContext -> {
        System.out.println(
            "Error occurred while processing events " +
            errorContext.getThrowable().getMessage());
    })
    .buildEventProcessorClient();
若要在 Node.js 應用程式中使用 DefaultAzureCredential,請安裝 @azure/identity 套件:
npm install --save @azure/identity
在檔案頂端,新增下列程式碼:
import { DefaultAzureCredential } from "@azure/identity";
在程式碼中找出哪些位置建立 EventHubProducerClient 或 EventHubConsumerClient 物件以連線至 Azure 事件中樞。 將程式碼更新為符合下列範例:
const credential = new DefaultAzureCredential();
const eventHubNamespace = `https://${namespace}.servicebus.windows.net`;

// Event Hubs producer
const producerClient = new EventHubProducerClient(
    eventHubNamespace,
    eventHubName,
    credential);

// Event Hubs processor
const processorClient = new EventHubConsumerClient(
    consumerGroupName,
    eventHubNamespace,
    eventHubName,
    credential
);
若要在 Python 應用程式中使用 DefaultAzureCredential,請安裝 azure-identity 套件:
pip install azure-identity
在檔案頂端,新增下列程式碼:
from azure.identity import DefaultAzureCredential
在程式碼中找出哪些位置建立 EventHubProducerClient 或 EventHubConsumerClient 物件以連線至 Azure 事件中樞。 將程式碼更新為符合下列範例:
credential = DefaultAzureCredential()
event_hub_namespace = "https://%s.servicebus.windows.net" % namespace

# Event Hubs producer
producer_client = EventHubProducerClient(
    fully_qualified_namespace = event_hub_namespace,
    eventhub_name = event_hub_name,
    credential = credential
)

# Event Hubs processor
processor_client = EventHubConsumerClient(
    fully_qualified_namespace = event_hub_namespace,
    eventhub_name = event_hub_name,
    consumer_group = "$Default",
    checkpoint_store = checkpoint_store,
    credential = credential
)
請務必在 EventHubProducerClient 或 EventProcessorClient 物件的 URI 中更新事件中樞命名空間。 您可以在 Azure 入口網站的概觀頁面上找到命名空間名稱。

在本機執行應用程式
完成這些程式碼變更之後,請在本機執行您的應用程式。 新的組態應該會挑選您的本機認證,例如 Azure CLI、Visual Studio 或 IntelliJ。 您在 Azure 中指派給使用者的角色可讓您的應用程式在本機連線至 Azure 服務。
一旦您的應用程式設定為使用無密碼連線並在本機執行,相同的程式碼在部署至 Azure 之後就可以向 Azure 服務進行驗證。 下列各節說明如何設定已部署的應用程式,以使用受控識別來連線至 Azure 事件中樞。 受控識別可針對應用程式提供 Microsoft Entra ID 中的自動受控識別,以在連線至支援 Microsoft Entra 驗證的資源時使用。 深入了解受控識別:
建立受控識別
您可以使用 Azure 入口網站或 Azure CLI 來建立使用者指派的受控識別。 您的應用程式使用身分識別向其他服務進行驗證。
- 在 Azure 入口網站頂端,搜尋受控識別。 選取受控識別結果。
- 選取受控識別概觀頁面頂端的+ 建立。
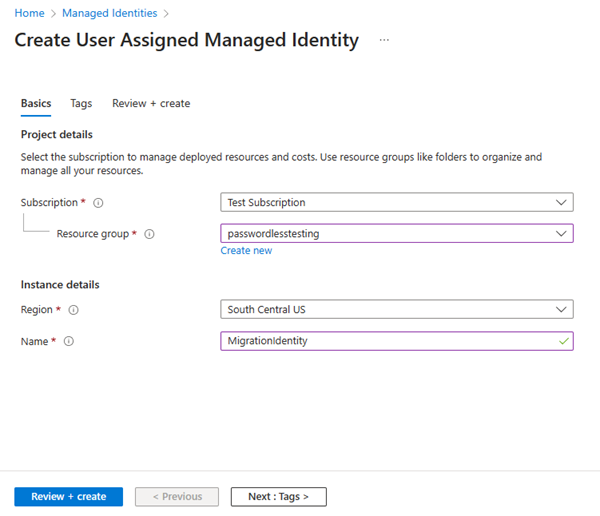
- 在 [基本] 索引標籤上,輸入下列值:
- 訂用帳戶:選取您想要的訂用帳戶。
- 資源群組:選取您想要的資源群組。
- 區域:選取靠近您所在位置的區域。
- 名稱:輸入身分識別的可辨識名稱,例如 MigrationIdentity。
- 選取頁面底部的 [檢閱 + 建立] 。
- 驗證檢查完成時,請選取建立。 Azure 會建立新的使用者指派身分識別。
建立資源之後,請選取移至資源以檢視受控識別的詳細資料。
使用az identity create命令,以建立使用者指派的受控識別:
az identity create --name MigrationIdentity --resource-group <your-resource-group>
將受控識別與您的 Web 應用程式相關聯
您需要將 Web 應用程式設定為使用您所建立的受控識別。 使用 Azure 入口網站或 Azure CLI,以將身分識別指派給應用程式。
完成 Azure 入口網站中的下列步驟,以將身分識別與您的應用程式相關聯。 這些相同的步驟適用於下列 Azure 服務:
- Azure Spring Apps
- Azure 容器應用程式
- Azure 虛擬機器
- Azure Kubernetes Service
導覽至您 Web 應用程式的概觀頁面。
從左側導覽中,選取身分識別。
在身分識別頁面上,切換至使用者指派索引標籤。
選取+ 新增,以開啟新增使用者指派的受控識別 飛出視窗。
選取先前用來建立身分識別的訂用帳戶。
依名稱搜尋 MigrationIdentity,然後從搜尋結果中予以選取。
選取新增,以將身分識別與您的應用程式相關聯。

使用下列 Azure CLI 命令,以將身分識別與您的應用程式相關聯:
使用 az identity show 命令,以擷取您所建立受控識別的識別碼。 請複製輸出值,以用於下一個步驟。
az identity show --name MigrationIdentity -g <your-identity-resource-group-name> --query id
您可以使用 az webapp identity assign 命令,將受控識別指派給 Azure App Service 執行個體。
az webapp identity assign \
    --resource-group <resource-group-name> \
    --name <webapp-name>
    --identities <managed-identity-id>
您可以使用 az spring app identity assign 命令,將受控識別指派給 Azure Spring 應用程式執行個體。
az spring app identity assign \
    --resource-group <resource-group-name> \
    --name <app-name> \
    --service <service-name>
    --user-assigned <managed-identity-id>
您可以使用 az containerapp identity assign 命令,以將受控識別指派給虛擬機器。
az containerapp identity assign \
    --resource-group <resource-group-name> \
    --name <app-name>
    --user-assigned <managed-identity-id>
您可以使用 az vm identity assign 命令,將受控識別指派給虛擬機器。
az vm identity assign \
    --resource-group <resource-group-name> \
    --name <virtual-machine-name>
    --identities <managed-identity-id>
您可以使用 az aks update命令,將受控識別指派給 Azure Kubernetes Service (AKS) 執行個體。
az aks update \
    --resource-group <resource-group-name> \
    --name <cluster-name> \
    --enable-managed-identity \
    --assign-identity <managed-identity-id> \
    --assign-kubelet-identity <managed-identity-id>
您可以使用服務連接器,以 Azure CLI 建立 Azure 計算裝載環境和目標服務之間的連線。 Service Connector CLI 命令會自動將適當的角色指派至您的身分識別。 您可以在概觀頁面上深入了解服務連接器及支援的案例。
使用 az identity show 命令,以擷取您所建立受控識別的用戶端識別碼。 複製這些值以供稍後使用。
az identity show \
    --name MigrationIdentity \
    --resource-group <your-resource-group> \
    --query clientId
使用適當的 CLI 命令來建立服務連線:
如果您使用 Azure App Service,請使用 az webapp connection 命令:
az webapp connection create eventhub \
    --resource-group <resource-group-name> \
    --name <webapp-name> \
    --target-resource-group <target-resource-group-name> \
    --account <target-event-hub-namespace> \
    --user-identity "client-id=<your-identity-client-id>" "subs-id=<your-subscription-id>"
如果您使用 Azure Spring Apps,請使用 az spring connection 命令:
az spring connection create eventhub \
    --resource-group <resource-group-name> \
    --service <service-instance-name> \
    --app <app-name> \
    --deployment <deployment-name> \
    --target-resource-group <target-resource-group> \
    --account <target-event-hub-namespace> \
    --user-identity "client-id=<your-identity-client-id>" "subs-id=<your-subscription-id>"
如果您使用 Azure 容器應用程式,請使用 az containerapp connection 命令:
az containerapp connection create eventhub \
    --resource-group <resource-group-name> \
    --name <containerapp-name> \
    --target-resource-group <target-resource-group> \
    --account <target-event-hub-namespace> \
    --user-identity "client-id=<your-identity-client-id>" "subs-id=<your-subscription-id>"
將角色指派給受控識別
接下來,必須授權您建立的受控識別來存取事件中樞。 透過將角色指派給受控識別授與權限,就像指派給本機開發使用者一樣。
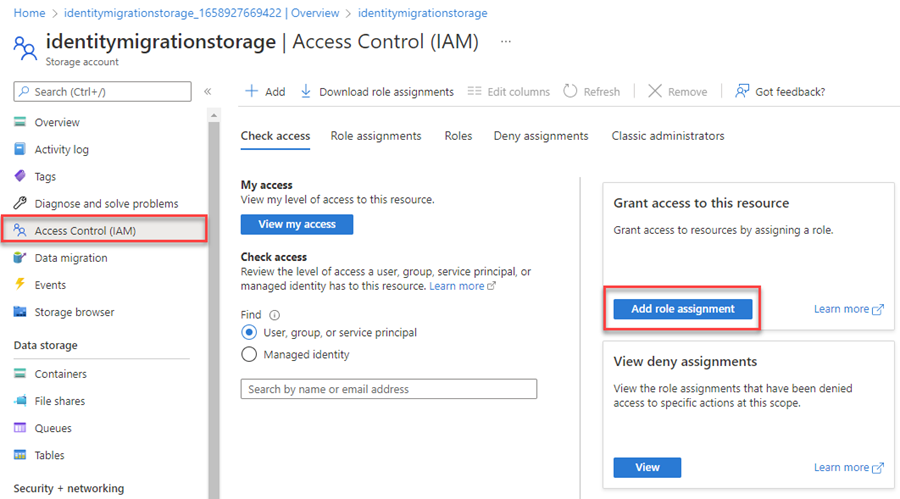
瀏覽至事件中樞概觀頁面,然後從左側導覽中選取 [存取控制 (IAM)]。
選擇 [新增角色指派]
在 [角色] 搜尋方塊中,搜尋「Azure 事件中樞資料傳送者」,此角色常用於管理佇列的資料作業。 根據您的使用案例,您可以指派任何適合的角色。 從清單中選取「Azure 事件中樞資料傳送者」,然後選擇 [下一步]。
在 [新增角色指派] 畫面上,針對 [存取權指派對象為] 選項,選取 [受控識別]。 然後選擇 [+選取成員]。
在飛出視窗中,透過名稱和從結果中選取來搜尋您建立的受控識別。 選擇選取以關閉飛出視窗功能表。
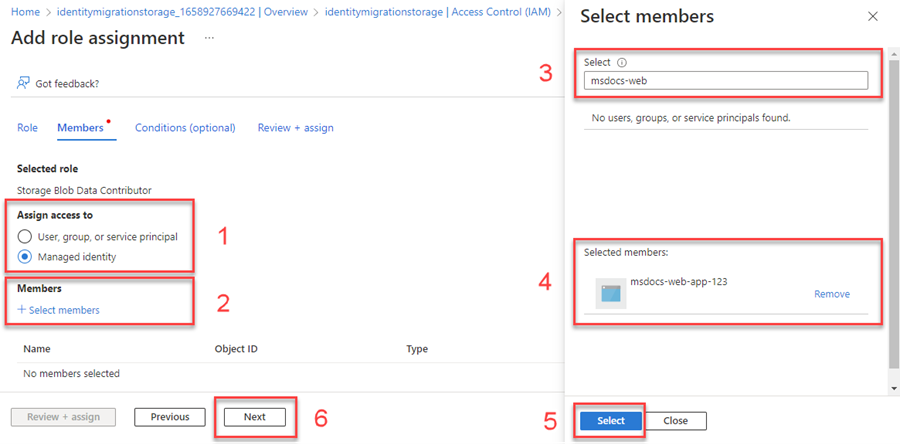
選取幾次 [下一步],直到能夠選取 [檢閱 + 指派] 來完成角色指派為止。
針對 Azure 事件中樞資料接收者角色重複這些步驟。
若要使用 Azure CLI 在資源層級指派角色,您必須先使用 az eventhubs eventhub show show 命令擷取資源識別碼。 您可以使用 --query 參數來篩選輸出屬性。
az eventhubs eventhub show \
    --resource-group '<your-resource-group-name>' \
    --namespace-name '<your-event-hubs-namespace>' \
    --name '<your-event-hub-name>' \
    --query id
複製上述命令的輸出識別碼。 接著,您可以使用 Azure CLI 的 az role assignment 命令來指派角色。
az role assignment create --assignee "<user@domain>" \
    --role "Azure Event Hubs Data Receiver" \
    --scope "<your-resource-id>"

az role assignment create --assignee "<user@domain>" \
    --role "Azure Event Hubs Data Sender" \
    --scope "<your-resource-id>"
如果您使用服務連接器來連線您的服務,則不需要完成此步驟。 當您執行 Service Connector CLI 命令時,會為您處理必要的角色設定。
更新應用程式碼
您需要設定應用程式碼,以尋找您在部署至 Azure 時所建立的特定受控識別。 在某些情況下,明確設定應用程式的受控識別也會防止意外偵測到以及自動使用其他環境身分識別。
在受控識別概觀頁面上,將用戶端識別碼值複製至剪貼簿。
套用下列語言特定變更:
建立 DefaultAzureCredentialOptions 物件,並將其傳遞給 DefaultAzureCredential。 將 ManagedIdentityClientId 屬性設定為用戶端識別碼。
DefaultAzureCredential credential = new(
    new DefaultAzureCredentialOptions
    {
        ManagedIdentityClientId = managedIdentityClientId
    });
將 AZURE_CLIENT_ID 環境變數設定為受控識別用戶端識別碼。 DefaultAzureCredential 會讀取此環境變數。
呼叫 managedIdentityClientId 方法。 將用戶端識別碼傳遞給它。
DefaultAzureCredential credential = new DefaultAzureCredentialBuilder()
    .managedIdentityClientId(managedIdentityClientId)
    .build();
建立其 managedIdentityClientId 屬性設定為用戶端識別碼的 DefaultAzureCredentialClientIdOptions 物件。 將該物件傳遞給 DefaultAzureCredential 建構函式。
const credential = new DefaultAzureCredential({
  managedIdentityClientId
});
將 DefaultAzureCredential 建構函式的 managed_identity_client_id 參數設定為用戶端識別碼。
credential = DefaultAzureCredential(
    managed_identity_client_id = managed_identity_client_id
)
在進行這項變更之後,將您的程式碼重新部署至 Azure,以套用設定更新。
測試應用程式
部署已變更的程式碼之後,請在瀏覽器中瀏覽至您的託管應用程式。 您的應用程式應該能夠成功連線到事件中樞。 請謹記,角色指派可能需要幾分鐘才會傳播到整個 Azure 環境。 您的應用程式現在已設定為在本機和實際執行環境中執行,而不需要開發人員管理應用程式本身的秘密。
下一步
在本教學課程中,您已了解如何將應用程式移轉為無密碼連線。
您可以閱讀下列資源,以更深入探索本文所討論的概念:


