快速入門:從 Azure 事件方格命名空間主題傳送及接收訊息 (.NET)
在本快速入門中,您會執行下列步驟:
- 使用 Azure 入口網站建立事件方格命名空間。
- 使用 Azure 入口網站建立事件方格命名空間主題。
- 使用 Azure 入口網站建立事件訂閱。
- 撰寫 .NET 主控台應用程式,以將一組訊息傳送到主題
- 撰寫 .NET 主控台應用程式,從主題接收這些訊息。
注意
本快速入門提供實作簡單情節的逐步指示,說明如何將一批訊息傳送至事件方格命名空間主題,並接收該訊息。 如需 .NET 用戶端程式庫的概觀,請參閱適用於 .NET 的 Azure 事件方格用戶端程式庫。 如需更多樣本,請參閱 GitHub 上的事件方格 .NET 樣本。
必要條件
如果您不熟悉服務,請先參閱事件方格概觀,再執行本快速入門。
- Azure 訂用帳戶。 若要使用 Azure 服務 (包括 Azure 事件方格),您需要訂用帳戶。 如果您沒有現有 Azure 帳戶,您可以註冊免費試用。
- Visual Studio 2022。 應用程式範例會使用 C# 10 中引進的新功能。 若要使用最新的語法,建議您安裝 .NET 6.0 或更高版本,並將語言版本設定為
latest。 如果您使用的是 Visual Studio,Visual Studio 2022 之前的版本與建置 C# 10 專案所需的工具不相容。
在 Azure 入口網站中建立命名空間
Azure 事件方格中的命名空間是一或多個主題、用戶端、用戶端群組、主題空間和權限繫結的邏輯容器。 提供唯一的命名空間,可讓您在相同 Azure 區域中擁有多個資源。 有了 Azure 事件方格命名空間,您現在可以將相關資源分組在一起,並以 Azure 訂用帳戶中單一單位的形式進行管理。
請遵循下列各節來建立、檢視及管理 Azure 事件方格命名空間。
若要建立命名空間:
登入 Azure 入口網站。
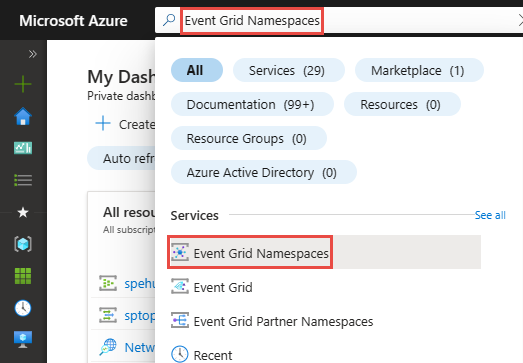
在搜尋方塊中,輸入事件方格命名空間,然後從結果中選取 [事件方格命名空間]。
在 [事件方格命名空間] 頁面上,選取工具列上的 [+ 建立]。
![螢幕擷取畫面顯示 [事件方格命名空間] 頁面,其中已選取命令列上的 [建立] 按鈕。](media/create-view-manage-namespaces/namespace-create-button.png)
在 [基本] 頁面上,遵循下列步驟。
選取您要在其中建立命名空間的 [Azure 訂用帳戶]。
選取現有的資源群組,或建立資源群組。
輸入命名空間的名稱。
選取您要在其中建立命名空間的區域或 [位置]。
選取頁面底部的 [檢閱 + 建立] 。
![螢幕擷取畫面顯示 [建立命名空間] 頁面的 [基本] 索引標籤。](media/create-view-manage-namespaces/create-namespace-basics-page.png)
在 [檢閱 + 建立] 分頁上檢閱設定,然後選取 [建立]。
在 [部署成功] 頁面上,選取 [移至資源] 以瀏覽至您的命名空間。
建立命名空間主題
如果您不在 [事件方格命名空間] 頁面上,請遵循建立、檢視和管理命名空間步驟來檢視您想要用來建立主題的命名空間。
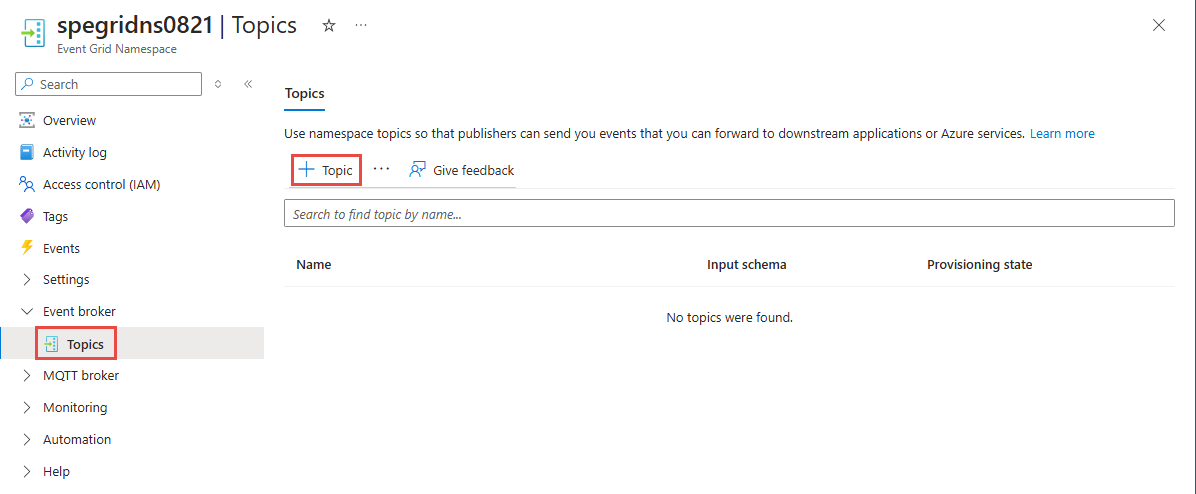
在 [事件方格命名空間] 頁面上,選取左側功能表中 [事件代理人] 區段中的 [主題] 選項。
在 [主題] 頁面上,選取命令列上的 [+ 主題] 按鈕。
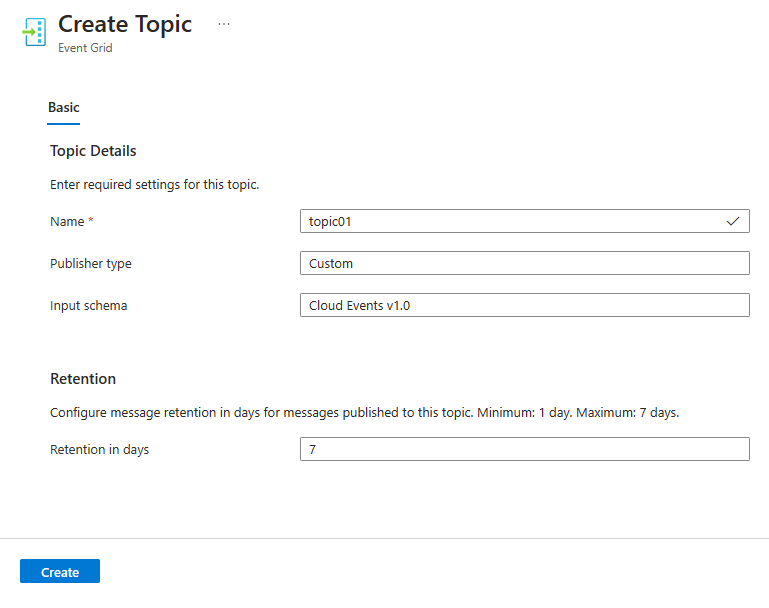
在 [建立主題] 頁面上,輸入您要建立的主題名稱,然後選取 [建立]。
建立事件訂閱
如果您在 Azure 入口網站中事件方格命名空間的 [主題] 頁面上,請從主題清單中選取您的主題。 如果您位於 [主題] 頁面上,請遵循建立、檢視及管理命名空間主題的指示,以識別您想要用來建立事件訂閱的主題。
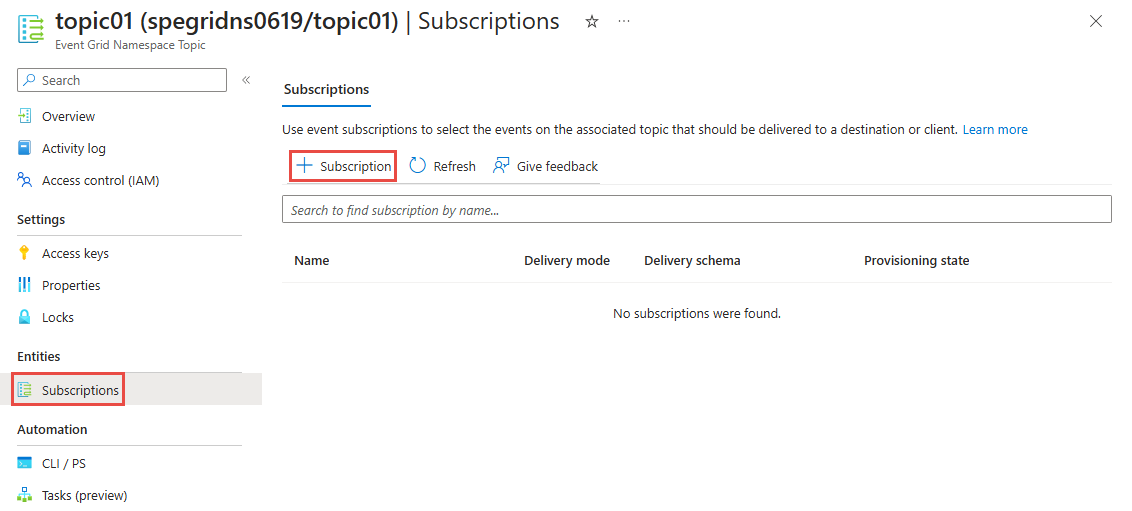
在 [事件方格命名空間主題] 頁面上,選取左側功能表 [實體] 區段中的 [訂閱] 選項。
在 [訂閱] 頁面上,選取命令列上的 [+ 訂用帳戶] 按鈕。
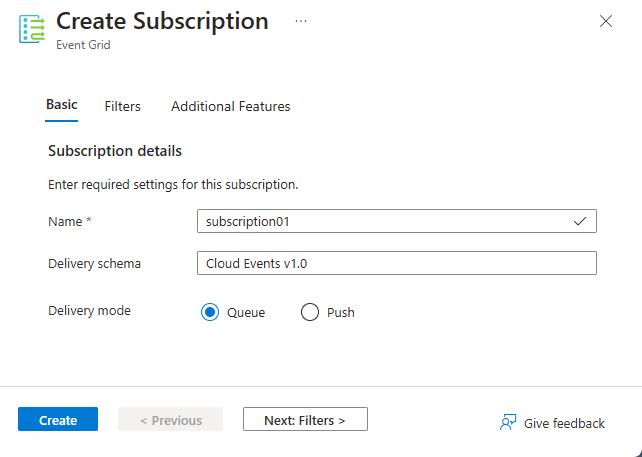
在 [基本] 索引標籤中,遵循下列步驟:
輸入您想要建立之訂用帳戶名稱
確認 [傳遞結構描述] 已設定 Cloud Events v1.0。
確認 [傳遞模式] 設定為 [佇列] (提取模式)。
選取頁面底部的 [下一步:篩選]。
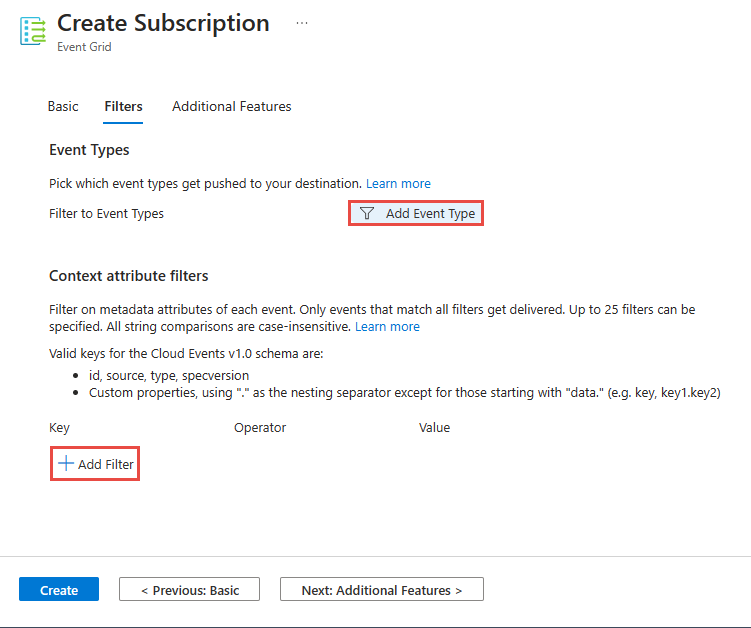
在 [篩選條件] 頁面中,新增您想要在訂用帳戶中篩選的事件類型名稱,然後新增您想要在訂用帳戶中使用的內容屬性篩選條件。 然後,選取頁面底部的 [下一步: 其他功能]。
在 [其他功能] 分頁中,您可以指定事件保留、最大傳遞計數、鎖定持續時間和無效信件處理設定。
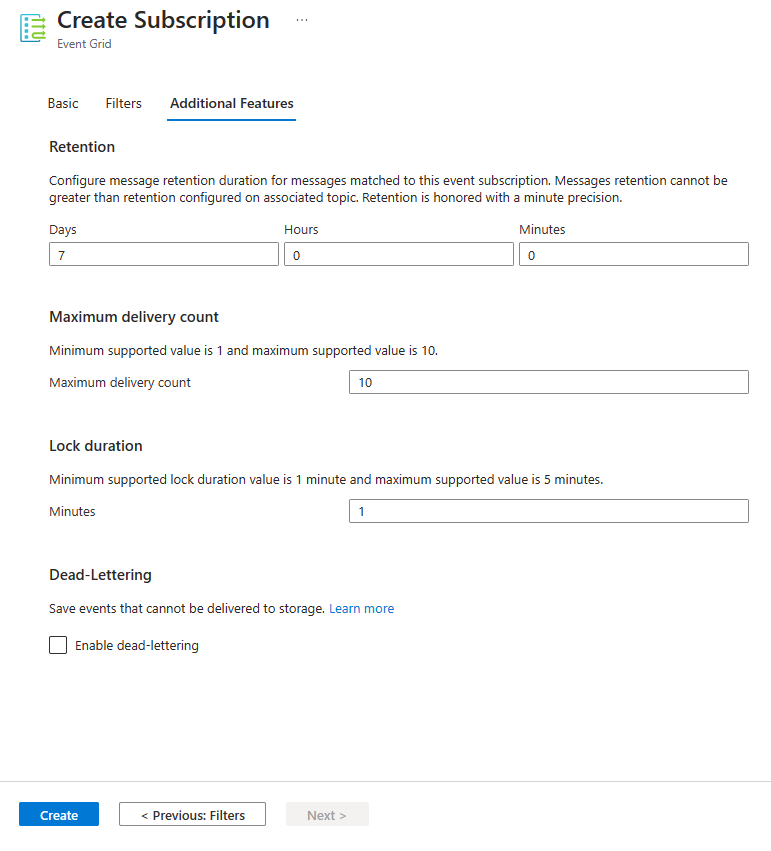
選取 [建立] 以建立事件訂閱。
向 Azure 驗證應用程式
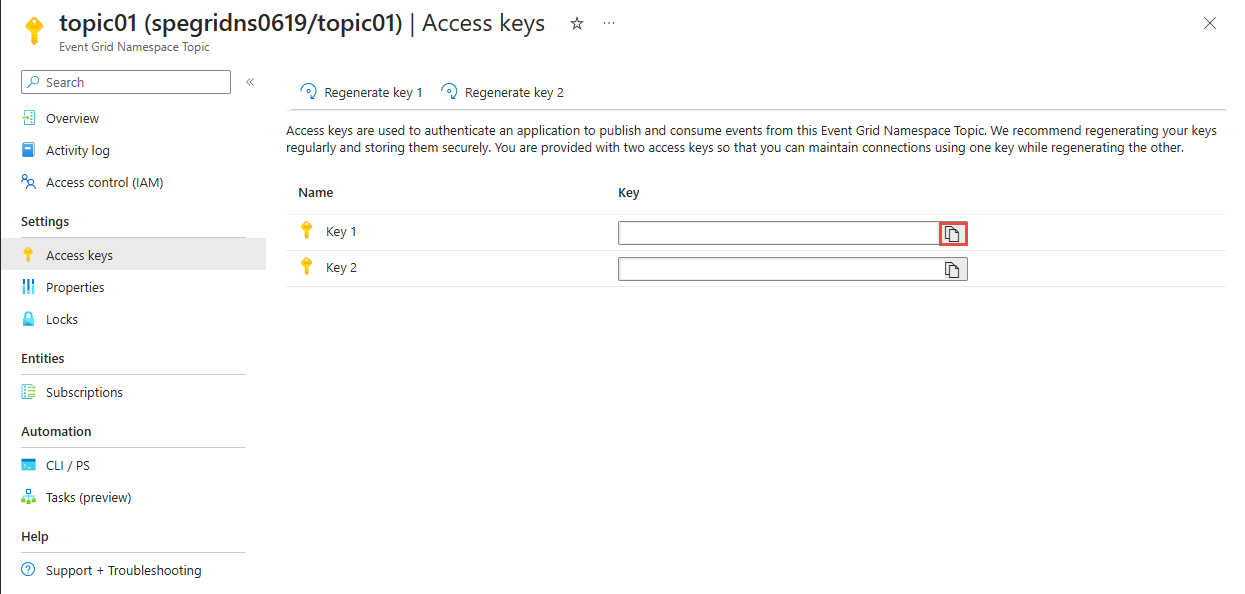
本快速入門會顯示連接到 Azure 事件方格的方式:連接字串。 本節說明如何使用連接字串來連線到事件方格命名空間。 如果您不熟悉 Azure,則連接字串選項可能會更容易遵循。 建立新的事件方格命名空間會自動產生初始的主要和次要金鑰,分別授與命名空間或主題各個層面的完整控制權。 用戶端可以使用連接字串來連接到事件方格命名空間。 若要複製命名空間主題的存取金鑰,請遵循下列步驟:
在 [事件方格命名空間] 頁面上,選取 [主題]。
選取您需要存取的主題。
在 [存取金鑰] 頁面上,選取 [金鑰 1 或金鑰 2] 旁邊的複製按鈕,將存取金鑰複製到剪貼簿以供稍後使用。 將此值貼到記事本或一些其他暫存位置。
啟動 Visual Studio
啟動 Visual Studio。 如果您看到 [開始使用] 視窗,請選取右側窗格中的 [不使用程式碼繼續] 連結。
將訊息傳送到主題
本節說明如何建立 .NET 主控台應用程式,將訊息傳送至事件方格主題。
建立主控台應用程式
在 Visual Studio 中,選取 [檔案] -> [新增] -> [專案] 功能表。
在 [建立新專案] 對話方塊上,執行下列步驟:如果您沒有看到此對話方塊,請在功能表上選取 [檔案]、選取 [新增],然後選取 [專案]。
選取 [C#] 作為程式設計語言。
選取 [主控台] 作為應用程式的類型。
從結果清單中選取 [主控台應用程式]。
然後選取下一步。
![螢幕擷取畫面顯示 [建立新專案] 對話方塊,其中已選取 [C#] 和 [控制台]。](media/event-grid-dotnet-get-started-events/new-send-project.png)
輸入 EventSender 作為專案名稱、輸入 EventGridQuickStart 作為解決方案名稱,然後選取 [下一步]。
![螢幕擷取畫面顯示 [設定新專案] 對話方塊中解決方案和專案名稱。](media/event-grid-dotnet-get-started-events/event-sender.png)
在 [其他資訊] 頁面上,選取 [建立] 以建立解決方案和專案。
將 NuGet 套件新增至專案
從功能表選取 [工具]>[NuGet 套件管理員]>[套件管理員主控台]。
執行以下命令來安裝 Azure.Messaging.EventGrid NuGet 套件:
Install-Package Azure.Messaging.EventGrid.Namespaces
新增程式碼以將事件傳送至命名空間主題
以下列程式碼取代
Program.cs的內容。 重要步驟會顯示,且程式碼註解中附有額外資訊。重要
使用命名空間端點、主題名稱和主題索引鍵,更新程式碼片段中的預留位置值 (
<NAMESPACE-ENDPOINT>,<TOPIC-NAME>,<TOPIC-ACCESS-KEY>,<TOPIC-SUBSCRIPTION-NAME>)。using Azure.Messaging; using Azure; using Azure.Messaging.EventGrid.Namespaces; // TODO: Replace the following placeholders with appropriate values // Endpoint of the namespace that you can find on the Overview page for your Event Grid namespace. Prefix it with https://. // Should be in the form: https://namespace01.eastus-1.eventgrid.azure.net. var namespaceEndpoint = "<NAMESPACE-ENDPOINT>"; // Name of the topic in the namespace var topicName = "<TOPIC-NAME>"; // Access key for the topic var topicKey = "<TOPIC-ACCESS-KEY>"; // Construct the client using an Endpoint for a namespace as well as the access key var client = new EventGridSenderClient(new Uri(namespaceEndpoint), topicName, new AzureKeyCredential(topicKey)); // Publish a single CloudEvent using a custom TestModel for the event data. var @ev = new CloudEvent("employee_source", "type", new TestModel { Name = "Bob", Age = 18 }); await client.SendAsync(ev); // Publish a batch of CloudEvents. await client.SendAsync( new[] { new CloudEvent("employee_source", "type", new TestModel { Name = "Tom", Age = 55 }), new CloudEvent("employee_source", "type", new TestModel { Name = "Alice", Age = 25 })}); Console.WriteLine("Three events have been published to the topic. Press any key to end the application."); Console.ReadKey(); public class TestModel { public string Name { get; set; } public int Age { get; set; } }建置專案,並確定沒有任何錯誤。
執行程式,並等待確認訊息。
Three events have been published to the topic. Press any key to end the application.重要
在大部分情況下,角色指派在 Azure 中傳播只需要一兩分鐘。 在少數情況下,可能需要長達八分鐘的時間。 如果您第一次執行程式碼時收到驗證錯誤,請稍候片刻再試一次。
在 Azure 入口網站中遵循下列步驟:
取用主題中的訊息
在本節中,您會建立 .NET 主控台應用程式,以接收來自主題的訊息。
建立專案以接收已發佈的 CloudEvents
- 在 [方案總管] 視窗中,以滑鼠右鍵按一下 [EventGridQuickStart] 解決方案,並指向 [新增],然後選取 [新增專案]。
- 選取 [主控台應用程式],然後選取 [下一步]。
- 輸入 EventReceiver 作為專案名稱,然後選取 [建立]。
- 在 [方案總管] 視窗中,以滑鼠右鍵按一下 [EventReceiver],然後選取 [設定為啟始專案]。
將 NuGet 套件新增至專案
從功能表選取 [工具]>[NuGet 套件管理員]>[套件管理員主控台]。
執行以下命令來安裝 Azure.Messaging.EventGrid NuGet 套件。 選取 [EventReceiver] 作為預設專案 (如果尚未設定的話)。
Install-Package Azure.Messaging.EventGrid.Namespaces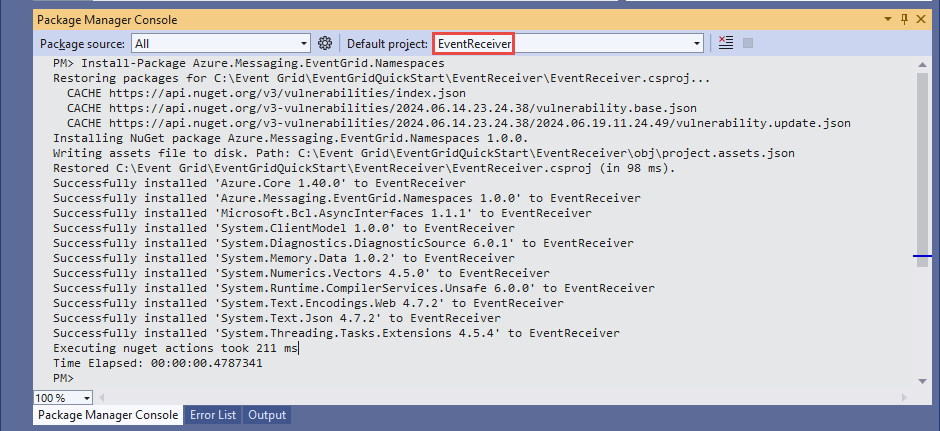
新增程式碼,以從主題接收事件
在本節中,您會新增程式碼以從佇列中擷取訊息。
在
Program類別內,新增下列程式碼:重要
使用命名空間端點、主題名稱、主題金鑰、主題訂用帳戶名稱,更新程式碼片段中的預留位置值 (
<NAMESPACE-ENDPOINT>,<TOPIC-NAME>,<TOPIC-ACCESS-KEY>,<TOPIC-SUBSCRIPTION-NAME>)。using Azure; using Azure.Messaging; using Azure.Messaging.EventGrid.Namespaces; // TODO: Replace the following placeholders with appropriate values // Endpoint of the namespace that you can find on the Overview page for your Event Grid namespace // Example: https://namespace01.eastus-1.eventgrid.azure.net. var namespaceEndpoint = "<NAMESPACE-ENDPOINT>"; // Should be in the form: https://namespace01.eastus-1.eventgrid.azure.net. // Name of the topic in the namespace var topicName = "<TOPIC-NAME>"; // Access key for the topic var topicKey = "<TOPIC-ACCESS-KEY>"; // Name of the subscription to the topic var subscriptionName = "<TOPIC-SUBSCRIPTION-NAME>"; // Maximum number of events you want to receive const short MaxEventCount = 3; // Construct the client using an Endpoint for a namespace as well as the access key var client = new EventGridReceiverClient(new Uri(namespaceEndpoint), topicName, subscriptionName, new AzureKeyCredential(topicKey)); // Receive the published CloudEvents. ReceiveResult result = await client.ReceiveAsync(MaxEventCount); Console.WriteLine("Received Response"); Console.WriteLine("-----------------");將下列方法附加至
Program類別的尾端。// handle received messages. Define these variables on the top. var toRelease = new List<string>(); var toAcknowledge = new List<string>(); var toReject = new List<string>(); // Iterate through the results and collect the lock tokens for events we want to release/acknowledge/result foreach (ReceiveDetails detail in result.Details) { CloudEvent @event = detail.Event; BrokerProperties brokerProperties = detail.BrokerProperties; Console.WriteLine(@event.Data.ToString()); // The lock token is used to acknowledge, reject or release the event Console.WriteLine(brokerProperties.LockToken); Console.WriteLine(); // If the event is from the "employee_source" and the name is "Bob", we are not able to acknowledge it yet, so we release it if (@event.Source == "employee_source" && @event.Data.ToObjectFromJson<TestModel>().Name == "Bob") { toRelease.Add(brokerProperties.LockToken); } // acknowledge other employee_source events else if (@event.Source == "employee_source") { toAcknowledge.Add(brokerProperties.LockToken); } // reject all other events else { toReject.Add(brokerProperties.LockToken); } } // Release/acknowledge/reject the events if (toRelease.Count > 0) { ReleaseResult releaseResult = await client.ReleaseAsync(toRelease); // Inspect the Release result Console.WriteLine($"Failed count for Release: {releaseResult.FailedLockTokens.Count}"); foreach (FailedLockToken failedLockToken in releaseResult.FailedLockTokens) { Console.WriteLine($"Lock Token: {failedLockToken.LockToken}"); Console.WriteLine($"Error Code: {failedLockToken.Error}"); Console.WriteLine($"Error Description: {failedLockToken.ToString}"); } Console.WriteLine($"Success count for Release: {releaseResult.SucceededLockTokens.Count}"); foreach (string lockToken in releaseResult.SucceededLockTokens) { Console.WriteLine($"Lock Token: {lockToken}"); } Console.WriteLine(); } if (toAcknowledge.Count > 0) { AcknowledgeResult acknowledgeResult = await client.AcknowledgeAsync(toAcknowledge); // Inspect the Acknowledge result Console.WriteLine($"Failed count for Acknowledge: {acknowledgeResult.FailedLockTokens.Count}"); foreach (FailedLockToken failedLockToken in acknowledgeResult.FailedLockTokens) { Console.WriteLine($"Lock Token: {failedLockToken.LockToken}"); Console.WriteLine($"Error Code: {failedLockToken.Error}"); Console.WriteLine($"Error Description: {failedLockToken.ToString}"); } Console.WriteLine($"Success count for Acknowledge: {acknowledgeResult.SucceededLockTokens.Count}"); foreach (string lockToken in acknowledgeResult.SucceededLockTokens) { Console.WriteLine($"Lock Token: {lockToken}"); } Console.WriteLine(); } if (toReject.Count > 0) { RejectResult rejectResult = await client.RejectAsync(toReject); // Inspect the Reject result Console.WriteLine($"Failed count for Reject: {rejectResult.FailedLockTokens.Count}"); foreach (FailedLockToken failedLockToken in rejectResult.FailedLockTokens) { Console.WriteLine($"Lock Token: {failedLockToken.LockToken}"); Console.WriteLine($"Error Code: {failedLockToken.Error}"); Console.WriteLine($"Error Description: {failedLockToken.ToString}"); } Console.WriteLine($"Success count for Reject: {rejectResult.SucceededLockTokens.Count}"); foreach (string lockToken in rejectResult.SucceededLockTokens) { Console.WriteLine($"Lock Token: {lockToken}"); } Console.WriteLine(); } public class TestModel { public string Name { get; set; } public int Age { get; set; } }在 [方案總管] 視窗中,以滑鼠右鍵按一下 [EventReceiver] 專案,然後選取 [設定為啟動專案]。
建置專案,並確定沒有任何錯誤。
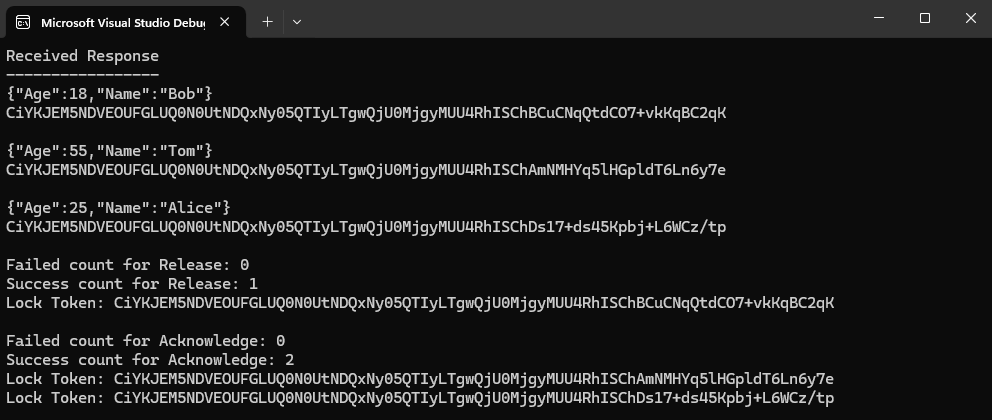
執行 EventReceiver 應用程式,並確認您在輸出視窗中看到三個事件。
清除資源
在 Azure 入口網站中瀏覽至您的事件方格命名空間,然後在 Azure 入口網站上選取 [刪除],以刪除其中的事件方格命名空間和主題。
相關主題
請參閱 .NET API 參考。
![螢幕擷取畫面顯示 [事件方格主題] 頁面,其中已選取主題。](media/create-view-manage-event-subscriptions/select-topic.png)
![螢幕擷取畫面顯示 Azure 入口網站中的 [事件方格命名空間]。](media/event-grid-dotnet-get-started-events/event-grid-namespace-metrics.png)
