適用於雲端的 Microsoft Defender 中的弱點掃描會使用整合式 Microsoft Defender 弱點管理,掃描計算機中的軟體清查和弱點,並提供 適用於雲端的 Defender 中的發現和見解。 如果您目前使用不同的弱點評估解決方案,您可以使用本文中的指示移至 Defender 弱點管理。
使用 Defender 弱點管理移至掃描
必要條件
- 檢閱 支持的機器
- 請確定您已啟用適用於伺服器的 Defender 方案。
- 方案必須啟用適用於端點的Defender整合。
- 您需要擁有者(資源群組層級)許可權才能部署。
- 您需要安全性讀取者許可權,才能檢視弱點結果。
針對 Azure VM 使用 Azure 原則進行轉換
執行下列步驟:
登入 Azure 入口網站。
瀏覽至 [原則]>[定義]。
搜尋
Setup subscriptions to transition to an alternative vulnerability assessment solution。選取指派。
選取範圍並輸入指派名稱。
選取 [檢閱 + 建立]。
檢閱您輸入的資訊,然後選取 [建立]。
此原則可確保所選訂用帳戶內的所有虛擬機(VM)都受到內建 Defender 弱點管理解決方案的保護。
完成轉換至 Defender 弱點管理解決方案之後,您需要移除舊的弱點評量解決方案
Azure 入口網站 中的轉換
在 Azure 入口網站 中,您可以將弱點評估解決方案變更為內建的 Defender 弱點管理解決方案。
登入 Azure 入口網站。
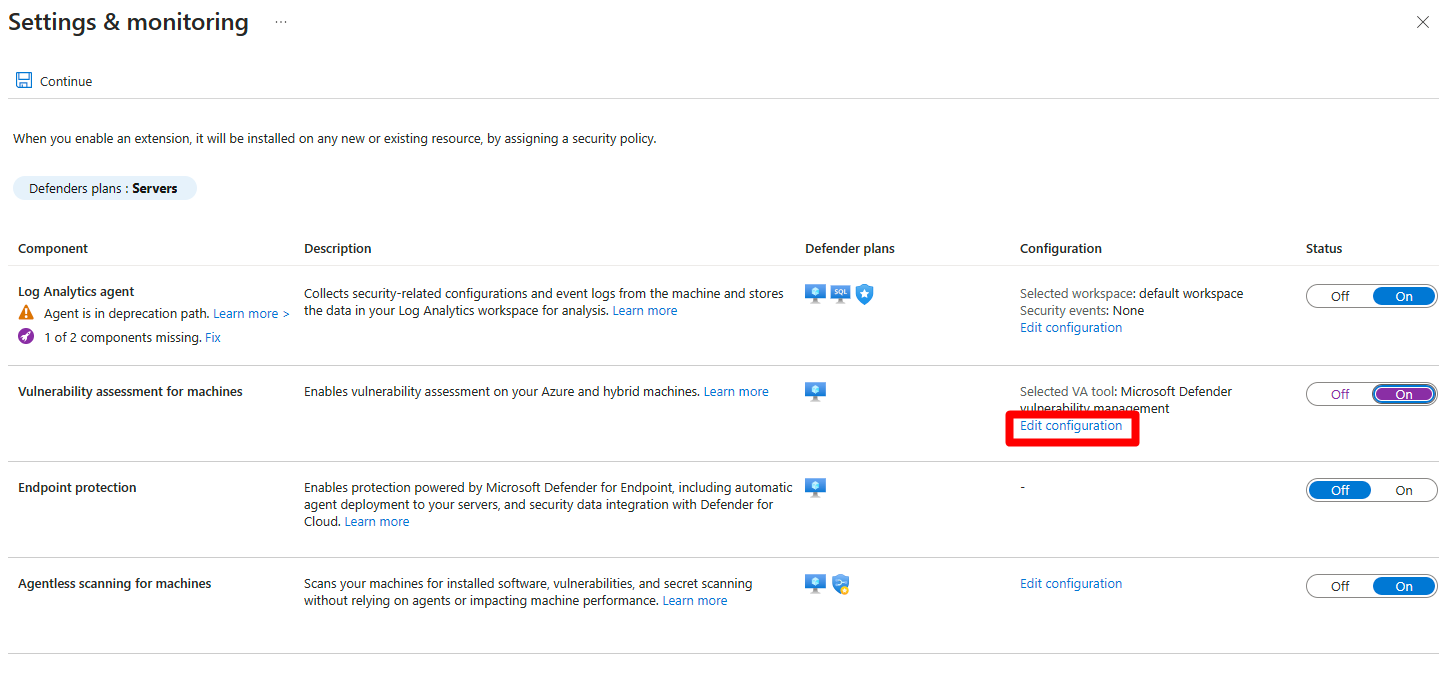
瀏覽至 [適用於雲端的 Microsoft Defender]>[環境設定]
選取相關的訂用帳戶。
找出適用於伺服器的 Defender 方案,然後選取 [設定]。
將
Vulnerability assessment for machines切換至 [開啟]。如果
Vulnerability assessment for machines已設定為開啟,請選取 [編輯組態]選取 [Microsoft Defender 弱點管理]。
選取套用。
確定
Endpoint protection或Agentless scanning for machines已切換至 [開啟]。選取繼續。
選取 [儲存]。
完成轉換至 Defender 弱點管理解決方案之後,您需要移除舊的弱點評量解決方案
使用 REST API 進行轉換
適用於 Azure VM 的 REST API
使用此 REST API,您可以輕鬆地大規模地將訂用帳戶從任何弱點評量解決方案移轉至 Defender 弱點管理解決方案。
PUT https://management.azure.com/subscriptions/{subscriptionId}/providers/Microsoft.Security/serverVulnerabilityAssessmentsSettings/AzureServersSetting?api-version=2022-01-01-preview
{
  "kind": "AzureServersSetting",
  "properties": {
    "selectedProvider": "MdeTvm"
  }
}
Once you complete the transition to the Defender Vulnerability Management solution, you need to remove the old vulnerability assessment solution.
REST API for multicloud VMs
Using this REST API, you can easily migrate your subscription, at scale, from any vulnerability assessment solution to the Defender Vulnerability Management solution.
PUT https://management.azure.com/subscriptions/{subscriptionId}/resourcegroups/{resourceGroupName}/providers/Microsoft.Security/securityconnectors/{connectorName}?api-version=2022-08-01-preview
{
"properties": {
"hierarchyIdentifier": "{GcpProjectNumber}",
"environmentName": "GCP",
"offerings": [
{
"offeringType": "CspmMonitorGcp",
"nativeCloudConnection": {
"workloadIdentityProviderId": "{cspm}",
"serviceAccountEmailAddress": "{emailAddressRemainsAsIs}"
}
},
{
"offeringType": "DefenderCspmGcp"
},
{
"offeringType": "DefenderForServersGcp",
"defenderForServers": {
"workloadIdentityProviderId": "{defender-for-servers}",
"serviceAccountEmailAddress": "{emailAddressRemainsAsIs}"
},
"arcAutoProvisioning": {
"enabled": true,
"configuration": {}
},
"mdeAutoProvisioning": {
"enabled": true,
"configuration": {}
},
"vaAutoProvisioning": {
"enabled": true,
"configuration": {
"type": "TVM"
}
},
"subPlan": "{P1/P2}"
}
],
"environmentData": {
"environmentType": "GcpProject",
"projectDetails": {
"projectId": "{GcpProjectId}",
"projectNumber": "{GcpProjectNumber}",
"workloadIdentityPoolId": "{identityPoolIdRemainsTheSame}"
}
}
},
"location": "{connectorRegion}"
}
Remove the old vulnerability assessment solution
After migrating to the built-in Defender Vulnerability Management solution in Defender for Cloud, offboard each VM from their old vulnerability assessment solution. To delete the VM extension, you can use the Remove-AzVMExtension PowerShell cmdlet or a REST API Delete request.
![[適用於雲端的 Defender 方案] 頁面的螢幕擷取畫面,其中顯示要在哪裡尋找並選取伺服器方案下的 [設定] 按鈕。](media/how-to-migrate-to-built-in/settings-server.png)

