透過 Azure PowerShell 指令碼在 Azure Stack Edge Pro GPU 裝置上部署 VM
適用於:  Azure Stack Edge Pro - GPU
 Azure Stack Edge Pro 2
 Azure Stack Edge Pro R
 Azure Stack Edge Mini R
本教學課程描述如何使用 Azure PowerShell 指令碼,以在 Azure Stack Edge Pro 裝置上建立和管理 VM。
必要條件
開始使用此指令碼以在 Azure Stack Edge Pro 裝置上建立和管理 VM 之前,您需要先確定已完成下列步驟中所列的必要條件:
針對透過本機 Web UI 的 Azure Stack Edge Pro 裝置
可在 Azure Stack Edge 裝置上部署 VM 之前,您必須透過 Azure PowerShell 將用戶端設定為透過 Azure Resource Manager 連線到裝置。 如需詳細指示,請參閱連線到 Azure Stack Edge 裝置上的 Azure Resource Manager。
請確定您可以使用下列步驟以從用戶端存取裝置。 當您已連線至 Azure Resource Manager 時,表示已完成此設定,現在您要確認設定成功。
執行下列命令,以確認 Azure Resource Manager 通訊是否正常運作:
若要呼叫本機裝置 API 以進行驗證,請輸入:
如果您已設定 Kubernetes 的計算,則可以略過此步驟。 否則,請執行下列動作,以確定您已啟用用於計算的網路介面:
a. 在本機使用者介面上,移至 [計算設定]。
b. 選取您想要用來建立虛擬交換器的網路介面。 您建立的 VM 將會連結虛擬交換器,而此虛擬交換器已連結至此連接埠和相關聯的網路。 請務必選擇符合您將用於 VM 之 IP 位址的網路。![[計算組態網络設定] 窗格的螢幕快照。](media/azure-stack-edge-gpu-deploy-virtual-machine-templates/enable-compute-setting.png)
c. 在網路介面的 [啟用計算] 下,選取 [是]。 Azure Stack Edge 將會建立和管理對應至該網路介面的虛擬交換器。 目前請不要輸入 Kubernetes 的特定 IP。 啟用計算可能需要幾分鐘的時間。
注意
如果您要建立 GPU VM,則請選取連線至網際網路的網路介面。 這麼做可讓您在裝置上安裝 GPU 延伸模組。
針對您的 Windows 用戶端
確定您已修改:
- 用戶端上的主機檔案,或
- DNS 伺服器組態
重要
建議您修改 DNS 伺服器設定以進行端點名稱解析。
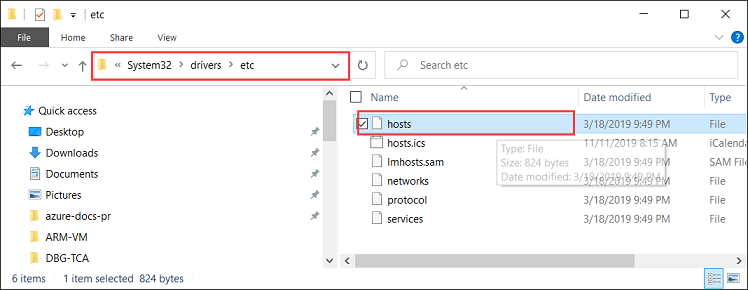
以系統管理員身分啟動 [記事本] (需有系統管理員權限才能儲存檔案),然後開啟位於
C:\Windows\System32\Drivers\etc的 hosts 檔案。
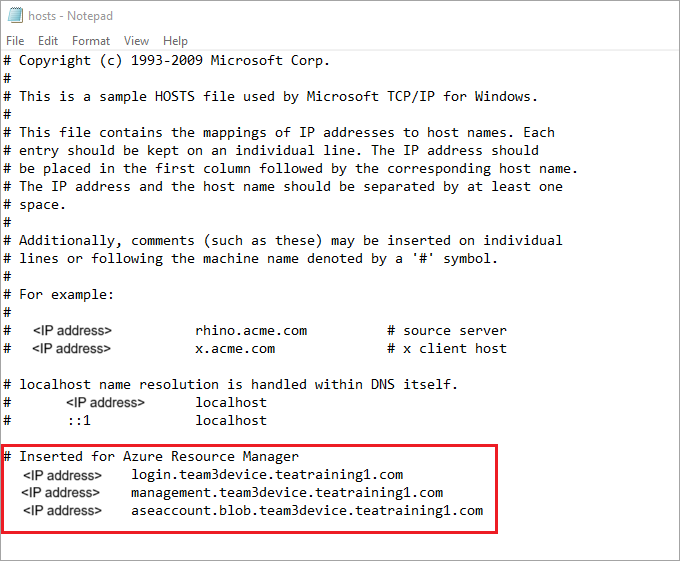
將下列項目新增至 hosts 檔案,並以您裝置的適當值加以取代:
<device IP> login.<appliance name>.<DNS domain>
<device IP> management.<appliance name>.<DNS domain>
<device IP> <storage name>.blob.<appliance name>.<DNS domain>
針對儲存體帳戶,您可以提供想要稍後用來建立新儲存體帳戶的指令碼名稱。 指令碼不會檢查該儲存體帳戶是否為現有帳戶。
使用下圖進行參考。 儲存 hosts 檔案。

確定您的 Windows 用戶端正在執行 PowerShell 5.0 或更新版本。
確定
Azure.Storage Module version 4.5.0已安裝在您的系統上。 您可以從 PowerShell 資源庫取得此模組。 若要安裝此模組,請輸入:Install-Module -Name Azure.Storage -RequiredVersion 4.5.0若要確認已安裝模組的版本,請輸入:
Get-InstalledModule -name Azure.Storage若要解除安裝任何其他版本模組,請輸入:
Uninstall-Module -Name Azure.Storage下載 AzCopy 10 至您的 Windows 用戶端。 記下此位置,因為您會在執行指令碼時將其作為參數進行傳遞。
請確定您的 Windows 用戶端正在執行 TLS 1.2 或更新版本。
建立 VM
以系統管理員身分執行 PowerShell。
移至您已在用戶端下載指令碼的資料夾。
執行指令碼之前,請確定您仍然連線至裝置的本機 Azure Resource Manager,而且連線尚未過期。
PS C:\windows\system32> login-AzureRMAccount -EnvironmentName aztest1 -TenantId aaaabbbb-0000-cccc-1111-dddd2222eeee

Account               SubscriptionName              TenantId                             Environment
-------               ----------------              --------                             -----------
EdgeArmUser@localhost Default Provider Subscription aaaabbbb-0000-cccc-1111-dddd2222eeee aztest1

PS C:\windows\system32> cd C:\Users\v2
PS C:\Users\v2>
使用下列命令執行指令碼:
.\ArmPowershellClient.ps1 -NicPrivateIp <Private IP> -VHDPath <Path> -VHDFile <VHD File, with extension> -StorageAccountName <Name> -OS <Windows/Linux> -VMSize <Supported VM Size> -VMUserName <Username to be used to sign in to VM> -VMPassword <Password for the VM> --AzCopy10Path <Absolute Path>如果您想要將 IP 動態配置給 VM,則請省略
-NicPrivateIp參數。以下是執行指令碼來建立 Windows VM 和 Linux VM 時的範例。
針對 Windows VM:
以下是已建立之 Windows VM 的範例輸出。
PS C:\Users\v2> .\ArmPowershellClient.ps1 -VHDPath \\asefs\Logs\vmvhd -VHDFile WindowsServer2016Datacenter.vhd -StorageAccountName myasesatest -OS Windows -VMSize Standard_D1_v2 -VMUserName Administrator -VMPassword Password1 -AzCopy10Path C:\Users\AzCopy10\AzCopy.exe
New-AzureRmResourceGroup -Name rg201221071831 -Location DBELocal -Force
Successfully created Resource Group:rg201221071831
Successfully created Resource Group:StorAccRG
Get-AzureRmStorageAccount -Name myasesatest -ResourceGroupName StorAccRG -ErrorAction SilentlyContinue
New-AzureRmStorageAccount -Name myasesatest  -ResourceGroupName StorAccRG -SkuName Standard_LRS -Location DBELocal

Created New Storage Account
Get-AzureRmStorageAccount -name myasesatest -resourcegroupname
StorageAccountName ResourceGroupName Location SkuName     Kind    AccessTier CreationTime          ProvisioningState EnableHttpsTrafficOnly
------------------ ----------------- -------- -------     ----    ---------- ------------          ----------------- ----------------------
myasesatest        StorAccRG         DBELocal StandardLRS Storage            12/22/2020 3:18:38 AM Succeeded         False
myasesatest        StorAccRG         DBELocal StandardLRS Storage            12/22/2020 3:18:38 AM Succeeded         False

 Uploading Vhd to Storage Account

New-AzureStorageContext -StorageAccountName myasesatest -StorageAccountKey hyibjhbVlOROgTlU1nQJIlxrg94eGDhF+RIQ71Z7UVZIxoOPMlHP274NUhZtA1hMxGBcpk2BVApiFasFPEhY/A== -Endpoint https://myasesatest.blob.myasegpuvm.wdshcsso.com/

New-AzureStorageAccountSASToken -Service Blob,File,Queue,Table -ResourceType Container,Service,Object -Permission

SAS Token : ?sv=2017-07-29&sig=TXaGbjum9tFFaJnu3SFmDuslJuqNiNQwvuHfpPJMYN0%3D&spr=https&se=2020-12-22T04%3A18%3A43Z&srt=sco&ss=bfqt&sp=racwdl

 C:\Users\AzCopy10\AzCopy.exe make https://myasesatest.blob.myasegpuvm.wdshcsso.com/vmimages?sv=2017-07-29&sig=TXaGbjum9tFFaJnu3SFmDuslJuqNiNQwvuHfpPJMYN0%3D&spr=https&se=2020-12-22T04%3A18%3A43Z&srt=sco&ss=bfqt&sp=racwdl

Successfully created the resource.

 AzCopy cp \\asefs\Logs\vmvhd\WindowsServer2016Datacenter.vhd https://myasesatest.blob.myasegpuvm.wdshcsso.com/vmimages?sv=2017-07-29&sig=TXaGbjum9tFFaJnu3SFmDuslJuqNiNQwvuHfpPJMYN0%3D&spr=https&se=2020-12-22T04%3A18%3A43Z&srt=sco&ss=bfqt&sp=racwdl

INFO: Scanning...

Job b6f54665-93c4-2f47-4770-5f3b7b0de2dc has started
Log file is located at: C:\Users\Administrator\.azcopy\b6f54665-93c4-2f47-4770-5f3b7b0de2dc.log

INFO: AzCopy.exe: A newer version 10.8.0 is available to download

99.9 %, 0 Done, 0 Failed, 1 Pending, 0 Skipped, 1 Total,  (Disk may be limiting speed)

Job b6f54665-93c4-2f47-4770-5f3b7b0de2dc summary
Elapsed Time (Minutes): 12.7717
Total Number Of Transfers: 1
Number of Transfers Completed: 1
Number of Transfers Failed: 0
Number of Transfers Skipped: 0
TotalBytesTransferred: 13958644224
Final Job Status: Completed

VHD Upload Done

 Creating a new managed disk

  = New-AzureRmDiskConfig -Location DBELocal -CreateOption Import -SourceUri

 Microsoft.Azure.Commands.Compute.Automation.Models.PSDisk

 New-AzureRmDisk -ResourceGroupName rg201221071831 -DiskName ld201221071831 -Disk

ResourceGroupName  : rg201221071831
ManagedBy          :
Sku                : Microsoft.Azure.Management.Compute.Models.DiskSku
Zones              :
TimeCreated        : 12/21/2020 7:31:35 PM
OsType             :
CreationData       : Microsoft.Azure.Management.Compute.Models.CreationData
DiskSizeGB         : 13
EncryptionSettings :
ProvisioningState  : Succeeded
Id                 : /subscriptions/aaaa0a0a-bb1b-cc2c-dd3d-eeeeee4e4e4e/resourceGroups/rg201221071831/providers/Microsoft.Compute/disks/ld201221071831
Name               : ld201221071831
Type               : Microsoft.Compute/disks
Location           : DBELocal
Tags               : {}

 Created a new managed disk

 Creating a new Image out of managed disk

ResourceGroupName    :
SourceVirtualMachine :
StorageProfile       : Microsoft.Azure.Management.Compute.Models.ImageStorageProfile
ProvisioningState    :
Id                   :
Name                 :
Type                 :
Location             : DBELocal
Tags                 :

 New-AzureRmImage -Image Microsoft.Azure.Commands.Compute.Automation.Models.PSImage -ImageName ig201221071831  -ResourceGroupName rg201221071831 -HyperVGeneration V1

ResourceGroupName    : rg201221071831
SourceVirtualMachine :
StorageProfile       : Microsoft.Azure.Management.Compute.Models.ImageStorageProfile
ProvisioningState    : Succeeded
Id                   : /subscriptions/aaaa0a0a-bb1b-cc2c-dd3d-eeeeee4e4e4e/resourceGroups/rg201221071831/providers/Microsoft.Compute/images/ig201221071831
Name                 : ig201221071831
Type                 : Microsoft.Compute/images
Location             : dbelocal
Tags                 : {}

 Created a new Image

 Using Vnet /subscriptions/aaaa0a0a-bb1b-cc2c-dd3d-eeeeee4e4e4e/resourceGroups/ASERG/providers/Microsoft.Network/virtualNetworks/ASEVNET

 Creating a new Network Interface
WARNING: The output object type of this cmdlet will be modified in a future release.

VirtualMachine              :
IpConfigurations            : {ip201221071831}
DnsSettings                 : Microsoft.Azure.Commands.Network.Models.PSNetworkInterfaceDnsSettings
MacAddress                  : 001DD87D7216
Primary                     :
EnableAcceleratedNetworking : False
EnableIPForwarding          : False
NetworkSecurityGroup        :
ProvisioningState           : Succeeded
VirtualMachineText          : null
IpConfigurationsText        : [
                                {
                                  "Name": "ip201221071831",
                                  "Etag": "W/\"27785dd5-d12a-4d73-9495-ffad7847261a\"",
                                  "Id": "/subscriptions/aaaa0a0a-bb1b-cc2c-dd3d-eeeeee4e4e4e/resourceGroups/rg201221071831/providers/Microsoft.Network/networkInterfaces/nic201221071831/ipConfigurations/ip201221071831",
                                  "PrivateIpAddress": "10.57.51.61",
                                  "PrivateIpAllocationMethod": "Dynamic",
                                  "Subnet": {
                                    "Id": "/subscriptions/aaaa0a0a-bb1b-cc2c-dd3d-eeeeee4e4e4e/resourceGroups/ASERG/providers/Microsoft.Network/virtualNetworks/ASEVNET/subnets/ASEVNETsubNet",
                                    "ResourceNavigationLinks": [],
                                    "ServiceEndpoints": []
                                  },
                                  "ProvisioningState": "Succeeded",
                                  "PrivateIpAddressVersion": "IPv4",
                                  "LoadBalancerBackendAddressPools": [],
                                  "LoadBalancerInboundNatRules": [],
                                  "Primary": true,
                                  "ApplicationGatewayBackendAddressPools": [],
                                  "ApplicationSecurityGroups": []
                                }
                              ]
DnsSettingsText             : {
                                "DnsServers": [],
                                "AppliedDnsServers": [],
                                "InternalDomainNameSuffix": "qgotb4hjdh4efnhn0vz5adtb3f.a--x.internal.cloudapp.net"
                              }
NetworkSecurityGroupText    : null
ResourceGroupName           : rg201221071831
Location                    : dbelocal
ResourceGuid                : e6327ab9-0855-4f04-9b36-17bbf31b5bd8
Type                        : Microsoft.Network/networkInterfaces
Tag                         :
TagsTable                   :
Name                        : nic201221071831
Etag                        : W/"27785dd5-d12a-4d73-9495-ffad7847261a"
Id                          : /subscriptions/aaaa0a0a-bb1b-cc2c-dd3d-eeeeee4e4e4e/resourceGroups/rg201221071831/providers/Microsoft.Network/networkInterfaces/nic201221071831

 Created Network Interface

 Creating a new VM

 New-AzureRmVMConfig -VMName VM201221071831 -VMSize Standard_D1_v2

 Set-AzureRmVMOperatingSystem -VM Microsoft.Azure.Commands.Compute.Models.PSVirtualMachine -Windows -ComputerName COM201221071831 -Credential System.Management.Automation.PSCredential

 Microsoft.Azure.Commands.Compute.Models.PSVirtualMachine = Set-AzureRmVMOSDisk -VM Microsoft.Azure.Commands.Compute.Models.PSVirtualMachine -Name osld201221071831 -Caching ReadWrite -CreateOption FromImage -Windows -StorageAccountType StandardLRS

 Add-AzureRmVMNetworkInterface -VM Microsoft.Azure.Commands.Compute.Models.PSVirtualMachine -Id /subscriptions/aaaa0a0a-bb1b-cc2c-dd3d-eeeeee4e4e4e/resourceGroups/rg201221071831/providers/Microsoft.Network/networkInterfaces/nic201221071831.Id

 Set-AzureRmVMSourceImage -VM Microsoft.Azure.Commands.Compute.Models.PSVirtualMachine -Id /subscriptions/aaaa0a0a-bb1b-cc2c-dd3d-eeeeee4e4e4e/resourceGroups/rg201221071831/providers/Microsoft.Compute/images/ig201221071831

 New-AzureRmVM -ResourceGroupName rg201221071831 -Location DBELocal -VM Microsoft.Azure.Commands.Compute.Models.PSVirtualMachine -Verbose
WARNING: Since the VM is created using premium storage or managed disk, existing standard storage account, myasesa1, is used for boot
diagnostics.
VERBOSE: Performing the operation "New" on target "VM201221071831".

Ticks             : 1533424841
Days              : 0
Hours             : 0
Milliseconds      : 342
Minutes           : 2
Seconds           : 33
TotalDays         : 0.00177479726967593
TotalHours        : 0.0425951344722222
TotalMilliseconds : 153342.4841
TotalMinutes      : 2.55570806833333
TotalSeconds      : 153.3424841

RequestId           :
IsSuccessStatusCode : True
StatusCode          : OK
ReasonPhrase        : OK

PS C:\Users\v2>
針對 Linux VM:
以下是用來建立 Linux VM 的命令範例。
.\ArmPowershellClient.ps1 -VHDPath \\asefs\Logs\vmvhd -VHDFile ubuntu13.vhd -StorageAccountName myasesatest -OS Linux -VMSize Standard_D1_v2 -VMUserName Administrator -VMPassword Password1 -AzCopy10Path C:\Users\AzCopy10\AzCopy.exe
New-AzureRmResourceGroup -Name rg201221075546 -Location DBELocal -Force
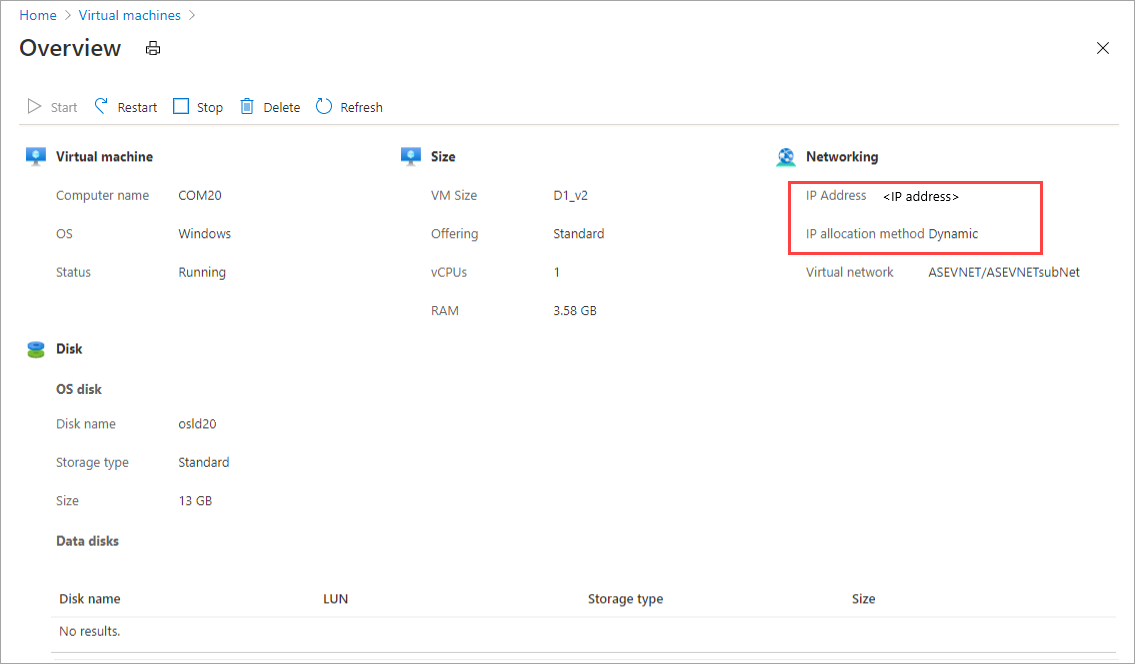
在您成功建立 VM 之後,這些 VM 應該會顯示在 Azure 入口網站中的虛擬機器清單中。 若要檢視 VM,請在 Azure 入口網站中裝置的 Azure Stack Edge 資源中,移至 [Edge 服務] > [虛擬機器]。

若要檢視 VM 的詳細資料,請選取 VM 名稱。 請注意此 VM 的 IP 動態配置。

若要清除指令碼所建立的資源,請使用下列命令:
Get-AzureRmVM | Remove-AzureRmVM -Force
Get-AzureRmNetworkInterface | Remove-AzureRmNetworkInterface -Force
Get-AzureRmImage | Remove-AzureRmImage -Force
Get-AzureRmDisk | Remove-AzureRmDisk -Force
Get-AzureRmStorageAccount | Remove-AzureRmStorageAccount -Force