使用 Azure CLI 和 Python 在 Azure Stack Edge Pro GPU 裝置上部署 VM
適用於:  Azure Stack Edge Pro - GPU
 Azure Stack Edge Pro 2
 Azure Stack Edge Pro R
 Azure Stack Edge Mini R
您可使用 API,在 Azure Stack Edge 裝置上建立和管理虛擬機器 (VM)。 這些 API 是使用本機 Azure Stack Edge 端點呼叫的標準 Azure Resource Manager API。 Azure Resource Manager API 會提供一致的管理層,在此案例中,可讓您建立、更新和刪除裝置上現有本機訂用帳戶中的 VM。 您可以透過 Azure PowerShell Cmdlet,連線到在 Azure Stack Edge 上執行的 Azure Resource Manager。
本教學課程描述如何在 Azure Stack Edge Pro 裝置上使用 Azure API 和 Python 建立和管理 VM。
VM 部署工作流程
下圖說明部署工作流程。
部署工作流程的整體摘要如下:
- 連線到 Azure Resource Manager
- 建立資源群組
- 建立儲存體帳戶
- 將 Blob URI 新增至 hosts 檔案
- 安裝憑證
- 上傳 VHD
- 從 VHD 建立受控磁碟
- 從映像受控磁碟建立 VM 映像
- 使用先前建立的資源建立 VM
- 建立 VNet
- 使用 VNet 子網路識別碼建立 VNIC
如需工作流程圖表的詳細說明,請參閱使用 Azure PowerShell 在 Azure Stack Edge Pro 裝置上部署 VM。 如需如何連線到 Azure Resource Manager 的相關資訊,請參閱使用 Azure PowerShell 連線到 Azure Resource Manager。
必要條件
開始使用 Azure CLI 和 Python 在 Azure Stack Edge Pro 裝置上建立和管理 VM 之前,您必須先確定已完成下列步驟中所列的必要條件:
您已在 Azure Stack Edge Pro 裝置上完成網路設定,如步驟1:設定 Azure Stack Edge Pro 裝置所述。
您已啟用進行計算所需的網路介面。 此網路介面 IP 用來建立 VM 部署的虛擬交換器。 下列步驟會逐步引導您進行程序:
移至 [計算]。 選取您將用來建立虛擬交換器的網路介面。
重要
您只能設定一個連接埠進行計算。
在網路介面上啟用計算。 Azure Stack Edge Pro 會建立和管理對應至該網路介面的虛擬交換器。
您已在 Azure Stack Edge Pro 裝置上和用戶端的信任存放區中建立和安裝所有憑證。 遵循步驟 2:建立及安裝憑證中所述的程序。
您已為 Azure Stack Edge Pro 裝置建立 Base-64 編碼的 .cer 憑證 (PEM 格式)。 該憑證已上傳為裝置上的簽署鏈,並安裝在您用戶端上之受信任的根存放區中。 此憑證也必須為 pem 格式,Python 才能在此用戶端上運作。
使用 certutil 命令,將此憑證轉換為
pem格式。 您必須在包含憑證的目錄中執行此命令。certutil.exe <SourceCertificateName.cer> <DestinationCertificateName.pem>以下顯示命令使用範例:
PS C:\Certificates> certutil.exe -encode aze-root.cer aze-root.pem
Input Length = 2150
Output Length = 3014
CertUtil: -encode command completed successfully.
PS C:\Certificates>
您稍後也會將此
pem新增至 Python 存放區。您在裝置的本機 Web UI 中的 [網路] 頁面中指派了裝置 IP。 將此 IP 新增至:
- 用戶端上的主機檔案,或
- DNS 伺服器組態
重要
建議您修改 DNS 伺服器設定以進行端點名稱解析。
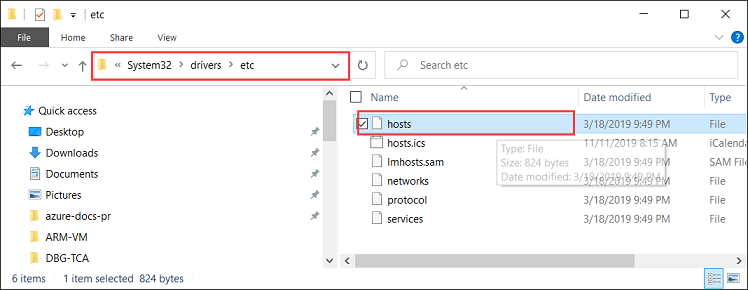
以系統管理員身分啟動 [記事本] (需有系統管理員權限才能儲存檔案),然後開啟位於
C:\Windows\System32\Drivers\etc的 hosts 檔案。
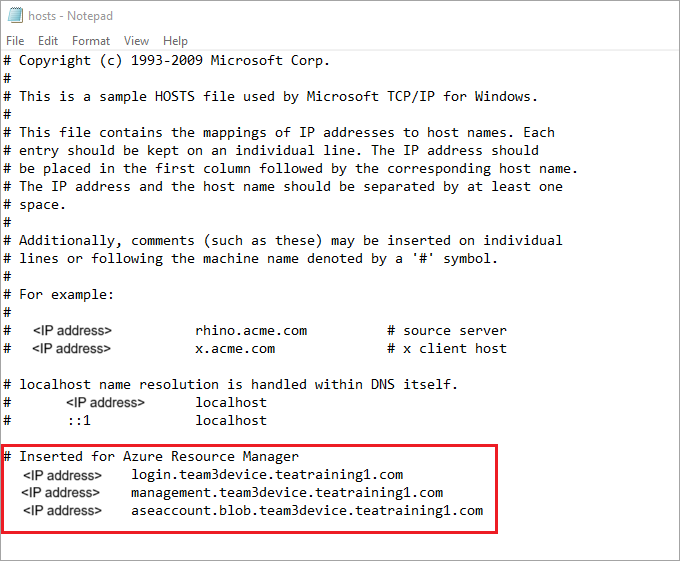
將下列項目新增至 hosts 檔案,並以您裝置的適當值加以取代:
<Device IP> login.<appliance name>.<DNS domain>
<Device IP> management.<appliance name>.<DNS domain>
<Device IP> <storage name>.blob.<appliance name>.<DNS domain>
使用下圖進行參考。 儲存 hosts 檔案。

備妥環境以使用 Azure CLI:
在 Azure Cloud Shell 中使用 Bash 環境。 如需詳細資訊,請參閱 Azure Cloud Shell 中的 Bash 快速入門。
若要在本地執行 CLI 參考命令,請安裝 Azure CLI。 若您在 Windows 或 macOS 上執行,請考慮在 Docker 容器中執行 Azure CLI。 如需詳細資訊,請參閱〈如何在 Docker 容器中執行 Azure CLI〉。
如果您使用的是本機安裝,請使用 az login 命令,透過 Azure CLI 來登入。 請遵循您終端機上顯示的步驟,完成驗證程序。 如需其他登入選項,請參閱使用 Azure CLI 登入。
出現提示時,請在第一次使用時安裝 Azure CLI 延伸模組。 如需擴充功能詳細資訊,請參閱使用 Azure CLI 擴充功能。
執行 az version 以尋找已安裝的版本和相依程式庫。 若要升級至最新版本,請執行 az upgrade。
步驟 1:在用戶端上設定 Azure CLI/Python
驗證設定檔並安裝 Azure CLI
在用戶端上安裝 Azure CLI。 在此範例中,已安裝 Azure CLI 2.0.80。 若要確認 Azure CLI 的版本,請執行 az --version 命令。
以下是來自上述命令的輸出範例:
PS C:\windows\system32> az --version
azure-cli                         2.0.80

command-modules-nspkg              2.0.3
core                              2.0.80
nspkg                              3.0.4
telemetry                          1.0.4
Extensions:
azure-cli-iot-ext                  0.7.1

Python location 'C:\Program Files (x86)\Microsoft SDKs\Azure\CLI2\python.exe'
Extensions directory 'C:\.azure\cliextensions'

Python (Windows) 3.6.6 (v3.6.6:4cf1f54eb7, Jun 27 2018, 02:47:15) [MSC v.1900 32 bit (Intel)]

Legal docs and information: aka.ms/AzureCliLegal

Your CLI is up-to-date.

Please let us know how we are doing: https://aka.ms/clihats
PS C:\windows\system32>
如果您沒有 Azure CLI,請下載並在 Windows 上安裝 Azure CLI。 您可使用 Windows 命令提示字元或透過 Windows PowerShell 執行 Azure CLI。
記下 CLI 的 Python 位置。 您需要 Python 位置來確認 Azure CLI 的受信任的根憑證存放區位置。
若要執行本文中使用的範例指令碼,您需要下列 Python 程式庫版本:
azure-common==1.1.23
azure-mgmt-resource==2.1.0
azure-mgmt-network==2.7.0
azure-mgmt-compute==5.0.0
azure-mgmt-storage==1.5.0
azure-storage-blob==1.2.0rc1
haikunator
msrestazure==0.6.2
若要安裝這些版本,請執行下列命令:
.\python.exe -m pip install haikunator下列範例輸出顯示 Haikunator 的安裝:
PS C:\Program Files (x86)\Microsoft SDKs\Azure\CLI2> .\python.exe -m pip install haikunator

Collecting haikunator
  Downloading https://files.pythonhosted.org/packages/43/fa/130968f1a1bb1461c287b9ff35c630460801783243acda2cbf3a4c5964a5/haikunator-2.1.0-py2.py3-none-any.whl

Installing collected packages: haikunator
Successfully installed haikunator-2.1.0
You are using pip version 10.0.1, however version 20.0.1 is available.
You should consider upgrading using the 'python -m pip install --upgrade pip' command.

PS C:\Program Files (x86)\Microsoft SDKs\Azure\CLI2>
下列範例輸出顯示
msrestazure的 pip 安裝:PS C:\Program Files (x86)\Microsoft SDKs\Azure\CLI2> .\python.exe -m pip install msrestazure==0.6.2 Requirement already satisfied: msrestazure==0.6.2 in c:\program files (x86)\microsoft sdks\azure\cli2\lib\site-packages (0.6.2) Requirement already satisfied: msrest<2.0.0,>=0.6.0 in c:\program files (x86)\microsoft sdks\azure\cli2\lib\site-packages (from msrestazure==0.6.2) (0.6.10) === CUT =========================== CUT ================================== Requirement already satisfied: cffi!=1.11.3,>=1.8 in c:\program files (x86)\microsoft sdks\azure\cli2\lib\site-packages (from cryptography>=1.1.0->adal<2.0.0,>=0.6.0->msrestazure==0.6.2) (1.13.2) Requirement already satisfied: pycparser in c:\program files (x86)\microsoft sdks\azure\cli2\lib\site-packages (from cffi!=1.11.3,>=1.8->cryptography>=1.1.0->adal<2.0.0,>=0.6.0->msrestazure==0.6.2) (2.18) You are using pip version 10.0.1, however version 20.0.1 is available. You should consider upgrading using the 'python -m pip install --upgrade pip' command. PS C:\Program Files (x86)\Microsoft SDKs\Azure\CLI2>
信任 Azure Stack Edge Pro CA 根憑證
尋找您機器上的憑證位置。 此位置可能會根據您安裝
az cli的位置不同而有所差異。 以系統管理員的身分執行 Windows PowerShell。 切換至az cli安裝 Python 的路徑:C:\Program Files (x86)\Microsoft SDKs\Azure\CLI2\python.exe。若要取得憑證位置,請輸入下列命令:
.\python -c "import certifi; print(certifi.where())"此 Cmdlet 會傳回憑證位置,如下所示:
PS C:\Program Files (x86)\Microsoft SDKs\Azure\CLI2> .\python -c "import certifi; print(certifi.where())"
C:\Program Files (x86)\Microsoft SDKs\Azure\CLI2\lib\site-packages\certifi\cacert.pem
PS C:\Program Files (x86)\Microsoft SDKs\Azure\CLI2>
記下此位置,因為您稍後會用到 -
C:\Program Files (x86)\Microsoft SDKs\Azure\CLI2\lib\site-packages\certifi\cacert.pem將 Azure Stack Edge Pro CA 根憑證附加到現有的 Python 憑證,以信任該根憑證。 您會提供稍早儲存 PEM 憑證的路徑。
$pemFile = "<Path to the pem format certificate>"範例路徑會是 "C:\VM-scripts\rootteam3device.pem"
然後,在 Windows PowerShell 中輸入以下一系列的命令:
$root = New-Object System.Security.Cryptography.X509Certificates.X509Certificate2
    $root.Import($pemFile)

Write-Host "Extracting required information from the cert file"
$md5Hash    = (Get-FileHash -Path $pemFile -Algorithm MD5).Hash.ToLower()
$sha1Hash   = (Get-FileHash -Path $pemFile -Algorithm SHA1).Hash.ToLower()
$sha256Hash = (Get-FileHash -Path $pemFile -Algorithm SHA256).Hash.ToLower()

$issuerEntry  = [string]::Format("# Issuer: {0}", $root.Issuer)
$subjectEntry = [string]::Format("# Subject: {0}", $root.Subject)
$labelEntry   = [string]::Format("# Label: {0}", $root.Subject.Split('=')[-1])
$serialEntry  = [string]::Format("# Serial: {0}", $root.GetSerialNumberString().ToLower())
$md5Entry = [string]::Format("# MD5 Fingerprint: {0}", $md5Hash)
$sha1Entry= [string]::Format("# SHA1 Fingerprint: {0}", $sha1Hash)
$sha256Entry  = [string]::Format("# SHA256 Fingerprint: {0}", $sha256Hash)
$certText = (Get-Content -Path $pemFile -Raw).ToString().Replace("`r`n","`n")

$rootCertEntry = "`n" + $issuerEntry + "`n" + $subjectEntry + "`n" + $labelEntry + "`n" + `
$serialEntry + "`n" + $md5Entry + "`n" + $sha1Entry + "`n" + $sha256Entry + "`n" + $certText

Write-Host "Adding the certificate content to Python Cert store"
Add-Content "${env:ProgramFiles(x86)}\Microsoft SDKs\Azure\CLI2\Lib\site-packages\certifi\cacert.pem" $rootCertEntry

Write-Host "Python Cert store was updated to allow the Azure Stack Edge Pro CA root certificate"
連線至 Azure Stack Edge Pro
執行 az cloud register 命令來註冊 Azure Stack Edge Pro 環境。
在某些情況下,直接輸出的網際網路連線是透過 Proxy 或防火牆進行路由傳送,這會強制執行 SSL 攔截。 在這些情況下,
az cloud register命令可能會失敗並發生錯誤,例如「無法從雲端取得端點」。若要解決這個錯誤,請在 Windows PowerShell 中設定下列環境變數:$ENV:AZURE_CLI_DISABLE_CONNECTION_VERIFICATION = 1 $ENV:ADAL_PYTHON_SSL_NO_VERIFY = 1為 Azure Resource Manager 端點的指令碼設定環境變數、建立資源的位置,以及來源 VHD 所在的路徑。 在所有 Azure Stack Edge Pro 裝置上,資源的位置是固定的且設定為
dbelocal。 您也必須指定位址前置詞和私人 IP 位址。 下列所有環境變數都是以您的值為基礎的值,但AZURE_RESOURCE_LOCATION除外,其應該會硬式編碼為"dbelocal"。$ENV:ARM_ENDPOINT = "https://management.team3device.teatraining1.com" $ENV:AZURE_RESOURCE_LOCATION = "dbelocal" $ENV:VHD_FILE_PATH = "C:\Downloads\Ubuntu1604\Ubuntu13.vhd" $ENV:ADDRESS_PREFIXES = "5.5.0.0/16" $ENV:PRIVATE_IP_ADDRESS = "5.5.174.126"註冊您的環境。 在執行 az cloud register 時使用下列參數:
值 Description 範例 環境名稱 您嘗試連線的環境名稱 提供名稱,例如 aze-environResource Manager 端點 此 URL 為 https://Management.<appliancename><dnsdomain>。
若要取得此 URL,請移至裝置的本機 Web UI 中的 [裝置] 頁面。例如: https://management.team3device.teatraining1.com。az cloud register -n <environmentname> --endpoint-resource-manager "https://management.<appliance name>.<DNS domain>"以下顯示上述命令的使用範例:
PS C:\Program Files (x86)\Microsoft SDKs\Azure\CLI2> az cloud register -n az-new-env --endpoint-resource-manager "https://management.team3device.teatraining1.com"使用下列命令來設定作用中環境:
az cloud set -n <EnvironmentName>以下顯示上述命令的使用範例:
PS C:\Program Files (x86)\Microsoft SDKs\Azure\CLI2> az cloud set -n az-new-env
Switched active cloud to 'az-new-env'.
Use 'az login' to log in to this cloud.
Use 'az account set' to set the active subscription.
PS C:\Program Files (x86)\Microsoft SDKs\Azure\CLI2>
使用 az login 命令登入您的 Azure Stack Edge Pro 環境。 您可以以使用者身分或以服務主體形式登入 Azure Stack Edge Pro 環境。
遵循下列步驟,以「使用者」身分登入:
您可以直接在
az login命令內指定使用者名稱和密碼,或使用瀏覽器進行驗證。 如果您的帳戶已啟用多重要素驗證,則必須採用後者的方式。以下顯示
az login的使用範例:PS C:\Certificates> az login -u EdgeARMuser使用登入命令之後,系統會提示您輸入密碼。 提供 Azure Resource Manager 密碼。
以下顯示在提供密碼之後成功登入的輸出範例:
PS C:\Program Files (x86)\Microsoft SDKs\Azure\CLI2> az login -u EdgeARMuser
Password:
[
     {
         "cloudName": "az-new-env",
         "id": "A4257FDE-B946-4E01-ADE7-674760B8D1A3",
         "isDefault": true,
         "name": "Default Provider Subscription",
         "state": "Enabled",
         "tenantId": "aaaabbbb-0000-cccc-1111-dddd2222eeee",
         "user": {
             "name": "EdgeArmUser@localhost",
             "type": "user"
         }
     }
]
PS C:\Program Files (x86)\Microsoft SDKs\Azure\CLI2>
記下
id和tenantId值,這些值會分別對應至您的 Azure Resource Manager 訂閱識別碼和 Azure Resource Manager 租用戶識別碼,並將在稍後的步驟中使用。下列環境變數必須設定為以「服務主體」的形式運作:
$ENV:ARM_TENANT_ID = "aaaabbbb-0000-cccc-1111-dddd2222eeee"
$ENV:ARM_CLIENT_ID = "cbd868c5-7207-431f-8d16-1cb144b50971"
$ENV:ARM_CLIENT_SECRET - "<Your Azure Resource Manager password>"
$ENV:ARM_SUBSCRIPTION_ID = "<Your subscription ID>"
您的 Azure Resource Manager 用戶端識別碼是硬式編碼。 您的 Azure Resource Manager 租用戶識別碼和 Azure Resource Manager 訂閱識別碼都出現在您稍早執行之
az login命令的輸出中。 Azure Resource Manager 用戶端密碼是您所設定的 Azure Resource Manager 密碼。如需詳細資訊,請參閱 Azure Resource Manager 密碼。
將設定檔變更為版本 2019-03-01-hybrid。 若要變更設定檔版本,請執行下列命令:
az cloud update --profile 2019-03-01-hybrid以下顯示
az cloud update的使用範例:PS C:\Program Files (x86)\Microsoft SDKs\Azure\CLI2> az cloud update --profile 2019-03-01-hybrid PS C:\Program Files (x86)\Microsoft SDKs\Azure\CLI2>
步驟 2:建立 VM
系統會提供 Python 指令碼給您建立 VM。 根據您是以使用者身分登入或設為服務主體,指令碼會據以採用輸入並建立 VM。
- 從安裝 Python 的相同目錄執行 Python 指令碼。
.\python.exe example_dbe_arguments_name_https.py cli
當指令碼執行時,上傳 VHD 需要20-30 分鐘的時間。 若要檢視上傳作業的進度,您可使用 Azure 儲存體總管或 AzCopy。
以下是成功執行指令碼的輸出範例。 此指令碼會建立資源群組內的所有資源、使用這些資源來建立 VM,最後刪除資源群組 (包括其建立的所有資源)。
PS C:\Program Files (x86)\Microsoft SDKs\Azure\CLI2> .\python.exe example_dbe_arguments_name_https.py cli

Create Resource Group
Create a storage account
Uploading to Azure Stack Storage as blob:
        ubuntu13.vhd

Listing blobs...
        ubuntu13.vhd

VM image resource id:
            /subscriptions/.../resourceGroups/azure-sample-group-virtual-machines118/providers/Microsoft.Compute/images/UbuntuImage

Create Vnet
Create Subnet
Create NIC
Creating Linux Virtual Machine
Tag Virtual Machine
Create (empty) managed Data Disk
Get Virtual Machine by Name
Attach Data Disk
Detach Data Disk
Deallocating the VM (to prepare for a disk resize)
Update OS disk size
Start VM
Restart VM
Stop VM

List VMs in subscription
        VM: VmName118

List VMs in resource group
        VM: VmName118

Delete VM
All example operations completed successfully!

Delete Resource Group
Deleted: azure-sample-group-virtual-machines118
PS C:\Program Files (x86)\Microsoft SDKs\Azure\CLI2>
