啟用客戶自控金鑰
本文是四部分教學課程系列的第二部分。 第一部分提供客戶自控金鑰的概觀、其特性,以及在您的登錄上啟用此種金鑰前的考量。 本文將逐步引導您完成使用 Azure CLI、Azure 入口網站或 Azure Resource Manager 範本啟用客戶自控金鑰的步驟。
必要條件
- 安裝 Azure CLI 或準備使用 Azure Cloud Shell。
- 登入 Azure 入口網站。
使用 Azure CLI 啟用客戶自控金鑰
建立資源群組
執行 az group create 命令,以建立用來保存金鑰保存庫、容器登錄和其他必要資源的資源群組:
az group create --name <resource-group-name> --location <location>
建立使用者指派的受控識別
為登錄設定使用者指派的受控識別,以便您可以存取金鑰保存庫:
使用 az identity create 命令來建立受控識別:
az identity create \
  --resource-group <resource-group-name> \
  --name <managed-identity-name>
在命令輸出中,記下
id和principalId的值,以使用金鑰保存庫設定登錄存取:{ "clientId": "00001111-aaaa-2222-bbbb-3333cccc4444", "clientSecretUrl": "https://control-eastus.identity.azure.net/subscriptions/aaaa0a0a-bb1b-cc2c-dd3d-eeeeee4e4e4e/resourcegroups/myresourcegroup/providers/Microsoft.ManagedIdentity/userAssignedIdentities/myidentityname/credentials?tid=aaaabbbb-0000-cccc-1111-dddd2222eeee&oid=aaaaaaaa-0000-1111-2222-bbbbbbbbbbbb&aid=00001111-aaaa-2222-bbbb-3333cccc4444", "id": "/subscriptions/aaaa0a0a-bb1b-cc2c-dd3d-eeeeee4e4e4e/resourcegroups/myresourcegroup/providers/Microsoft.ManagedIdentity/userAssignedIdentities/myresourcegroup", "location": "eastus", "name": "myidentityname", "principalId": "xxxxxxxx-xxxx-xxxx-xxxx-xxxxxxxxxxxx", "resourceGroup": "myresourcegroup", "tags": {}, "tenantId": "xxxxxxxx-xxxx-xxxx-xxxx-xxxxxxxxxxxx", "type": "Microsoft.ManagedIdentity/userAssignedIdentities" }為了方便起見,請將
id和principalId的值儲存在環境變數中:identityID=$(az identity show --resource-group <resource-group-name> --name <managed-identity-name> --query 'id' --output tsv) identityPrincipalID=$(az identity show --resource-group <resource-group-name> --name <managed-identity-name> --query 'principalId' --output tsv)
建立金鑰保存庫
執行 az keyvault create 命令以建立金鑰保存庫,以便您可以儲存用於登錄加密的客戶自控金鑰。
根據預設,新的金鑰保存庫會自動啟用虛刪除設定。 若要防止意外刪除金鑰或金鑰保存庫而引起資料遺失,建議啟用 [清除保護] 設定:
az keyvault create --name <key-vault-name> \
  --resource-group <resource-group-name> \
  --enable-purge-protection
為了方便起見,請記下金鑰保存庫資源識別碼,並將值儲存在環境變數中:
keyvaultID=$(az keyvault show --resource-group <resource-group-name> --name <key-vault-name> --query 'id' --output tsv)
啟用受信任的服務以存取金鑰保存庫
如果金鑰保存庫受到防火牆或虛擬網路 (私人端點) 保護,您必須啟用網路設定以允許受信任的 Azure 服務存取。 如需詳細資訊,請參閱設定 Azure Key Vault 網路設定。
啟用受控識別以存取金鑰保存庫
有兩種方式可讓受控識別存取您的金鑰保存庫。
第一個選項是設定金鑰保存庫的存取原則,並設定使用使用者指派的受控識別來存取的金鑰權限:
執行 az keyvault set-policy 命令。 傳遞先前建立並儲存的
principalID環境變數值。將金鑰權限設定為
get、unwrapKey和wrapKey:az keyvault set-policy \ --resource-group <resource-group-name> \ --name <key-vault-name> \ --object-id $identityPrincipalID \ --key-permissions get unwrapKey wrapKey
第二個選項是使用 Azure 角色型存取控制 (RBAC),將權限指派給使用者指派的受控識別,並存取金鑰保存庫。 執行 az role assignment create 命令,並將 Key Vault Crypto Service Encryption User 角色指派給使用者指派的受控識別:
az role assignment create --assignee $identityPrincipalID \
  --role "Key Vault Crypto Service Encryption User" \
  --scope $keyvaultID
建立金鑰並取得金鑰識別元
執行 az keyvault key create 命令來建立金鑰保存庫中的金鑰:
az keyvault key create \
  --name <key-name> \
  --vault-name <key-vault-name>
在命令輸出中,記下金鑰識別元 (
kid):[...] "key": { "crv": null, "d": null, "dp": null, "dq": null, "e": "AQAB", "k": null, "keyOps": [ "encrypt", "decrypt", "sign", "verify", "wrapKey", "unwrapKey" ], "kid": "https://mykeyvault.vault.azure.net/keys/mykey/<version>", "kty": "RSA", [...]為了方便起見,請將您選擇的金鑰識別碼格式儲存在
$keyID環境變數中。 您可以使用包含或不含版本的金鑰識別元。
金鑰輪替
您可以選擇手動或自動金鑰輪替。
使用客戶自控金鑰加密登錄,且金鑰版本僅允許在 Azure Container Registry 中手動金鑰輪替。 此範例會儲存金鑰的 kid 屬性:
keyID=$(az keyvault key show \
  --name <keyname> \
  --vault-name <key-vault-name> \
  --query 'key.kid' --output tsv)
藉由省略金鑰版本使用客戶自控金鑰加密登錄,可讓自動金鑰輪替偵測 Azure Key Vault 中的新金鑰版本。 此範例會從金鑰的 kid 屬性中移除版本:
keyID=$(az keyvault key show \
  --name <keyname> \
  --vault-name <key-vault-name> \
  --query 'key.kid' --output tsv)

keyID=$(echo $keyID | sed -e "s/\/[^/]*$//")
使用客戶管理的金鑰建立登錄
執行 az acr create 命令以在進階服務層級中建立登錄,並啟用客戶管理的金鑰。
傳遞先前步驟中儲存在環境變數中的受控識別識別碼 (
id) 和金鑰識別元 (kid) 值:az acr create \ --resource-group <resource-group-name> \ --name <container-registry-name> \ --identity $identityID \ --key-encryption-key $keyID \ --sku Premium
顯示加密狀態
執行 az acr encryption show 命令,以顯示客戶自控金鑰的登錄加密狀態:
az acr encryption show --name <container-registry-name>
根據用於加密登錄的金鑰而定,輸出如下所示:
{
  "keyVaultProperties": {
    "identity": "xxxxxxxx-xxxx-xxxx-xxxx-xxxxxxxxxxxx",
    "keyIdentifier": "https://myvault.vault.azure.net/keys/myresourcegroup/abcdefg123456789...",
    "keyRotationEnabled": true,
    "lastKeyRotationTimestamp": xxxxxxxx
    "versionedKeyIdentifier": "https://myvault.vault.azure.net/keys/myresourcegroup/abcdefg123456789...",
  },
  "status": "enabled"
}
使用 Azure 入口網站啟用客戶自控金鑰
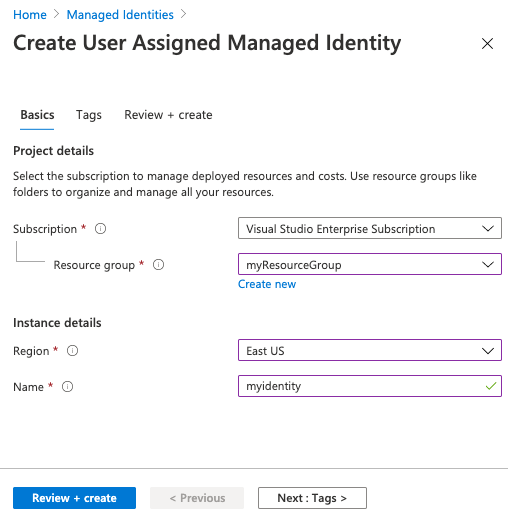
建立使用者指派的受控識別
若要在 Azure 入口網站中建立使用者指派的 Azure 資源受控識別:
請遵循步驟來建立使用者指派的身分識別。
儲存身分識別的名稱,以供後續步驟使用。

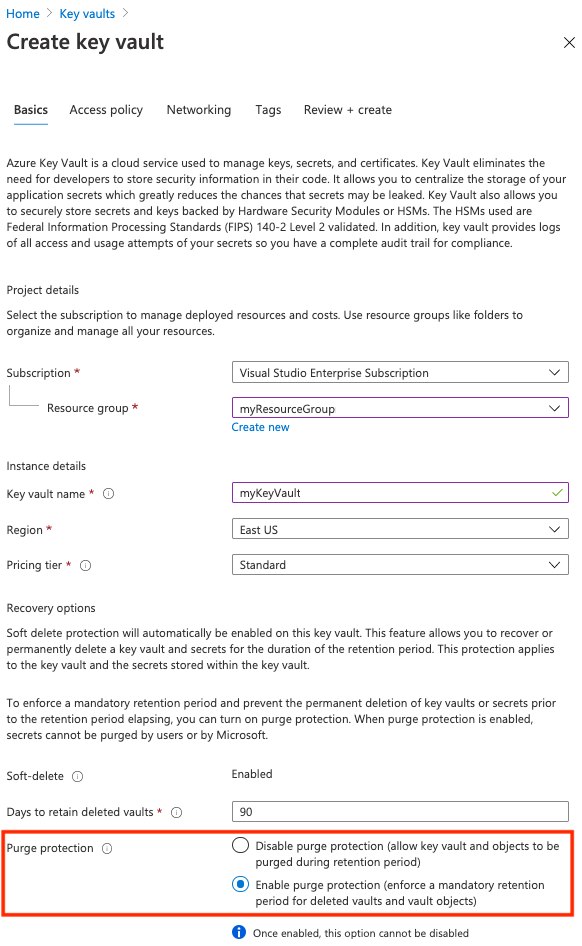
建立金鑰保存庫
請遵循快速入門:使用 Azure 入口網站建立金鑰保存庫中的步驟。
當您為客戶自控金鑰建立金鑰保存庫時,請在 [基本概念] 索引標籤上,啟用 [清除保護] 設定。 此設定有助於防止意外刪除金鑰或金鑰保存庫所導致的資料遺失。

啟用受信任的服務以存取金鑰保存庫
如果金鑰保存庫受到防火牆或虛擬網路 (私人端點) 保護,請啟用網路設定以允許受信任的 Azure 服務存取。 如需詳細資訊,請參閱設定 Azure Key Vault 網路設定。
啟用受控識別以存取金鑰保存庫
有兩種方式可讓受控識別存取您的金鑰保存庫。
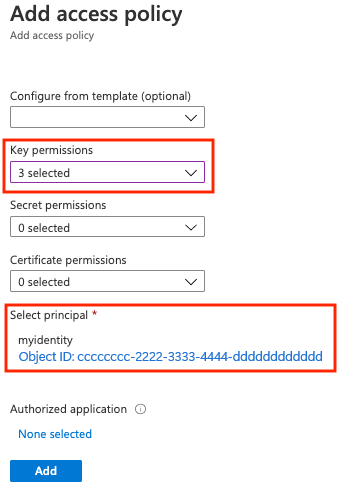
第一個選項是設定金鑰保存庫的存取原則,並設定使用使用者指派的受控識別來存取的金鑰權限:
- 移至您的金鑰保存庫。
- 選取 [設定]>[存取原則] > [+新增存取原則]。
- 選取 [金鑰權限],然後選取 [取得]、[將金鑰取消換行] 和 [包裝金鑰]。
- 在 [選取主體] 中,選取使用者指派受控識別的資源名稱。
- 選擇新增,然後選擇儲存。

另一個選項是將 Key Vault Crypto Service Encryption User 角色指派給金鑰保存庫範圍內的使用者指派受控識別。 如需詳細步驟,請參閱使用 Azure 入口網站指派 Azure 角色。
建立金鑰
在金鑰保存庫中建立金鑰,將其用於加密登錄。 如果您想要選取特定金鑰版本作為客戶自控金鑰,請遵循下列步驟。 如果金鑰保存庫存取受限於私人端點或選取的網路,您可能也需要在建立登錄之前先建立金鑰。
- 移至您的金鑰保存庫。
- 選取 [設定]>[金鑰]。
- 選取 [+產生/匯入],然後輸入唯一的金鑰名稱。
- 接受剩餘預設值,然後選取 [建立]。
- 建立之後,請選取金鑰,然後選取目前的版本。 複製金鑰版本的金鑰識別碼。
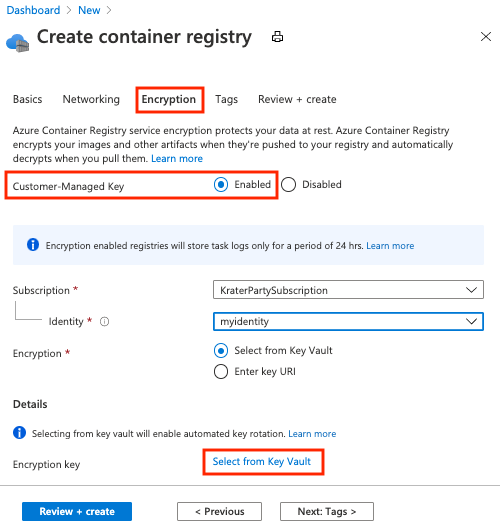
建立容器登錄
- 選取 [建立資源]>[容器]>[容器登錄]。
- 在 [基本概念] 索引標籤上,選取或建立資源群組,然後輸入登錄名稱。 在 SKU 中,選取 [進階]。
- 在 [加密] 索引標籤的 [客戶自控金鑰] 上,選取 [已啟用]。
- 針對 [身分識別],選取您建立的受控識別。
- 針對 [加密],選擇下列其中一個選項:
- 選擇 [從金鑰保存庫選取],然後選取現有的金鑰保存庫和金鑰,或選取 [新建]。 您選取的金鑰並未設定版本並啟用自動金鑰輪替。
- 選取 [輸入金鑰 URI],並提供現有金鑰的識別碼。 您可以提供已設定版本的金鑰 URI (適用於必須手動輪替的金鑰),或提供未設定版本的金鑰 URI (其可啟用自動金鑰輪替)。 如需建立金鑰的步驟,請參閱上一節。
- 選取 [檢閱 + 建立]。
- 選取 [建立] 以部署登錄執行個體。

顯示加密狀態
若要在入口網站中查看登錄的加密狀態,請移至您的登錄。 在 [設定] 之下,選取 [加密]。
使用 Resource Manager 範本啟用客戶自控金鑰
您可以使用 Resource Manager 範本來建立容器登錄,並使用客戶管理的金鑰來啟用加密:
將下列 Resource Manager 範本的內容複製到新檔案,並將其儲存為 CMKtemplate.json:
{
  "$schema": "https://schema.management.azure.com/schemas/2015-01-01/deploymentTemplate.json#",
  "contentVersion": "1.0.0.0",
  "parameters": {
    "vault_name": {
      "defaultValue": "",
      "type": "String"
    },
    "registry_name": {
      "defaultValue": "",
      "type": "String"
    },
    "identity_name": {
      "defaultValue": "",
      "type": "String"
    },
    "kek_id": {
      "type": "String"
    }
  },
  "variables": {},
  "resources": [
    {
      "type": "Microsoft.ContainerRegistry/registries",
      "apiVersion": "2019-12-01-preview",
      "name": "[parameters('registry_name')]",
      "location": "[resourceGroup().location]",
      "sku": {
        "name": "Premium",
        "tier": "Premium"
      },
      "identity": {
        "type": "UserAssigned",
        "userAssignedIdentities": {
          "[resourceID('Microsoft.ManagedIdentity/userAssignedIdentities', parameters('identity_name'))]": {}
        }
      },
      "dependsOn": [
        "[resourceId('Microsoft.ManagedIdentity/userAssignedIdentities', parameters('identity_name'))]"
      ],
      "properties": {
        "adminUserEnabled": false,
        "encryption": {
          "status": "enabled",
          "keyVaultProperties": {
            "identity": "[reference(resourceId('Microsoft.ManagedIdentity/userAssignedIdentities', parameters('identity_name')), '2018-11-30').clientId]",
            "KeyIdentifier": "[parameters('kek_id')]"
          }
        },
        "networkRuleSet": {
          "defaultAction": "Allow",
          "virtualNetworkRules": [],
          "ipRules": []
        },
        "policies": {
          "quarantinePolicy": {
            "status": "disabled"
          },
          "trustPolicy": {
            "type": "Notary",
            "status": "disabled"
          },
          "retentionPolicy": {
            "days": 7,
            "status": "disabled"
          }
        }
      }
    },
    {
      "type": "Microsoft.KeyVault/vaults/accessPolicies",
      "apiVersion": "2018-02-14",
      "name": "[concat(parameters('vault_name'), '/add')]",
      "dependsOn": [
        "[resourceId('Microsoft.ManagedIdentity/userAssignedIdentities', parameters('identity_name'))]"
      ],
      "properties": {
        "accessPolicies": [
          {
            "tenantId": "[subscription().tenantId]",
            "objectId": "[reference(resourceId('Microsoft.ManagedIdentity/userAssignedIdentities', parameters('identity_name')), '2018-11-30').principalId]",
            "permissions": {
              "keys": [
                "get",
                "unwrapKey",
                "wrapKey"
              ]
            }
          }
        ]
      }
    },
    {
      "type": "Microsoft.ManagedIdentity/userAssignedIdentities",
      "apiVersion": "2018-11-30",
      "name": "[parameters('identity_name')]",
      "location": "[resourceGroup().location]"
    }
  ]
}
依照之前章節中的步驟來建立下列資源:
- 金鑰保存庫,依名稱識別
- 金鑰保存庫,依金鑰識別元識別
執行 az deployment group create 命令,以使用先前的範本檔案來建立登錄。 在指示時,提供新的登錄名稱和使用者指派的受控識別,以及您所建立的金鑰保存庫名稱和金鑰識別元。
az deployment group create \
  --resource-group <resource-group-name> \
  --template-file CMKtemplate.json \
  --parameters \
    registry_name=<registry-name> \
    identity_name=<managed-identity> \
    vault_name=<key-vault-name> \
    key_id=<key-vault-key-id>
執行 az acr encryption show 命令,以顯示登錄加密的狀態:
az acr encryption show --name <registry-name>
下一步
前往下一篇文章以逐步瞭解如何輪替客戶自控金鑰、更新金鑰版本,以及撤銷客戶自控金鑰。