快速入門:將功能旗標新增至 Spring Boot 應用程式
在本快速入門中,您會將 Azure 應用程式組態納入 Spring Boot Web 應用程式中,以建立功能管理的端對端實作。 您可以使用應用程式組態服務來集中儲存所有功能旗標及控制其狀態。
Spring Boot 功能管理程式庫可透過全方位的功能旗標支援來擴充架構。 這些程式庫不會相依於任何 Azure 程式庫。 它們可透過 Spring Boot 組態提供者完美地與應用程式組態整合。
必要條件
- 具有有效訂用帳戶的 Azure 帳戶。 免費建立一個。
- 應用程式組態存放區。 建立存放區。
- 受支援的 Java 開發套件 SDK 第 11 版。
- Apache Maven 3.0 版或更新版本。
新增功能旗標
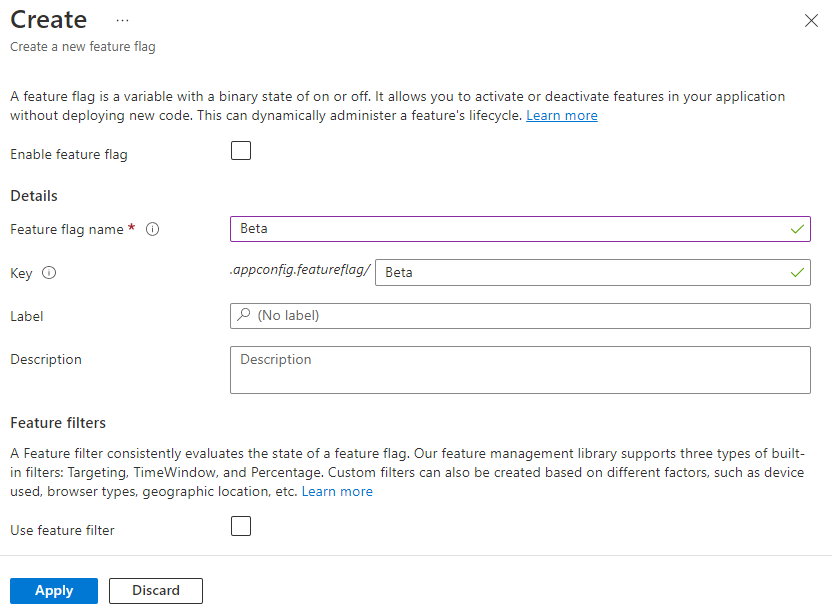
將名為 Beta 的功能旗標新增至應用程式組態存放區,並保留標籤和描述的預設值。 如需如何使用 Azure 入口網站或 CLI 將功能旗標新增至存放區的詳細資訊,請移至建立功能旗標。

建立 Spring Boot 應用程式
若要建立新的 Spring Boot 專案:
瀏覽至 Spring Initializr。
請指定下列選項:
- 使用 Java 產生 Maven 專案。
- 指定 Spring Boot 版本,應等於或大於 2.0。
- 指定應用程式的群組和成品名稱。 本文使用
com.example和demo。 - 新增 Spring Web 相依性。
在指定先前的選項之後,選取 [產生專案]。 出現提示時,將專案下載至您的本機電腦。
新增功能管理
當您在本機系統上擷取檔案之後,就可以開始編輯 Spring Boot 應用程式。 在應用程式的根目錄中找出 pom.xml。
在文字編輯器中開啟 pom.xml 檔案,並將下列內容新增至
<dependencies>的清單:
<dependency>
    <groupId>com.azure.spring</groupId>
    <artifactId>spring-cloud-azure-appconfiguration-config-web</artifactId>
</dependency>
<dependency>
    <groupId>com.azure.spring</groupId>
    <artifactId>spring-cloud-azure-feature-management-web</artifactId>
</dependency>
<dependency>
    <groupId>org.springframework.boot</groupId>
    <artifactId>spring-boot-starter-thymeleaf</artifactId>
</dependency>

<dependencyManagement>
    <dependencies>
        <dependency>
        <groupId>com.azure.spring</groupId>
        <artifactId>spring-cloud-azure-dependencies</artifactId>
        <version>5.18.0</version>
        <type>pom</type>
        <scope>import</scope>
        </dependency>
    </dependencies>
</dependencyManagement>
注意
- 有一個非 Web 功能管理程式庫不會相依於 Spring Web。 請參閱 GitHub 的文件以了解其差異。
連線至應用程式組態存放區
流覽至
resources應用程式的目錄,然後開啟bootstrap.properties或bootstrap.yaml檔案。 如果該檔案不存在,請加以建立。 在檔案中新增以下一行。您可以使用
DefaultAzureCredential來向 應用程式組態 存放區進行驗證。 請遵循指示,將認證指派給 應用程式組態 數據讀取者角色。 在執行應用程式之前,請務必允許足夠的時間來傳播許可權。 建立名為 AppConfigCredential.java 的新檔案, 並新增下列幾行:如果您使用屬性檔案,請使用下列程式代碼:
 spring.cloud.azure.appconfiguration.stores[0].endpoint= ${APP_CONFIGURATION_ENDPOINT}
 spring.cloud.azure.appconfiguration.stores[0].feature-flags.enabled=true
如果您使用 yaml 檔案,請使用下列程式代碼:
spring:
  cloud:
    azure:
      appconfiguration:
        stores[0]:
          feature-flags:
            enabled: 'true'
          connection-string: ${APP_CONFIGURATION_CONNECTION_STRING}
此外,除非您想要使用受控識別,否則您必須將下列程式代碼新增至專案:
import org.springframework.stereotype.Component;

import com.azure.data.appconfiguration.ConfigurationClientBuilder;
import com.azure.identity.DefaultAzureCredentialBuilder;
import com.azure.spring.cloud.appconfiguration.config.ConfigurationClientCustomizer;

@Component
public class AppConfigCredential implements ConfigurationClientCustomizer {

    @Override
    public void customize(ConfigurationClientBuilder builder, String endpoint) {
        builder.credential(new DefaultAzureCredentialBuilder().build());
    }
}
並新增組態Bootstrap組態,方法是在目錄下
resources/META-INF建立spring.factories檔案,並新增下列幾行,並使用您的應用程式名稱和套件進行更新com.example.MyApplication:org.springframework.cloud.bootstrap.BootstrapConfiguration=\ com.example.MyApplication設定環境變數。
將名為 APP_CONFIGURATION_ENDPOINT 的環境變數設定為您在 Azure 入口網站 中存放區概觀底下找到 應用程式組態 存放區的端點。
如果您使用 Windows 命令提示字元,請執行下列命令,然後重新啟動命令提示字元以讓變更生效:
setx APP_CONFIGURATION_ENDPOINT "endpoint-of-your-app-configuration-store"如果您使用 PowerShell,請執行下列命令:
$Env:APP_CONFIGURATION_ENDPOINT = "<endpoint-of-your-app-configuration-store>"如果您使用 macOS 或 Linux,請執行下列命令:
export APP_CONFIGURATION_ENDPOINT='<endpoint-of-your-app-configuration-store>'重新啟動命令提示字元,讓變更生效。 輸出環境變數的值,以驗證其設定是否正確。
在應用程式的 package 目錄中建立名為 HelloController.java 的新 Java 檔案。
package com.example.demo;

import org.springframework.boot.context.properties.ConfigurationProperties;
import org.springframework.stereotype.Controller;
import org.springframework.ui.Model;

import com.azure.spring.cloud.feature.management.FeatureManager;
import org.springframework.web.bind.annotation.GetMapping;


@Controller
@ConfigurationProperties("controller")
public class HelloController {

    private FeatureManager featureManager;

    public HelloController(FeatureManager featureManager) {
        this.featureManager = featureManager;
    }

    @GetMapping("/welcome")
    public String mainWithParam(Model model) {
        model.addAttribute("Beta", featureManager.isEnabledAsync("Beta").block());
        return "welcome";
    }
}
在應用程式的範本目錄中,建立名為 welcome.html 的新 HTML 檔案。
<!DOCTYPE html> <html lang="en" xmlns:th="http://www.thymeleaf.org"> <head> <meta charset="utf-8"> <meta name="viewport" content="width=device-width, initial-scale=1, shrink-to-fit=no"> <title>Feature Management with Spring Cloud Azure</title> <link rel="stylesheet" href="/css/main.css"> <link rel="stylesheet" href="https://stackpath.bootstrapcdn.com/bootstrap/4.3.1/css/bootstrap.min.css" integrity="sha384-ggOyR0iXCbMQv3Xipma34MD+dH/1fQ784/j6cY/iJTQUOhcWr7x9JvoRxT2MZw1T" crossorigin="anonymous"> <script src="https://code.jquery.com/jquery-3.6.0.min.js" integrity="sha256-/xUj+3OJU5yExlq6GSYGSHk7tPXikynS7ogEvDej/m4=" crossorigin="anonymous"></script> <script src="https://unpkg.com/@popperjs/core@2"></script> <script src="https://cdn.jsdelivr.net/npm/bootstrap@5.1.3/dist/js/bootstrap.bundle.min.js" integrity="sha384-ka7Sk0Gln4gmtz2MlQnikT1wXgYsOg+OMhuP+IlRH9sENBO0LRn5q+8nbTov4+1p" crossorigin="anonymous"></script> </head> <body> <header> <!-- Fixed navbar --> <nav class="navbar navbar-expand-md navbar-dark fixed-top bg-dark"> <a class="navbar-brand" href="#">TestFeatureFlags</a> <button class="navbar-toggler" aria-expanded="false" aria-controls="navbarCollapse" aria-label="Toggle navigation" type="button" data-target="#navbarCollapse" data-toggle="collapse"> <span class="navbar-toggler-icon"></span> </button> <div class="collapse navbar-collapse" id="navbarCollapse"> <ul class="navbar-nav mr-auto"> <li class="nav-item active"> <a class="nav-link" href="#">Home <span class="sr-only">(current)</span></a> </li> <li class="nav-item" th:if="${Beta}"> <a class="nav-link" href="#">Beta</a> </li> <li class="nav-item"> <a class="nav-link" href="#">Privacy</a> </li> </ul> </div> </nav> </header> <div class="container body-content"> <h1 class="mt-5">Welcome</h1> <p>Learn more about <a href="https://github.com/Azure/azure-sdk-for-java/tree/main/sdk/spring/spring-cloud-azure-feature-management/README.md">Feature Management with Spring Cloud Azure</a></p> </div> <footer class="footer"> <div class="container"> <span class="text-muted">© 2019 - Projects</span> </div> </footer> </body> </html>在
static下建立名為 CSS 的新資料夾,並在其中建立名為 main.css 的新 CSS 檔案。html { position: relative; min-height: 100%; } body { margin-bottom: 60px; } .footer { position: absolute; bottom: 0; width: 100%; height: 60px; line-height: 60px; background-color: #f5f5f5; } body > .container { padding: 60px 15px 0; } .footer > .container { padding-right: 15px; padding-left: 15px; } code { font-size: 80%; }
於本機建置並執行應用程式
使用 Maven 建置 Spring Boot 應用程式並加以執行。
mvn clean package
mvn spring-boot:run
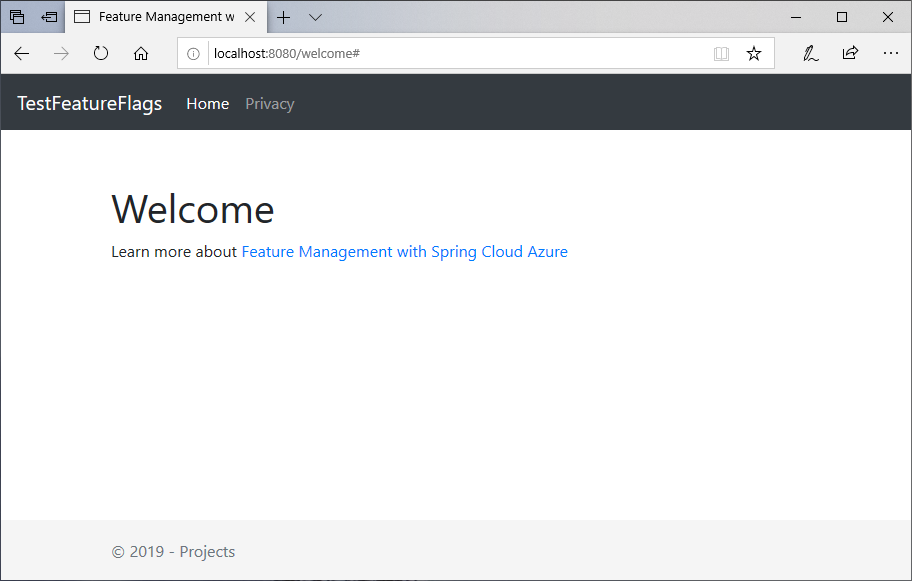
開啟瀏覽器視窗並移至 URL:
http://localhost:8080/welcome。
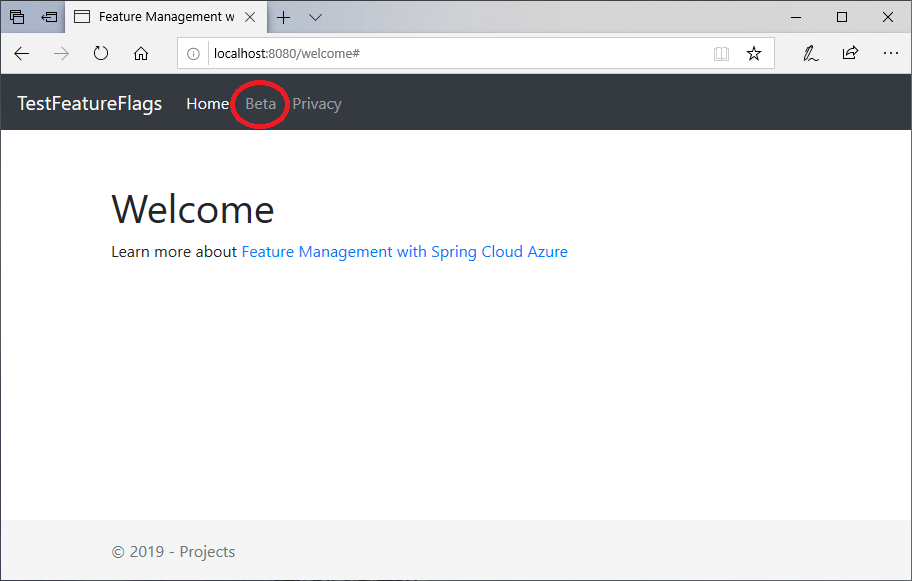
在應用程式組態入口網站中選取 [功能管理員],然後將 Beta 金鑰的狀態變更為 [開啟]:
機碼 州/省 Beta 另一 重新整理瀏覽器頁面,以查看新的組態設定。

清除資源
如果您不想繼續使用本文中建立的資源,請刪除在此處建立的資源群組,以避免產生費用。
重要
刪除資源群組是無法回復的動作。 資源群組和其中的所有資源都將被永久刪除。 請確定您不會誤刪錯誤的資源群組或資源。 如果您是在包含需保留其他資源的資源群組內部,建立本文的資源,則可以從每個資源各自的窗格中個別刪除每個資源,而不必刪除整個資源群組。
- 登入 Azure 入口網站,然後選取 [資源群組]。
- 在 [依名稱篩選] 方塊中,輸入您資源群組的名稱。
- 在結果清單中,選取資源群組名稱以查看概觀。
- 選取 [刪除資源群組]。
- 系統將會要求您確認是否刪除資源群組。 輸入您資源群組的名稱以進行確認,然後選取 [刪除]。
不久後,系統便會刪除該資源群組及其所有的資源。
下一步
在本快速入門中,您已建立新的應用程式組態存放區,並透過功能管理程式庫用它來管理 Spring Boot Web 應用程式中的功能。
- 程式庫參考文件
- 深入了解功能管理。
- 管理功能旗標。
- 在 Spring Boot Core 應用程式中使用功能旗標。