使用語意核心和 Azure AI Foundry 開發應用程式
在本文中,您將瞭解如何使用 語意核心 搭配從 Azure AI Foundry 入口網站中 Azure AI 模型目錄部署的模型。
必要條件
Azure AI 專案,如在 Azure AI Foundry 入口網站中建立專案中所述。
支援已部署之 Azure AI 模型推斷 API (英文) 的模型。 在此範例中,我們使用
Mistral-Large部署,但使用您偏好的任何模型。 若要在 LlamaIndex 中使用內嵌功能,您需要內嵌模型,例如cohere-embed-v3-multilingual。- 您可以遵循將模型部署為無伺服器 API (英文) 中的指示。
已安裝 Python 3.10 或更新版本,包括 pip。
已安裝語意核心。 您可以透過下列方式來完成:
pip install semantic-kernel在此範例中,我們會使用 Azure AI 模型推斷 API,因此我們會安裝相關的 Azure 相依性。 您可以透過下列方式來完成:
pip install semantic-kernel[azure]
設定環境
若要使用部署在 Azure AI Foundry 入口網站中的 LLM,您需要端點和認證才能連線到它。 請遵循下列步驟,從您想要使用的模型取得所需的資訊:
如果尚未開啟模型,請開啟部署模型的專案。
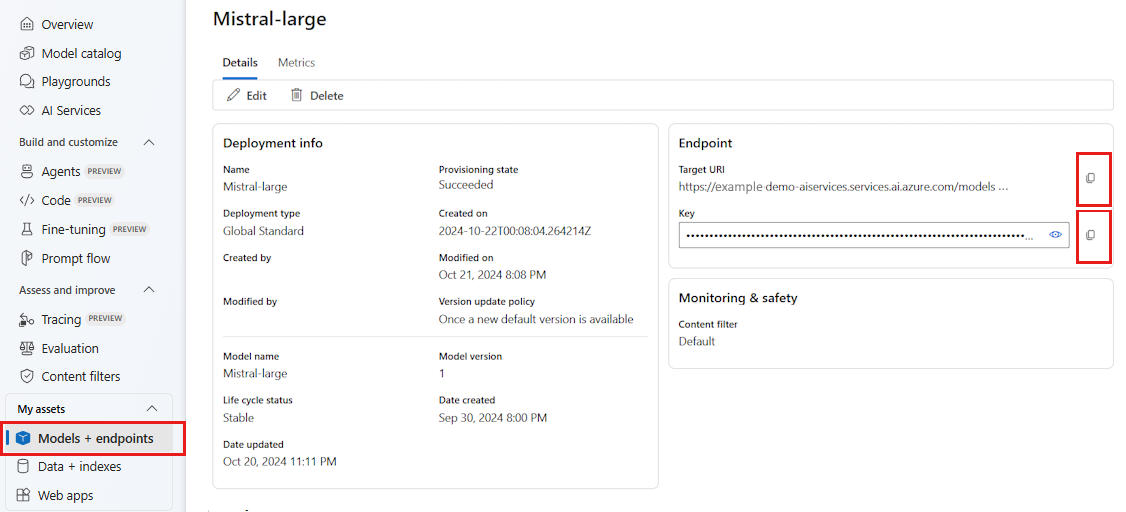
移至 [模型 + 端點 ],然後選取您部署的模型,如必要條件中所述。
複製端點 URL 和金鑰。
提示
如果您的模型已使用 Microsoft Entra ID 支援部署,則不需要金鑰。

在此案例中,我們將端點 URL 和金鑰放在下列環境變數中:
export AZURE_AI_INFERENCE_ENDPOINT="<your-model-endpoint-goes-here>"
export AZURE_AI_INFERENCE_API_KEY="<your-key-goes-here>"
設定好之後,請建立用戶端以連線到端點:
from semantic_kernel.connectors.ai.azure_ai_inference import AzureAIInferenceChatCompletion

chat_completion_service = AzureAIInferenceChatCompletion(ai_model_id="<deployment-name>")
提示
用戶端會自動讀取環境變數 AZURE_AI_INFERENCE_ENDPOINT ,並 AZURE_AI_INFERENCE_API_KEY 連線至模型。 不過,您也可以透過 endpoint 建構函式上的 和 api_key 參數,直接將端點和密鑰傳遞至用戶端。
或者,如果您的端點支援 Microsoft Entra ID,您可以使用下列程式碼來建立用戶端:
export AZURE_AI_INFERENCE_ENDPOINT="<your-model-endpoint-goes-here>"
from semantic_kernel.connectors.ai.azure_ai_inference import AzureAIInferenceChatCompletion

chat_completion_service = AzureAIInferenceChatCompletion(ai_model_id="<deployment-name>")
注意
使用 Microsoft Entra ID 時,請確定端點是以該驗證方法部署,而且您具有加以叫用所需的權限。
Azure OpenAI 模型
如果您使用 Azure OpenAI 模型,您可以使用下列程式代碼來建立用戶端:
from azure.ai.inference.aio import ChatCompletionsClient
from azure.identity.aio import DefaultAzureCredential

from semantic_kernel.connectors.ai.azure_ai_inference import AzureAIInferenceChatCompletion

chat_completion_service = AzureAIInferenceChatCompletion(
    ai_model_id="<deployment-name>",
    client=ChatCompletionsClient(
        endpoint=f"{str(<your-azure-open-ai-endpoint>).strip('/')}/openai/deployments/{<deployment_name>}",
        credential=DefaultAzureCredential(),
        credential_scopes=["https://cognitiveservices.azure.com/.default"],
    ),
)
推斷參數
您可以使用 類別來設定推斷的執行 AzureAIInferenceChatPromptExecutionSettings 方式:
from semantic_kernel.connectors.ai.azure_ai_inference import AzureAIInferenceChatPromptExecutionSettings

execution_settings = AzureAIInferenceChatPromptExecutionSettings(
    max_tokens=100,
    temperature=0.5,
    top_p=0.9,
    # extra_parameters={...},    # model-specific parameters
)
呼叫服務
讓我們先使用簡單的聊天記錄來呼叫聊天完成服務:
提示
語意核心是異步連結庫,因此您必須使用 asyncio 連結庫來執行程式代碼。
import asyncio

async def main():
    ...

if __name__ == "__main__":
    asyncio.run(main())
from semantic_kernel.contents.chat_history import ChatHistory

chat_history = ChatHistory()
chat_history.add_user_message("Hello, how are you?")

response = await chat_completion_service.get_chat_message_content(
    chat_history=chat_history,
    settings=execution_settings,
)
print(response)
或者,您可以從服務串流回應:
chat_history = ChatHistory()
chat_history.add_user_message("Hello, how are you?")

response = chat_completion_service.get_streaming_chat_message_content(
    chat_history=chat_history,
    settings=execution_settings,
)

chunks = []
async for chunk in response:
    chunks.append(chunk)
    print(chunk, end="")

full_response = sum(chunks[1:], chunks[0])
建立長時間執行的交談
您可以使用循環來建立長時間執行的交談:
while True:
    response = await chat_completion_service.get_chat_message_content(
        chat_history=chat_history,
        settings=execution_settings,
    )
    print(response)
    chat_history.add_message(response)
    chat_history.add_user_message(user_input = input("User:> "))
如果您要串流回應,您可以使用下列程式代碼:
while True:
    response = chat_completion_service.get_streaming_chat_message_content(
        chat_history=chat_history,
        settings=execution_settings,
    )

    chunks = []
    async for chunk in response:
        chunks.append(chunk)
        print(chunk, end="")

    full_response = sum(chunks[1:], chunks[0])
    chat_history.add_message(full_response)
    chat_history.add_user_message(user_input = input("User:> "))
使用內嵌模型
設定您的環境與先前的步驟類似,但使用 AzureAIInferenceEmbeddings 類別:
from semantic_kernel.connectors.ai.azure_ai_inference import AzureAIInferenceTextEmbedding

embedding_generation_service = AzureAIInferenceTextEmbedding(ai_model_id="<deployment-name>")
下列程式代碼示範如何從服務取得內嵌:
embeddings = await embedding_generation_service.generate_embeddings(
    texts=["My favorite color is blue.", "I love to eat pizza."],
)

for embedding in embeddings:
    print(embedding)