使用 Azure Active Directory B2C 設定 xID 以進行無密碼驗證
在本教學課程中,瞭解如何整合 Azure Active Directory B2C (Azure AD B2C) 驗證與 xID 數位識別碼解決方案。 xID 應用程式為使用者提供無密碼、安全、多重要素驗證。 日文政府核發的數位識別碼卡片「我的號碼卡」會驗證 xID 驗證的使用者身分識別。 對於他們的使用者,組織可以透過 xID API 取得已驗證的個人識別資訊 (客戶內容) 。 此外,xID 應用程式會在使用者行動裝置的安全區域中產生私密金鑰,使其成為數位簽章裝置。
必要條件
Azure 訂用帳戶
- 如果沒有訂用帳戶,您可以取得 Azure 免費帳戶
連結至 Azure 訂用帳戶的 Azure AD B2C 租使用者
xID inc. 提供的 xID 用戶端資訊
移至 xid.inc Contact Us 頁面以取得 xID 用戶端資訊:
- 用戶端識別碼
- 用戶端密碼
- 重新導向 URL
- 範圍
移至 x-id.me,在行動裝置上安裝 xID 應用程式 :
- 我的號碼卡
- 如果您使用 API UAT 版本,請取得 xID 應用程式 UAT 版本。 請參閱, 請與我們連絡
案例描述
下圖顯示架構。
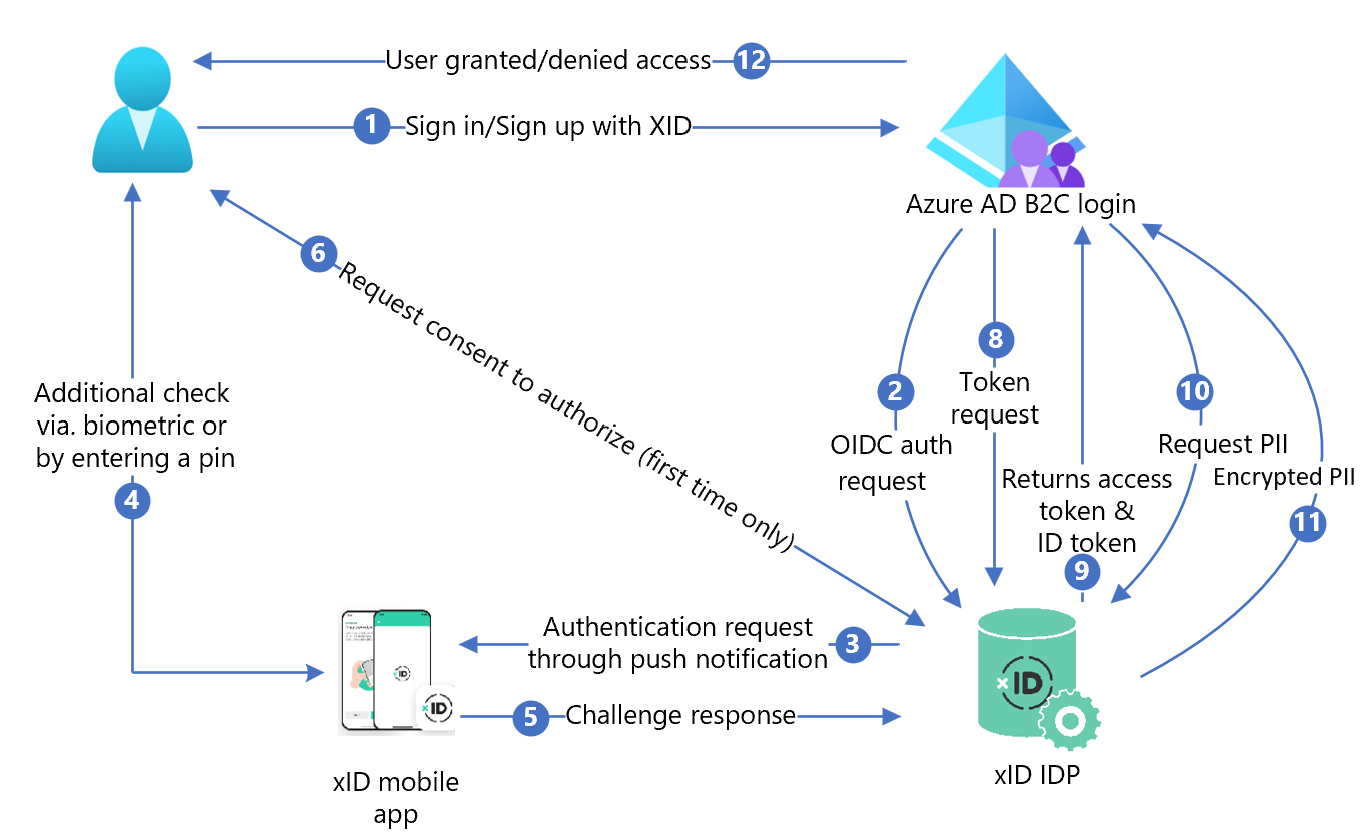
- 在 Azure AD B2C 登入頁面使用者登入或註冊。
- Azure AD B2C 會使用 OpenID Connect (OIDC) 要求,將使用者重新導向至 xID 授權 API 端點。 OIDC 端點具有端點資訊。 xID 識別提供者 (IdP) 會將使用者重新導向至 xID 授權登入頁面。 使用者輸入電子郵件地址。
- xID IdP 會將推播通知傳送給使用者行動裝置。
- 使用者開啟 xID 應用程式、檢查要求、輸入 PIN 或使用生物特徵辨識。 xID 應用程式會啟動私密金鑰,並建立電子簽章。
- xID 應用程式會將簽章傳送至 xID IdP 以供驗證。
- 同意畫面隨即出現,以將個人資訊提供給服務。
- xID IdP 會將 OAuth 授權碼傳回至 Azure AD B2C。
- Azure AD B2C 使用授權碼傳送權杖要求。
- xID IdP 會檢查權杖要求。 如果有效,則會傳回 OAuth 存取權杖,以及具有使用者識別碼和電子郵件地址的識別碼權杖。
- 如果需要使用者客戶內容,Azure AD B2C 會呼叫 xID 使用者資料 API。
- xID 使用者資料 API 會傳回加密的客戶內容。 使用者會使用私密金鑰解密,在要求 xID 用戶端資訊時建立。
- 使用者被授與或拒絕存取客戶應用程式。
安裝 xID
- 若要要求 API 檔,請填寫要求表單。 請前往 與我們連絡。
- 在訊息中,指出您使用的是 Azure AD B2C。
- xID 銷售代表會連絡您。
- 請遵循 xID API 檔中的指示。
- 要求 xID API 用戶端。
- xID 技術小組會在 3-4 個工作天內將用戶端資訊傳送給您。
- 使用下列模式在您的網站中提供重新導向 URI。 使用者會在驗證之後返回它。
https://<your-b2c-domain>.b2clogin.com/<your-b2c-domain>.onmicrosoft.com/oauth2/authresp
在 Azure AD B2C 中註冊 Web 應用程式
在您所管理的租使用者中註冊應用程式,然後他們可以與 Azure AD B2C 互動。
深入瞭解: 可在 Active Directory B2C 中使用的應用程式類型
為了進行測試,您會註冊 https://jwt.ms Microsoft Web 應用程式,其中包含未離開瀏覽器的已解碼權杖內容。
註冊 Web 應用程式並啟用識別碼權杖隱含授與
完成 教學課程:在 Azure AD B2C 中註冊 Web 應用程式
建立 xID 原則金鑰
將來自 xID 的用戶端密碼儲存在您的 Azure AD B2C 租使用者中。 如需下列指示,請使用目錄搭配 Azure AD B2C 租使用者。
- 登入 Azure 入口網站。
- 在入口網站工具列中,選取 [目錄 + 訂用帳戶]。
- 在 入口網站設定上 |[目錄 + 訂 用帳戶] 頁面的 [目錄名稱] 清單中,找出您的 Azure AD B2C 目錄。
- 選取 [切換]。
- 在Azure 入口網站左上角,選取[所有服務]。
- 搜尋並選取 [Azure AD B2C]。
- 在 [ 概觀] 上,選取 [ 身分識別體驗架構]。
- 選取 [ 原則金鑰]。
- 選取 [新增]。
- 針對 [選項],選取 [手動]。
- 輸入原則金鑰 的原則金鑰 [名稱 ] 作為原則金鑰。 前置詞
B2C_1A_會附加至金鑰名稱。 - 在 [秘密] 中,輸入來自 xID 的 [用戶端密碼]。
- 針對 [金鑰使用方法] 選取 [簽章]。
- 選取 [建立]。
將 xID 設定為識別提供者
若要讓使用者使用 xID 登入,請讓 xID 成為 Azure AD B2C 透過端點與其通訊的宣告提供者。 端點提供 Azure AD B2C 用來驗證其裝置上以數位身分識別驗證的使用者宣告。
將 xID 新增為宣告提供者
從 GitHub 取得自訂原則入門套件,然後使用您的 Azure AD B2C 租使用者名稱更新 SocialAccounts 入門套件中的 XML 檔案。
下載 zip 檔案 active-directory-b2c-policy-starterpack-main 或複製存放庫。 請參閱 Azure-Samples/active-directory-b2c-custom-policy-starterpack。
在 SocialAccounts 目錄中的檔案中,以您的 Azure AD B2C 租使用者名稱取代字串
yourtenant。 例如,yourtenant.onmicrosoft.com會成為contoso.onmicrosoft.com。開啟 SocialAccounts/TrustFrameworkExtensions.xml。
尋找 ClaimsProviders 元素。 如果沒有,請在根項目底下新增它。
新增類似下列範例的新 ClaimsProvider :
 <ClaimsProvider>
   <Domain>X-ID</Domain>
   <DisplayName>X-ID</DisplayName>
   <TechnicalProfiles>
     <TechnicalProfile Id="X-ID-OIDC">
       <DisplayName>X-ID</DisplayName>
       <Description>Login with your X-ID account</Description>
       <Protocol Name="OpenIdConnect" />
       <Metadata>
         <Item Key="METADATA">https://oidc-uat.x-id.io/.well-known/openid-configuration</Item>
         <!-- Update the Client ID below to the X-ID Application ID -->
         <Item Key="client_id">00000000-0000-0000-0000-000000000000</Item>
         <Item Key="response_types">code</Item>
         <Item Key="scope">openid verification</Item>
         <Item Key="response_mode">query</Item>
         <Item Key="HttpBinding">POST</Item>
         <Item Key="UsePolicyInRedirectUri">false</Item>
         <Item Key="DiscoverMetadataByTokenIssuer">true</Item>
         <Item Key="token_endpoint_auth_method">client_secret_basic</Item>
         <Item Key="ClaimsEndpoint">https://oidc-uat.x-id.io/userinfo</Item>
         <Item Key="ValidTokenIssuerPrefixes">https://oidc-uat.x-id.io/</Item>
       </Metadata>
       <CryptographicKeys>
         <Key Id="client_secret" StorageReferenceId="B2C_1A_XIDSecAppSecret" />
       </CryptographicKeys>
       <OutputClaims>
         <OutputClaim ClaimTypeReferenceId="issuerUserId" PartnerClaimType="sub" />
         <OutputClaim ClaimTypeReferenceId="tenantId" PartnerClaimType="tid" />
         <OutputClaim ClaimTypeReferenceId="email" />
         <OutputClaim ClaimTypeReferenceId="sid" />
         <OutputClaim ClaimTypeReferenceId="userdataid" />
         <OutputClaim ClaimTypeReferenceId="XID_verified" />
         <OutputClaim ClaimTypeReferenceId="email_verified" />
         <OutputClaim ClaimTypeReferenceId="authenticationSource" DefaultValue="socialIdpAuthentication" AlwaysUseDefaultValue="true" />
         <OutputClaim ClaimTypeReferenceId="identityProvider" PartnerClaimType="iss" DefaultValue="https://oidc-uat.x-id.io/" />
         <OutputClaim ClaimTypeReferenceId="identityProviderAccessToken" PartnerClaimType="{oauth2:access_token}" />
       </OutputClaims>
       <OutputClaimsTransformations>
         <OutputClaimsTransformation ReferenceId="CreateRandomUPNUserName" />
         <OutputClaimsTransformation ReferenceId="CreateUserPrincipalName" />
         <OutputClaimsTransformation ReferenceId="CreateAlternativeSecurityId" />
         <OutputClaimsTransformation ReferenceId="CreateSubjectClaimFromAlternativeSecurityId" />
       </OutputClaimsTransformations>
       <UseTechnicalProfileForSessionManagement ReferenceId="SM-SocialLogin" />
     </TechnicalProfile>

   <TechnicalProfile Id="X-ID-Userdata">
     <DisplayName>Userdata (Personal Information)</DisplayName>
     <Protocol Name="Proprietary" Handler="Web.TPEngine.Providers.RestfulProvider, Web.TPEngine, Version=1.0.0.0, Culture=neutral, PublicKeyToken=null" />
     <Metadata>
       <Item Key="ServiceUrl">https://api-uat.x-id.io/v4/verification/userdata</Item>
       <Item Key="SendClaimsIn">Header</Item>
       <Item Key="AuthenticationType">Bearer</Item>
       <Item Key="UseClaimAsBearerToken">identityProviderAccessToken</Item>
       <!-- <Item Key="AllowInsecureAuthInProduction">true</Item> -->
       <Item Key="DebugMode">true</Item>
       <Item Key="DefaultUserMessageIfRequestFailed">Can't process your request right now, please try again later.</Item>
     </Metadata>
     <InputClaims>
       <!-- Claims sent to your REST API -->
       <InputClaim ClaimTypeReferenceId="identityProviderAccessToken" />
     </InputClaims>
     <OutputClaims>
       <!-- Claims parsed from your REST API -->
       <OutputClaim ClaimTypeReferenceId="last_name" />
       <OutputClaim ClaimTypeReferenceId="first_name" />
       <OutputClaim ClaimTypeReferenceId="previous_name" />
       <OutputClaim ClaimTypeReferenceId="year" />
       <OutputClaim ClaimTypeReferenceId="month" />
       <OutputClaim ClaimTypeReferenceId="date" />
       <OutputClaim ClaimTypeReferenceId="prefecture" />
       <OutputClaim ClaimTypeReferenceId="city" />
       <OutputClaim ClaimTypeReferenceId="address" />
       <OutputClaim ClaimTypeReferenceId="sub_char_common_name" />
       <OutputClaim ClaimTypeReferenceId="sub_char_previous_name" />
       <OutputClaim ClaimTypeReferenceId="sub_char_address" />
       <OutputClaim ClaimTypeReferenceId="gender" />
       <OutputClaim ClaimTypeReferenceId="verified_at" />
     </OutputClaims>
     <UseTechnicalProfileForSessionManagement ReferenceId="SM-Noop" />
   </TechnicalProfile>
 </TechnicalProfiles>
 </ClaimsProvider>
使用 xID 應用程式識別碼來設定 client_id。
選取 [儲存]。
新增使用者旅程圖
新增識別提供者以登入頁面。
- 如果您有自訂使用者旅程圖,請移至 將識別提供者新增至使用者旅程圖。 否則,請建立範本使用者旅程圖的複本:
- 從入門套件中,開啟 TrustFrameworkBase.xml。
- 找出並複製包含
ID=SignUpOrSignIn的UserJourneys元素內容。 - 開啟 TrustFrameworkExtensions.xml 並找出 UserJourneys 元素。 如果沒有,請新增一個。
- 將 UserJourney 元素的內容貼上為 UserJourneys 元素的子系。
- 重新命名使用者旅程圖識別碼。 例如,
ID=CustomSignUpSignIn
將識別提供者新增至使用者旅程圖
將新的識別提供者新增至使用者旅程圖。
- 在使用者旅程圖中,找出具有 Type=
CombinedSignInAndSignUp或 Type=ClaimsProviderSelection的協調流程步驟元素。 這通常是第一個協調流程步驟。 ClaimsProviderSelections元素具有用於登入的識別提供者清單。 元素的順序會控制登入按鈕的順序。 - 新增 ClaimsProviderSelection XML 元素。
- 將 TargetClaimsExchangeId 的值設定為易記名稱。
- 新增 ClaimsExchange 元素。
- 將 識別碼 設定為目標宣告交換識別碼的值。 這項變更會將 xID 按鈕連結至
X-IDExchange動作。 - 將 TechnicalProfileReferenceId 值更新為您建立的技術設定檔識別碼 (
X-ID-OIDC) 。 - 新增協調流程步驟以呼叫 xID UserInfo 端點,以傳回有關已驗證使用者
X-ID-Userdata的宣告。
下列 XML 示範具有 xID 識別提供者的使用者旅程圖協調流程。
 <UserJourney Id="CombinedSignInAndSignUp">
   <OrchestrationSteps>

     <OrchestrationStep Order="1" Type="CombinedSignInAndSignUp" ContentDefinitionReferenceId="api.signuporsignin">
       <ClaimsProviderSelections>
         <ClaimsProviderSelection TargetClaimsExchangeId="X-IDExchange" />
       </ClaimsProviderSelections>
     </OrchestrationStep>

     <OrchestrationStep Order="2" Type="ClaimsExchange">
       <ClaimsExchanges>
         <ClaimsExchange Id="X-IDExchange" TechnicalProfileReferenceId="X-ID-OIDC" />
       </ClaimsExchanges>
     </OrchestrationStep>

     <OrchestrationStep Order="3" Type="ClaimsExchange">
       <ClaimsExchanges>
         <ClaimsExchange Id="X-ID-Userdata" TechnicalProfileReferenceId="X-ID-Userdata" />
       </ClaimsExchanges>
     </OrchestrationStep>

     <!-- For social IDP authentication, attempt to find the user account in the directory. -->
     <OrchestrationStep Order="4" Type="ClaimsExchange">
       <ClaimsExchanges>
         <ClaimsExchange Id="AADUserReadUsingAlternativeSecurityId" TechnicalProfileReferenceId="AAD-UserReadUsingAlternativeSecurityId-NoError" />
       </ClaimsExchanges>
     </OrchestrationStep>

     <!-- Show self-asserted page only if the directory does not have the user account already (i.e. we do not have an objectId).  -->
     <OrchestrationStep Order="5" Type="ClaimsExchange">
       <Preconditions>
         <Precondition Type="ClaimsExist" ExecuteActionsIf="true">
           <Value>objectId</Value>
           <Action>SkipThisOrchestrationStep</Action>
         </Precondition>
       </Preconditions>
       <ClaimsExchanges>
         <ClaimsExchange Id="SelfAsserted-Social" TechnicalProfileReferenceId="SelfAsserted-Social" />
       </ClaimsExchanges>
     </OrchestrationStep>

     <!-- The previous step (SelfAsserted-Social) could have been skipped if there were no attributes to collect
          from the user. So, in that case, create the user in the directory if one does not already exist
          (verified using objectId which would be set from the last step if account was created in the directory. -->
     <OrchestrationStep Order="6" Type="ClaimsExchange">
       <Preconditions>
         <Precondition Type="ClaimsExist" ExecuteActionsIf="true">
           <Value>objectId</Value>
           <Action>SkipThisOrchestrationStep</Action>
         </Precondition>
       </Preconditions>
       <ClaimsExchanges>
         <ClaimsExchange Id="AADUserWrite" TechnicalProfileReferenceId="AAD-UserWriteUsingAlternativeSecurityId" />
       </ClaimsExchanges>
     </OrchestrationStep>

     <OrchestrationStep Order="7" Type="SendClaims" CpimIssuerTechnicalProfileReferenceId="JwtIssuer" />

   </OrchestrationSteps>
   <ClientDefinition ReferenceId="DefaultWeb" />
 </UserJourney>
有身分識別宣告 xID 支援在原則中參考。 宣告架構是您宣告宣告的位置。 ClaimsSchema 元素具有 ClaimType 元素清單。 ClaimType 元素包含 ID 屬性,也就是宣告名稱。
- 開啟 TrustFrameworksExtension.xml。
- 找出 BuildingBlocks 元素。
- 在TrustFrameworksExtension.xml原則的ClaimsSchema元素中新增下列 ClaimType 元素
 <BuildingBlocks>
    <ClaimsSchema>
      <!-- xID -->
      <ClaimType Id="sid">
        <DisplayName>sid</DisplayName>
        <DataType>string</DataType>
      </ClaimType>
      <ClaimType Id="userdataid">
        <DisplayName>userdataid</DisplayName>
        <DataType>string</DataType>
      </ClaimType>
      <ClaimType Id="xid_verified">
        <DisplayName>xid_verified</DisplayName>
        <DataType>boolean</DataType>
      </ClaimType>
      <ClaimType Id="email_verified">
        <DisplayName>email_verified</DisplayName>
        <DataType>boolean</DataType>
      </ClaimType>
      <ClaimType Id="identityProviderAccessToken">
        <DisplayName>Identity Provider Access Token</DisplayName>
        <DataType>string</DataType>
        <AdminHelpText>Stores the access token of the identity provider.</AdminHelpText>
      </ClaimType>
      <ClaimType Id="last_name">
        <DisplayName>last_name</DisplayName>
        <DataType>string</DataType>
      </ClaimType>
      <ClaimType Id="first_name">
        <DisplayName>first_name</DisplayName>
        <DataType>string</DataType>
      </ClaimType>
      <ClaimType Id="previous_name">
        <DisplayName>previous_name</DisplayName>
        <DataType>string</DataType>
      </ClaimType>
      <ClaimType Id="year">
        <DisplayName>year</DisplayName>
        <DataType>string</DataType>
      </ClaimType>
      <ClaimType Id="month">
        <DisplayName>month</DisplayName>
        <DataType>string</DataType>
      </ClaimType>
      <ClaimType Id="date">
        <DisplayName>date</DisplayName>
        <DataType>string</DataType>
      </ClaimType>
      <ClaimType Id="prefecture">
        <DisplayName>prefecture</DisplayName>
        <DataType>string</DataType>
      </ClaimType>
      <ClaimType Id="city">
        <DisplayName>city</DisplayName>
        <DataType>string</DataType>
      </ClaimType>
      <ClaimType Id="address">
        <DisplayName>address</DisplayName>
        <DataType>string</DataType>
      </ClaimType>
      <ClaimType Id="sub_char_common_name">
        <DisplayName>sub_char_common_name</DisplayName>
        <DataType>string</DataType>
      </ClaimType>
      <ClaimType Id="sub_char_previous_name">
        <DisplayName>sub_char_previous_name</DisplayName>
        <DataType>string</DataType>
      </ClaimType>
      <ClaimType Id="sub_char_address">
        <DisplayName>sub_char_address</DisplayName>
        <DataType>string</DataType>
      </ClaimType>
      <ClaimType Id="verified_at">
        <DisplayName>verified_at</DisplayName>
        <DataType>int</DataType>
      </ClaimType>
      <ClaimType Id="gender">
        <DisplayName>Gender</DisplayName>
        <DataType>string</DataType>
        <DefaultPartnerClaimTypes>
          <Protocol Name="OpenIdConnect" PartnerClaimType="gender" />
        </DefaultPartnerClaimTypes>
        <AdminHelpText>The user's gender.</AdminHelpText>
        <UserHelpText>Your gender.</UserHelpText>
        <UserInputType>TextBox</UserInputType>
      </ClaimType>
      <ClaimType Id="correlationId">
        <DisplayName>correlation ID</DisplayName>
        <DataType>string</DataType>
      </ClaimType>
      <!-- xID -->
    </ClaimsSchema>
  </BuildingBlocks>
設定信賴憑證者原則
信賴憑證者原則,例如 SignUpSignIn.xml,指定 Azure AD B2C 執行的使用者旅程圖。
- 在信賴憑證者中,找出 DefaultUserJourney 元素。
- 更新 ReferenceId 以符合您新增至識別提供者的使用者旅程識別碼。
在下列範例中,針對 xID 使用者旅程圖, ReferenceId 會設定為 CombinedSignInAndSignUp 。
   <RelyingParty>
        <DefaultUserJourney ReferenceId="CombinedSignInAndSignUp" />
        <TechnicalProfile Id="PolicyProfile">
          <DisplayName>PolicyProfile</DisplayName>
          <Protocol Name="OpenIdConnect" />
          <OutputClaims>
          <OutputClaim ClaimTypeReferenceId="objectId" PartnerClaimType="sub" />
          <OutputClaim ClaimTypeReferenceId="tenantId" AlwaysUseDefaultValue="true" DefaultValue="{Policy:TenantObjectId}" />
          <OutputClaim ClaimTypeReferenceId="correlationId" DefaultValue="{Context:CorrelationId}" />
          <OutputClaim ClaimTypeReferenceId="issuerUserId" />
          <OutputClaim ClaimTypeReferenceId="givenName" PartnerClaimType="first_name" />
          <OutputClaim ClaimTypeReferenceId="surName" PartnerClaimType="last_name" />
          <OutputClaim ClaimTypeReferenceId="previous_name" />
          <OutputClaim ClaimTypeReferenceId="year" />
          <OutputClaim ClaimTypeReferenceId="month" />
          <OutputClaim ClaimTypeReferenceId="date" />
          <OutputClaim ClaimTypeReferenceId="prefecture" />
          <OutputClaim ClaimTypeReferenceId="city" />
          <OutputClaim ClaimTypeReferenceId="address" />
          <OutputClaim ClaimTypeReferenceId="sub_char_common_name" />
          <OutputClaim ClaimTypeReferenceId="sub_char_previous_name" />
          <OutputClaim ClaimTypeReferenceId="sub_char_address" />
          <OutputClaim ClaimTypeReferenceId="gender" />
          <OutputClaim ClaimTypeReferenceId="verified_at" />
          <OutputClaim ClaimTypeReferenceId="email" />
          <OutputClaim ClaimTypeReferenceId="sid" />
          <OutputClaim ClaimTypeReferenceId="userdataid" />
          <OutputClaim ClaimTypeReferenceId="xid_verified" />
          <OutputClaim ClaimTypeReferenceId="email_verified" />
          </OutputClaims>
          <SubjectNamingInfo ClaimType="sub" />
        </TechnicalProfile>
      </RelyingParty>
上傳自訂原則
如需下列指示,請使用目錄搭配 Azure AD B2C 租使用者。
- 登入 Azure 入口網站。
- 在入口網站工具列中,選取 [目錄 + 訂用帳戶]。
- 在 入口網站設定上 |目錄 + 訂 用帳戶頁面,位於 [目錄名稱] 清單中。 找出您的 Azure AD B2C 目錄。
- 選取 [切換]。
- 在 Azure 入口網站中,搜尋並選取 [Azure AD B2C]。
- 在 [原則] 下,選取 [Identity Experience Framework]。
- 選取 [上傳自訂原則]。
- 依下列順序上傳檔案:
- 基底原則檔案:
TrustFrameworkBase.xml - 擴充原則:
TrustFrameworkExtensions.xml - 信賴憑證者原則:
SignUpSignIn.xml
測試自訂原則
- 在 Azure AD B2C 租用戶的 [原則] 下,選取 [Identity Experience Framework]。
- 在 [自訂原則] 下,選取 [CustomSignUpSignIn]。
- 針對 [應用程式],選取您註冊的 Web 應用程式。
回復 URL為
https://jwt.ms。 - 選取 [立即執行]。
- 瀏覽器會重新導向至 xID 登入頁面。
- 瀏覽器會重新導向至
https://jwt.ms。 Azure AD B2C 傳回的權杖內容隨即出現。