教學課程:使用 Azure Active Directory B2C 設定 BioCatch
瞭解如何整合 Azure Active Directory B2C (Azure AD B2C) 驗證與 BioCatch 技術,以增強客戶身分識別和存取管理 (CIAM) 安全性狀態。 BioCatch 產品會分析使用者實體和認知數位行為,以取得可協助區別合法客戶的深入解析。
移至 biocatch.com 以深入瞭解 BioCatch
必要條件
若要開始,您需要:
- Azure 訂用帳戶
- 如果您沒有帳戶,請取得 Azure 免費帳戶
- 連結至 Azure 訂用帳戶的 Azure AD B2C 租使用者
- 移至 [biocatch.com 連絡我們 ] 頁面以要求帳戶
- 提及 Azure AD B2C 整合
案例描述
BioCatch 整合包括下列元件:
-
Web 應用程式或 Web 服務 - 使用者流覽至此 Web 服務,以具現化移至 BioCatch 的唯一用戶端會話識別碼
- 會話識別碼會將使用者行為特性傳輸至 BioCatch
- 方法 - 將會話識別碼傳送至 Azure AD B2C。 在此範例中,JavaScript 會將值輸入隱藏的 HTML 欄位中。
- Azure AD B2C 自訂 UI - 隱藏來自 JavaScript 的會話識別碼輸入 HTML 欄位
-
Azure AD B2C 自訂原則:
- 透過自我判斷技術設定檔,以會話識別碼作為宣告
- 透過 REST API 宣告提供者與 BioCatch 整合,並將會話識別碼傳遞至BioCatch
- 自訂原則邏輯的多個自訂宣告會從 BioCatch 傳回
- 使用者旅程圖會評估傳回的宣告,並執行條件式動作,例如多重要素驗證
深入了解:
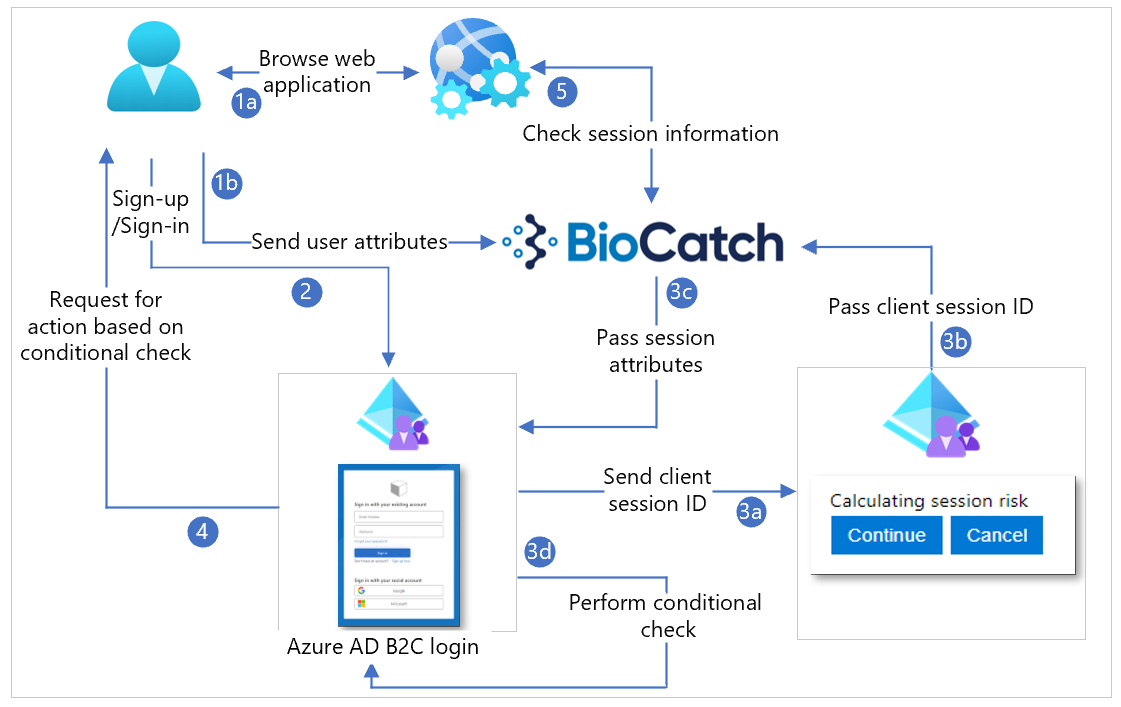
下圖說明具有會話資訊的使用者流程。

- 使用者流覽至 Web 服務,其會傳回 HTML、CSS 或 JavaScript 值,然後載入 BioCatch JavaScript SDK。 用戶端 JavaScript 會設定 BioCatch SDK 的用戶端會話識別碼。 或者,Web 服務會預先設定用戶端會話識別碼,並將其傳送至用戶端。 您可以使用用戶端會話識別碼,設定具現化的BioCatch JavaScript SDK forBioCatch,以將使用者行為從用戶端裝置傳送至 BioCatch。
- 使用者註冊或登入,並重新導向至 Azure AD B2C。
- 使用者旅程圖包含自我判斷宣告提供者,其會輸入用戶端會話識別碼。 此欄位已隱藏。 使用 JavaScript 將會話識別碼輸入欄位中。 選取 [下一步],繼續註冊或登入。 會話識別碼會移至BioCatch 以取得風險分數。 BioCatch 會傳回會話資訊,並建議允許或封鎖。 使用者旅程圖有條件式檢查,可對傳回的宣告採取動作。
- 根據條件式檢查結果,會叫用動作。
- Web 服務可以使用會話識別碼來查詢 BioCatch API,以判斷風險和會話資訊。
開始使用BioCatch
移至 [biocatch.com 連絡我們 ] 頁面以起始帳戶。
設定自訂 UI
建議您使用 CSS、JavaScript 或其他方法隱藏 [用戶端會話識別碼] 欄位。 若要進行測試,請取消隱藏欄位。 例如,JavaScript 會將輸入欄位隱藏為:
document.getElementById("clientSessionId").style.display = 'none';
設定 Azure AD B2C Identity Experience Framework 原則
若要開始使用,請參閱 教學課程:在 Azure AD B2C 中建立使用者流程和自訂原則。
建立繼承自延伸模組檔案的新檔案。
<BasePolicy>

    <TenantId>tenant.onmicrosoft.com</TenantId>

    <PolicyId>B2C_1A_TrustFrameworkExtensions</PolicyId>

  </BasePolicy>
在 BuildingBlocks 資源下建立自訂 UI 的參考,以隱藏輸入方塊。
<ContentDefinitions>

    <ContentDefinition Id="api.selfasserted">

        <LoadUri>https://domain.com/path/to/selfAsserted.cshtml</LoadUri>

        <DataUri>urn:com:microsoft:aad:b2c:elements:contract:selfasserted:2.1.0</DataUri>

      </ContentDefinition>

    </ContentDefinitions>
在 BuildingBlocks 資源下,新增下列宣告。
<ClaimsSchema>

      <ClaimType Id="riskLevel">

        <DisplayName>Session risk level</DisplayName>

        <DataType>string</DataType>

      </ClaimType>

      <ClaimType Id="score">

        <DisplayName>Session risk score</DisplayName>

        <DataType>int</DataType>

      </ClaimType>

      <ClaimType Id="clientSessionId">

        <DisplayName>The ID of the client session</DisplayName>

        <DataType>string</DataType>

        <UserInputType>TextBox</UserInputType>

      </ClaimType>

</ClaimsSchema>
設定用戶端會話識別碼欄位的自我判斷宣告提供者。
<ClaimsProvider>

      <DisplayName>Client Session ID Claims Provider</DisplayName>

      <TechnicalProfiles>

        <TechnicalProfile Id="login-NonInteractive-clientSessionId">

          <DisplayName>Client Session ID TP</DisplayName>

          <Protocol Name="Proprietary" Handler="Web.TPEngine.Providers.SelfAssertedAttributeProvider, Web.TPEngine, Version=1.0.0.0, Culture=neutral, PublicKeyToken=null" />

          <Metadata>

            <Item Key="ContentDefinitionReferenceId">api.selfasserted</Item>

          </Metadata>

          <CryptographicKeys>

            <Key Id="issuer_secret" StorageReferenceId="B2C_1A_TokenSigningKeyContainer" />

          </CryptographicKeys>

        <!—Claim we created earlier -->

          <OutputClaims>

            <OutputClaim ClaimTypeReferenceId="clientSessionId" Required="false" DefaultValue="100"/>

          </OutputClaims>

        <UseTechnicalProfileForSessionManagement ReferenceId="SM-AAD" />

        </TechnicalProfile>

      </TechnicalProfiles>

    </ClaimsProvider>
設定 BioCatch 的 REST API 宣告提供者。
<TechnicalProfile Id="BioCatch-API-GETSCORE"> <DisplayName>Technical profile for BioCatch API to return session information</DisplayName> <Protocol Name="Proprietary" Handler="Web.TPEngine.Providers.RestfulProvider, Web.TPEngine, Version=1.0.0.0, Culture=neutral, PublicKeyToken=null" /> <Metadata> <Item Key="ServiceUrl">https://biocatch-url.com/api/v6/score?customerID=<customerid>&action=getScore&uuid=<uuid>&customerSessionID={clientSessionId}&solution=ATO&activtyType=<activity_type>&brand=<brand></Item> <Item Key="SendClaimsIn">Url</Item> <Item Key="IncludeClaimResolvingInClaimsHandling">true</Item> <!-- Set AuthenticationType to Basic or ClientCertificate in production environments --> <Item Key="AuthenticationType">None</Item> <!-- REMOVE the following line in production environments --> <Item Key="AllowInsecureAuthInProduction">true</Item> </Metadata> <InputClaims> <InputClaim ClaimTypeReferenceId="clientsessionId" /> </InputClaims> <OutputClaims> <OutputClaim ClaimTypeReferenceId="riskLevel" /> <OutputClaim ClaimTypeReferenceId="score" /> </OutputClaims> <UseTechnicalProfileForSessionManagement ReferenceId="SM-Noop" /> </TechnicalProfile> </TechnicalProfiles>注意
BioCatch 提供 URL、客戶識別碼和唯一的使用者識別碼, (UUID) 。 客戶 SessionID 宣告會以查詢字串參數的形式傳遞至 BioCatch。 您可以選取活動類型,例如 MAKE_PAYMENT。
使用下列範例設定使用者旅程圖:
- 取得 clientSessionID 作為宣告。
- 呼叫 BioCatch API 以取得會話資訊。
- 如果傳回的宣告風險 很低,請略過 MFA 的步驟,否則會強制執行使用者 MFA。
<OrchestrationStep Order="8" Type="ClaimsExchange">

      <ClaimsExchanges>

        <ClaimsExchange Id="clientSessionIdInput" TechnicalProfileReferenceId="login-NonInteractive-clientSessionId" />

      </ClaimsExchanges>

    </OrchestrationStep>

    <OrchestrationStep Order="9" Type="ClaimsExchange">

      <ClaimsExchanges>

        <ClaimsExchange Id="BcGetScore" TechnicalProfileReferenceId=" BioCatch-API-GETSCORE" />

      </ClaimsExchanges>

    </OrchestrationStep>

    <OrchestrationStep Order="10" Type="ClaimsExchange">

      <Preconditions>

        <Precondition Type="ClaimEquals" ExecuteActionsIf="true">

          <Value>riskLevel</Value>

          <Value>LOW</Value>

          <Action>SkipThisOrchestrationStep</Action>

        </Precondition>

      </Preconditions>

      <ClaimsExchanges>

        <ClaimsExchange Id="PhoneFactor-Verify" TechnicalProfileReferenceId="PhoneFactor-InputOrVerify" />

      </ClaimsExchanges>
設定信賴憑證者 (選擇性) 。 您可以將 BioCatch 傳回的資訊傳遞至您的應用程式作為權杖中的宣告:risklevel 和 score。
<RelyingParty>

<DefaultUserJourney ReferenceId="SignUpOrSignInMfa" />

<UserJourneyBehaviors>

  <SingleSignOn Scope="Tenant" KeepAliveInDays="30" />

  <SessionExpiryType>Absolute</SessionExpiryType>

  <SessionExpiryInSeconds>1200</SessionExpiryInSeconds>

  <ScriptExecution>Allow</ScriptExecution>

</UserJourneyBehaviors>

<TechnicalProfile Id="PolicyProfile">

  <DisplayName>PolicyProfile</DisplayName>

  <Protocol Name="OpenIdConnect" />

  <OutputClaims>

    <OutputClaim ClaimTypeReferenceId="displayName" />

    <OutputClaim ClaimTypeReferenceId="givenName" />

    <OutputClaim ClaimTypeReferenceId="surname" />

    <OutputClaim ClaimTypeReferenceId="email" />

    <OutputClaim ClaimTypeReferenceId="objectId" PartnerClaimType="sub" />

    <OutputClaim ClaimTypeReferenceId="identityProvider" />

    <OutputClaim ClaimTypeReferenceId="riskLevel" />

    <OutputClaim ClaimTypeReferenceId="score" />

    <OutputClaim ClaimTypeReferenceId="tenantId" AlwaysUseDefaultValue="true" DefaultValue="{Policy:TenantObjectId}" />

  </OutputClaims>

  <SubjectNamingInfo ClaimType="sub" />

</TechnicalProfile>

</RelyingParty>
與 Azure AD B2C 整合
將原則檔案新增至 Azure AD B2C。 如需下列指示,請使用目錄搭配 Azure AD B2C 租使用者。
- 以 Azure AD B2C 租使用者的全域管理員身分登入Azure 入口網站。
- 在入口網站工具列中,選取 [目錄 + 訂用帳戶]。
- 在 [ 入口網站設定] 的 [目錄 + 訂用帳戶 ] 頁面上,于 [ 目錄名稱 ] 清單中,找出 Azure AD B2C 目錄。
- 選取 [切換]。
- 在Azure 入口網站左上角,選取[所有服務]。
- 搜尋並選取 [Azure AD B2C]。
- 流覽至Azure AD B2C>身分識別體驗架構。
- 將原則檔案上傳至租使用者。
測試解決方案
如需下列指示,請參閱 教學課程:在 Azure Active Directory B2C 中註冊 Web 應用程式
註冊重新導向至 JWT.MS 的虛擬應用程式。
在 [身分識別體驗架構] 下,選取您建立的原則。
在原則視窗中,選取虛擬 JWT.MS 應用程式
選取 [立即執行]。
執行註冊流程並建立帳戶。
傳回給 JWT.MS 的權杖具有 riskLevel 和 score 的 2 倍宣告。
請使用下列範例。
{

  "typ": "JWT",

  "alg": "RS256",

  "kid": "_keyid"

}.{

  "exp": 1615872580,

  "nbf": 1615868980,

  "ver": "1.0",

  "iss": "https://tenant.b2clogin.com/12345678-1234-1234-1234-123456789012/v2.0/",

  "sub": "12345678-1234-1234-1234-123456789012",

  "aud": "12345678-1234-1234-1234-123456789012",

  "acr": "b2c_1a_signup_signin_biocatch_policy",

  "nonce": "defaultNonce",

  "iat": 1615868980,

  "auth_time": 1615868980,

  "name": "John Smith",

  "email": "john.smith@contoso.com",

  "given_name": "John",

  "family_name": "Smith",

  "riskLevel": "LOW",

  "score": 275,

  "tid": "12345678-1234-1234-1234-123456789012"

}.[Signature]