在 Azure Stack Hub 或 Azure Stack 開發工具包上設定 Azure CLI 的憑證
請遵循本文中的步驟,設定 Azure 命令列介面 (CLI) 以從Linux、Mac和 Windows 用戶端平臺管理 Azure Stack 開發工具包 (ASDK) 資源。 如果您在中斷連線的環境中使用整合式系統 Azure Stack Hub,或您的憑證不是由受信任根程式中的 CA 所簽發,您也可以遵循這些步驟。
本文說明取得您的憑證,並在遠端管理計算機上信任這些憑證。 若要安裝 Azure CLI 並連線到您的環境,請參閱 在 Azure Stack Hub 上安裝 Azure CLI。
準備 Azure CLI
您需要 Azure Stack Hub 的 CA 跟證書,才能在開發電腦上使用 Azure CLI。 您可以使用憑證透過 CLI 管理資源。
如果您是從 Azure Stack Hub 環境外部的工作站使用 CLI,則需要 Azure Stack Hub CA 跟證書 。
虛擬機別名端點 會提供別名,例如 「UbuntuLTS」 或 「Win2012Datacenter」。此別名會在部署 VM 時參考映像發行者、供應專案、SKU 和版本作為單一參數。
下列各節說明如何取得這些值。
匯出 Azure Stack Hub CA 跟證書
匯出 CA 跟證書。 若要以 PEM 格式匯出 ASDK 跟證書:
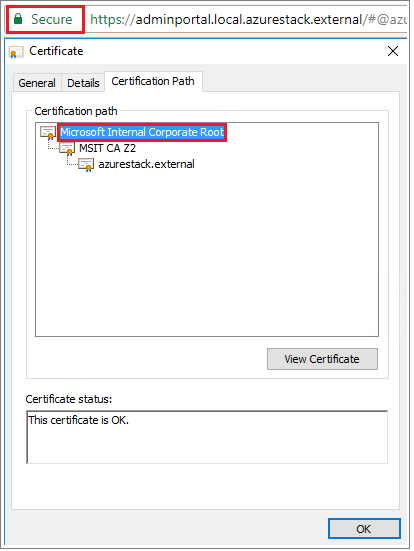
取得 Azure Stack Hub 跟憑證的名稱:
- 登入 Azure Stack Hub 使用者或 Azure Stack Hub 系統管理員入口網站。
- 選取瀏覽器網址列中的鎖定。
- 在彈出視窗中,選取 [ 連線是安全的]。
- 在 [憑證] 視窗中,選取 [ 認證路徑] 索引標籤 。
- 記下 Azure Stack Hub 跟證書的名稱,例如
*.<locale>.<FQDN>

在 Azure Stack Hub 上建立 Windows VM。
登入 VM、開啟提升許可權的 PowerShell 提示字元,然後執行下列腳本:
  $label = "*.<locale>.<FQDN> from step 1"
  Write-Host "Getting certificate from the current user trusted store with subject CN=$label"
  $root = Get-ChildItem Cert:\CurrentUser\Root | Where-Object Subject -eq "CN=$label" | select -First 1
  if (-not $root)
  {
      Write-Error "Certificate with subject CN=$label not found"
      return
  }

Write-Host "Exporting certificate"
Export-Certificate -Type CERT -FilePath root.cer -Cert $root
針對 Linux,也需要下列命令:
export REQUESTS_CA_BUNDLE=~/.local/lib/python3.9/site-packages/certifi/cacert.pem
# RECOMMENDED: set the env var automatically for your subsequent sessions
echo 'export REQUESTS_CA_BUNDLE=~/.local/lib/python3.9/site-packages/certifi/cacert.pem' >> ~/.bash_profile
將憑證複製到本機計算機。
設定虛擬機別名端點
您可以設定可公開存取的端點,以裝載 VM 別名檔案。 VM 別名檔案是 JSON 檔案,可提供映像的通用名稱。 當您將 VM 部署為 Azure CLI 參數時,請使用名稱。
如果您發佈自定義映像,請記下您在發佈期間指定的發行者、供應專案、SKU 和版本資訊。 如果是來自市集的映射,您可以使用 Cmdlet 來檢視資訊
Get-AzureVMImage。在 Azure Stack Hub 中建立記憶體帳戶。 完成時,請建立 Blob 容器。 將存取原則設定為 「公用」。
將 JSON 檔案上傳至新的容器。 完成時,您可以檢視 Blob 的 URL。 選取 Blob 名稱,然後從 Blob 屬性中選取 URL。
信任憑證
若要搭配 ASDK 使用 Azure CLI,您必須信任遠端電腦上的 CA 跟證書。
尋找您機器上的憑證位置。 位置可能會根據您已安裝 Python 的位置而有所不同。
若要尋找位置,請開啟 CMD 提示字元或提升許可權的 PowerShell 提示字元,然後輸入:
az --version。 版本和 Python 位置會出現在提示中。azure-cli 2.30.0 core 2.30.0 telemetry 1.0.6 Python location 'C:\Program Files (x86)\Microsoft SDKs\Azure\CLI2\python.exe' Extensions directory 'C:\Users\username\.azure\cliextensions' Python (Windows) 3.8.9 (tags/v3.8.9:a743f81, Apr 6 2021, 13:22:56) [MSC v.1928 32 bit (Intel)] Legal docs and information: aka.ms/AzureCliLegal Your CLI is up-to-date. Please let us know how we are doing: https://aka.ms/azureclihats and let us know if you're interested in trying out our newest features: https://aka.ms/CLIUXstudy變更至 Azure CLI 已安裝 Python 的目錄。 例如,使用步驟 2
cd "C:\Program Files (x86)\Microsoft SDKs\Azure\CLI2\中的位置。輸入以下命令:
.\python -c "import certifi; print(certifi.where())"這會傳回您電腦上的憑證位置路徑。 您的特定路徑取決於您的OS和已安裝的 Python 版本。 例如:
C:\Program Files (x86)\Microsoft SDKs\Azure\CLI2\lib\site-packages\certifi\cacert.pem記下憑證位置。 在下一個步驟中,您將使用路徑。
將 Azure Stack Hub CA 跟證書附加至現有的 Python 憑證,以信任該跟證書。
$cerFile = "<Fully qualified path to the cer certificate exported from `
your Azure Stack Hub and saved. For example: C:\Users\user1\Downloads\root.cer"
$pythonCertStore = <result from step 4>

$cerDir = Split-Path -Parent $cerFile
$pemFile = "$cerDir\root.pem"
Write-Host "Converting certificate to PEM format at $pemFile"
certutil -encode $cerFile $pemFile
$root = New-Object System.Security.Cryptography.X509Certificates.X509Certificate2
$root.Import($pemFile)

# X509Certificate2.Thumbprint calculates SHA1 hash of the public key. You can get sha1 of the pem file by using openssl,
# e.g. openssl x509 -noout -fingerprint -sha1 -inform pem -in ./root.pem
# Alternatively, 'Get-FileHash' gives the same value (without ':') for the corresponding cer file
# Since the thumbprint is a unique value for the certificate, it is commonly used to find a particular certificate in a certificate store
Write-Host "Extracting required information from the cert file"
$md5Hash    = (Get-FileHash -Path $cerFile -Algorithm MD5).Hash.ToLower()
$sha1Hash   = (Get-FileHash -Path $cerFile -Algorithm SHA1).Hash.ToLower()
$sha256Hash = (Get-FileHash -Path $cerFile -Algorithm SHA256).Hash.ToLower()

$issuerEntry  = [string]::Format("# Issuer: {0}", $root.Issuer)
$subjectEntry = [string]::Format("# Subject: {0}", $root.Subject)
$labelEntry   = [string]::Format("# Label: {0}", $root.Subject.Split('=')[-1])
$serialEntry  = [string]::Format("# Serial: {0}", $root.GetSerialNumberString().ToLower())
$md5Entry     = [string]::Format("# MD5 Fingerprint: {0}", $md5Hash)
$sha1Entry    = [string]::Format("# SHA1 Fingerprint: {0}", $sha1Hash)
$sha256Entry  = [string]::Format("# SHA256 Fingerprint: {0}", $sha256Hash)
$certText = (Get-Content -Path $pemFile -Raw).ToString().Replace("`r`n","`n")

$rootCertEntry = "`n" + $issuerEntry + "`n" + $subjectEntry + "`n" + $labelEntry + "`n" + `
$serialEntry + "`n" + $md5Entry + "`n" + $sha1Entry + "`n" + $sha256Entry + "`n" + $certText

Write-Host "Adding the certificate content to Python Cert store"
Add-Content $pythonCertStore $rootCertEntry

Write-Host "Python Cert store was updated to allow the Azure Stack Hub CA root certificate"
如需使用 Azure CLI 安裝和連線的指示,請參閱 在 Azure Stack Hub 上安裝 Azure CLI。