Collecting Microsoft Band Data in OMS Using PowerShell in OpsMgr
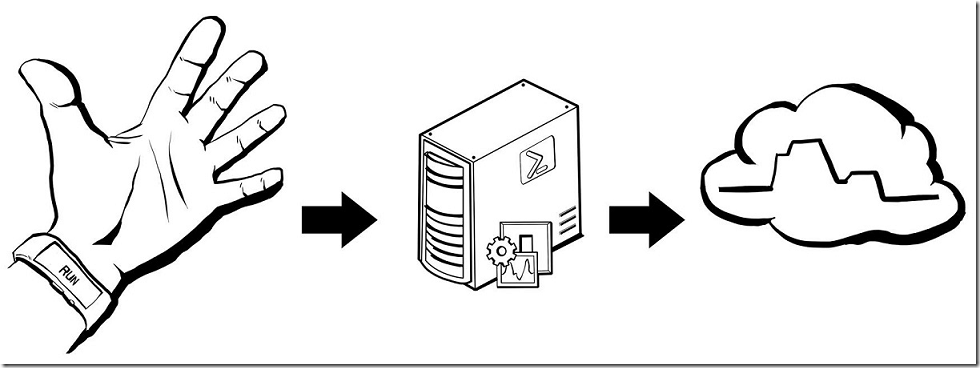
This post demonstrates how we can collect and display our Microsoft Band 2 health stats as monitoring data in Operations Management Suite (OMS), by querying the Microsoft Health Cloud APIs with PowerShell to retrieve the information, using a PowerShell-based collection rule in OpsMgr 2012 R2.
Firstly, a HUGE shout out and kudos to my colleague Stefan Stranger, who wrote the Microsoft Health PowerShell Module (also available on GitHub)
for the Microsoft Health Cloud API. This PowerShell module can be used in a PowerShell-based collection rule in OpsMgr 2012 to connect and retrieve some Microsoft Band data from the Microsoft Health Cloud API and then stored in an OMS Workspace connected to the OpsMgr 2012 Management Group. Therefore, the setup process consist of 2 parts – Setting up the Microsoft Health PowerShell Modue, and Configuring the PowerShell-based collection rule in OpsMgr.
Part 1: To setup the Microsoft Health PowerShell Module (download from here ) before configuring the PowerShell-based collection rule in OpsMgr,
Follow all the steps as specified here to setup an application and obtain authorization against the Microsoft Health Cloud APIs. Here’s an excerpt of the configuration steps:
- Go to https://account.live.com/developers/applications .
- Login with your Microsoft account.
- Create application.
- Enter a name for your awesome app (Microsoft Health PowerShell).
- Select Yes for Mobile or desktop client app.
- Save settings.
- Retrieve and write down your client id and client secret needed for using the PowerShell MicrosoftHealth Module.
- Open Authentication.config.xml_example file in your downloaded MicrosoftHealth Module folder.
- Enter your personal MicrosoftHealth client id and secret in the Authentication.config.xml_example file.
- Save Authentication.config.xml_example file as Authentication.config.xml in MicrosoftHealth Module folder.
After importing the PowerShell module, running the Get-Command -Module MicrosoftHealth will list the following available commands:
- Get-MicrosoftHealthActivity
- Get-MicrosoftHealthDevice
- Get-MicrosoftHealthProfile
- Get-MicrosoftHealthSummary
Running any of these commands (from (2.)) the first time after importing the PowerShell module will first open a sign-in page for your Microsoft account (use the account associated with your application created in (1.)).
Then the following page will open for you to accept and allow the connection to your Microsoft Health profile: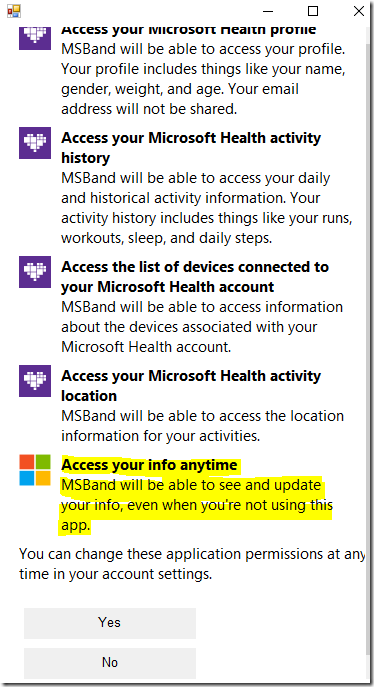
Clicking the Yes button will allow the PowerShell module to work in offline mode, without having to enter the credentials and accepting the connections again in future.
Note:
Offline mode is enabled in this instance of the Microsoft Health PowerShell Module because offline_access was added in the scope:
$Scope = @('mshealth.ReadProfile', 'mshealth.ReadActivityHistory', 'mshealth.ReadDevices', 'mshealth.ReadActivityLocation', 'offline_access' )As a reminder, please be aware that your Access Token and Refresh Token will be stored in the module folder, hence make sure that it’s securely stored.

Part 2: To create an OMS bound PowerShell-based collection rule using the Microsoft Health PowerShell Module configured for offline access in OpsMgr,
Download and import the Sample Management Pack with wizards to Create PowerShell script Collection Rules from the TechNet Gallery into a OpsMgr 2012 Management Group connected to an OMS Workspace.
Copy the MicrosoftHealth Module folder from Part 1 into the OpsMgr server with the Root Management Server emulator role (RMSe), for example, to ‘C:/MSHEALTHSCOM’. Make sure that the Authentication.config.xml file is also available in the MicrosoftHealth folder as that is where the offline access refresh token is stored.

Follow the steps as specified here to create a custom NRT performance collection rule based on the PowerShell Script (Performance – OMS Bound) Rule Type.

When configuring the PowerShell performance collection rule, remember to target the RMSe.

Since the Microsoft Health Cloud API currently only exposes hourly and daily health and aggregated data, a less aggressive sample interval should be used, for example poll only twice per hour etc.
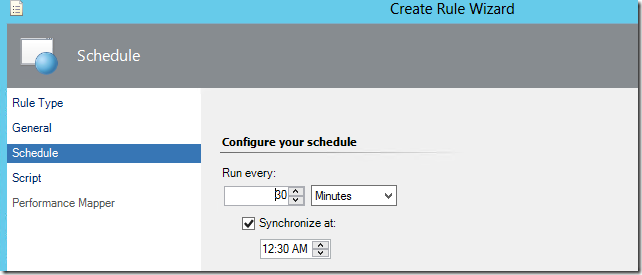
Paste your collection script into the Script page with the MOM.ScriptAPI com object.
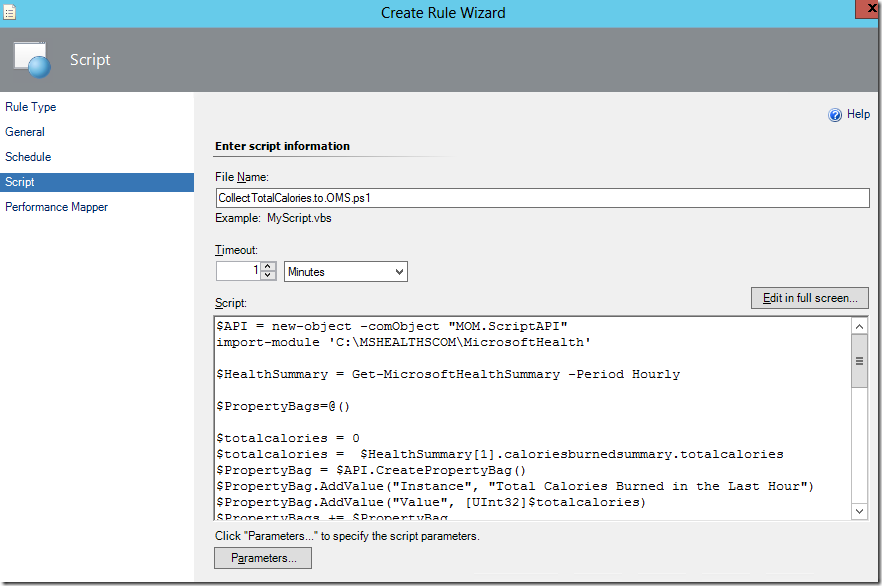
Here is the PowerShell script used in this example: (looks easy right? because Stefan has done the heavy lifting in the Microsoft Health PowerShell Module)
#///////////////////////////////////// Script Starts/////////////////////////////////////
$API = new-object -comObject "MOM.ScriptAPI"
import-module 'C:\MSHEALTHSCOM\MicrosoftHealth'
$HealthSummary = Get-MicrosoftHealthSummary -Period Hourly
$PropertyBags=@()
$totalcalories = 0
$totalcalories = $HealthSummary[1].caloriesburnedsummary.totalcalories
$PropertyBag = $API.CreatePropertyBag()
$PropertyBag.AddValue("Instance", "Total Calories Burned in the Last Hour")
$PropertyBag.AddValue("Value", [UInt32]$totalcalories)
$PropertyBags += $PropertyBag$StepsTaken = 0
$StepsTaken = $HealthSummary[1].stepstaken
$PropertyBag = $API.CreatePropertyBag()
$PropertyBag.AddValue("Instance", "Steps Taken in the Last Hour")
$PropertyBag.AddValue("Value", [UInt32]$StepsTaken)
$PropertyBags += $PropertyBag$averageHeartRate = 0
$averageHeartRate = $HealthSummary[1].heartratesummary.averageheartrate
$PropertyBag = $API.CreatePropertyBag()
$PropertyBag.AddValue("Instance", "Avg Heart Rate in the Last Hour")
$PropertyBag.AddValue("Value", [UInt32]$averageHeartRate)
$PropertyBags += $PropertyBag$peakHeartRate = 0
$peakHeartRate = $HealthSummary[1].heartratesummary.peakheartrate
$PropertyBag = $API.CreatePropertyBag()
$PropertyBag.AddValue("Instance", "Peak Heart Rate in the Last Hour")
$PropertyBag.AddValue("Value", [UInt32]$peakHeartRate)
$PropertyBags += $PropertyBag$PropertyBags #/////////////////////////////////////Script Ends///////////////////////////////////////
On the Performance Mapper page, the script data value collected can be retrieved from the property bags using this the right syntax:
$Data/Property[@Name=’Instance’]$ and $Data/Property[@Name=’Value’]$
The ‘ellipsis’ buttons can be used to reference target variables.MOST IMPORTANTLY, the value specified in the Object name field MUST follow the \\FQDN\YourObjectName format.
You can use the Network Name target variable for multi-instance class for the FQDN part, but it needs to be prefixed with a “\\” as follows: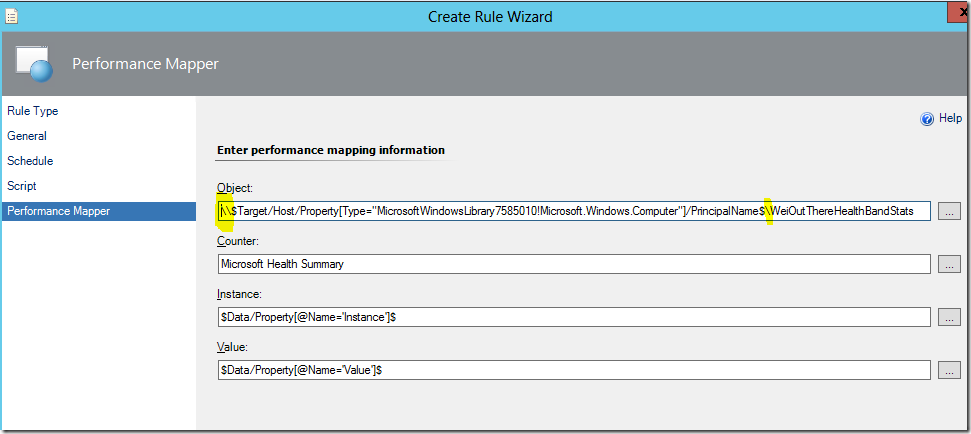
Completing the last page of the wizard and clicking the Create button will create two rules – one rule to collect aggregated script data and another to collect raw script data and both will be automatically disabled. Since the target for these rules is the RMS emulator, both rules can be located and enabled there.

Review the sample interval and the script used for the data collection (Again, make sure that the value specified in the ObjectName field follow the \\NetworkName\YourObjectName format):
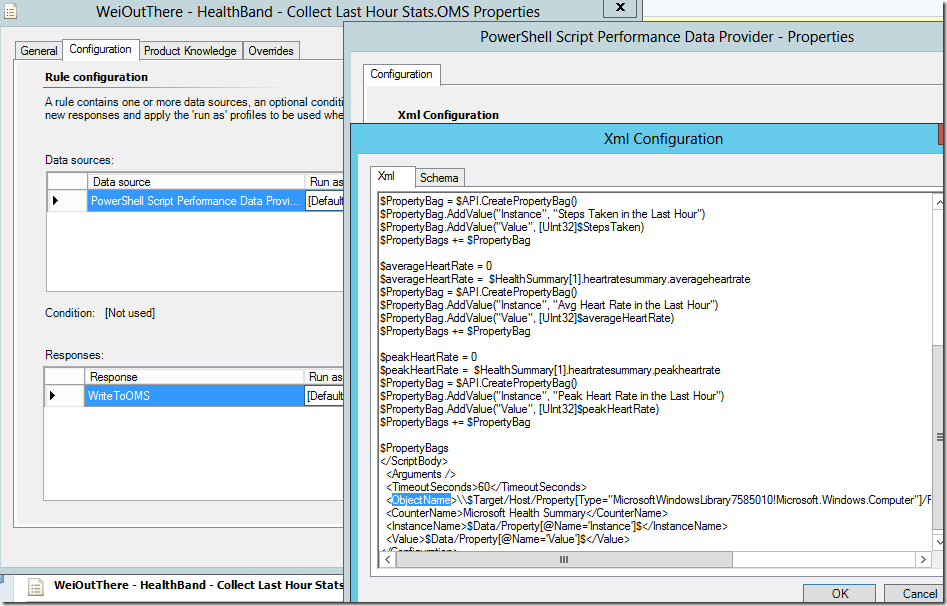
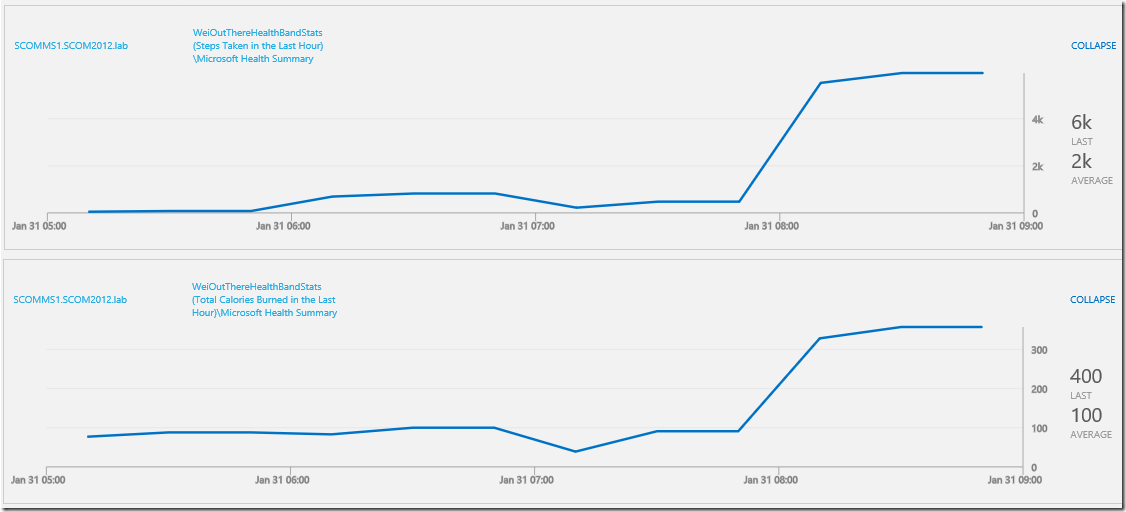
After enabling these custom collection rules, BE PATIENT and wait for a few hours for the custom counter names to appear in your OMS workspace. From then on, data should come in and update the performance chart depending on how frequent the sample interval is configured in the collection rule.
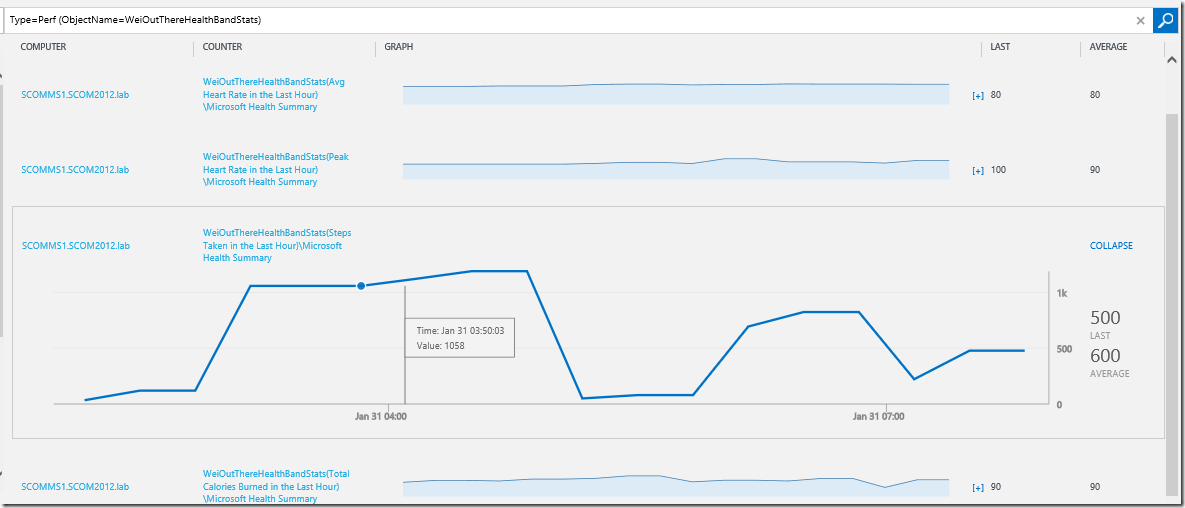
Collapsed and filtered view: Type=Perf (ObjectName=WeiOutThereHealthBandStats :
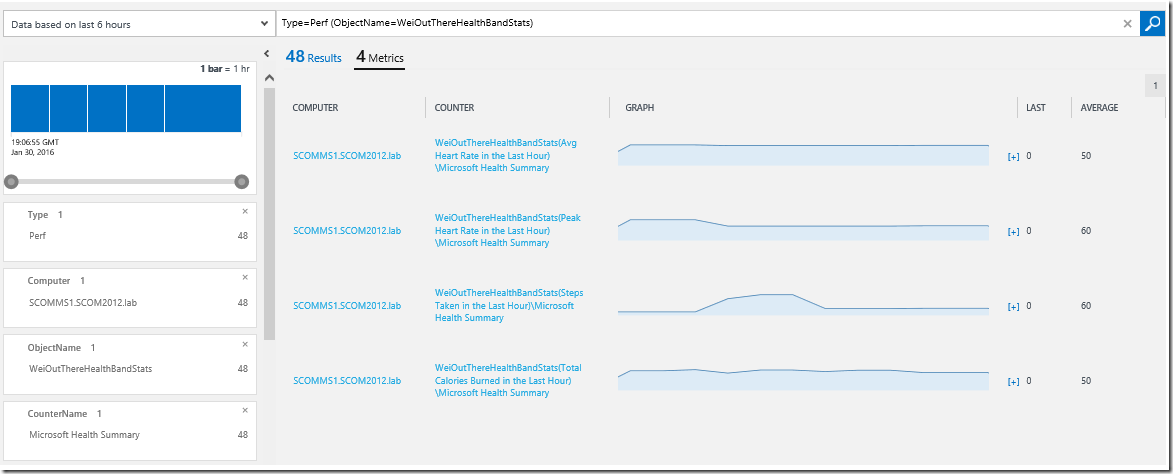
Expanded and filtered view: Type=Perf (ObjectName=WeiOutThereHealthBandStats :
Thank you for your support !
Disclaimer:
All information on this blog is provided on an as-is basis with no warranties and for informational purposes only. Use at your own risk. The opinions and views expressed in this blog are those of the author and do not necessarily state or reflect those of my employer.
Comments
- Anonymous
January 31, 2016
Interesting post!