Controlling build result based on code coverage percentage (For XAML Builds).
We can control the success of a build in our own customized way. And one of them would be based on the amount of Code Coverage done by the tests. I began customizing a build process template for achieving it and detailing the effort below.
Roughly the process would be on the following lines
· Write a custom activity for XAML build definition, that is capable of reading the current build’s statistics, and calculate the percentage of code coverage.
· Add this activity to the build process definition.
· Using Arguments in the build process XAML, get from the control percentage.
· Depending on the percentage and the build’s code coverage we calculate, change the status of the build to failure
While this explains the over-view, each step has to be dealt with separately and can take some time to complete. We’ll look into each of it in detail.
Before we begin discussing in detail, this solution is going to be universal (works for TFS 2010, 2012, 2013, 2015 XAML builds).
I have not really tested it on VSO XAML builds, but you can try it! ![]() (may need a few minor tweaks).
(may need a few minor tweaks).
However, I have a separate blog for customizing vNext Build
Creating CodeCoverageCheck Activity
As we know XAML build definitions are composed of individual activities presented as a part of work flow. The existing components can be found in the toolbox. For example – there is a default activity called “GetBuildAgent” that can be dragged and dropped into the XAML work flow to get details about the build agent that is executing the current build. We would be writing our own custom activity (let’s call it CodeCoverageCheck) so that we can drag and drop it into any build process definition XAML we would like.
· First step is to create a new project. Open Visual Studio (that matches the version of your build controller – please stick to the same version through the entire process)
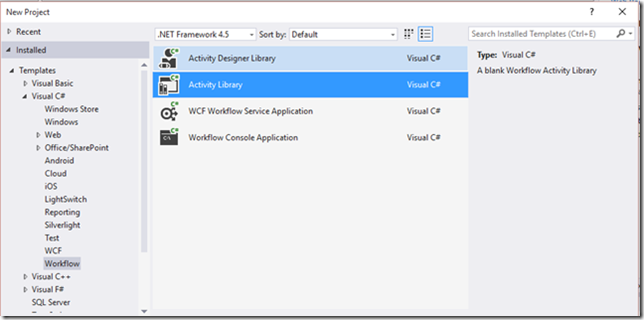
· Go to File and create new project of type Visual C# - Workflow and then Activity Library. I am going to call my solution CodeCoverageCheck.
· Add reference to the following assemblies
o Microsoft.TeamFoundation.Build.Client.dll
o Microsoft.TeamFoundation.Client.dll
o Microsoft.TeamFoundation.TestManagement.Client.dll
o Microsoft.TeamFoundation.WorkItemTracking.Client.dll
You can find all the four assemblies in the GAC of your Visual Studio machine.
· Now we need to create the activity we want. Right click on the solution and go to Add Item – New Item. We will create one of the type “Code Activity” under Worklow.
I am going to call it CodeCoverageCheck.cs
· Once the file is created you can go ahead and put this code in.
using System;
using System.Collections.Generic;
using System.Linq;
using System.Text;
using System.Activities;
using Microsoft.TeamFoundation.Build.Client;
using Microsoft.TeamFoundation.TestManagement.Client;
namespace CodeCoverageCheck
{
[BuildActivity(HostEnvironmentOption.All)] //specifying the scope of the activity - I have put it all so that this can execute in all the scopes (build, agent, controller) etc
publicsealedclassCodeCoverageCheckActivity : CodeActivity<int> //returns integer
{
publicInArgument<IBuildDetail> BuildDetail { get; set; } //getting the currrent build context.
//BuildDetail will be the variable that will habve all the information about the current build
//It is a InArgument hence going to be an input to the activity
protectedoverrideint Execute(CodeActivityContext context)
{
IBuildDetail currentBuildDetail = context.GetValue<IBuildDetail>(this.BuildDetail); //Creating a local variable to copy the BuildDetail we get as input
ITestManagementService service = currentBuildDetail.BuildServer.TeamProjectCollection.GetService<ITestManagementService>(); //Initializing the Test Management Service
ITestManagementTeamProject teamProject = service.GetTeamProject(currentBuildDetail.TeamProject); //Getting the team project associated with the build
System.Collections.Generic.IEnumerable<ITestRun> totalRuns = teamProject.TestRuns.ByBuild(currentBuildDetail.Uri); //Getting the Total tests run
ICoverageAnalysisManager coverageAnalysisManager = teamProject.CoverageAnalysisManager; //Getting the Class to retrieve code coverage
int coveredBlocks = 0;
int skippedBlocks = 0;
int codeCoveragePercent = 0;
foreach (ITestRun currentRun in totalRuns) //Looping through all the test runs
{
ITestRunCoverage[] sourceBlocks = coverageAnalysisManager.QueryTestRunCoverage(currentRun.Id, CoverageQueryFlags.Modules);
foreach (ITestRunCoverage currentBlock in sourceBlocks)
{
IModuleCoverage[] modules = currentBlock.Modules;
foreach (IModuleCoverage module in modules)
{
coveredBlocks += module.Statistics.BlocksCovered;
skippedBlocks += module.Statistics.BlocksNotCovered;
}
}
}
int totalBlocks = coveredBlocks + skippedBlocks;
if (totalBlocks == 0)
{
codeCoveragePercent = 0;
return codeCoveragePercent;
}
codeCoveragePercent = (int)((double)coveredBlocks * 100.0 / (double)totalBlocks);
return codeCoveragePercent; //We will be using this return value for comparison in the build
}
}
}
· Compile the project and you will get an assembly generated in the bin folder. Mine is CodeCoverageCheck.dll.
Pick this assembly and put it in two places.o C:\Program Files (x86)\Microsoft Visual Studio <>\Common7\IDE\PublicAssemblies (so that tool box will be able to identify the assembly)
o Add this assembly to the source control * . I have created a folder call support and have put the assembly in. Check the same into the source control tree. I am marking this with * as we would be using this really late in the process.
With this you have created the required activity. This activity takes an input (an object that represents the current build in progress) and gives back one input (the code coverage percentage).
Adding the new activity to tool box
Now we will go ahead add the activity we created to the tool box.
Go to View Tool box. Then right click and then select choose items.
Now choose the assembly we have generated.
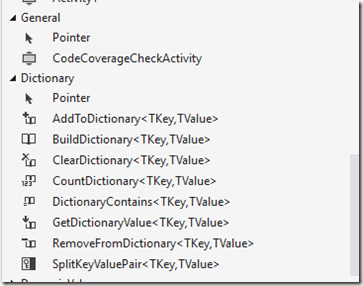
This should list the new activity we created.
Now we can go ahead and drop the activity into the XAML.
Modifying the Build XAML
I am going to use the TfvcTemplate.12.XAML as the base (just for explaining, you can use it on any build definition). Create a copy of the TfvcTemplate so that you don’t mess with the source.
First step would be to get the required variables and arguments in place.
· Create two Variables at the root level.
o (1) BuildDetailReference of type IBuildDetail (if you don’t get this typ go to imports tab and import Microsoft.TeamFoundation.Build.Activities.Extensions)
o (2) CodeCoverageResult of type Int32
We would be using the two variables for storing temporary data in the build process
· Create an argument (3) CodeCoveragePercentage with Direction In and Argument type Int32. This is the input we would be getting from the user in the build definition. This would serve as the control value – the value below which builds would fail
Next step would be to get the object that represents the current build. This should be passed as the input to the custom activity.
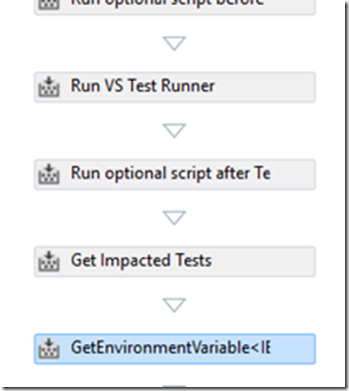
· Locate the activity “Get Impacted Test” in the build process.
· Below that use tool box and add an activity “GetEnvironmentVariable<T>” and set the data type to be IBuildDetail.
We will be using this activity to get the object that represents the details of the current build.
· In the properties Result should be set to the variable we created (1) BuildDetailReference
· Now BuildDetailReferencewill get the details of the build till that point i.e. test results, compile status etc. Later we will be passing this as input to the CodeCoverageCheck activity.
Next would be to make use of the CodeCoverageActivity we created.
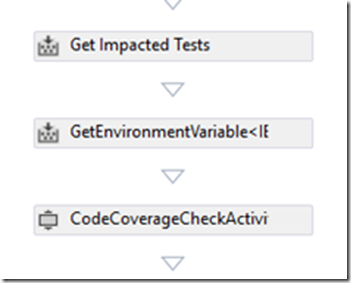
· Drag and drop CodeCoverageActivity below GetEnvironmentVariable activity.
· Set the BuildDetail input to the variable(1) BuildDetailReference
· Set the Result to variable(2) CoverageResult
We are giving the BuildDetails as input and the output of the activity (which is the Code coverage percentage) would be captured by CoverageResult variable. We will be using this for condition to fail the build next.
We have reached the last step – which would be to use the variable result to fail the build.
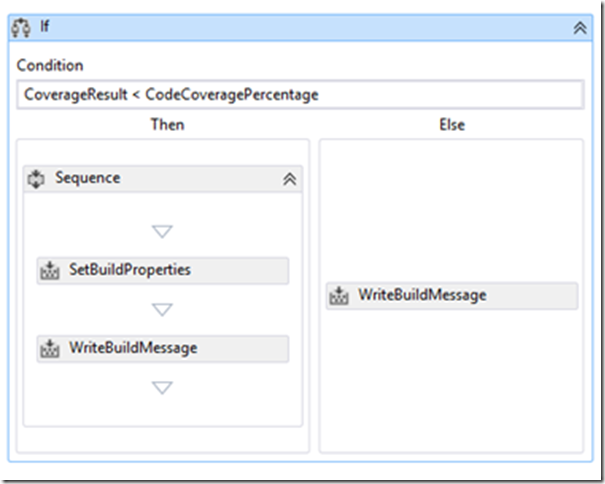
· Use the tool box and then add an If condition below the CodeCoverageCheck activity.
· The condition should be set as “CoverageResult < CodeCoveragePercentage”.
This translates to comparing the code coverage result returned by the activity (variable 2) against the input that the user sets in the build process (variable 3).
· In the If clause (which means the code coverage of the build is less than desired) we should fail the build. So add a SetBuildProperities activity from the toolbox.
In the properties to set select CompilationStatus. And in the CompilationStatus set the value to be “BuildPhaseStatus.Failed”. Failed would make the build fail. You can choose to keep it partial too.
I have added a few WriteBuildMessage to display the status – this would be optional.
This ends the build process customizing. Save the XAML and then check it into source control.
After this we have one last step.
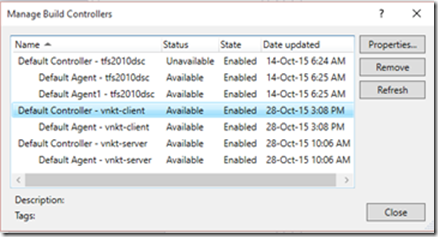
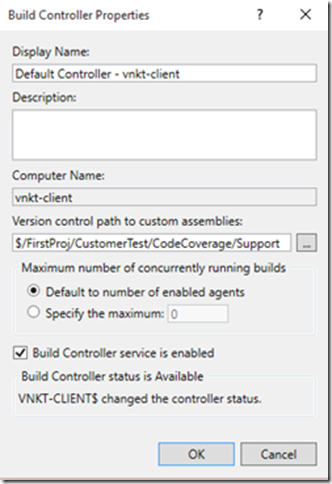
- Select the Controller and open the Properties
- Specify the version control path for the custom assembly (the step I had marked with * before) here. This is for the build controller to understand our custom step and then execute it.
We are all set. Now we can go ahead and create a new build definition with this process.
You will see that the option to enter the control percentage comes up.
For Example:
I have a build which has 12% code coverage. It succeeds when the control value is 10.
But fails if I change it to 95
Hope this helps!
Content created by – Venkata Narasimhan
Content reviewed by – Romit Gulati
Feel free to let us know if you needed any clarifications/improvements.
