Using Memcache to access a Windows Azure Dedicated Cache–Take 2
Back in October, I wrote a post that showed you how to set up a role as a dedicated cache and then access it using the memcache protocol. The steps involved were many and tedious, and in the post I said that you could expect tooling that made the work much easier. Well, that tooling is here! Now, all you have to do is follow a few steps:
1. Get the latest version of Windows Azure Powershell. The cmdlets will install via the Web Platform Installer.
2. Create a new project with the New-AzureServiceProject cmdlet.
PS C:\> New-AzureServiceProject MyService
3. Add a web role with the Add-AzurePHPWebRole or Add-AzureNodeWebRole cmdlets.
PS C:\MyService> Add-AzurePHPWebRole mywebrole
-OR-
PS C:\MyService> Add-AzureNodeWebRole mywebrole
More information about creating Azure services and adding roles can be found here: How to use Windows Azure PowerShell.
4. Use the Add-AzureCacheWorkerRole cmdlet to add a worker role that will be your dedicated cache.
PS C:\MyService> Add-AzureCacheWorkerRole mycacherole
5. Configure a web role to access the dedicated cache using the memcache protocol by using the Enable-AzureMemcacheRole cmdlet. The following example configures an existing web role (called mywebrole) to access the dedicated cache (mycacherole):
PS C:\app\MyService> Enable-AzureMemcacheRole mywebrole mycacherole
You can then connect clients to the dedicated cache using the host name localhost_mywebrole (on port 11211 by default). The following examples show example connection code for PHP and Node.js:
PHP
 $memcache = new Memcache;
 $memcache->connect('localhost_mywebrole', 11211) or die ("Could not connect");
Note: For PHP, you still need to add the PHP memcache extension to the web role (it isn’t included by default). Do this by creating a php folder in the bin directory of your web role. In the php folder add a php.ini file with one line (this will be added to the role’s PHP configuration: extension=php_memcache.dll. Also, add an ext directory to the php folder and put the php_memcache.dll there (make sure it is the php 5.3, nts, VC9 version of the dll, which you can find here).
Node.js
 var mc = require("mc");
 var mcclient = new mc.Client('localhost_mywebrole');
 mcclient.connect(function() {
     console.log("Connected to the localhost memcache on port 11211!");
 });
Note: The Node.js code above uses the mc module, though other modules that work with memcache should work as well.
After you have added connection code to your project, you can publish it with the Publish-AzureServiceProject cmdlet:
PS C:\MyService> Publish-AzureServiceProject
Note: Running a dedicated cache worker role in the Azure Emulators is not currently supported.
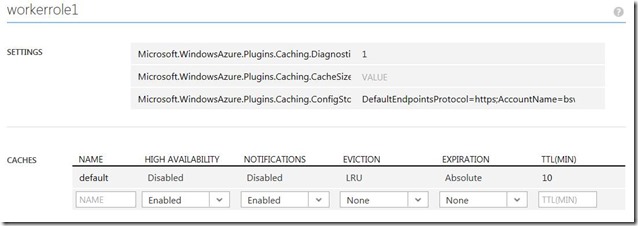
It is also worth pointing out that when you create a dedicated cache role, you can manage it in the Windows Azure Management Portal. After you deploy a project, navigate to the management portal and click on CONFIGURE from your project’s dashboard. You should see something similar to this part way down the page:
For more information about these configuration options, see Caching Features in Windows Azure.
For information about Windows Azure Caching, see Caching and Pricing Details.
That’s it. Hope you’ll agree that this is much easier than the manual configuration that was necessary before.
Thanks.
-Brian
Comments
- Anonymous
January 03, 2013
Great blog, Brian. Very straight forward now to implement (mem)caching! Cheers, Dave
