クライアント アプリケーションから SharePoint オンプレミス ADFS 認証環境にアクセスする
こんにちは、SharePoint サポートの森 健吾 (kenmori) です。
今回の投稿では、SharePoint オンプレミス ADFS 認証環境のサイトに対して、クライアント アプリケーションからユーザー認証し、HTTP を要求する処理を記載します。
利用シナリオの考察
この方法が最も求められるシナリオは、ウォームアップ スクリプトです。
SharePoint サーバーに 1 度アクセスしておくことで、アプリケーションやサイト上必要な初期処理やキャッシュの作成を行わせてしまいます。2 回目以降にアクセスする場合は、別ユーザーも含めて素早くサイトにアクセスすることができます。
Web アプリケーションの拡張を実施することで、SharePoint は同一コンテンツを複数領域にホストさせることができますが、ウォームアップ スクリプトは認証エンドポイントごとにそれぞれ実施したほうが効率的です。
現時点では、便宜上ブラウザーを使用してウォームアップする人も多いと思います。ただし、ブラウザーはユーザーがログオンして使用するクライアント アプリケーションであるため、ブラウザーを使用するウォーム アップ スクリプトはログオフした状態で実行することはサポートされていませんし、正常動作しません。そのため、ウォームアップ スクリプトを実行するサーバーをログオフさせて運用することが必要である場合には、このソリューションが必要となる可能性があるかもしれません。
別の利用シナリオとして、カスタム クライアント アプリケーションを開発し、Web サービスや REST API にアクセスする際に、SharePoint の ADFS 認証を使用した領域を選択する方をいらっしゃるかもしれません。
この場合においても、本投稿に記載された認証 Cookie を使用することで技術的に可能です。特に、実行するユーザーを扱う処理の実装が重要である場合には ADFS 認証させるためにご使用を検討ください。
ただし、SharePoint 製品としては Web アプリケーションを拡張した際にはWindows 認証だけの領域を 1 つは保持することを推奨しており、例として検索インデックスを作成するクロールの際には Windows 認証を使用してアクセスすることになります。 Windows NTLM 認証を使用して、権限の高いユーザーでアクセスする方が認証のオーバーヘッドを抑えられ、ほとんどのソリューションを実現できると考えています。
なお、SharePoint Online に対しては SharePoint Online Client SDK にあるMicrosoft.SharePoint.Client.SharePointOnlineCredentials クラスを使用することで、ADFS 連携された認証も通過できますため、本投稿のコード実装は不要です。
ADFS 認証の流れ
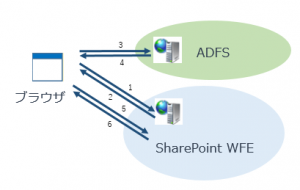
ADFS 認証は、1) ID を提供者である ADFS からセキュリティ トークンを発行させ、2) SharePoint が信頼している外部 ID プロバイダーからのものであることを確認し、認証内容を承認して成り立つ認証です。
ブラウザー アクセス時の認証では、Web サーバー側がブラウザーに HTTP 応答コード 302 を返してリダイレクトさせることで、自動的に上記の流れが実現できています。クライアント側が指示することなく受動的に認証が進んでいくことから、このブラウザーでの認証様式をパッシブ認証とも呼びます。
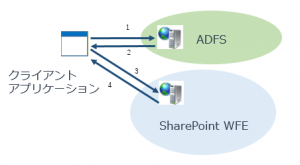
これに対して、本投稿でご紹介するクライアント アプリケーションでは、ADFS サーバーや SharePoint サーバーをクライアント側で指定して認証を進めていきます。このような認証様式を上記と比較して、アクティブ認証とも呼びます。 
要求 1. で ADFS 認証エンドポイントを呼び出し、応答 2. で SharePoint が利用できるセキュリティ トークンを受け取り、要求 3. でセキュリティ トークンを SharePoint のフェデレーション 認証エンドポイント (/_trust/) に送信して、応答 4. で認証 Cookie を受け取ります。
事前準備
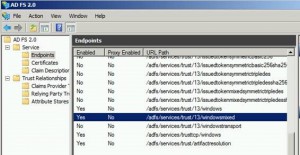
最初に、上図要求 1. でアクセスする際に使用するエンドポイントを有効化する方法を記載します。
今回の例では /adfs/services/trust/windowsmixed エンドポイントを使用します。有効化されていない場合は、エンドポイントを右クリックして有効化し、サービスの管理から AD FS Windows Service を再起動してください。
上図は AD FS 2.0 の管理コンソールです。以降のバージョンの ADFS も同様の UI です。
(参考)
上記に対し、ブラウザー ベースのパッシブ認証 (リダイレクトによる認証) のログインには /adfs/ls エンドポイントが使用されています。
サンプル コード
それでは、これからコードの実装を記載していきます。
1. Visual Studio を起動して、任意のソリューションを作成します。
2. ソリューション エクスプローラからプロジェクトを右クリックし、[追加] – [新しい項目] をクリックします。
3. クラスを選択し、任意の名前 (例. SPADFSAuthUtil) と名前を付けて [追加] をクリックします。
4. 以下のような実装コードで上書きします。
 using Microsoft.IdentityModel.Protocols.WSTrust;
using System;
using System.Collections.Generic;
using System.IO;
using System.Linq;
using System.Net;
using System.ServiceModel;
using System.Text;
using System.Threading.Tasks;
using System.Web;
using System.Xml;

namespace SPADFSUtils
{
    static class SPADFSAuthUtil
    {
        public static string GetAuthenticationCookie(string IdProviderUrl, string RP_Uri, string RP_Realm, string UserName, string Password, string Domain)
        {
            //-----------------------------------------------------------------------------
            // IP (ADFS) の Windows 認証エンドポイントにセキュリティ トークンを要求します。
            //-----------------------------------------------------------------------------
            var binding = new WS2007HttpBinding(SecurityMode.TransportWithMessageCredential);
            binding.Security.Message.EstablishSecurityContext = false;
            var endpoint = new EndpointAddress(IdProviderUrl + "/adfs/services/trust/13/windowsmixed");
            RequestSecurityTokenResponse rstr;
            using (var factory = new Microsoft.IdentityModel.Protocols.WSTrust.WSTrustChannelFactory(binding, endpoint))
            {
                factory.Credentials.Windows.ClientCredential =
                    new NetworkCredential(UserName, Password, Domain);
                factory.TrustVersion = System.ServiceModel.Security.TrustVersion.WSTrust13;

                var rst = new RequestSecurityToken();

                rst.AppliesTo = new EndpointAddress(RP_Realm);
                rst.KeyType = WSTrust13Constants.KeyTypes.Bearer;
                rst.RequestType = WSTrust13Constants.RequestTypes.Issue;

                var channel = (Microsoft.IdentityModel.Protocols.WSTrust.WSTrustChannel)factory.CreateChannel();
                channel.Issue(rst, out rstr);
            }

            //-----------------------------------------------------------------------------
            // IP から取得した信頼されたセキュリティ トークンを RP (SharePoint) に送信し
            //  SharePoint から認証 Cookie を取得します。
            //-----------------------------------------------------------------------------
            using (var output = new StringWriterUtf8(new StringBuilder()))
            {
                using (var xmlwr = XmlWriter.Create(output))
                {
                    WSTrust13ResponseSerializer rs = new WSTrust13ResponseSerializer();
                    rs.WriteXml(rstr, xmlwr, new WSTrustSerializationContext());
                }
                var str = string.Format("wa=wsignin1.0&wctx={0}&wresult={1}",
                    HttpUtility.UrlEncode(RP_Uri + "/_layouts/15/Authenticate.aspx?Source=%2F"),
                    HttpUtility.UrlEncode(output.ToString()));

                var req = (HttpWebRequest)HttpWebRequest.Create(RP_Uri + "/_trust/");

                req.Method = "POST";
                req.ContentType = "application/x-www-form-urlencoded";
                req.CookieContainer = new CookieContainer();
                req.AllowAutoRedirect = false;

                using (var res = req.GetRequestStream())
                {
                    byte[] postData = Encoding.UTF8.GetBytes(str);
                    res.Write(postData, 0, postData.Length);
                }

                using (var res = (HttpWebResponse)req.GetResponse())
                {
                    return res.Cookies["FedAuth"].Value;
                }
            }
        }


        internal class StringWriterUtf8 : StringWriter
        {
            public StringWriterUtf8(StringBuilder sb)
                : base(sb)
            { }

            public override Encoding Encoding
            {
                get
                {
                    return Encoding.UTF8;
                }
            }
        }
    }
}
5. ソリューション エクスプローラより "参照" を右クリックし、[参照の追加] をクリックし、"System.IdentityModel" と "System.Web" にチェックを入れて、[OK] をクリックします。
6. 同じくソリューション エクスプローラより "参照" を右クリックし、[参照の追加] をクリックし、 [参照(B)...] をクリック、C:\Program Files\Reference Assemblies\Microsoft\Windows Identity Foundation\v3.5\Microsoft.IdentityMode.dll を参照し、 [OK] をクリックします。
7. 上記までで、ユーティリティ単体ではビルドが通るようになりますので、あとは呼び出し元を作成します。
 using SPADFSUtils;
using System;
using System.Collections.Generic;
using System.Linq;
using System.Net;
using System.Text;
using System.Threading.Tasks;

namespace TestApp
{
    class Program
    {
        static void Main(string[] args)
        {
            // ADFS サーバーを指定します。(末尾に / をつけない)

            string IdProviderUrl = "https://adfsserver";
            // ADFS を利用する SharePoint サーバーを指定します。(末尾に / をつけない)
            string RP_Uri = "https://sharepointserver";
          // ADFS を利用する SharePoint サーバーの領域名 (realm) を指定します。
            string RP_Realm = "urn:seo:sharepoint";

            // ADFS 認証を行うユーザーの資格情報を指定します。
            string UserName = "Administrator";
            string Password = "PASSWORD";
            string Domain = "DOMAIN";


            HttpWebRequest req = (HttpWebRequest)HttpWebRequest.Create(RP_Uri);

            // 本投稿で作成した Utility を使用して認証 Cookie を取得します。
            var cc = new CookieContainer();
            cc.Add(new Uri(RP_Uri), new Cookie("FedAuth", SPADFSAuthUtil.GetAuthenticationCookie(IdProviderUrl, RP_Uri, RP_Realm, UserName, Password, Domain)));
            req.CookieContainer = cc;

            // SharePoint サーバーへアクセスします。
            using (var res = (HttpWebResponse)req.GetResponse())
            {
                Console.WriteLine("Status Code: " + res.StatusCode);
                Console.WriteLine("Press [ENTER] to finish...");
                Console.ReadLine();
            }
        }
   }
}
今回の投稿は以上です。

