How to create a Custom Activity Designer with Windows Workflow Foundation (WF4)
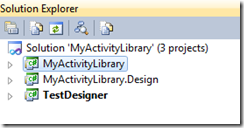
The Windows Workflow Foundation (WF4) - Custom Activity Designer sample demonstrates how you can build an activity and activity designer. It includes three projects
- MyActivityLibrary - The activity library project
- MyActivityLibrary.Design - The activity designer project
- TestDesigner - A rehosted designer project useful for testing the activity
Step 1: Create the Activity
The first step is to build your activity. Don't create a designer until you are satisifed with the interface to your activity in terms of arguments and properties. This sample includes a native activity named MyActivity which simply returns a string with the activity values.
The activity includes an InArgument and two properties including an enumerated value so you can see how to use these with your activity designer.
    1: public sealed class MyActivity : NativeActivity<string>
    2: {
    3:     public MyEnum Option { get; set; }
    4:     public bool TestCode { get; set; }
    5:
    6:     [DefaultValue(null)]
    7:     public InArgument<string> Text { get; set; }
    8:
    9:     protected override void Execute(NativeActivityContext context)
   10:     {
   11:         this.Result.Set(
   12:             context,
   13:             string.Format(
   14:                 "Text is {0}, TestCode is {1}, Option is {2}",
   15:                 context.GetValue(this.Text),
   16:                 this.TestCode,
   17:                 this.Option));
   18:     }
   19: }
Step 2: Add the Design Project
Visual Studio uses a naming convention to locate an associated designer project. Since our assembly is named MyActivity.dll, Visual Studio will attempt to load MyActivity.Design.dll.
- Select File / Add / New Project
- Choose the Activity Designer Library project template
- Name the project MyActivityLibrary.Design
Step 3: Add RegisterMetadata method
The activity designer class should include a method to register the metadata for that designer.
    1: public partial class MyActivityDesigner
    2: {
    3:     public MyActivityDesigner()
    4:     {
    5:         this.InitializeComponent();
    6:     }
    7:
    8:     public static void RegisterMetadata(AttributeTableBuilder builder)
    9:     {
   10:         builder.AddCustomAttributes(typeof(MyActivity), new DesignerAttribute(typeof(MyActivityDesigner)));
   11:         builder.AddCustomAttributes(typeof(MyActivity), new DescriptionAttribute("My sample activity"));
   12:     }
   13: }
Step 4: Add Metadata Class
Add a class that implements System.Activities.Presentation.Metadata.IRegisterMetadata. This class will be invoked at runtime to add attributes to the activity class. In the sample, I've added a static method called RegisterAll() which will register all of the activities contained in this library. This method is called from the test designer.
    1: public sealed class MyActivityLibraryMetadata : IRegisterMetadata
    2: {
    3:     public void Register()
    4:     {
    5:         RegisterAll();
    6:     }
    7:
    8:     public static void RegisterAll()
    9:     {
   10:         var builder = new AttributeTableBuilder();
   11:         MyActivityDesigner.RegisterMetadata(builder);
   12:         // TODO: Other activities can be added here
   13:         MetadataStore.AddAttributeTable(builder.CreateTable());
   14:     }
   15: }
Step 5: Add an activity image to your Design Project
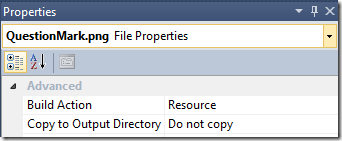
Your designer should include a 16x16 ToolBox image. The sample application includes the image QuestionMark.png in the activity library. The Build Action for this file should be set to Resource
Step 6: Add the ToolboxBitmap
To support a Toolbox Bitmp you will need to add the activity image to your activity library project also and set the Build Action to Embedded Resource. The sample application has included the file QuestionMark.png as a linked file from the design project.
Next go back to your activity class and add the ToolboxBitmap attribute
    1: // TODO: Be sure the build action for your bitmap is set to Embedded Resource
    2: [ToolboxBitmap(typeof(MyActivity), "QuestionMark.png")]
    3: public sealed class MyActivity : NativeActivity<string>
Step 7: Create The Designer
The XAML in the Activity Designer Library template is for a simple designer. This sample includes a designer with support for Expand/Collapse and an activity image as well as a drop down list with enumerated values.
Here is the collapsed view where you would show only the most important values
And this is the expanded view where you can add more commonly access properties. Remember the property grid allows access to other properties that are not included on the design surface.
Step 8: Configure the Designer project for debugging
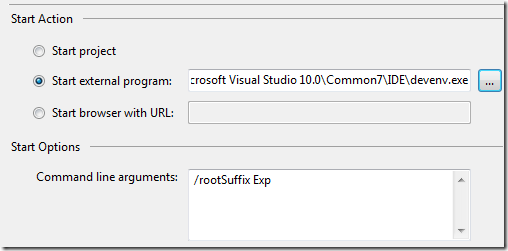
There are two options for debugging your designer project. The recommended approach is to debug with a re-hosted designer application such as the one included with this application. Set the project properties as shown for debugging support.
To test with Visual Studio it is best to use the Experimental Instance option. Debugging with Visual Studio can take a long time so it is best to test by starting without debugging.
And that’s it. Now all you need to do is manage the WPF side of things. Check the sample to see how it’s done.
Happy Coding!
Ron Jacobs


