Using Windows Azure Development Environment Essentials
The Windows Azure development is a simulation environment which enables you to run and debug your applications (services) before deploying them. The development environment provides the following utilities:
- The development fabric utility. The development fabric is a simulation environment for running your application (service) locally, for testing and debugging it before deploying it to the cloud. The fabric handles the lifecycle of your role instances, as well as providing access to simulated resources such as local storage resources.
- The development storage utility. It simulates the Blob, Queue, and Table services available in the cloud. If you are building a hosted service that employs storage services or writing any external application that calls storage services, you can test locally against development storage.
- The Windows Azure SDK also provides a set of utilities for packaging your service for either the development environment or for Windows Azure, and for running your service in the development fabric
For more information see Using the Windows Azure Development Environment.
Development Fabric
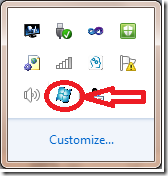
Before using the Windows Azure development environment, you must assure that it is activated. Usually this happens when you start debugging your application in Visual studio. You can verify the activation by checking that the related icon exists in the system tray as shown in the following illustration.
Figure 1 Windows Azure Development Environment Icon
Note. Using the CSRun command-line tool starts the development fabric if it is not yet running. You must run this tool as an administrator. For more information see CSRun Command-Line Tool.
You can right-click this icon to display the user interfaces for the development fabric and development storage and to start or shut down these services.
1. Right-click the icon and in the pop-up dialog click Show Development Fabric UI. A development fabric UI window is activated similar to the one shown in the following illustration. The development fabric UI shows your service deployments in an interactive format. You can examine the configuration of a service, its roles, and its role instances. From the UI, you can run, suspend, or restart a service. In this way, you can verify the basic functionality of your service.
Figure 2 Development Fabric UI
2. Right-click the icon and in the pop-up dialog click Show Development Storage UI. A development storage UI window is activated similar to the one shown in the following illustration. You can use the development storage UI to start or stop any of the services, or to reset them. Resetting a service stops the service, cleans all data for that service from the SQL database (including removing any existing blobs, queues, or tables), and restarts the service.
Figure 3 Development Storage UI
Development Storage
The development storage relies on a Microsoft SQL Server instance to simulate the storage servers. By default, the development storage is configured for Microsoft SQL Server Express versions 2005 or 2008. Also development storage uses Windows authentication to connect to the server.
Using the CSRun command-line tool automatically starts development storage. You can also use this command to stop development storage. The first time you run development storage, an initialization process runs to configure the environment. The initialization process creates a database in SQL Server Express and reserves HTTP ports for each local storage service.
Configuring Microsoft SQL Server
You can also configure the development storage to access a local instance of SQL Server different from the default SQL Server Express. You can do that by running the DSInit.exe command-line tool as shown next. Remember you must run this tool as an administrator. For more information see DSInit Tool.
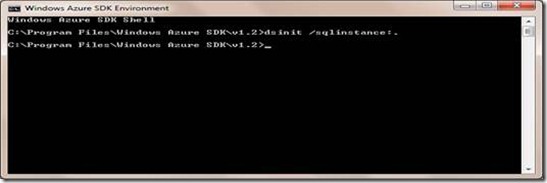
1. In the Windows Azure SDK command prompt execute the following command as shown in the next illustration:
>dsinit /sqlinstance:.
Figure 4 Initializing Development Environment Storage
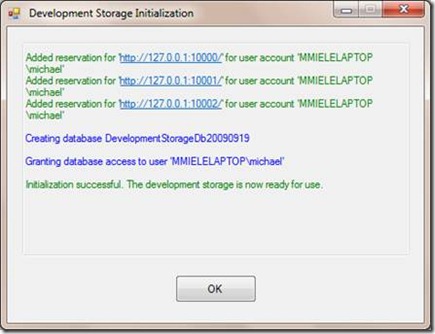
2. A dialog prompt is displayed similar to the one shown in the next illustration.
Figure 5 Confirming Development Environment Storage Initialization
The initialization process creates a database named DevelopmentStorageDb20090919in your current SQL Server default instance and reserves HTTP ports for each local storage service.
3. Click OK.
You can view the created database by using Microsoft SQL Server Management Studio as shown in the following illustration. The tool can be downloaded from this location: Microsoft SQL Server 2008 Management Studio Express.
Figure 6 Displaying Development Environment Storage Database
Connecting to Microsoft SQL Server
This section shows you how to connect to your own Microsoft SQL server instance. To do that you need to configure the connection string that development storage can use. The following steps show how to do this.
The first thing you want to do is to obtain the actual connection string to use.
1. Activate Visual Studio as an administrator then select Server Explorer.
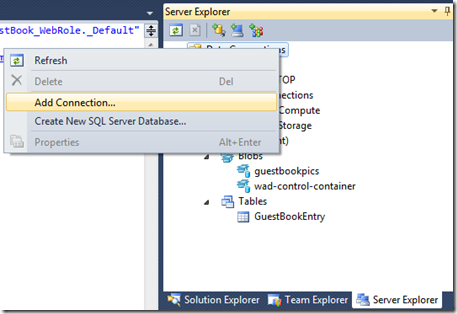
2. Right-click Data Connections and then select click Add Connection… as shown in the following illustration.
Figure 7 Creating Development Environment Storage Database Server Connection
3. In the displayed dialog window, in the Server name box enter the name of your SQL server (by default, it is the name of your machine).
4. In the Log on to the server, leave Use Windows Authentication selected. This is the authentication modality used by development storage.
5. In the Connect to a database check Select or enter a database name.
6. In the drop-down list select the development storage database DevelopmentStorageDb20090919. The following illustration is an example of these steps.
Figure 8 Specifying Development Environment Storage Database
7. Click Test Connection. If everything is correct, a successful pop-up dialog is displayed. Click OK.
8. Finally, Click OK in the main dialog window.
A new database connection, similar to the one shown in the following illustration, is created and displayed in Server Explorer.
Figure 9 Development Storage Database Connection
9. Right-click the data connection just created and in the pop-up dialog select Properties.
10. In the Properties window copy the Connection String property value that is similar to this:
Data Source=mmieleLAPTOP;Initial Catalog=DevelopmentStorageDb20090919;Integrated Security=True
Among other things, the string defines the name of the SQL server instance and the development storage database.
Now you need to instruct development storage to use this connection string to connect to the database. You do this by following the next steps.
11. In Visual Studio open the file C:\Program Files\Windows Azure SDK\v1.2\bin\devstore\dsservice.exe.config. Remember that you must activate Visual Studio as an administrator.
12. In the <configuration> element create a <connectionStrings> section.
13. In the section just created enter an <add> element.
14. To the name attribute assign the value DevelopmentStorageDbConnectionString.
15. To the connectionString attribute assign the connection string evaluated in the previous steps.
The following is an example of these connection string settings.
 <connectionStrings>
    <add name="DevelopmentStorageDbConnectionString"
         connectionString="Data Source=mmielelaptop;Initial Catalog=DevelopmentStorageDb20090919;Integrated Security=True"
         providerName="System.Data.SqlClient" />
  </connectionStrings>
Notice that development storage expects the name attribute to be DevelopmentStorageDbConnectionString .
16. Save and close the file.
You have configured development storage to use your own instance of the SQL server instead of the default SQL Express server.
Comments
Anonymous
December 26, 2010
I like the information provided here. Often providers of new technologies don't clearly layout how to get up and going, i.e. the plumbing. Thanks.Anonymous
December 26, 2010
I like the information provided here. Often providers of new technologies don't clearly layout how to get up and going, i.e. the plumbing. Thanks.


