SharePoint 2010 User Profile Service: Part 2 Developing the WCF service
In this post I will start talking about using the UPS and how we can use that to connect to two sources of user profiles data. Please refer to the previous post on how to configure the UPS.
The Scenario
So lets first describe the scenario at hand. We have user profiles data residing in two sources, one is the Directory Service (AD for example), the other is any data source like SQL or Oracle DB. So we will use a custom Windows Communication Foundation Service to communicate with the custom data source.We will then use the SharePoint BCS to connect to this data source. The UPS will have to consider this new source of data while synchronizing the user profiles.
The Steps
I will list here all the steps we are going to implement along the way. Although these steps are going to be separated between several blogs.
- Configure the UPS correctly. This is already described in the previous post.
- Develop and deploy the WCF service. This will be described in this post.
- Connect to the WCF using BCS.
- Connect the UPS to the data sources.
- Add the new user profile properties and configure the link property.
- Start the user profile synchronization and create the synchronization schedule.
- Inspect the user profiles to make sure it is correct.
- (Optional) Configure search source to allow people searching and configure people search center.
In this post I will talk about the development and deployment of the WCF service. As an example I will develop a WCF service that connects to a SQL database but you can do the same to connect to any sort of data source including Oracle. Now this assumes that a table is created and populated with employee data. The table can be created using the following SQL query.
USE [EmployeeDB]
GO
SET ANSI_NULLS ON
GO
SET QUOTED_IDENTIFIER ON
GO
CREATE TABLE [dbo].[Employees](
[ID] [decimal](18, 0) NOT NULL,
[Salary] [decimal](18, 0) NOT NULL,
[FullName] [nvarchar](max) NOT NULL,
[Degree] [nchar](10) NOT NULL,
[MainDepartment] [nchar](50) NOT NULL,
[SubDepartment] [nchar](50) NOT NULL,
CONSTRAINT [PK_Employees] PRIMARY KEY CLUSTERED
(
[ID] ASC
)WITH (PAD_INDEX = OFF, STATISTICS_NORECOMPUTE = OFF, IGNORE_DUP_KEY = OFF, ALLOW_ROW_LOCKS = ON, ALLOW_PAGE_LOCKS = ON) ON [PRIMARY]
) ON [PRIMARY]
GO
I will be using the ID as the linking property later between both user profiles sources.
Create WCF Project
Step 1: Left click on "File (menu item)" in "Microsoft Visual Studio (Administrator)" |
|
Step 2: Left click on "Project... (menu item)" in "&New" |
|
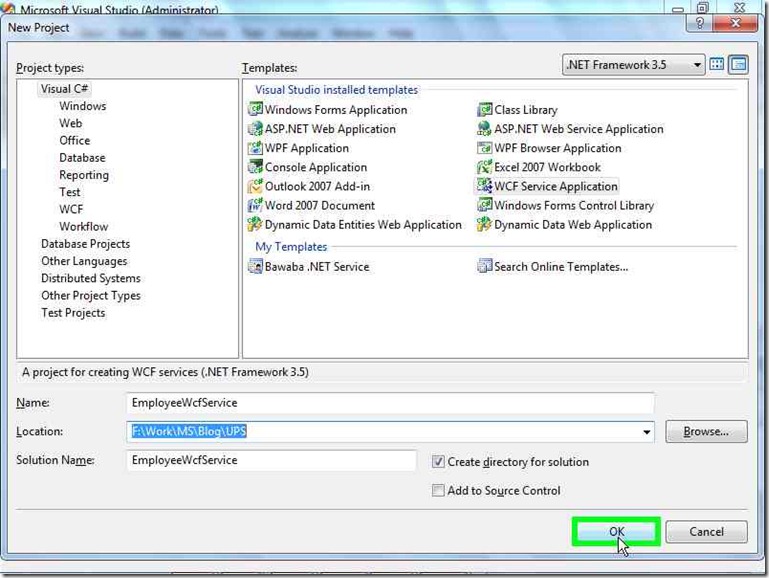
Step 3: Left click on "WCF Service Application (list item)" in "New Project" |
|
Step 4: Left click on "Name: (editable text)" in "New Project" |
|
Step 5: Keyboard input in "New Project" [Backspace Home ... Alt-Shift-Tab] |
|
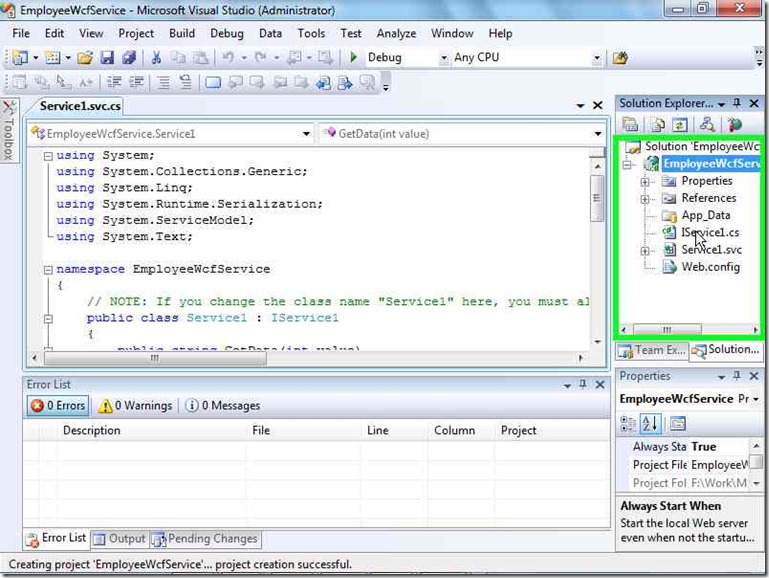
Step 6: User left click on "OK (push button)" in "New Project" |
|
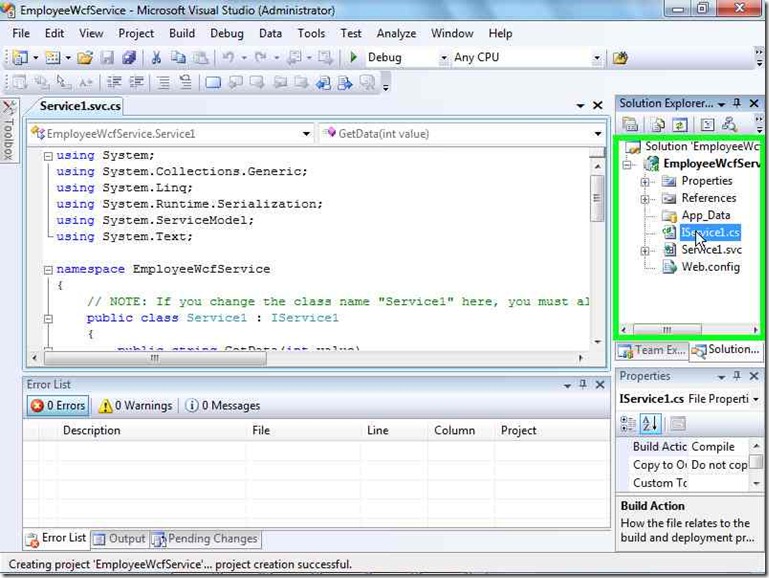
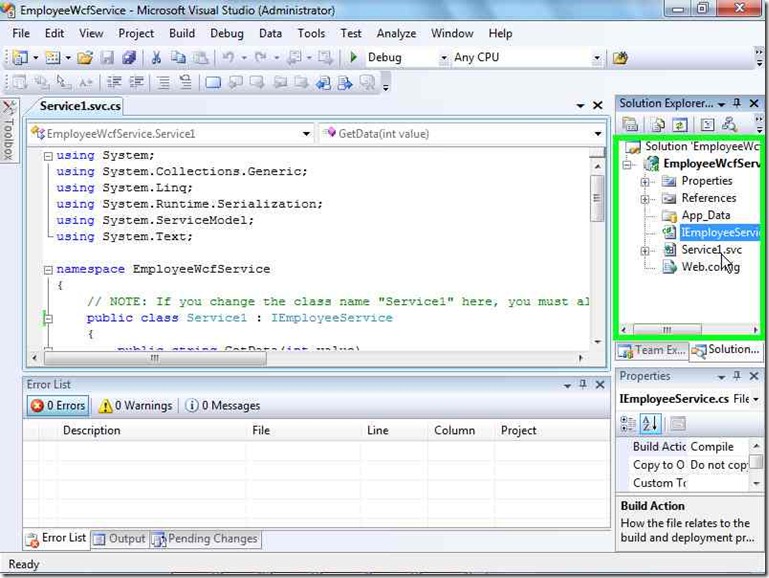
Step 7: User left click on "IService1.cs (outline item)" in "EmployeeWcfService - Microsoft Visual Studio (Administrator)" |
|
Step 8: User keyboard input in "EmployeeWcfService - Microsoft Visual Studio (Administrator)" [F2] |
|
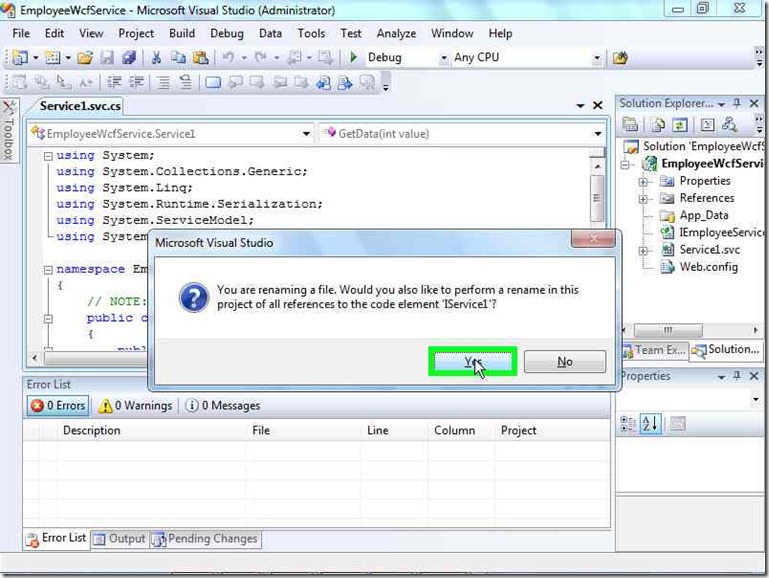
Step 9: User keyboard input in "EmployeeWcfService - Microsoft Visual Studio (Administrator)" |
|
Step 10: User left click on "Yes (push button)" in "Microsoft Visual Studio" |
|
Step 11: User left click on "Service1.svc (outline item)" in "EmployeeWcfService - Microsoft Visual Studio (Administrator)" |
|
Step 12: User keyboard input in "EmployeeWcfService - Microsoft Visual Studio (Administrator)" [F2] |
|
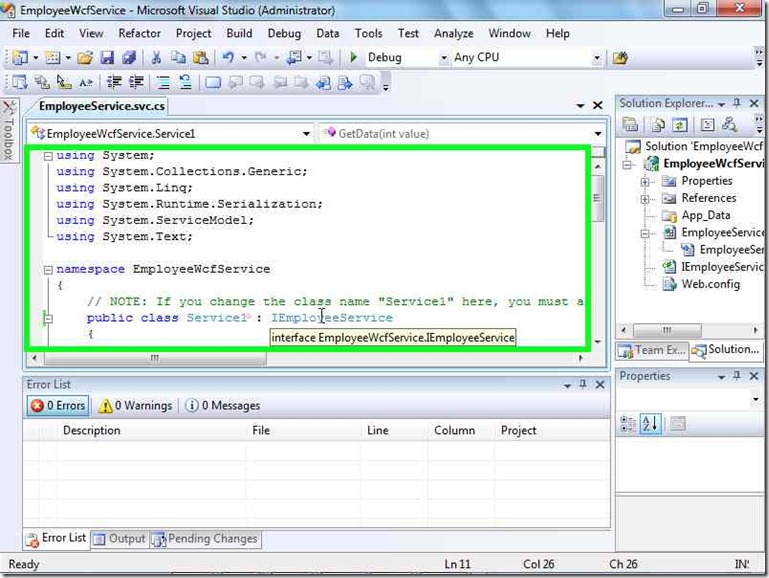
Step 13: User keyboard input in "EmployeeWcfService - Microsoft Visual Studio (Administrator)" |
|
Step 14: User left click on "Character 26 (editable text)" in "EmployeeWcfService - Microsoft Visual Studio (Administrator)" |
|
Step 15: User keyboard input in "EmployeeWcfService - Microsoft Visual Studio (Administrator)" |
|
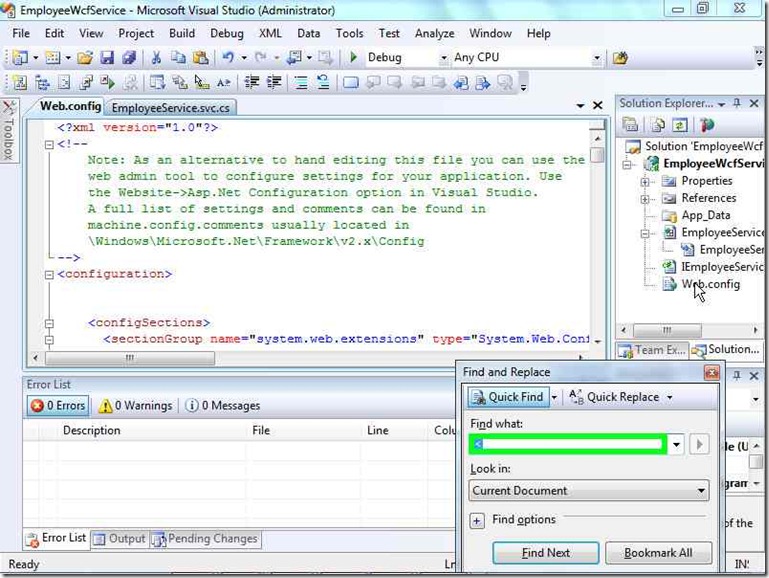
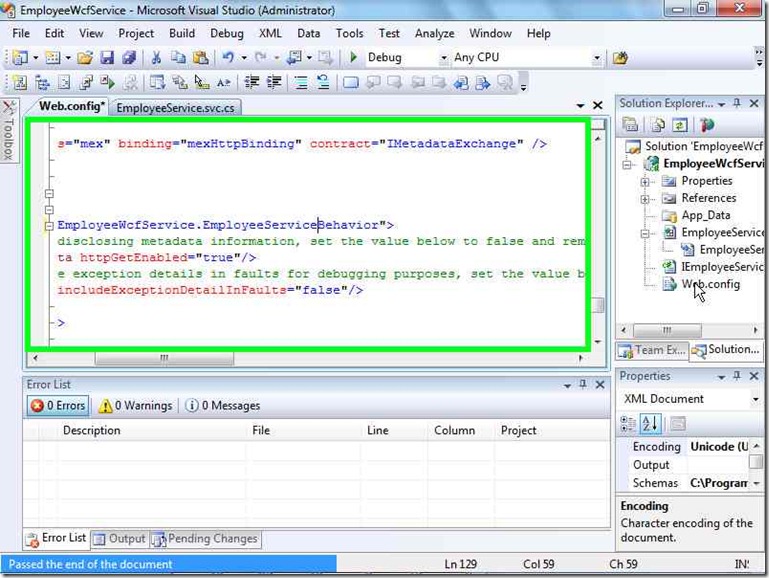
Step 16: User left double click on "Web.config (outline item)" in "EmployeeWcfService - Microsoft Visual Studio (Administrator)" |
|
Step 17: User keyboard input in "EmployeeWcfService - Microsoft Visual Studio (Administrator)" [... Ctrl-F] |
|
Step 18: User keyboard input in "Find and Replace" [... Enter Esc] |
|
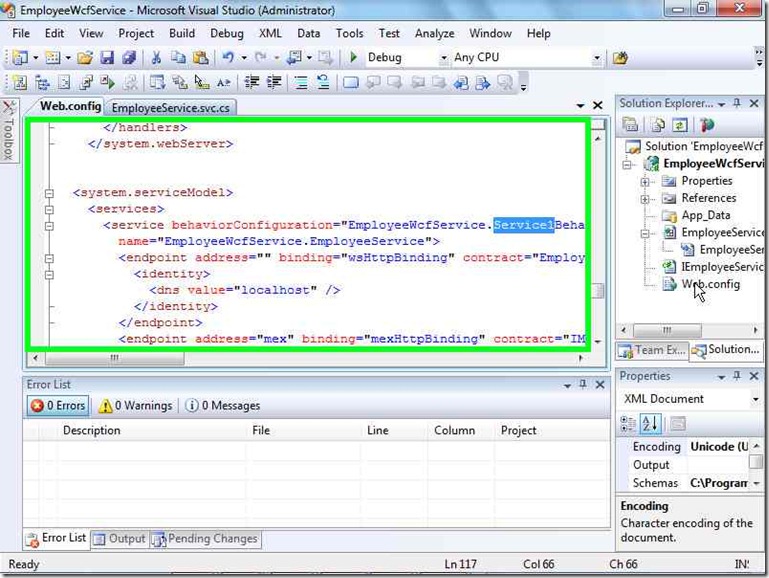
Step 19: User keyboard input in "EmployeeWcfService - Microsoft Visual Studio (Administrator)" |
|
Step 20: User keyboard input in "Microsoft Visual Studio" [Enter] |
|
Step 21: User keyboard input in "EmployeeWcfService - Microsoft Visual Studio (Administrator)" |
|
Step 22: User keyboard input in "EmployeeWcfService - Microsoft Visual Studio (Administrator)" |
|
Add Database Connection
Step 1: User left click on "Server Explorer (menu item)" in "&View" |
|
Step 2: User left click on "Connect to Database... (push button)" in "EmployeeWcfService - Microsoft Visual Studio (Administrator)" |
|
Step 3: User keyboard input in "Add Connection" [...] |
|
Step 4: User left click on "Use SQL Server Authentication (radio button)" in "Add Connection" |
|
Step 5: User left click on "User name: (editable text)" in "Add Connection" |
|
Step 6: User keyboard input in "Add Connection" [... Tab] |
|
Step 7: User keyboard input in "Add Connection" [...] |
|
Step 8: User left click on "Save my password (check box)" in "Add Connection" |
|
Step 9: User left click on "Open (push button)" in "Add Connection" |
|
Step 10: User left click on "EmployeeDB (list item)" |
|
Step 11: User left click on "Test Connection (push button)" in "Add Connection" |
|
Step 12: User left click on "OK (push button)" in "Microsoft Visual Studio" |
|
Step 13: User left click on "OK (push button)" in "Add Connection" |
|
Create The Employee Dataset
Step 1: User right click on "EmployeeWcfService (outline item)" in "EmployeeWcfService - Microsoft Visual Studio (Administrator)" |
|
Step 2: User left click on "New Item... (menu item)" in "A&dd" |
|
Step 3: User left click on "Data (outline item)" in "Add New Item - EmployeeWcfService" |
|
Step 4: User left click on "DataSet (list item)" in "Add New Item - EmployeeWcfService" |
|
Step 5: User left click on "Name: (editable text)" in "Add New Item - EmployeeWcfService" |
|
Step 6: User keyboard input in "Add New Item - EmployeeWcfService" [Backspace Home ...] |
|
Step 7: User left click on "Add (push button)" in "Add New Item - EmployeeWcfService" |
|
Step 8: User left click on "sp2010.EmployeeDB.dbo (outline item)" in "EmployeeWcfService - Microsoft Visual Studio (Administrator)" |
|
Step 9: User left click on "Tables (outline item)" in "EmployeeWcfService - Microsoft Visual Studio (Administrator)" |
|
Step 10: User mouse drag start on "Employees (outline item)" in "EmployeeWcfService - Microsoft Visual Studio (Administrator)" |
|
Step 11: User mouse drag end in "EmployeeWcfService - Microsoft Visual Studio (Administrator)" |
|
Step 12: User left click on "Row 0 (row)" in "EmployeeWcfService - Microsoft Visual Studio (Administrator)" |
|
Step 13: User keyboard input in "EmployeeWcfService - Microsoft Visual Studio (Administrator)" [... Alt-Shift-Ctrl Alt-Shift-Tab] |
|
Step 14: User left click on "SELECT ID, Salary, FullName, Degree, MainDepartment, SubDepartment FROM dbo.Employees (tool tip)" |
|
Step 15: User left click on "CommandText (row)" in "EmployeeWcfService - Microsoft Visual Studio (Administrator)" |
|
Step 16: User left click on "row 0, column 7 (cell)" in "Query Builder" |
|
Step 17: User keyboard input in "Query Builder" [... Enter] |
|
Step 18: User left click on "Execute Query (push button)" in "Query Builder" |
|
Step 19: User keyboard input in "Query Parameters" [... Enter] |
|
Step 20: User left click on "OK (push button)" in "Query Builder" |
|
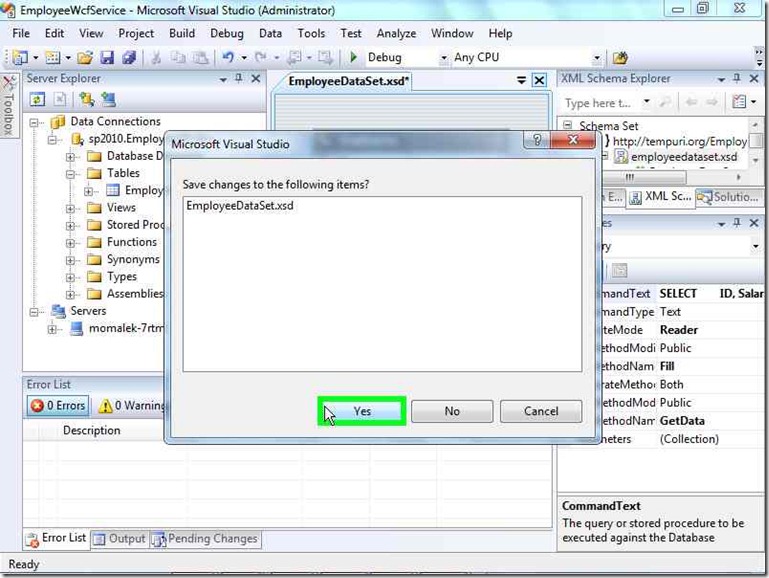
Step 21: User left click on "Yes (push button)" in "Microsoft Visual Studio" |
|
Step 22: User left click in "EmployeeWcfService - Microsoft Visual Studio (Administrator)" |
|
Step 21: User left click on "Yes (push button)" in "Microsoft Visual Studio" |
|
Add Service Code
In the file “IEmployeeService” add the employee data contract as follows:
[DataContract]
public class Employee
{
[DataMember]
public string ID;
[DataMember]
public decimal Salary;
[DataMember]
public string FullName;
[DataMember]
public string Degree;
[DataMember]
public string MainDept;
[DataMember]
public string SubDept;
}
And change the service contract to be as follows:
[ServiceContract]
public interface IEmployeeService
{
[OperationContract]
Employee GetEmployeeData(string EmpID);
}
In the file “EmployeeService.svc.cs” change the service implementation as follows:
public class EmployeeService : IEmployeeService
{
public Employee GetEmployeeData(string EmpID)
{
try
{
decimal EmpIdParam = decimal.Parse(EmpID);
Employee emp = new Employee();
EmployeeDataSet.EmployeesDataTable dt=new EmployeeDataSet.EmployeesDataTable();
EmployeesTableAdapter ta = new EmployeesTableAdapter();
ta.Fill(dt, EmpIdParam);
if (dt.Rows.Count != 1) return null;
emp.ID = dt.Rows[0]["ID"].ToString();
emp.Salary = decimal.Parse(dt.Rows[0]["Salary"].ToString());
emp.FullName = dt.Rows[0]["FullName"].ToString();
emp.Degree = dt.Rows[0]["Degree"].ToString();
emp.MainDept = dt.Rows[0]["MainDepartment"].ToString();
emp.SubDept = dt.Rows[0]["SubDepartment"].ToString();
return emp;
}
catch
{
}
finally
{
}
return null;
}
}
This completes the service implementation now we will deploy the service.
Deploy the WCF service to the IIS
We now deploy the developed WCF service to the IIS.
Step 1: User right click on "EmployeeWcfService (outline item)" in "EmployeeWcfService - Microsoft Visual Studio (Administrator)" |
|
Step 2: User left click on "Publish... (menu item)" in "Project" |
|
Step 3: User left click on "Publish (push button)" in "Publish Web" |
|
Step 4: User keyboard input in "EmployeeWcfService - Microsoft Visual Studio (Administrator)" [... Alt-Shift-Tab] |
|
Now this completes the WCF development and deployment and it is ready for use. In the next post I will show you how to connect to it using the SharePoint BCS.
Comments
- Anonymous
March 10, 2011
Great set of posts. I am building a sp2010 extranet and I am in an unusual situation where, for security reasons, my AD is located in a totally different forest than my SP farm. This means the UPS synch with AD directly wont work which is something of a showstopper. I like this WCF solution to add other LOB attributes to the SP user profiles - can I use WCF to get around my issue with AD as well? We also have just acquired BTS - could that also have a role presenting the WCF service or is that over the top ? Cheers John
![clip_image001[4] clip_image001[4]](https://msdntnarchive.z22.web.core.windows.net/media/MSDNBlogsFS/prod.evol.blogs.msdn.com/CommunityServer.Blogs.Components.WeblogFiles/00/00/01/39/29/metablogapi/0576.clip_image0014_688FDF71.jpg)
![clip_image002[4] clip_image002[4]](https://msdntnarchive.z22.web.core.windows.net/media/MSDNBlogsFS/prod.evol.blogs.msdn.com/CommunityServer.Blogs.Components.WeblogFiles/00/00/01/39/29/metablogapi/7571.clip_image0024_7B90C083.jpg)
![clip_image003[4] clip_image003[4]](https://msdntnarchive.z22.web.core.windows.net/media/MSDNBlogsFS/prod.evol.blogs.msdn.com/CommunityServer.Blogs.Components.WeblogFiles/00/00/01/39/29/metablogapi/3603.clip_image0034_75662190.jpg)
![clip_image004[4] clip_image004[4]](https://msdntnarchive.z22.web.core.windows.net/media/MSDNBlogsFS/prod.evol.blogs.msdn.com/CommunityServer.Blogs.Components.WeblogFiles/00/00/01/39/29/metablogapi/5224.clip_image0044_6B210EFE.jpg)
![clip_image005[4] clip_image005[4]](https://msdntnarchive.z22.web.core.windows.net/media/MSDNBlogsFS/prod.evol.blogs.msdn.com/CommunityServer.Blogs.Components.WeblogFiles/00/00/01/39/29/metablogapi/8171.clip_image0054_7EEA302D.jpg)







![clip_image001[6] clip_image001[6]](https://msdntnarchive.z22.web.core.windows.net/media/MSDNBlogsFS/prod.evol.blogs.msdn.com/CommunityServer.Blogs.Components.WeblogFiles/00/00/01/39/29/metablogapi/3021.clip_image0016_7E3C25D0.jpg)
![clip_image002[6] clip_image002[6]](https://msdntnarchive.z22.web.core.windows.net/media/MSDNBlogsFS/prod.evol.blogs.msdn.com/CommunityServer.Blogs.Components.WeblogFiles/00/00/01/39/29/metablogapi/7127.clip_image0026_738AE049.jpg)
![clip_image003[6] clip_image003[6]](https://msdntnarchive.z22.web.core.windows.net/media/MSDNBlogsFS/prod.evol.blogs.msdn.com/CommunityServer.Blogs.Components.WeblogFiles/00/00/01/39/29/metablogapi/7827.clip_image0036_6E94B468.jpg)
![clip_image004[6] clip_image004[6]](https://msdntnarchive.z22.web.core.windows.net/media/MSDNBlogsFS/prod.evol.blogs.msdn.com/CommunityServer.Blogs.Components.WeblogFiles/00/00/01/39/29/metablogapi/2110.clip_image0046_3CA925AC.jpg)
![clip_image005[6] clip_image005[6]](https://msdntnarchive.z22.web.core.windows.net/media/MSDNBlogsFS/prod.evol.blogs.msdn.com/CommunityServer.Blogs.Components.WeblogFiles/00/00/01/39/29/metablogapi/4532.clip_image0056_384EDC80.jpg)
![clip_image006[4] clip_image006[4]](https://msdntnarchive.z22.web.core.windows.net/media/MSDNBlogsFS/prod.evol.blogs.msdn.com/CommunityServer.Blogs.Components.WeblogFiles/00/00/01/39/29/metablogapi/5123.clip_image0064_218C429F.jpg)
![clip_image007[4] clip_image007[4]](https://msdntnarchive.z22.web.core.windows.net/media/MSDNBlogsFS/prod.evol.blogs.msdn.com/CommunityServer.Blogs.Components.WeblogFiles/00/00/01/39/29/metablogapi/1261.clip_image0074_7FFC2B9B.jpg)
![clip_image008[4] clip_image008[4]](https://msdntnarchive.z22.web.core.windows.net/media/MSDNBlogsFS/prod.evol.blogs.msdn.com/CommunityServer.Blogs.Components.WeblogFiles/00/00/01/39/29/metablogapi/2234.clip_image0084_6EA8025E.jpg)
![clip_image009[4] clip_image009[4]](https://msdntnarchive.z22.web.core.windows.net/media/MSDNBlogsFS/prod.evol.blogs.msdn.com/CommunityServer.Blogs.Components.WeblogFiles/00/00/01/39/29/metablogapi/4760.clip_image0094_5E2C3F0B.jpg)
![clip_image010[4] clip_image010[4]](https://msdntnarchive.z22.web.core.windows.net/media/MSDNBlogsFS/prod.evol.blogs.msdn.com/CommunityServer.Blogs.Components.WeblogFiles/00/00/01/39/29/metablogapi/4174.clip_image0104_10CBD419.jpg)
![clip_image011[4] clip_image011[4]](https://msdntnarchive.z22.web.core.windows.net/media/MSDNBlogsFS/prod.evol.blogs.msdn.com/CommunityServer.Blogs.Components.WeblogFiles/00/00/01/39/29/metablogapi/5444.clip_image0114_061A8E92.jpg)
![clip_image012[4] clip_image012[4]](https://msdntnarchive.z22.web.core.windows.net/media/MSDNBlogsFS/prod.evol.blogs.msdn.com/CommunityServer.Blogs.Components.WeblogFiles/00/00/01/39/29/metablogapi/4341.clip_image0124_67CC8543.jpg)
![clip_image013[4] clip_image013[4]](https://msdntnarchive.z22.web.core.windows.net/media/MSDNBlogsFS/prod.evol.blogs.msdn.com/CommunityServer.Blogs.Components.WeblogFiles/00/00/01/39/29/metablogapi/6371.clip_image0134_2D211408.jpg)
![clip_image001[8] clip_image001[8]](https://msdntnarchive.z22.web.core.windows.net/media/MSDNBlogsFS/prod.evol.blogs.msdn.com/CommunityServer.Blogs.Components.WeblogFiles/00/00/01/39/29/metablogapi/4617.clip_image0018_72391F97.jpg)
![clip_image002[8] clip_image002[8]](https://msdntnarchive.z22.web.core.windows.net/media/MSDNBlogsFS/prod.evol.blogs.msdn.com/CommunityServer.Blogs.Components.WeblogFiles/00/00/01/39/29/metablogapi/5444.clip_image0028_3649157D.jpg)
![clip_image003[8] clip_image003[8]](https://msdntnarchive.z22.web.core.windows.net/media/MSDNBlogsFS/prod.evol.blogs.msdn.com/CommunityServer.Blogs.Components.WeblogFiles/00/00/01/39/29/metablogapi/8463.clip_image0038_649E872B.jpg)
![clip_image004[8] clip_image004[8]](https://msdntnarchive.z22.web.core.windows.net/media/MSDNBlogsFS/prod.evol.blogs.msdn.com/CommunityServer.Blogs.Components.WeblogFiles/00/00/01/39/29/metablogapi/0508.clip_image0048_3F50CB58.jpg)
![clip_image005[8] clip_image005[8]](https://msdntnarchive.z22.web.core.windows.net/media/MSDNBlogsFS/prod.evol.blogs.msdn.com/CommunityServer.Blogs.Components.WeblogFiles/00/00/01/39/29/metablogapi/1537.clip_image0058_05E9F2FC.jpg)
![clip_image006[6] clip_image006[6]](https://msdntnarchive.z22.web.core.windows.net/media/MSDNBlogsFS/prod.evol.blogs.msdn.com/CommunityServer.Blogs.Components.WeblogFiles/00/00/01/39/29/metablogapi/7245.clip_image0066_694CB581.jpg)
![clip_image007[6] clip_image007[6]](https://msdntnarchive.z22.web.core.windows.net/media/MSDNBlogsFS/prod.evol.blogs.msdn.com/CommunityServer.Blogs.Components.WeblogFiles/00/00/01/39/29/metablogapi/2844.clip_image0076_620D2D6F.jpg)
![clip_image008[6] clip_image008[6]](https://msdntnarchive.z22.web.core.windows.net/media/MSDNBlogsFS/prod.evol.blogs.msdn.com/CommunityServer.Blogs.Components.WeblogFiles/00/00/01/39/29/metablogapi/6518.clip_image0086_495D4485.jpg)
![clip_image009[6] clip_image009[6]](https://msdntnarchive.z22.web.core.windows.net/media/MSDNBlogsFS/prod.evol.blogs.msdn.com/CommunityServer.Blogs.Components.WeblogFiles/00/00/01/39/29/metablogapi/7080.clip_image0096_0D6D3A6B.jpg)
![clip_image010[6] clip_image010[6]](https://msdntnarchive.z22.web.core.windows.net/media/MSDNBlogsFS/prod.evol.blogs.msdn.com/CommunityServer.Blogs.Components.WeblogFiles/00/00/01/39/29/metablogapi/8865.clip_image0106_2B877FFA.jpg)
![clip_image011[6] clip_image011[6]](https://msdntnarchive.z22.web.core.windows.net/media/MSDNBlogsFS/prod.evol.blogs.msdn.com/CommunityServer.Blogs.Components.WeblogFiles/00/00/01/39/29/metablogapi/4162.clip_image0116_682B9065.jpg)
![clip_image012[6] clip_image012[6]](https://msdntnarchive.z22.web.core.windows.net/media/MSDNBlogsFS/prod.evol.blogs.msdn.com/CommunityServer.Blogs.Components.WeblogFiles/00/00/01/39/29/metablogapi/8105.clip_image0126_77AA8E35.jpg)
![clip_image013[6] clip_image013[6]](https://msdntnarchive.z22.web.core.windows.net/media/MSDNBlogsFS/prod.evol.blogs.msdn.com/CommunityServer.Blogs.Components.WeblogFiles/00/00/01/39/29/metablogapi/6825.clip_image0136_51C0EFAD.jpg)
![clip_image014[4] clip_image014[4]](https://msdntnarchive.z22.web.core.windows.net/media/MSDNBlogsFS/prod.evol.blogs.msdn.com/CommunityServer.Blogs.Components.WeblogFiles/00/00/01/39/29/metablogapi/7888.clip_image0144_56FEEEEA.jpg)
![clip_image015[4] clip_image015[4]](https://msdntnarchive.z22.web.core.windows.net/media/MSDNBlogsFS/prod.evol.blogs.msdn.com/CommunityServer.Blogs.Components.WeblogFiles/00/00/01/39/29/metablogapi/8360.clip_image0154_1C537DAF.jpg)
![clip_image016[4] clip_image016[4]](https://msdntnarchive.z22.web.core.windows.net/media/MSDNBlogsFS/prod.evol.blogs.msdn.com/CommunityServer.Blogs.Components.WeblogFiles/00/00/01/39/29/metablogapi/8737.clip_image0164_77AE7805.jpg)
![clip_image017[4] clip_image017[4]](https://msdntnarchive.z22.web.core.windows.net/media/MSDNBlogsFS/prod.evol.blogs.msdn.com/CommunityServer.Blogs.Components.WeblogFiles/00/00/01/39/29/metablogapi/3005.clip_image0174_3AA984CC.jpg)
![clip_image018[4] clip_image018[4]](https://msdntnarchive.z22.web.core.windows.net/media/MSDNBlogsFS/prod.evol.blogs.msdn.com/CommunityServer.Blogs.Components.WeblogFiles/00/00/01/39/29/metablogapi/5355.clip_image0184_6FD24B97.jpg)
![clip_image019[4] clip_image019[4]](https://msdntnarchive.z22.web.core.windows.net/media/MSDNBlogsFS/prod.evol.blogs.msdn.com/CommunityServer.Blogs.Components.WeblogFiles/00/00/01/39/29/metablogapi/8372.clip_image0194_05B86B90.jpg)
![clip_image020[4] clip_image020[4]](https://msdntnarchive.z22.web.core.windows.net/media/MSDNBlogsFS/prod.evol.blogs.msdn.com/CommunityServer.Blogs.Components.WeblogFiles/00/00/01/39/29/metablogapi/0882.clip_image0204_3A18F23E.jpg)
![clip_image021[4] clip_image021[4]](https://msdntnarchive.z22.web.core.windows.net/media/MSDNBlogsFS/prod.evol.blogs.msdn.com/CommunityServer.Blogs.Components.WeblogFiles/00/00/01/39/29/metablogapi/4848.clip_image0214_389483D2.jpg)
![clip_image022[4] clip_image022[4]](https://msdntnarchive.z22.web.core.windows.net/media/MSDNBlogsFS/prod.evol.blogs.msdn.com/CommunityServer.Blogs.Components.WeblogFiles/00/00/01/39/29/metablogapi/5417.clip_image0224_69630171.jpg)
![clip_image001[10] clip_image001[10]](https://msdntnarchive.z22.web.core.windows.net/media/MSDNBlogsFS/prod.evol.blogs.msdn.com/CommunityServer.Blogs.Components.WeblogFiles/00/00/01/39/29/metablogapi/4657.clip_image00110_56E676F0.jpg)
![clip_image002[10] clip_image002[10]](https://msdntnarchive.z22.web.core.windows.net/media/MSDNBlogsFS/prod.evol.blogs.msdn.com/CommunityServer.Blogs.Components.WeblogFiles/00/00/01/39/29/metablogapi/4101.clip_image00210_239A17BA.jpg)
![clip_image003[10] clip_image003[10]](https://msdntnarchive.z22.web.core.windows.net/media/MSDNBlogsFS/prod.evol.blogs.msdn.com/CommunityServer.Blogs.Components.WeblogFiles/00/00/01/39/29/metablogapi/6354.clip_image00310_54A92C8D.jpg)
![clip_image004[10] clip_image004[10]](https://msdntnarchive.z22.web.core.windows.net/media/MSDNBlogsFS/prod.evol.blogs.msdn.com/CommunityServer.Blogs.Components.WeblogFiles/00/00/01/39/29/metablogapi/7380.clip_image00410_5A73AA59.jpg)