Enterprise Mobility End to End // Part 4 – Enable BYOD and Passport for Work
In this module we will discuss the setup for Azure Device Registration following by the configuration of Passport for work. The first Scenario we want to archive is a complete device registration from home to enable BYOD. In addition to the device enrollment we enable Microsoft Passport for Work to replace passwords with strong two-factor authentication. Passport for work combines an enrolled device with a PIN or a biometric user input (Windows Hello) to sign in. Passport lets you use a user gesture to log in, instead of a password. A user gesture might be a simple PIN, biometric authentication such as Windows Hello, or an external device such as a fingerprint reader. You will see, it's super cool but first you need to get the device enrolled.
Set-Up Azure Active Directory Automatic Device Registration
Azure Active Directory Device Registration is the foundation for device-based access scenarios. When a device is registered, Azure Active Directory Device Registration provides the device with an identity which is used to authenticate the device when the user signs in. The authenticated device, and the attributes of the device, can then be used to enforce conditional access policies for applications that are hosted in the cloud and on-premises.
When combined with a mobile device management (MDM) solution such as Intune, the device attributes in Azure Active Directory are updated with additional information about the device. This allows you to create conditional access rules that enforce access from devices to meet your standards for security and compliance. You need to enable Azure AD Device Registration in the Azure Portal so that mobile devices can discover the service by looking for well-known DNS records. You must configure your company DNS so that Windows 10, Windows 8.1, Windows 7, Android and iOS devices can discover and use the service. You can view and enable/disable registered devices using the Administrator Portal in Azure Active Directory.
Enable Azure Active Directory Device Registration Service
Sign in to the Microsoft Azure portal (https://manage.windowsazure.com) as Administrator.
On the left pane, select Active Directory.
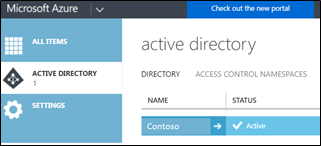
On the Directory tab, select your directory.
Select the Configure tab.
Scroll to the section called Devices.
Select ALL for USERS MAY JOIN DEVICES TO AZURE AD

Select the maximum number of devices you want to authorize per user.
Note: Enrollment with Microsoft Intune or Mobile Device Management for Office 365 requires Workplace Join. If you have configured either of these services, ALL is selected and the NONE button is disabled.
Set Up Automatic Device registration with Azure Active Directory for Windows 10 PC
Domain join in Windows 10 will provide the following benefits after you connect devices to Azure Active Directory (Azure AD):
- Single sign-on (SSO) to Azure AD resources from anywhere
- Access to the enterprise Windows Store by using work or school accounts (no Microsoft account required)
- Enterprise-compliant roaming of user settings across devices by using work or school accounts (no Microsoft account required)
- Strong authentication and convenient sign-in for work or school accounts with Microsoft Passport and Windows Hello
- Ability to restrict access only to devices that comply with organizational device Group Policy settings
Configure Azure Active Directory Device Registration discovery
Internet Explorer Configuration
Configure the following settings on Internet Explorer on your Windows devices for the Local intranet security zone:
- Don't prompt for client certificate selection when only one certificate exists: Enable
- Allow scripting: Enable
- Automatic logon only in Intranet zone: Checked
These are the default settings for the Internet Explorer Local intranet security zone. You can view or manage these settings in Internet Explorer by navigating to Internet Options >Security > Local intranet > Custom level. You can also configure these settings using Active Directory Group Policy.
Network Connectivity
Domain joined Windows devices must have connectivity to AD FS and an Active Directory Domain Controller to automatically register with Azure AD. This typically means the machine must be connected to the corporate network. This can include a wired connection, a Wi-Fi connection, DirectAccess, or VPN.
DNS Configuration
Windows 7, 8/8.1 and Windows 10 devices will discover the Device Registration service by combining the user account name with a well-known Device Registration server name.
You must create a DNS CNAME record that points to the A record associated with your Azure Active Directory Device Registration service. The CNAME record must use the well-known prefix enterpriseregistration followed by the UPN suffix used by the user accounts at your organization. If your organization uses multiple UPN suffixes, multiple CNAME records must be created in your public DNS.
For example, if you use two UPN suffixes at your organization named @contoso.com and @region.contoso.com, you will create the following DNS records.
Entry |
Type |
Address |
enterpriseregistration.contoso.com |
CNAME |
enterpriseregistration.windows.net |
enterpriseregistration.region.contoso.com |
CNAME |
enterpriseregistration.windows.net |
Deployment instructions for Automatic Registration to Azure AD
Step 1: Deploy Azure Active Directory Connect
Azure AD Connect will enable you to provision computers on-premises as device objects in the cloud.
To deploy Azure AD Connect, refer to "Install Azure AD Connect" in the article: Integrating your on-premises identities with Azure Active Directory .
Step 2: Create a service connection point in on-premises Active Directory
Domain-joined devices will use the service connection point to discover Azure AD tenant information at the time of automatic registration with the Azure device registration service.
On the Azure AD Connect server, run the following on elevated PowerShell commands:
- Import-Module -Name "C:\Program Files\Microsoft Azure Active Directory Connect\AdPrep\AdSyncPrep.psm1";
- $aadAdminCred = Get-Credential;
- Initialize-ADSyncDomainJoinedComputerSync –AdConnectorAccount [connector account name] -AzureADCredentials $aadAdminCred;
Note: When running the cmdlet $aadAdminCred = Get-Credential, use the format user@example.com for the user name of the credential that's entered when the Get-Credential pop-up appears.
When running the cmdlet Initialize-ADSyncDomainJoinedComputerSync, replace [connector account name] with the domain account that's used as the Active Directory Connector Service Account.
TIP:
Can't find [connector account name]? If you installed using Express Mode your connector account will be in the Users container in Active Directory, prefixed with MSOL. If Azure AD Connect was installed using the custom method, it is possible you chose an existing account. To locate this account run C:\Program Files\Microsoft Azure AD Sync\UIShell\miisclient.exe on the server hosting Azure AD Connect. Select the Connectors tab, right click on Type Active Directory Domain Services, choose Properties, and choose Connect to Active Directory Forest. The account listed under User name is the [connector account name].
Step 3: Configure AD FS claim rules
Configuring the AD FS claim rules enables instantaneous registration of a computer with Azure device registration service by allowing computers to authenticate by using Kerberos/NTLM via AD FS. Without this step, computers will get to Azure AD in a delayed manner (subject to Azure AD Connect sync times).
Note: If you don't have AD FS as the federation server on-premises, follow the instructions of your vendor to create the claim rules.
On the AD FS server (or on a session connected to the AD FS server), You can create a PowerShell script and copy and run the following PowerShell commands below:
<#----------------------------------------------------------------------
| Modify the Azure AD Relying Party to include the claims needed
| for DomainJoin++. The rules include:
| -ObjectGuid
| -AccountType
| -ObjectSid
+---------------------------------------------------------------------#>
$existingRules = (Get-ADFSRelyingPartyTrust -Identifier urn:federation:MicrosoftOnline).IssuanceTransformRules
$rule1 = '@RuleName = "Issue object GUID"
c1:[Type == "https://schemas.microsoft.com/ws/2008/06/identity/claims/groupsid", Value =~ "515$", Issuer =~ "^(AD AUTHORITY|SELF AUTHORITY|LOCAL AUTHORITY)$"] &&
c2:[Type == "https://schemas.microsoft.com/ws/2008/06/identity/claims/windowsaccountname", Issuer =~ "^(AD AUTHORITY|SELF AUTHORITY|LOCAL AUTHORITY)$"]
=> issue(store = "Active Directory", types = ("https://schemas.microsoft.com/identity/claims/onpremobjectguid"), query = ";objectguid;{0}", param = c2.Value);'
$rule2 = '@RuleName = "Issue account type for domain joined computers"
c:[Type == "https://schemas.microsoft.com/ws/2008/06/identity/claims/groupsid", Value =~ "515$", Issuer =~ "^(AD AUTHORITY|SELF AUTHORITY|LOCAL AUTHORITY)$"]
=> issue(Type = "https://schemas.microsoft.com/ws/2012/01/accounttype", Value = "DJ");'
$rule3 = '@RuleName = "Pass through primary SID"
c1:[Type == "https://schemas.microsoft.com/ws/2008/06/identity/claims/groupsid", Value =~ "515$", Issuer =~ "^(AD AUTHORITY|SELF AUTHORITY|LOCAL AUTHORITY)$"] &&
c2:[Type == "https://schemas.microsoft.com/ws/2008/06/identity/claims/primarysid", Issuer =~ "^(AD AUTHORITY|SELF AUTHORITY|LOCAL AUTHORITY)$"]
=> issue(claim = c2);'
$updatedRules = $existingRules + $rule1 + $rule2 + $rule3
$crSet = New-ADFSClaimRuleSet -ClaimRule $updatedRules
Set-AdfsRelyingPartyTrust -TargetIdentifier urn:federation:MicrosoftOnline -IssuanceTransformRules $crSet.ClaimRulesString
Note: Windows 10 computers will authenticate by using Windows Integrated authentication to an active WS-Trust endpoint hosted by AD FS.
Ensure that this endpoint is enabled. If you are using the Web Authentication Proxy, also ensure that this endpoint is published through the proxy.
You can do this by checking the adfs/services/trust/13/windowstransport. It should show as enabled in the AD FS management console under Service > Endpoints.

Step 4: Configure automatic device registration via Group Policy in Active Directory
You can use Group Policy in Active Directory to configure your Windows 10 domain-joined devices to automatically register with Azure AD. To do this, use the following step-by-step instructions:
Open Server Manager and navigate to Tools > Group Policy Management.
From Group Policy Management, navigate to the domain node that corresponds to the domain in which you would like to enable Azure AD Join.
Right-click Group Policy Objects, and then select New. Give your Group Policy object a name, for example, Automatic Azure AD Join. Click OK.

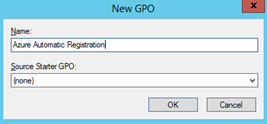
Right-click your new Group Policy object, and then select Edit.
Navigate to Computer Configuration > Policies > Administrative Templates > Windows Components > Workplace Join.
Right-click Automatically workplace join client computers, and then select Edit.
Select the Enabled option button, and then click Apply. Click OK.

Link the Group Policy object to a location of your choice. To enable this policy for all of the domain-joined Windows 10 devices at your organization, link the Group Policy object to the domain. For example:
- A specific organizational unit (OU) in Active Directory where Windows 10 domain-joined computers will be located
- A specific security group containing Windows 10 domain-joined computers that will be auto-registered with Azure AD
Note: This Group Policy template has been renamed in Windows 10. If you are running the Group Policy tool from a Windows 10 computer, the policy will appear as:
Register domain joined computers as devices
The policy is in the following location:
Computer Configuration/Policies/Administrative Templates/Windows Components/Device Registration
Step 5: Verify the device registration status
There are several methods to verify the status of automatic registration to Azure AD devices do appear in the Registered Devices report under the user object in Azure AD.
Open the machine's event viewer application and drill down to Applications and Services -> Microsoft -> Windows -> User Device Registration. Look for Event ID: 105 similar to the following diagram:
User Device Registration Events

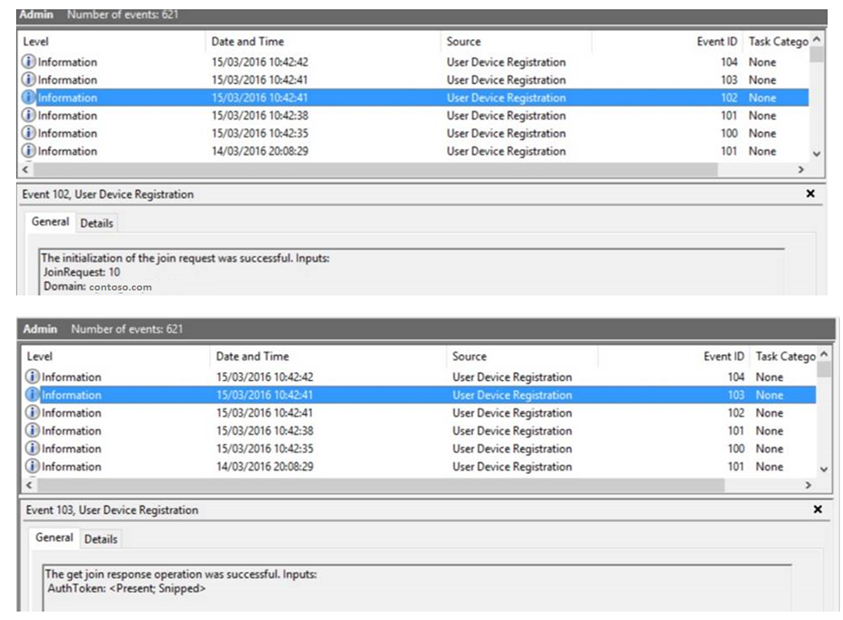

Read the events from the bottom up, 100 to 105.
Note that the Event ID: 104 will show you the certificate thumbprint issued by the Azure Device Registration. Event showing certificate thumbprint
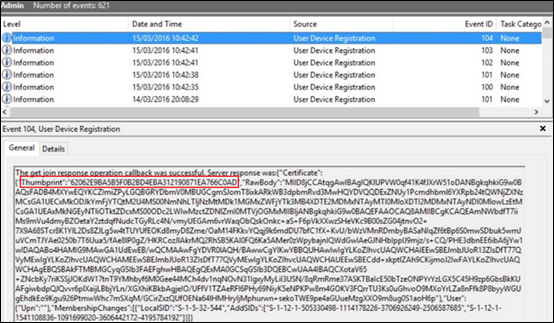
We can also verify the token was issued via this PowerShell command run with administrator privileges: Get-ChildItem –Path Cert:\LocalMachine\My | where-object {$_.Issuer -like "*MS-Organization-Access*"}
Verifying token via PowerShell

It should match the Thumbprint shown in the Event ID 104
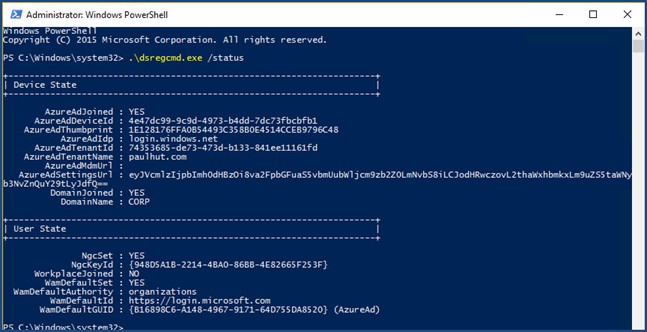
The command dsregcmd.exe /status will also confirm your Windows 10 client is registered as well as confirm thumbprint, Azure AD settings URL, NGC status, as well as other good information. Note the base64 encryption of one of the URLs.
Output of dsregcmd.exe /status
Note:
In case you encountered an issue and want to further troubleshoot you can try the following to see more logs:
- Download the PsExec https://technet.microsoft.com/en-us/sysinternals/psexec.aspx
- Open an elevated command prompt and browser to the folder where PsExec is stored.
- Execute the command psexec.exe –i –s cmd.exe
- In the new command prompt execute the command dsregcmd.exe /debug
You can also check if the device successfully registered to Azure AD by logging in to the Azure Portal and by looking on the user device

IMPORTANT NOTE:
If your ADFS setup used the parameter -supportmultipledomains during your federation configuration to Office 365, you have to do more additional steps for Automatic Registration to Azure AD to work. Normally –supportmultipledomains parameter is being used if your organization need to support multiple top level domains being used as UPN by your users.
But first the question is, how will you know if during ADFS Setup the –supportmultipledomains parameter was used?
The easiest way is by connecting to Office365 and run the cmdlet:
Get-msolfederationproperty –domainname <yourDomainName>
Then look at the FederationServiceIdentifier field, If the one from the ADFS Server Source field doesn't directly matched the one under the Microsoft Office 365 Source field then the –supportmultipledomains switch was used.
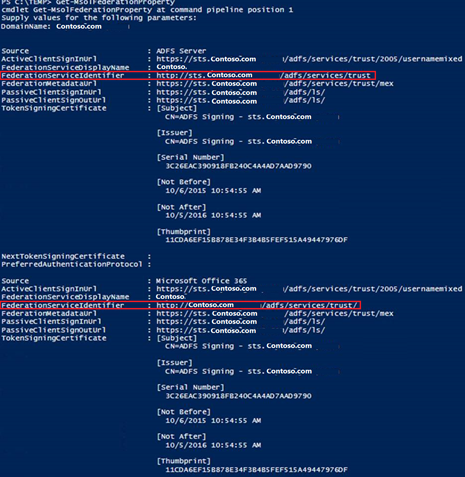
Therefore, you have to remove and add additional Claims in the ADFS Server by following these steps:
First thing to do is to remove this claim under Issuance Transform Rules in ADFS (ADFS Console > Trust Relationships > Relying Party Trusts > Microsoft Office 365 Identity Platforms > Right Click > Edit Claims > Issuance Transform Rules), look for this claim as this was created when the –supportmultipledomains switch was run.
c:[Type == "https://schemas.xmlsoap.org/claims/UPN"]
=> issue(Type = "https://schemas.microsoft.com/ws/2008/06/identity/claims/issuerid", Value = regexreplace(c.Value, ".+@(?<domain>.+)",
"https://${domain}/adfs/services/trust/"));
Second, after removing the claim mentioned above, you need to add these additional claims in order using the "Send Claims Using a Custom Rule" from the Add Transform Claim Rule Wizard. This is on top of the claims that already been created in STEP 3 earlier
" Issues AccountType with the value USER when it's not a computer account"
NOT EXISTS([Type == "https://schemas.microsoft.com/ws/2012/01/accounttype", Value == "DJ"])
=> add(Type = "https://schemas.microsoft.com/ws/2012/01/accounttype", Value = "User");
"Captures UPN when AccountType is User and issues the IssuerID"
c1:[Type == "https://schemas.xmlsoap.org/claims/UPN"]
&& c2:[Type == "https://schemas.microsoft.com/ws/2012/01/accounttype", Value == "User"]
=> issue(Type = "https://schemas.microsoft.com/ws/2008/06/identity/claims/issuerid", Value = regexreplace(c1.Value, ".+@(?<domain>.+)", "https://${domain}/adfs/services/trust/"));
"Update issuer for DJ computer auth"
c1:[Type == "https://schemas.microsoft.com/ws/2012/01/accounttype", Value == "DJ"]
=> issue(Type = "https://schemas.microsoft.com/ws/2008/06/identity/claims/issuerid", Value = "https://<Verified_Domain_Name>/adfs/services/trust/");
NOTE: You need to modify https://<Verified_Domain_Name>/adfs/services/trust/ In the claim rule "Update issuer for DJ computer auth". Replace <Verified_Domain_Name> with one of the verified and federated domain names under your tenant.
But If the one from the ADFS Server Source field directly matched the one under Microsoft Office 365 Source field then the –supportmultipledomains switch was NOT used. Therefore, the ADFS Claim Rules created from the STEP 3 earlier is already sufficient.

Configure Automatic MDM Enrollment – Optional for AAD Premium
Note: Automatic MDM Enrollment is an Azure AD Premium feature.
In the Azure management portal, navigate to the 'Active Directory' node and select your directory.

Click on the 'Applications' tab and you should see Microsoft Intune in the list of applications.
Note: If you do not have an Azure AD Premium subscription or do not have a Microsoft Intune subscription you will not see Microsoft Intune in the list of applications.
Click on the arrow and you should see a page that enables you to configure Microsoft Intune.
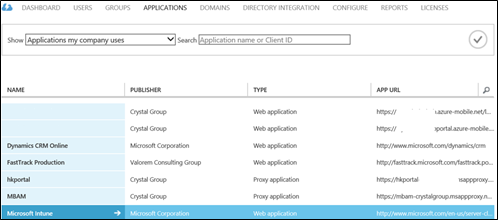
Click the 'Configure' button to start configuring automatic MDM enrollment with Microsoft Intune. On the Configure tab of this page, you can see a couple of URLs for Intune. You do not need to change any of these URLs. They are automatically configured for your Azure AD tenant.
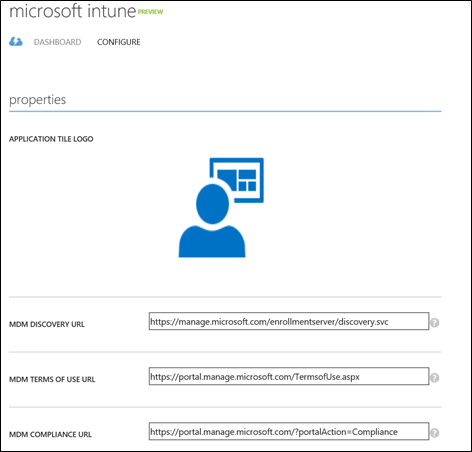
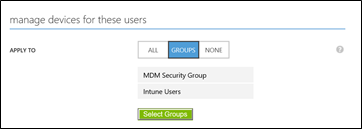
You will notice a setting that lets you specify which Group of Users or All should be managed by Microsoft Intune. These users' Windows 10 devices will be automatically enrolled for management with Microsoft Intune.
View and manage device objects in Azure Active Directory
From the Azure Administrator portal, you can view, block, and unblock devices. A device that is blocked will no longer have access to applications that are configured to allow only registered devices.
Log on to the Microsoft Azure Portal as Administrator.
On the left pane, select Active Directory.
Select your directory.
Select the Users tab. Then select a user to view their devices
Select the Devices tab.
Select Devices from the drop down menu.
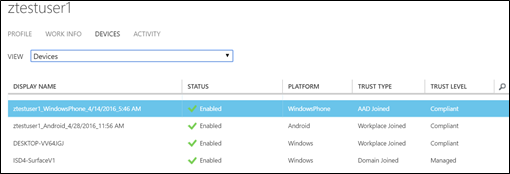
Here you can view, block, or unblock the users registered devices.
Note: You can also enable automatic registration to Azure AD for Windows 7 and 8/8.1 devices by following the instructions here:
https://azure.microsoft.com/en-us/documentation/articles/active-directory-conditional-access-automatic-device-registration-windows7/
https://azure.microsoft.com/en-us/documentation/articles/active-directory-conditional-access-automatic-device-registration-windows-8-1/
Set-Up Microsoft Passport for Work
In Windows 10, Microsoft Passport for Work replaces passwords with strong two-factor authentication that combines an enrolled device with a PIN or a biometric user input (Windows Hello) to sign in. Passport lets you use a user gesture to log in, instead of a password. A user gesture might be a simple PIN, biometric authentication such as Windows Hello, or an external device such as a fingerprint reader.
Microsoft Passport for Work is a private and public key or certificate-based authentication approach that goes beyond passwords. This form of authentication relies on key pair credentials that can replace passwords and are resistant to breaches, thefts, and phishing.
The private key is made available solely through user input like a PIN, biometrics, or a remote device like a smart card that the user uses to sign in to the device. This information is linked to a certificate or an asymmetrical key pair. The private key is hardware attested if the device has a Trusted Platform Module (TPM) chip. The private key never leaves the device. For devices that lack TPM, Microsoft Passport can encrypt and store credential data in software, but administrators can disable this feature to force a "TPM or nothing" deployment.
The public key is registered with Azure Active Directory (cloud) and Windows Server Active Directory (on-premises). Identity providers validate the user by mapping the public key of the user to the private key, and provide access information through one-time password, phone authentication, or a different notification mechanism.
Whenever possible, Microsoft recommends the use of TPM hardware. The TPM protects against a variety of known and potential attacks, including PIN brute-force attacks. The TPM provides an additional layer of protection after an account lockout, too. When the TPM has locked the key material, the user will have to reset the PIN (which means he or she will have to use MFA to re-authenticate to the IDP before the IDP allows him or her to re-register). Resetting the PIN means that all keys and certificates encrypted with the old key material will be removed.
Microsoft Passport for Work lets users authenticate to a Microsoft account, an Active Directory account, a Microsoft Azure Active Directory (Azure AD) account or other identity provider/services that support Fast ID Online (FIDO) v2.0 authentication.
How it works
Keys are generated on the hardware by Trusted Platform Module (TPM) chips or software. Many devices have a built-in TPM chip that secures the hardware by integrating cryptographic keys into devices.
The TPM attests these hardware-bound keys.
A PIN or an unlock gesture using Windows Hello unlocks the device. This gesture allows access to multiple resources if the device is domain-joined or Azure AD-joined.
How a PIN is better than a Password?
Microsoft Passport for Work for work with a PIN addresses many of the inherent problems with passwords. Passwords can be difficult for users to remember, may be reused on multiple sites, and can sometimes be easy to guess. Server breaches can expose symmetric network credentials, or users can inadvertently divulge their passwords during phishing attacks.
It isn't the structure, length, or complexity of a PIN that makes it better than a password, it's how it works.
- PIN is tied to the device. The PIN is tied to the specific device on which it was set up. That PIN is useless to anyone without that specific hardware.
- PIN is local to the device. A password is transmitted to the server, a PIN is local to the device—it isn't transmitted anywhere and it isn't stored on the server. When the PIN is created, it establishes a trusted relationship with the identity provider and creates an asymmetric key pair that is used for authentication. When you enter your PIN, it unlocks the authentication key and uses the key to sign the request that is sent to the authenticating server.
- PIN is backed by hardware. The Passport for Work PIN is backed by a TPM chip, which is a secure cryptoprocessor that is designed to carry out cryptographic operations. The chip includes multiple physical security mechanisms to make it tamper resistant, and malicious software is unable to tamper with the security functions of the TPM. The TPM protects against a variety of known and potential attacks. Note that for devices that lack TPM, Microsoft Passport can encrypt and store credential data in software, but administrators can disable this feature to force a "TPM or nothing" deployment.
Deployment Requirements:
Customers may utilize the Passport feature in three environments: Azure AD only, Hybrid AD (On-Premise Active Directory synchronized to Azure AD) and On-Premise Only Active Directory. All three methods can be secured in one of two ways: Key based or certificate based.
Key based or Certificate based
Passport for Work lets users authenticate using an Active Directory (AD) account, a cloud domain (Azure Active Directory) account, or to the domain through an Intune-managed device. After an initial two-step verification during Passport enrollment, the Passport for Work keys or certificates are provisioned on the TPM when the user sets a PIN, which depending upon the PIN policy, can be numeric or alpha numeric. Then, on that device, the user provides the PIN to verify identity and gain access to the keys stored in TPM. Windows uses Passport for Work to authenticate and provide access to resources and services.
For a hybrid environment we have two options to configure Passport credentials: Key based, where the authentication asymmetric key pair is generated in the TPM and the public key is stored with the user object in Azure AD, or Certificate based, where a user certificate is issued from a Microsoft Enterprise Certificate Authority. For certificate-based Microsoft Passport for Work, when the container is unlocked, applications that require access to the IDP key or key pair can request access. IDP keys are used to sign or encrypt authentication requests or tokens sent from this machine to the IDP.
Both methods have their benefits but have different authentication infrastructure requirements. Both methods require a certificate authority to issue certificates to domain controllers based upon the Domain Controller template, but only certificate based Passport for Work will issue user certificates based on Microsoft Passport keys as the backing credential.
This table demonstrates the requirements for both key and certificate based Passport for Work:
Microsoft Passport method |
Azure AD |
Hybrid Active Directory |
On-premises Active Directory only |
Key-based |
|
|
|
Certificate-based |
|
|
|
Note:
On-premises deployments require the forthcoming Active Directory Federation Services (AD FS) version included in Windows Server 2016 Technical Preview to support provisioning of Microsoft Passport credentials to devices. In this scenario, AD FS takes the place of the provisioning that Azure AD performs in cloud-based deployments.
Server Roles and Services Needed
- Azure AD subscription with ADRS (device registration service) is used to enroll devices to Azure Active Directory
- Configuration Manager, Certificate Registration Point (CRP), and Microsoft Intune infrastructure. Configuration Manager is used for domain-joined devices, and Microsoft Intune is used for BYOD and Azure AD-joined devices. They handle policy enforcement as well as certificate enrollment and deployment on behalf of the client
- Azure AD Federated Services and Active Directory Federation Services Web Application Proxy (WAP) infrastructure. Used for federation scenarios, WAP used for Internet-facing Network Device Enrollment Service (NDES) issuance.
- Public Key Infrastructure includes NDES servers (with policy module) and Certificate Authorities (with smart card EKU template), used for the Microsoft Passport for Work certificates' issuance, renewals and revocation. (Certificate Based)
Enable and Configure Passport for Work (Certificate Based)
Configure Automatic Registration for Windows 10 domain-joined devices.
Configure Microsoft Passport for Work GPO in Active Directory
Configure the certificate profile to use the "Passport for Work" enrollment certificate in Configuration Manager
Configure Automatic Registration for Windows 10 domain-joined devices.
Please refer to the earlier guide as it already provides the proper configuration to make the domain joined Windows 10 devices to register automatically to Azure AD:
Set-Up Azure Active Directory Automatic Device Registration
Configure Microsoft Passport for Work GPO in Active Directory
The following table lists the Group Policy settings that you can configure for Passport use in your workplace. These policy settings are available in Computer Configuration > Policies > Administrative Templates > Windows Components >Microsoft Passport for Work.
Policy | Options | |
Use Microsoft Passport for Work | Not configured: Users can provision Passport for Work, which encrypts their domain password. Enabled: Device provisions Passport for Work using keys or certificates for all users. Disabled: Device does not provision Passport for Work for any user. | |
Use a hardware security device | Not configured: Passport for Work will be provisioned using TPM if available, and will be provisioned using software if TPM is not available. Enabled: Passport for Work will only be provisioned using TPM. Disabled: Passport for Work will be provisioned using TPM if available, and will be provisioned using software if TPM is not available. | |
Use biometrics | Not configured: Biometrics can be used as a gesture in place of a PIN. Enabled: Biometrics can be used as a gesture in place of a PIN. Disabled: Only a PIN can be used as a gesture. | |
PIN Complexity | Require digits | Not configured: Users must include a digit in their PIN. Enabled: Users must include a digit in their PIN. Disabled: Users cannot use digits in their PIN. |
Require lowercase letters | Not configured: Users cannot use lowercase letters in their PIN. Enabled: Users must include at least one lowercase letter in their PIN. Disabled: Users cannot use lowercase letters in their PIN. | |
Maximum PIN length | Not configured: PIN length must be less than or equal to 127. Enabled: PIN length must be less than or equal to the number you specify. Disabled: PIN length must be less than or equal to 127. | |
Minimum PIN length | Not configured: PIN length must be greater than or equal to 4. Enabled: PIN length must be greater than or equal to the number you specify. Disabled: PIN length must be greater than or equal to 4. | |
Expiration | Not configured: PIN does not expire. Enabled: PIN can be set to expire after any number of days between 1 and 730, or PIN can be set to never expire by setting policy to 0. Disabled: PIN does not expire. | |
History | Not configured: Previous PINs are not stored. Enabled: Specify the number of previous PINs that can be associated to a user account that can't be reused. Disabled: Previous PINs are not stored. Note Current PIN is included in PIN history. | |
Require special characters | Not configured: Users cannot include a special character in their PIN. Enabled: Users must include at least one special character in their PIN. Disabled: Users cannot include a special character in their PIN. | |
Require uppercase letters | Not configured: Users cannot include an uppercase letter in their PIN. Enabled: Users must include at least one uppercase letter in their PIN. Disabled: Users cannot include an uppercase letter in their PIN. | |
Use Remote Passport | Not configured: Remote Passport is disabled. Enabled: Users can use a portable, registered device as a companion device for desktop authentication. Disabled: Remote Passport is disabled. | |
You can use Group Policy in Windows Server Active Directory to configure your Windows 10 domain-joined devices to provision Microsoft Passport user credentials on user sign-in to Windows:
Open Server Manager, and navigate to Tools > Group Policy Management.

From Group Policy Management, navigate to the domain node that corresponds to the domain in which you want to enable Azure AD Join.
Right-click Group Policy Objects, and select New. Give your Group Policy Object a name, for example, Enable Microsoft Passport. Click OK.

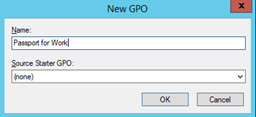
Right-click your new Group Policy Object, and then select Edit.
Navigate to Computer Configuration > Policies > Administrative Templates > Windows Components > Microsoft Passport for Work.

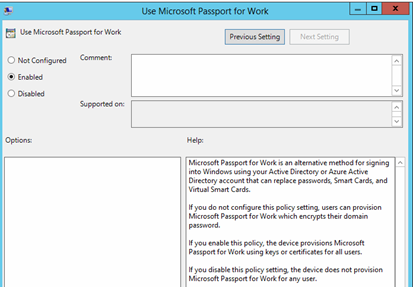
Right-click Enable Passport for Work, and then select Edit.
Select the Enabled option button, and then click Apply. Click OK.
Configure the Pin Complexity

Remote

You can now link the Group Policy Object to a location of your choice. To enable this policy for all of the domain-joined Windows 10 devices in your organization, link the Group Policy to the domain. For example:
- A specific organizational unit (OU) in Active Directory where Windows 10 domain-joined computers will be located
- A specific security group that contains Windows 10 domain-joined computers that will be automatically registered with Azure AD
Configure Passport Policy for BYOD PC's and Windows Phone
In the Configuration Manager console in the Administration workspace, go to Cloud Services > Microsoft Intune Subscriptions.
On the Home tab, click Configure Platforms, and then click Windows.

On the General tab, select Passport for Work.

Select Enable Passport for Work for enrolled devices and configure your desired settings.
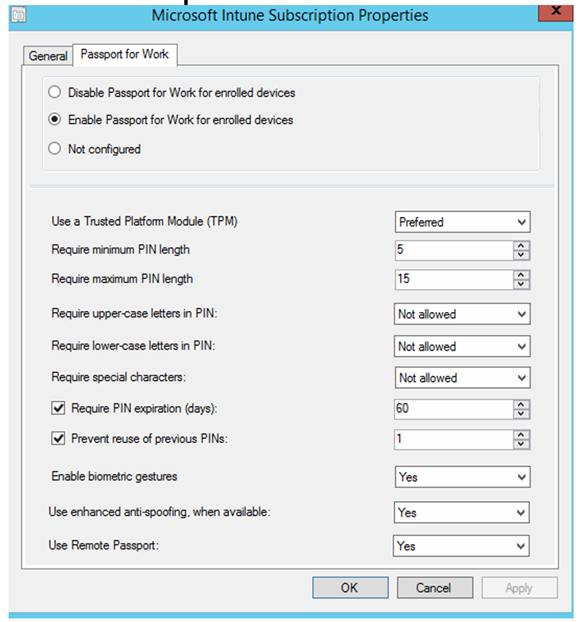
Configure the certificate profile to use the "Passport for Work" enrollment certificate in Configuration Manager
Please refer to the earlier guide as it will provide the Certificate Template to be use for Microsoft Passport and how to deploy the certificate profile via Configuration Manager:
Set-Up NDES Configuration
IMPORTANT NOTE:
For Windows 10 that have TH1(1507), TH2 (1511) and RS1 build prior to March 25th 2016, there is a known bug on the Windows 10 SCEP Client code that uses "Microsoft Passport Key Storage Provider" and rely on Microsoft NDES SCEP server with the default configuration (or any SCEP server that prioritizes SHA-512 algorithm). Microsoft Passport Certificates couldn't be provisioned on the machines that have these builds because the NDES SCEP server returns SHA-512 as the first hash algorithm when asked for the GetCACaps response but the Windows 10 SCEP client code on these mentioned builds doesn't know how to skip this secure hash algorithm, and this results in a not supported error. The workaround to solved this issue is to configure the NDES SCEP server not to send SHA-512 algorithm response.
Note: This bug was fixed already on Redstone builds that been released March 25th 2016 onwards, so if you are running 1607 build of Windows 10, no need to run these commands below.
This can be done by running these following CertUtil command in the elevated command prompt of the NDES Server:
- First is to check if the registry fix was already been set by running this cmd:
certutil –getreg –f MSCEP\CACapabilitiesAlgorithms\CACapabilitiesAlgorithms

If in case the registry value was already been set, then you have to remove the SHA-512 algorithm by running this cmd:
- certutil –setreg MSCEP\CACapabilitiesAlgorithms\CACapabilitiesAlgorithms "-SHA-512"
- iisreset
- For Microsoft NDES server that does not have registry value that been set, then you have to run this cmd to fix the issue:
certutil –setreg –f MSCEP\CACapabilitiesAlgorithms\CACapabilitiesAlgorithms "SHA-256\nSHA-1\nDES3"
iisreset

Setting up and managing your PIN
If your enterprise requires that you sign in using a PIN, use one of the following procedures to create a PIN for work access. The procedure you choose depends on whether your device is domain-joined, Azure Active Directory-joined, or Intune-managed.
Domain-joined device or Azure AD joined device
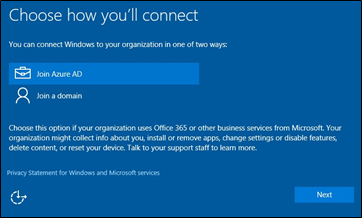
For Azure AD Joined Machines, During the Windows setup process, select Join Azure AD to join the device to the Azure Active Directory. Select Join Azure AD,then select Next.
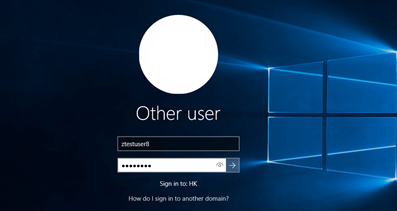
For Domain Joined Machines, Sign in to your network domain account with your username and password.
Microsoft Passport setup will start and Select Create PIN.
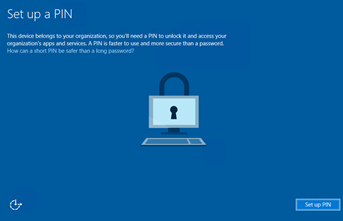
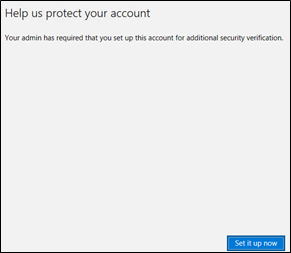
If you haven't configured any Multi-Factor Authentication yet, you will be required to set up one for Microsoft Passport use. Click Set it up now.
Choose an authentication method and enter your second factor for authentication. You can choose Phone or Text Message or through the use of Mobile App

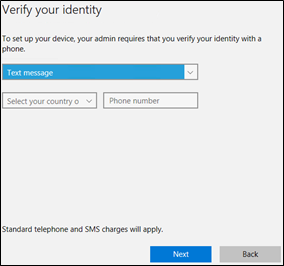
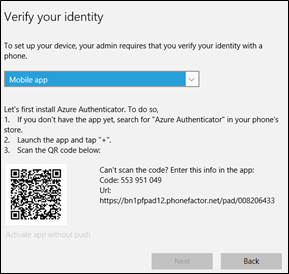
Once you have selected the method you want, it will send a code or notification to your mobile device. Enter the code.
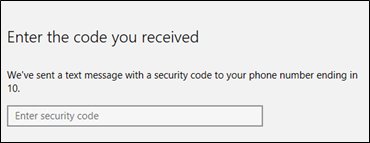
After you enter the correct code, it will ask you to set up now the PIN for your Microsoft Passport for login (see PIN requirements for details). Then select OK.

Sign out of Windows, and make sure that Sign-in options appears and shows the key button for the password option and a PIN pad icon for the PIN option.

Note:
If you tried to login using PIN and if it doesn't work and shows a "There are currently no logon servers available to service the logon request", that means the Passport Certificate was not yet received by the user. You can try the following:
-
Login again using your Password and follow the Certificate Profile Troubleshooting earlier in the Create and Deploy Certificate Profiles on Configuration Managersection
Login again using your Password and wait for about 5mins until you see the "Making sure it's you" prompt. This will trigger the certificate request. Logout and try to login using PIN again.

Login again using Password then logout and try to login using the PIN again or restart the Machine
BYOD - Intune-managed device
Select the Start
 button, then select Settings > Accounts
Select Access Work or School and click Connect
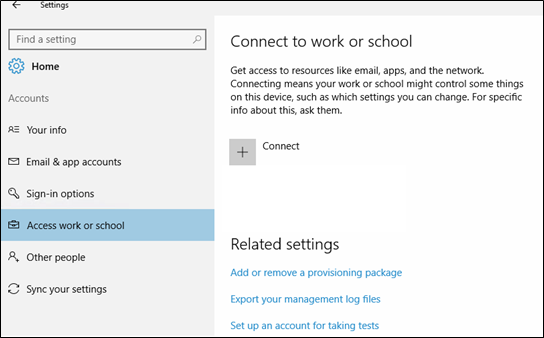
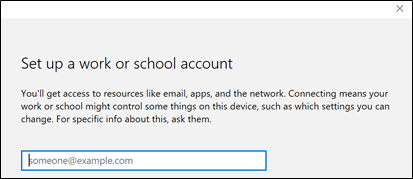
Enter your work email account in the form, then your password, and then select Continue.
If you have MFA enabled, you will be asked to provide your second Factor Authentication. After providing it correctly, you are all set. Click Done

After you enrolled your device to MDM, Intune Policy set by your organizations will be push down to your device including the Microsoft Passport Policy.
On your next login, you will be prompted to Create a Pin, follow similar procedure shown earlier in the domain-joined or azure ad joined devices guide.
PIN management
The following procedures show how to change the PIN and how to reset the PIN when you cannot remember it.
Change your PIN
Select the Start
 button, then select Settings > Accounts > Sign-in options > PIN.
Select Change.
Enter the current PIN for validation, followed by a new PIN, then select OK.

After the process is complete, the Sign-in
options page appears.Verify the new PIN by signing out and then use the new PIN to sign in.
Reset your PIN
Select the Start
 button, then select Settings > Accounts > Sign-in options.
Select I forgot my PIN.

If you are not signed in using your PIN, you will be required to authenticate your identity.
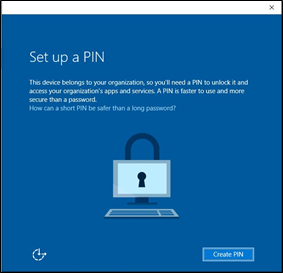
Enter a new PIN, and then select OK.
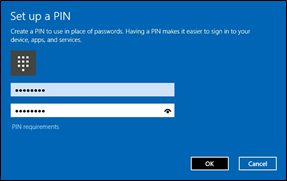
After the process is complete, the Sign-in
options page appears.Verify the new PIN by signing out and then using the new PIN to sign in.
Getting started with Windows Hello
Windows Hello greets you by name, letting you sign in without a password and providing instant, secure access to your Windows 10 devices. With Windows Hello, biometric authentication is easy with your face or finger, providing instant recognition.
PCs with fingerprint readers are ready to use Windows Hello now, and more devices that can recognize your face are coming soon.
Note:
- To install Windows Hello, your device must have the required biometric hardware.
- Windows Hello is optional, and you can remove your enrolled biometric data at any time.
- Your biometric data is saved and used only on the device that you enrolled in Windows Hello. It never leaves that device.
- Some of the screens shown in these procedures may differ from what you see in Windows Hello.
Set up facial recognition
To use the facial recognition feature, you need an infrared camera that is supported by Windows Hello. Also, you need to have a PIN already configured for your device.
Select the Start
 button, then select Settings > Accounts > Sign-in options.
In the Windows Hello section, under Face, select Set up.

When Windows prompts you, enter your PIN.
NOTE:
If your device has biometric hardware, before this PIN entry prompt appears, you will see a prompt to establish your facial recognition or fingerprint biometric.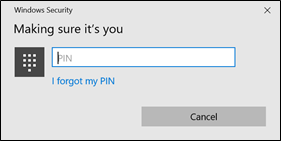
Select Get started.
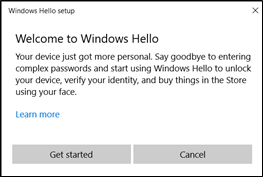
Position yourself in front of the camera, making sure your face is in the center of the frame.

After the setup program finishes recording your face, the All set! message appears.
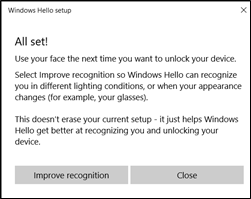
Select Improve recognition to help Hello optimize recognition. This is helpful if you wear glasses or sign in under different lighting conditions.
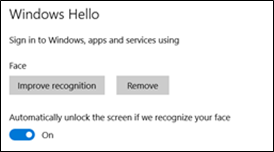
After the Windows Hello setup program finishes, your face is registered on your device.

Figure 1: Sign-on page using face recognition.
Set up fingerprint recognition
To use the fingerprint recognition feature, you will either need a device with a fingerprint reader, or a USB fingerprint reader that you can connect to your device.
Select the Start
 button, then select Settings > Accounts > Sign-in options.
In the Windows Hello section, under Fingerprint, select Set up.
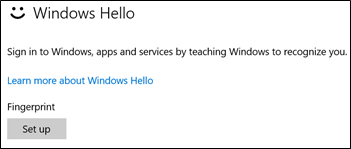
In the prompt, click Get Started

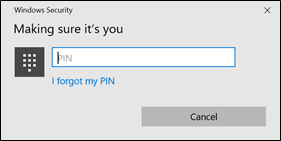
If you have set-up already the Microsoft Passport, you will be prompt to enter again you PIN
Depending on the type of reader you are using, you will be asked to either swipe or touch your finger several times.
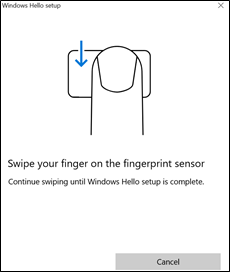
Touch a finger to the fingerprint reader to scan your fingerprint.
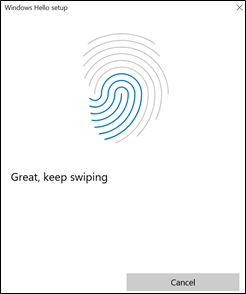
After your fingerprints have been scanned, the All set! message appears.

Note: If you want, you can register multiple fingers. Just click Add another finger
The next time you sign in or need to unlock the screen, you can use a fingerprint.
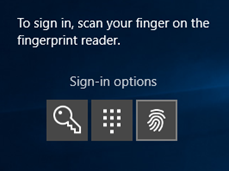
After you're set up with Hello, you'll be able to sign in with a quick swipe or glance.
Reference:
https://technet.microsoft.com/en-us/itpro/windows/keep-secure/microsoft-passport-guide
https://azure.microsoft.com/en-us/documentation/articles/active-directory-azureadjoin-passport-deployment/
https://technet.microsoft.com/en-us/itpro/windows/keep-secure/implement-microsoft-passport-in-your-organization
This Blog post was published by the authors
Lutz Seidemann (Architect) and Raymond Michael Sy Guan (Consultant). We both with Microsoft Consulting Services – Worldwide Enterprise Mobility Center of Excellence (CoE).
Disclaimer: The information on this site is provided "AS IS" with no warranties, confers no rights, and is not supported by the authors or Microsoft Corporation. Use of included script samples are subject to the terms specified in the Terms of Use.
Comments
- Anonymous
July 18, 2016
AFAIK Windows 7 is not supported for Azure DRS, can you please confirm?- Anonymous
July 18, 2016
correct , lutz
- Anonymous
- Anonymous
July 31, 2016
So where can I find the steps to configure passport for work for KEY BASED authentication? I am able to set the Pin for Work on Windows 10, but I can't logon with it. (Hybrid AD, DC 2016+2012R2, DC Certificate) - Anonymous
November 12, 2016
Self answering after months of trials: It's necessary to start a manual Schema Update in AD Connect as the last step, even if you installed it onto Server 2016 in a completely new tenant and on-prem Domain. If you don't do that, the msDS-KeyCredentialLink attribute will not be synced and this is the key Attribute to get this Feature work. Also important: Lutz Forgets to activate Device Writeback in AD Connect. This is essential to get Hello for Business up!And in the beginning of this article you should activate Device Registration in AAD, not AAD join!