Using Azure RMS for Generic File Protection
Introduction
Recently, I’ve had the need to work with Azure Rights Management and Generic File Protection using File Server Resource Manager (FSRM). Configuration of Azure Rights Management for use with O365 is straight forward (see here), as is use of the Azure Rights Management Connector for protection of email and Office documents (see here) using on-premises services (Exchange, SharePoint and FSRM).
Generic File Protection however, requires the use of PowerShell RMS Protection cmdlets which in turn, depend upon an extensive list of pre-requisites. I began with the goal of configuring Generic File Protection but found myself bouncing between several sources of documentation to get it working. Due to this experience, I thought it worthwhile to lay it out here. Nothing that follows isn't already in a Microsoft document somewhere - my goal is to make it easier.
Keep in mind that using Azure RMS to protect files that are not associated with RMS Enlightened applications will be read-only after protection. If files need to be edited, protection must be removed first (by using Unprotect-RMSFile).
Reading generic files protected with Azure RMS is possible on Windows clients by installing the Rights Management Service Client 2.1.
Installing Prerequisites
The prerequisites outlined in the following steps should be executed in order on the file server where you will be running FSRM.
- Install the Microsoft Online Services Sign-In Assistant for IT Professionals RTW and then the Azure Active Directory Module for Windows PowerShell (64-bit version) by following instructions here
- Install the Azure Rights Management Administration Tool from here
- Install the Rights Management Service Client 2.1 from here
- Ensure PowerShell 4.0 or later and .NET 4.5 are installed (they will be for Windows Server 2012 R2)
- Install the RMS Protection Tool from here
Preparing for Azure RMS Integration with FSRM for Generic File Protection
The following steps assume you already have an Azure Active Directory tenant populated with on-premises users and that Rights Management has been activated. I’ll also assume you’re either using the default RMS templates or have configured your own. If you’re not sure how to do this, refer to Microsoft’s online documentation starting here.
Lastly, I’ll assume that you’ve installed the File Server Resource Manager role on your file server.
The first thing you’ll need to do is collect some information to use later. Begin by opening PowerShell and executing
Connect-AadrmService
Provide your AAD tenant administrator credentials when prompted.
Execute
Get-AadrmConfiguration
An example of the output from Get-AadrmConfiguration might be
 C:\PS> Get-AadrmConfiguration

BPOSId : 23976bc6-dcd4-4173-9d96-dad1f48efd42
RightsManagement ServiceId : 1a302373-f233-440600909-4cdf305e2e76
LicensingIntranetDistributionPointUrl : https://1s302373-f233-4406-9090-4cdf30 5e2e76.rms.na.aadrm.com/_wmcs/licensing
LicensingExtranetDistributionPointUrl : https://1s302373-f233-4406-9090-4cdf305e 2e76.rms.na.aadrm.com/_wmcs/licensing
CertificationIntranetDistributionPointUrl: https://1s302373-f233-4406-9090-4cdf305e 2e76.rms.na.aadrm.com/_wmcs/certification
CertificationExtranetDistributionPointUrl: https://1s302373-f233-4406-9090-4cdf305e 2e76.rms.na.aadrm.com/_wmcs/certification
Take note of the BPOSId.
If you’re outside the Azure North America region, additional configuration is required and so also take note of the CertificationExtranetDistributionPointUrl and LicensingExtranetDistributionPointUrl values.
Next connect to Azure Active Directory by executing
Connect-MsolService
Provide your AAD tenant administrator credentials when prompted.
Next create a service principal that will be used for document protection by executing
New-MsolServicePrincipal -DisplayName AzureRMSProtectionServicePrincipal
And example of the output from New-MsolServicePrincipal might be
 The following symmetric key was created as one was not supplied zIeMu8zNJ6U377CLtppkhkbl4gjodmYSXUVwAO5ycgA=
Display Name: AzureRMSProtectionServicePrincipal
ServicePrincipalNames: (b5e3f7g1-b5c2-4c96-a594-a0807f65bba4)
ObjectId: 23720996-593c-4122-bfc7-1abb5a0b5109
AppPrincipalId: b5e3f76a-b5c2-4c96-a594-a0807f65bba4
TrustedForDelegation: False
AccountEnabled: True
Addresses: ()
KeyType: Symmetric
KeyId: 8ef61651-ca11-48ea-a350-25834a1ba17c
StartDate: 3/7/2014 4:43:59 AM
EndDate: 3/7/2014 4:43:59 AM
Usage: Verify
Take note of the symmetric_key and the AppPrincipalId. It's particularly important that you record the symmetric key at this time - it cannot be retrieved later.
Now add your new service principal as a super user for Azure RMS (this allows the account to be used for removal of rights management policies from files protected by domain users) by executing
Add-AadrmSuperUser –ServicePrincipalId <AppPrincipalId>
where <AppPrincipalID> is the one you recorded above (b5e3f76a-b5c2-4c96-a594-a0807f65bba4 in our example).
At this stage, you will make use of the CertificationExtranetDistributionPointUrl and LicensingExtranetDistributionPointUrl values captured earlier but only if you are outside the Azure North America region. Only make the following registry edits if this is true -
- Open RegEdit
- Navigate to HKEY_LOCAL_MACHINE\Software\Microsoft\MSIPC
- If you do not see the ServiceLocation key, create it, so that your registry path shows HKEY_LOCAL_MACHINE\SOFTWARE\Microsoft\MSIPC\ServiceLocation
- Under the ServiceLocation key, create two more keys named EnterpriseCertification and EnterprisePublishing
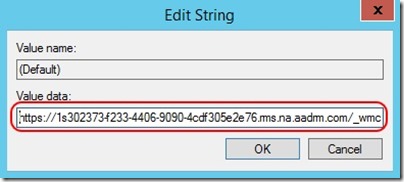
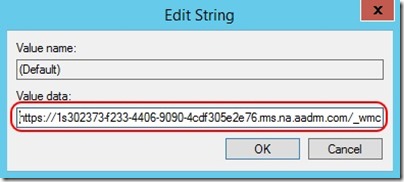
- Under each of these new keys, you will find a (Default) REG_SZ value that is displayed as “ (value not set) ”

- Edit the (Default) value under EnterpriseCertification and set it to the value captured for CertificationExtranetDistributionPointUrl above

- Edit the (Default) value under EnterprisePublishing and set it to the value captured for LicensingExtranetDistributionPointUrl above

- Close RegEdit
Now connect to the Azure RMS service using details captured above and retrieve a list of Azure RMS templates by executing
 Set-RMSServerAuthentication –Key <symmetric_key> –AppPrincipalId <AppPrincipalId> –BposTenantId <BPOSId>

Get-RMSTemplate
where <symmetric_key> , <AppPrincipalId> and <BPOSId> are the values captured earlier (zIeMu8zNJ6U377CLtppkhkbl4gjodmYSXUVwAO5ycgA= , b5e3f76a-b5c2-4c96-a594-a0807f65bba4 and 23976bc6-dcd4-4173-9d96-dad1f48efd42 in our example)
The Get-RMSTemplate cmdlet will return a list of templates similar to
 C:\PS> Get-AadrmConfiguration

TemplateId : {82bf3474-6efe-4fa1-8827-d1bd93339119}
CultureInfo : en-US Description : This content is proprietary information intended for internal users only. This content cannot be modified.
Name : Contoso, Ltd - Confidential View Only
IssuerDisplayName : Contoso, Ltd
FromTemplate : True

TemplateId : {e6ee2481-26b9-45e5-b34a-f744eacd53b0}
CultureInfo : en-US
Description : This content is proprietary information intended for internal users only. This content can be modified but cannot be copied and printed.
Name : Contoso, Ltd – Confidential
IssuerDisplayName : Contoso, Ltd
FromTemplate : True
If this fails, double-check your registry edits and ensure you’re using the right values in Set-RMSServerAuthentication.
Take note of the TemplateID of the Azure RMS template you wish to use for file protection.
Close the PowerShell prompt.
Configuring Azure RMS Integration with FSRM for Generic File Protection
Everything you’ve done to this point will allow you to use the RMS Protection Tool PowerShell cmdlets. All you need do is re-run the Set-RMSServerAuthentication cmdlet with the same values and you'll have access to the cmdlets for file protection, removal of file protection, etc.
Microsoft kindly provides a script that makes use of these cmdlets and that may be used in conjunction with FSRM to automate Generic File Protection.
First, obtain the script from here and save it with the name RMS-Protect-FCI.ps1 in a folder on your FSRM server of your choosing (say C:\RMS-Protection).
Edit the script and enter the AppPrincipalId, symmetric_key and BPOSId where indicated -
 [Parameter(Mandatory = $false)]
[string]$AppPrincipalId = "<enter your AppPrincipalId here>",

[Parameter(Mandatory = $false)]
[string]$SymmetricKey = "<enter your key here>",

[Parameter(Mandatory = $false)]
[string]$BposTenantId = "<enter your BposTenantId here>"
Save the changes. It’s at this point that you would want to sign the script for a production environment. For testing purposes, it’s sufficient to set your PowerShell script execution policy to RemoteSigned.
Run the script without any parameters and you should see it successfully connect to Azure RMS -
 PS C:\RMS-Protection> .\RMS-Protect-FCI.ps1

-== RMS-Protect-FCI.ps1 version 1.0 ==-
Information: Connected to Azure RMS Service with BposTenantId: 23976bc6-dcd4-4173-9d96-dad1f48efd42 using AppPrincipalId: b5e3f76a-b5c2-4c96-a594-a0807f65bba4
Connected to Azure RMS
-== RMS-Protect-FCI.ps1 version 1.0  ==-
If you follow this script with Get-RMSTemplate, you should see a list of your templates returned successfully. If you do not, double-check the script edits performed above.
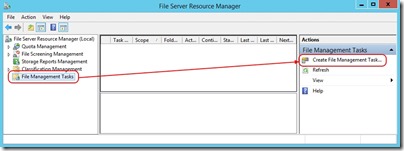
Open File Server Resource Manager and navigate to File Management Tasks and then click on Create File Management Task …
Now
On the General tab, provide a name for the task, leave the task Enabled and optionally provide a description
On the Scope tab, leave all check boxes un-ticked and then add the folder to which you wish to apply Azure RMS file protection
On the Action tab, choose Custom next to Type
On the Action tab, enter the following next to Executable
C:\Windows\System32\WindowsPowerShell\v1.0\powershell.exeOn the Action tab, enter the following next to Arguments
-Noprofile -Command "C:\RMS-Protection\RMS-Protect-FCI.ps1 -File '[Source File Path]' -TemplateID <TemplateID> -OwnerMail [Source File Owner Email]"- where <TemplateID> is the value recorded earlier
- Replace the path to the RMS-Protect-FCI.ps1 script if you are using something different
- Note that [Source File Path] and [Source File Owner Email] are used by FSRM to pass this file specific data to the -File and -OwnerEmail parameters as each file is processed. Do not edit these
On the Action tab, configure Run the command as: to use Local System
On the Schedule tab, set a schedule of your choosing
On the Schedule tab, select Run continuously on new files under Continuous operation
Click OK
Either wait for the task to run on schedule or run it manually to validate Azure RMS file protection
What Could Go Wrong?
Script incorrectly populated with values
The Executable or Arguments fields on the Action tab of your File Management Task may be entered incorrectly
Registry entries for MSIPC may incorrect or missing for deployments outside the North America region. This leads to an inability to access the RMS template specified
Files may not be owned by a domain user account or the domain user account that owns the files may not have a correctly configured mail attribute assigned to their user object in Active Directory. FSRM passes the contents of this mail attribute to the -OwnerMail parameter and so the mail attribute must match a valid Azure Active Directory tenant user
In my own testing, I've encountered an issue where the connection to Azure RMS is unsuccessful inside the script when run by FSRM. Running the script manually and specifying parameters is successful. I believe this is a timing problem with Set-RMSServerAuthentication. I've managed to resolve this by adding a call to Get-RMSTemplate as follows
 if ($Script:isScriptProcess) {
    #Write-Host ("Try to connect to Azure RMS with AppId: $AppPrincipalId and BPOSID: $BposTenantId" )
    if (Set-RMSConnection $AppPrincipalId $SymmetricKey $BposTenantId) {
        Write-Host ("Connected to Azure RMS")
        Get-RMSTemplate
    } else {
        Write-Host ("Couldn't connect to Azure RMS") -foregroundcolor "yellow" -backgroundcolor "black"
        $Script:isScriptProcess = $False
    }
}
Conclusion
After completing these steps, you'll have a File Management Task that will use Azure RMS to protect files in the chosen folder. You may wish to use the file classification capabilities of FSRM and modify options on the Condition tab of the task to apply protection in a more granular manner (beyond the scope of this post).
References and More Information
