Planning for Desktop Virtualization using the MAP Toolkit 7.0 (Part 2 of 4)
In our next two topics in this series, we will cover the capacity planning related features in the MAP toolkit 7.0. For those of you who have used the server consolidation features in MAP, a few of these steps will seem familiar. There a couple of new things that you will need to perform and we will spend most of the time covering those.
There are two key problems that the MAP toolkit is trying to solve when planning for VDI and Session Virtualization. The first is how to model the performance characteristics and usage profile of a type of worker (e.g. people in your call center, information workers, task workers, people in finance). The second is how many Remote Desktop Server Virtualization or Session Hosts will you need to support one or more of those ‘desktop workloads’. Today, we will cover the first - A way to capture and model the hardware performance impact of a usage scenario.
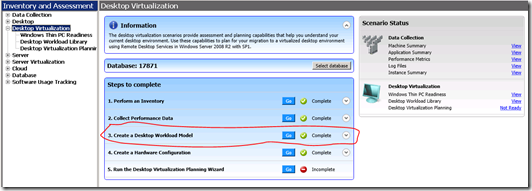
The steps you will need to create a desktop workload model are:
- Perform an inventory of Windows machines
- Gather performance metrics
- Run the Desktop Workload Library Wizard
A couple of things to note about gathering performance metrics for this scenario:
- Desktop performance profiles differ from those found in servers. Downtime (meaning no performance metrics exist) is an expected behavior. We’ve implemented some new mechanisms to take this into account, so you data collected in the past will not be useful in this exercise. You will need to collect new data from a set of physical Windows client operating systems.
- We recommend that you collect at least a day or two of activity for each desktop that you want to consider in the model(s) that you are creating. Covering heavy use periods such as the end of the month will help in giving you an indication of a fully burdened workload for those user types.
Once you’ve gathered an appropriate amount of performance data for the desktops you have targeted. You can now create your first entry in the Desktop Workload Library.
There are four steps to creating an entry in the Desktop Workload Library.
- Name your workload
- Select the computers to be included
- Review your selections
- Create the model
You can start the Desktop Workload Library Wizard from the Desktop Virtualization Summary page within the toolkit console.
The first page of the wizard allows you to create, edit and delete entries from your workload library.
I’m going to create one for the Information Worker profile in my organization and click ‘Next’.
On the next page of the wizard, I’m presented with a list of computers along with the name of their operating system, how many successful performance metric samples were collected and the 95th percentile calculations for CPU, Memory, Disk and Network utilization metrics.
I simply select the computers that I want to include in the model and click ‘Next’.
I review my selections and then click ‘Finish’ and MAP will calculate the performance profile for this set of desktops.
MAP does a couple of things when calculating the performance profile.
- It creates a time series for each performance dimension based upon the average and peak observations for each machine included the set used to create the model. The dimensions are:
- CPU utilization
- Memory utilization
- IOPS
- Network utilization
- % User Time
- Pool Nonpaged Bytes
- Pool Paged Bytes
- The CPU models from each machine included in the workload are normalized to the highest rated processor according to SpecInt. This enables MAP to ensure that the utilization of each type is treated accurately.
In the Desktop Workload Library, you will see the average and peak profiles. For display purposes, the average values are provided.
Now that we have a workload, we can determine how many servers we will need to host this workload. We will cover that in part III – coming soon.
Until then, download the MAP toolkit 7.0 and tell us what you think about this feature!
Rob


