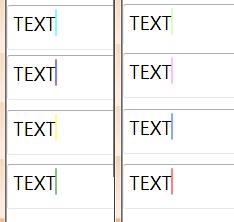
Changing caret color in (Rich)TextBox
This sounds simple but its not so since we do not make it public. So what are the options we have here. hmmm... How about an hack J. The caret color is the inverse of the background color. So a very simple way is to set the background which then doesn’t get rendered.
<Style TargetType="{x:Type TextBox}">
<Setter Property="KeyboardNavigation.TabNavigation" Value="None" />
<Setter Property="FocusVisualStyle" Value="{x:Null}" />
<Setter Property="AllowDrop" Value="true" />
<Setter Property="Template">
<Setter.Value>
<ControlTemplate TargetType="{x:Type TextBox}">
<Grid>
<Border x:Name="Border” BorderThickness="2" SnapsToDevicePixels="True" Padding="2" CornerRadius="2">
<ScrollViewer Margin="0" x:Name="PART_ContentHost" Style="{DynamicResource SimpleTextScrollViewer}" />
</Border>
</Grid>
<ControlTemplate.Triggers>
<Trigger Property="IsEnabled" Value="False">
<Setter Property="Background" Value="{DynamicResource DisabledBackgroundBrush}" TargetName="Border" />
<Setter Property="BorderBrush" Value="{DynamicResource DisabledBackgroundBrush}" TargetName="Border" />
<Setter Property="Foreground" Value="{DynamicResource DisabledForegroundBrush}" />
</Trigger>
</ControlTemplate.Triggers>
</ControlTemplate>
</Setter.Value>
</Setter>
</Style>
Now if you have a TextBox with the Background set to Red you would have the white background but the caret is Cyan. Yoohoo!!!. Notice the missing background property on the Border. Its not being set. That’s where the magic lies.

If you are not creating a new style then you could change the default template of the textbox and remove the background property on the Border.. voila!! … The same trick applies to RichTextBox. You can get the default style from Expresson blend, Snoop tool, or from XamlPadX. And
and as always the styles are attached :)


