Writing BDD style unit tests to verify the MVC based Web API
[Previous post –>Writing a simple implementation of dependency injection in MVC 4 Web API with .NET Framework 4.5]
In my previous blog post, we developed a simple REST based web API that exposes web methods using MVC 4 controller. We also discussed how to implement a simple dependency injection mechanism using the inbuilt IDependencyResolver interface, which may be useful to understand the IoC pattern for academic purposes though the practical implementation inevitably requires a DI framework such as Unity framework by Microsoft Patterns and Practices team! ![]() (Winking for the shameless promotion though it’s among the best out there and we recently utilized it in our latest guidance that shows how to use Microsoft Azure Media Services to build an On-Demand Video Service. And here goes another
(Winking for the shameless promotion though it’s among the best out there and we recently utilized it in our latest guidance that shows how to use Microsoft Azure Media Services to build an On-Demand Video Service. And here goes another ![]() for the latter!
for the latter!
Okay, let’s get back to the topic under discussion before I deviate any further. In this post, first we’ll write a couple of BDD style unit tests to verify the API methods.
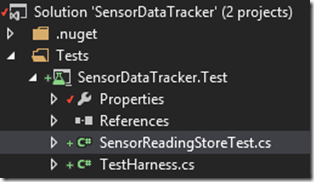
To the solution created in the previous step, add a new solution folder named Test and create a new Unit Test Project named SensorDataTracker.Test under the Test folder:
Rename the default source file UnitTest1.cs to TestHarness.cs:
Replace the code in TestHarness.cs with the following:
namespace SensorDataTracker.Test
{
using System;
using System.Collections.Generic;
using SensorDataTracker.Models;
using SensorDataTracker.Store;
internal static class TestHarness
{
internal static IEnumerable<SensorReading> GenerateAndStoreReadings(
ISensorReadingStore store,
int count,
Func<int, int> genMethod)
{
var readings = new List<SensorReading>();
for (var i = 0; i < count; i++)
{
var sensorReading = new SensorReading { Id = genMethod(i) };
readings.Add(sensorReading);
store.Save(sensorReading);
}
return readings;
}
}
}
As you can see, we’ve created a utility method that generates and store readings. For the sake of brevity, the same method is generating as well as storing the readings though ideally in order to adhere to SRP, you’d like to refactor! The method GenerateAndStoreReadings expects a SensorReadingStore object, a count of readings to generate and a method that acts as the reading generator. A SensorReading is generated and added to a list as well as to a SensorReadingStore and finally the list of readings is returned to the caller.
Now since the harness is in place, we’re ready to add our first unit test. Add a new class to SensorDataTracker.Test project and name it SensorReadingStoreTest.cs as shown below:
Paste the following code in SensorReadingStoreTest.cs file:
namespace SensorDataTracker.Test
{
using System.Collections.Generic;
using System.Linq;
using Microsoft.VisualStudio.TestTools.UnitTesting;
using SensorDataTracker.Models;
using SensorDataTracker.Store;
[TestClass]
public class SensorReadingStoreTest
{
[TestMethod]
public void WhenSavingItemsShouldReturnSincereRepresentationOfTheItems()
{
// Given
var store = new SensorReadingStore();
var readings = TestHarness.GenerateAndStoreReadings(store, 3, i => 2 * i + 1);
// When
var results = store.Get().Results.ToList();
// Then
CollectionAssert.AreEqual(
readings.ToArray(),
results,
Comparer<SensorReading>.Create((x, y) => x.Id.CompareTo(y.Id)));
}
}
}
Carefully examine the language I used while naming the test that self-documents the intent of the test. The test is nicely structured to depict that
given a specific set of initial conditions
when certain operations are performed that triggers a scenario
then specific set of outcomes should be obtained.
The test first creates 3 sensor readings using any random function such as an odd number generation algorithm in this particular case and saves the readings to the store. When readings are obtained from the in memory store they should match with the list of readings returned by the method that generates and stores the sensor readings. Note the use of a Comparer delegate that uses a lambda expression to compare the corresponding ids of two collections of sensor readings, pretty elegant! ![]()
Let’s add another test. Add the following code in SensorReadingStoreTest.cs:
[TestMethod]
public void WhenSecondPageIsRequestedShouldReturnTheSecondPageOfResults()
{
var store = new SensorReadingStore();
const int TwoPages = 2 * SensorReadingStore.PageSize;
for (var i = 0; i < TwoPages; i++)
{
store.Save(new SensorReading() { Id = i, CreateDate = DateTime.Now });
}
var page = store.Get(2);
Assert.AreEqual(SensorReadingStore.PageSize, page.Results.Count());
Assert.AreEqual(SensorReadingStore.PageSize, page.Results.First().Id);
}
Here we’re verifying that on requesting the second page of sensor readings, the test should indeed return the second page. And how do we verify if we’re actually getting the second page? First we initialize a constant integer to double the size of a page e.g. if one page stores 5 readings then TwoPages is initialized to 10. Now we store sensor readings with ids from 0 to 9 in the SensorReadingStore instance and then request the second page of results (ResultPage) from the Web API controller using Get method. And all we’re left to do, is to verify that the number of results and the Id of the first reading in the second page both match the PageSize!
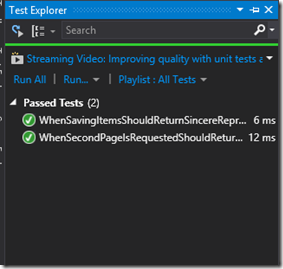
Now let’s run the tests and verify that they are passing. I prefer to run all my tests in the Test Explorer window. To bring up Test Explorer in Visual Studio 2013, choose TEST—>Windows—>Test Explorer from the main menu. Select Run All option in the toolbar of Test Explorer window and you should see something similar to below if all goes well!
That’s it! In the next blog post, we’ll add a Windows Phone client that consumes the Web API so stay tuned. ![]() .
.
[Next Post—>Developing a Windows Phone 8.1 client for the sensor data tracker web API via a Portable Class Library]
Comments
- Anonymous
May 14, 2014
Very interesting, I'm going to have to look at BDD.


