Using the Azure SDK for Java with Eclipse and Maven
This post will show how to leverage various Azure SDKs for Java using Eclipse and Maven. In just a few short steps, you will have a Java application that leverages Azure services.
Background
I have been working with a customer and trying to do demos for them, but I have been doing them all in Visual Studio. It makes things kind of hard to translate when this customer does a bunch of Java development. I thought it would be easy, just download the SDK and start going… but I was stuck on the basics. For instance, the Download the Azure SDK for Java page on the Azure.com site says to download the SDK or use Maven, but I was stuck on how to reference the SDK and use it with my code. With the help of a friend who works for this customer, I was able to get it sorted and start coding against Azure within a few minutes.
For the .NET Crowd - What is Maven?
Realizing that many of my readers come from a Microsoft background, it’s helpful to understand some of the terminology. Maven is similar in many respects to NuGet in that it provides a consistent way to obtain and version packages. It provides a build system to describe your project’s dependencies, similar to MSBuild, and there are Maven templates that will generate projects that have all the dependencies already contained in them, similar to Visual Studio’s project templates.
Setting up Maven
I will use the same Eclipse development environment that I described how to create in a previous blog post, Creating an Eclipse Development Environment for Azure.
The first step is to download Maven from https://maven.apache.org/download.cgi. I downloaded the latest ZIP file.
Extract the contents to a directory. I extracted it directly to the C: drive so I could find it easily later.
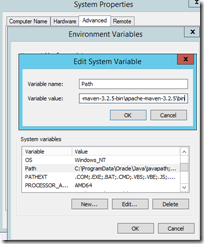
Many blog posts will show examples using the Maven command line. It may be helpful to add Maven to your %PATH% environment variable to make this easier for you in the future (this step is not required).
Finally, you will likely want to use the nice search capability within Eclipse to search for packages instead of having to go to the Central Repository web site and entering those by hand. This tip is courtesy of the article How to enable index downloads in Eclipse for Maven search?
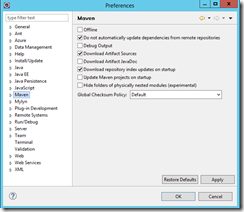
To enable this, go to Window / Preferences / Maven and enable the “Download Artifact Sources” and “Download repository index updates on startup” options.
Once you’ve enabled that, restart Eclipse.
Create a Maven Project in Eclipse
Once Maven is installed, you can use Eclipse to create a new Maven Project. Here you can specify the workspace location or add to a working set. For this example, we leave the defaults.
The next screen shows various Maven archetypes that you can choose. These are project templates with the dependencies already defined in them, similar to the New Project dialog in Visual Studio.
In case you want to create a web project and don’t want to sift through all the non-descript names to divine what’s in them, you can just type “web” to filter to the artifacts that have “web” in the group or artifact ID.
For simplicity, we will use the QuickStart archetype.
The project you are creating is uniquely defined by a group ID, artifact ID, and version, often referred to as GAV (group, artifact, version). For the group ID, I provided the value “com.microsoft.kirkevans”, and the artifact ID “MyHelloWorld”. For the .NET folks, this is similar to the project name and the default namespace. We will accept the default value of “0.0.1-SNAPSHOT” for the version.
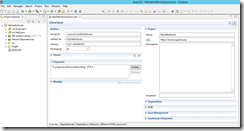
Click Finish, and wait for the project creation to finish. The result is a new project, and there is a “pom.xml” file in the root. This file describes the properties and dependencies for your Maven project.
Click the “Dependencies” tab to see that the only dependency by default is jUnit.
Adding the Azure SDKs to the POM
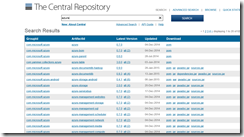
I mentioned before that Maven is kind of like NuGet in that it is a package manager. You can see the various Azure SDKs that are available by going to the Central Repository at https://search.maven.org/ and searching for Azure.
This will show you the GAV – group ID, artifact ID, and version for the package. If you wanted to edit the POM.xml file by hand, you would add a dependency element to the POM.xml using the GAV values:
Code Snippet
- <dependency>
- <groupId>com.microsoft.azure</groupId>
- <artifactId>azure-storage</artifactId>
- <version>2.0.0</version>
- </dependency>
Note that you can also use the source code on GitHub (yes, it’s open source).
There is an easier way to do this. In Eclipse, double-click on the pom.xml file and then go to the Dependencies tab. Click the Add button to add a dependency. In the “Enter groupId, artifactId, or sha1 prefix or pattern” text box, type “azure” to see all the Azure SDKs for Java. Here, I show the azure-storage SDK.
Note that I am using the azure-storage SDK here because that’s what we’ll code against in a little bit. There are packages for DocumentDB, Websites, media, network… pretty much everything in Azure has a library to code against it.
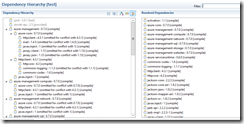
For the .NET developers, this is very similar to adding a NuGet package in Visual Studio. Something else I thought was kind of cool was the ability to see the dependencies and see where a package came from by going to the Hierarchy tab to view the dependency hierarchy.
Add an Azure Storage Account
Using your Azure subscription (don’t have one? You can create a free trial subscription), go to https://portal.azure.com and click the New button in the bottom left corner, then click the “Everything” link.
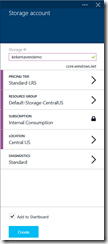
Click “Storage, cache, and backup”, click “Storage”, then click “Create” to create a new storage account.
Change the pricing tier to Locally Redundant Storage (for this demo, we don’t need our data replicated within the zone or geographically), choose a resource group, and optionally turn diagnostics on (not required, but interesting to look at).
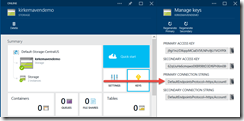
Once it is created, click the newly created storage account and then click “Keys”. Copy the Primary Connection String.
Using the Azure Storage SDK
Now that you’ve added the package and have a storage account, we are ready for coding and debugging. I right-click the project and add a class. The source folder is filled in for me as “MyHelloWorld/src/main/java”. The package is also filled in as “com.microsoft.kirkevans.MyHelloWorld”. I simply provide a name for the class, “TableStorageDemo”.
Once the class is created, I add my code that will create a table in Azure.
TableStorageDemo Class
- package com.microsoft.kirkevans.MyHelloWorld;
- //Include the following imports to use table APIs
- import com.microsoft.azure.storage.*;
- import com.microsoft.azure.storage.table.*;
- import com.microsoft.azure.storage.table.TableQuery.*;
- public class TableStorageDemo
- {
- public static void CreateTable(String tableName, String storageConnectionString) throws Exception
- {
- try
- {
- // Retrieve storage account from connection-string.
- CloudStorageAccount storageAccount =
- CloudStorageAccount.parse(storageConnectionString);
- // Create the table client.
- CloudTableClient tableClient = storageAccount.createCloudTableClient();
- // Create the table if it doesn't exist.
- CloudTable cloudTable = new CloudTable(tableName,tableClient);
- cloudTable.createIfNotExists();
- }
- catch (Exception e)
- {
- // Output the stack trace.
- e.printStackTrace();
- // Toss the exception back to the caller
- throw(e);
- }
- }
- }
We will now go into Eclipse and expand the src/main/java node and edit the App.java class.
I replace the code with the following, replacing the connection string with the value we copied from the Azure portal previously.
App.java
- package com.microsoft.kirkevans.MyHelloWorld;
- import java.io.*;
- /**
- * Hello world!
- *
- */
- public class App
- {
- public static void main( String[] args )
- {
- String connectionString =
- "DefaultEndpointsProtocol=https;" +
- "AccountName=kirkemavendemo;" +
- "AccountKey=sLBVY7z423SeQJKY0TyrdglY9l6LMaUwkLiNVjt+ysbD1i/ZePDTfXUmOrlSfFoBw5/SgjlIb/1ijHk7B2AzZw==";
- try
- {
- TableStorageDemo.CreateTable("testTable", connectionString);
- System.out.println( "Table created!" );
- }
- catch (Exception e)
- {
- e.printStackTrace();
- }
- System.out.println("Press ENTER to terminate");
- BufferedReader buffer=new BufferedReader(new InputStreamReader(System.in));
- try
- {
- buffer.readLine();
- }
- catch (IOException e)
- {
- e.printStackTrace();
- }
- }
- }
Run the application (Run / Run, or Ctrl+F11), and you should see the output:
Now go back to the Azure Management Portal and look at your storage account. You will see that there is a table named “testable” created!
For More Information
Sign up for free and get $200 to spend on all Azure services
How to enable index downloads in Eclipse for Maven search?
Java SDK source code on GitHub
Microsoft Azure Java Developer Center – documentation, samples, and more


