Using Portable Class Libraries to Reuse Models and ViewModels
This post will show you how to create a portable class library (PCL) to reuse logic across client applications. We show how to reuse the model and view model in various Windows platforms in this post, and show how to reuse it within an Android application in the post Build Android Apps With Xamarin Using Portable Class Libraries. We will look at how the newly announced Universal Apps fit into this picture in a subsequent post.
Background
My team built a solution to help jumpstart custom development projects that involve mobile workers, showing how to leverage Microsoft Azure as the center of gravity for everything. We built apps using ASP.NET MVC, Windows Phone 8, Windows 8 Store Apps, and we even used Xamarin to build iOS and Android apps. All of these clients talk to Web API endpoints hosted in Azure, are authenticated with Windows Azure Active Directory, and leverage various services such as Service Bus and Push Notifications.
One of the challenges with building all of these apps is trying to avoid writing the same thing over and over, reusing logic when possible. That’s where using portable class libraries provides a huge advantage.
The code samples are based off the MSDN article Using Portable Class Library with Model-View-View Model. This post simply adds a few things on top of that sample, including demonstrations of different views that reference a PCL.
Portable Class Libraries
Like many of you, I haven’t spent much time doing client development over the past few years, I have been strictly doing web development, primarily with SharePoint. A key concept you may not already be familiar with is that of a Portable Class Library (PCL). From MSDN:
The .NET Framework Portable Class Library project type in Visual Studio helps you build cross-platform apps and libraries for Microsoft platforms quickly and easily.
Portable class libraries can help you reduce the time and costs of developing and testing code. Use this project type to write and build portable .NET Framework assemblies, and then reference those assemblies from apps that target multiple platforms such as Windows and Windows Phone.
[via https://msdn.microsoft.com/en-us/library/vstudio/gg597391(v=vs.100).aspx]
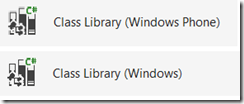
Each platform has the concept of a class library that provides the implementation for each type of platform.
If I’m creating an app for Windows 8.1 and an app for Windows Phone 8, I don’t want to have to write that code twice. I’d rather write it once and reference it from each project. That’s exactly what a PCL provides you. This helps you to create a single library of code that is shared across multiple platforms. Think about this for a second, because it’s pretty cool. I can write a library of code that can be written once and referenced from my Windows Phone 8, Windows 8.1 app, or even an app written with Xamarin.
When you create a PCL, you choose the targets for your library, which determines the baseline functionality that you want to apply across platforms.
This PCL can then be referenced from a project that targets .NET 4.5 for desktop apps, Windows 8 or Windows 8.1 store apps, Windows Phone apps for WP8 or WP8.1 that use Silverlight, or even Xamarin apps that target Android or iOS.
Write the code once and reference it across multiple project types. To demonstrate the power behind this model, I will show an example of a PCL that enables reuse of models, repositories, and view models. The platform-specific implementation is implemented in the views for each platform, which results in nearly zero code in each platform implementation. The project structure shows the library of reusable code and the three platform implementations that reuse this code.
Reusing Models
The easiest thing to reuse in a PCL library is the model. That’s typically a class that provides property getters and setters that model the data that you want to use. A simple example is a Customer class:
Code Snippet
- using System;
- using System.ComponentModel;
- namespace ReusableLibrary
- {
- public class Customer : INotifyPropertyChanged
- {
- public event PropertyChangedEventHandler PropertyChanged;
- private string _fullName;
- private string _phone;
- public int CustomerID { get; set; }
- public string FullName
- {
- get
- {
- return _fullName;
- }
- set
- {
- _fullName = value;
- OnPropertyChanged("FullName");
- }
- }
- public string Phone
- {
- get
- {
- return _phone;
- }
- set
- {
- _phone = value;
- OnPropertyChanged("Phone");
- }
- }
- protected virtual void OnPropertyChanged(string propName)
- {
- if (PropertyChanged != null)
- {
- PropertyChanged(this, new PropertyChangedEventArgs(propName));
- }
- }
- }
- }
Notice that we can do more than just primitive types here, we can also use the INotifyPropertyChanged interface to notify when a property changes. Also notice the reuse of the PropertyChangedEventArgs type that can be reused across all implementations.
Reusing a Repository
This one gets a little harder. Reusing a repository is completely possible so long as the types that you are using are common across all implementations. As an example, we have a CustomerRepository class that initializes with a few items.
Code Snippet
- using System;
- using System.Collections.Generic;
- using System.Linq;
- namespace ReusableLibrary
- {
- public class CustomerRepository
- {
- private List<Customer> _customers;
- public CustomerRepository()
- {
- _customers = new List<Customer>
- {
- new Customer(){ CustomerID = 1, FullName="Dana Birkby", Phone="394-555-0181"},
- new Customer(){ CustomerID = 2, FullName="Adriana Giorgi", Phone="117-555-0119"},
- new Customer(){ CustomerID = 3, FullName="Wei Yu", Phone="798-555-0118"}
- };
- }
- public List<Customer> GetCustomers()
- {
- return _customers;
- }
- public void UpdateCustomer(Customer SelectedCustomer)
- {
- Customer customerToChange = _customers.Single(
- c => c.CustomerID == SelectedCustomer.CustomerID);
- customerToChange = SelectedCustomer;
- }
- }
- }
Admittedly, this is a simplistic scenario that might not be applicable. For instance, your repository class might need to grab data from a database, in which case the classes to do so might not be available on all platforms. In this case, you might need to inject the platform-specific implementation into the repository, and each platform deals with the specifics of how to obtain the data. For now, we’ll stick with our simple case of returning a list of customer objects.
Reusing ViewModels
Here’s where it gets really tricky. Defining ViewModels can be difficult based on differences between platforms. For instance, handling navigation can be different between platforms, even between Windows Phone 8 and Windows Store applications. Handling those differences requires that you create those abstractions yourself. For a simple example of reusing the ViewModels, we first define a base class.
Code Snippet
- using System;
- using System.ComponentModel;
- namespace ReusableLibrary
- {
- public abstract class ViewModelBase : INotifyPropertyChanged
- {
- public event PropertyChangedEventHandler PropertyChanged;
- protected virtual void OnPropertyChanged(string propName)
- {
- if (PropertyChanged != null)
- {
- PropertyChanged(this, new PropertyChangedEventArgs(propName));
- }
- }
- }
- }
This base class provides the base implementation for handling property changed events in the ViewModel. The responsibility of the view model is to provide the glue between the view and the model, which is typically done through events and commands. When a property is changed, we raise an event. We also want to provide the ability for our view model to respond to commands, such as a button is being clicked. We provide this through a command class called RelayCommand that implements the ICommand interface, which is typical when using MVVM.
Code Snippet
- using System;
- using System.Windows.Input;
- namespace ReusableLibrary
- {
- public class RelayCommand : ICommand
- {
- private readonly Action _handler;
- private bool _isEnabled;
- public RelayCommand(Action handler)
- {
- _handler = handler;
- }
- public bool IsEnabled
- {
- get { return _isEnabled; }
- set
- {
- if (value != _isEnabled)
- {
- _isEnabled = value;
- if (CanExecuteChanged != null)
- {
- CanExecuteChanged(this, EventArgs.Empty);
- }
- }
- }
- }
- public bool CanExecute(object parameter)
- {
- return IsEnabled;
- }
- public event EventHandler CanExecuteChanged;
- public void Execute(object parameter)
- {
- _handler();
- }
- }
- }
We can then define a view model that derives from the base class that wires up the ICommand interface implementation.
Code Snippet
- using System;
- using System.Collections.Generic;
- using System.Linq;
- using System.Text;
- using System.Threading.Tasks;
- namespace ReusableLibrary
- {
- public class CustomerViewModel : ViewModelBase
- {
- private List<Customer> _customers;
- private Customer _currentCustomer;
- private CustomerRepository _repository;
- public CustomerViewModel()
- {
- _repository = new CustomerRepository();
- _customers = _repository.GetCustomers();
- WireCommands();
- }
- private void WireCommands()
- {
- UpdateCustomerCommand = new RelayCommand(UpdateCustomer);
- }
- public RelayCommand UpdateCustomerCommand
- {
- get;
- private set;
- }
- public List<Customer> Customers
- {
- get { return _customers; }
- set { _customers = value; }
- }
- public Customer CurrentCustomer
- {
- get
- {
- return _currentCustomer;
- }
- set
- {
- if (_currentCustomer != value)
- {
- _currentCustomer = value;
- OnPropertyChanged("CurrentCustomer");
- UpdateCustomerCommand.IsEnabled = true;
- }
- }
- }
- public void UpdateCustomer()
- {
- _repository.UpdateCustomer(CurrentCustomer);
- OnPropertyChanged("CurrentCustomer");
- UpdateCustomerCommand.IsEnabled = false;
- }
- }
- }
Our view model can now respond to commands and notify any listeners when a property is changed. This is all typical MVVM plumbing so far, but the key point is that this is all implemented within a single PCL library that can be reused across platforms.
Defining a View for WPF
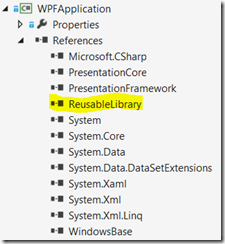
OK, let’s start to show the payoff. We can now create a WPF application that references the PCL library.
I generated a blank WPF application and then changed the MainWindow.xaml to bind to the library.
Code Snippet
- <Window x:Class="WPFApplication.MainWindow"
- xmlns="https://schemas.microsoft.com/winfx/2006/xaml/presentation"
- xmlns:x="https://schemas.microsoft.com/winfx/2006/xaml"
- xmlns:viewModels="clr-namespace:ReusableLibrary;assembly=ReusableLibrary"
- Title="MainWindow"
- Height="350"
- Width="525">
- <Window.Resources>
- <viewModels:CustomerViewModel x:Key="ViewModel" />
- </Window.Resources>
- <Grid DataContext="{Binding Source={StaticResource ViewModel}}">
- <Grid.ColumnDefinitions>
- <ColumnDefinition></ColumnDefinition>
- <ColumnDefinition></ColumnDefinition>
- </Grid.ColumnDefinitions>
- <Grid.RowDefinitions>
- <RowDefinition Height="Auto"></RowDefinition>
- <RowDefinition Height="Auto"></RowDefinition>
- <RowDefinition Height="Auto"></RowDefinition>
- <RowDefinition Height="Auto"></RowDefinition>
- <RowDefinition Height="Auto"></RowDefinition>
- </Grid.RowDefinitions>
- <TextBlock Height="23"
- Margin="5"
- HorizontalAlignment="Right"
- Grid.Column="0"
- Grid.Row="0"
- Name="textBlock2"
- Text="Select a Customer:"
- VerticalAlignment="Top" />
- <ComboBox Height="23"
- HorizontalAlignment="Left"
- Grid.Column="1"
- Grid.Row="0"
- Name="CustomersComboBox"
- VerticalAlignment="Top"
- Width="173"
- DisplayMemberPath="FullName"
- SelectedItem="{Binding Path=CurrentCustomer, Mode=TwoWay}"
- ItemsSource="{Binding Path=Customers}" />
- <TextBlock Height="23"
- Margin="5"
- HorizontalAlignment="Right"
- Grid.Column="0"
- Grid.Row="1"
- Name="textBlock4"
- Text="Customer ID" />
- <TextBlock Height="23"
- Margin="5"
- HorizontalAlignment="Right"
- Grid.Column="0"
- Grid.Row="2"
- Name="textBlock5"
- Text="Name" />
- <TextBlock Height="23"
- Margin="5"
- HorizontalAlignment="Right"
- Grid.Column="0"
- Grid.Row="3"
- Name="textBlock9"
- Text="Phone" />
- <TextBlock Height="23"
- HorizontalAlignment="Left"
- Grid.Column="1"
- Grid.Row="1"
- Name="CustomerIDTextBlock"
- Text="{Binding ElementName=CustomersComboBox, Path=SelectedItem.CustomerID}" />
- <TextBox Height="23"
- HorizontalAlignment="Left"
- Grid.Column="1"
- Grid.Row="2"
- Width="219"
- Text="{Binding Path=CurrentCustomer.FullName, Mode=TwoWay}" />
- <TextBox Height="23"
- HorizontalAlignment="Left"
- Grid.Column="1"
- Grid.Row="3"
- Width="219"
- Text="{Binding Path=CurrentCustomer.Phone, Mode=TwoWay}" />
- <Button Name="UpdateButton"
- Command="{Binding UpdateCustomerCommand}"
- Content="Update"
- Height="40"
- Grid.Column="0"
- Grid.Row="4"
- VerticalAlignment="Top"
- HorizontalAlignment="Center"
- Width="80"
- Grid.ColumnSpan="2"
- Margin="10,10,10,10" />
- </Grid>
- </Window>
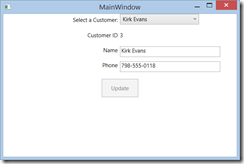
I know all that XAML looks intimidating, but it looks like this when it runs.
What’s even better is the code-behind for the MainWindow.xaml page. I offer it here in its entirety.
There’s no databinding code, no code for a button click event, there’s just the single call to InitializeComponent and that’s it. The view is entirely in XAML, and the code provides two-way databinding to the view model, which in turn changes properties of the model. When the model is updated, it notifies the view of the change, and the view responds accordingly. To demonstrate, I change the customer’s name to “Kirk Evans’ and click the update button, and the model is changed and reflected in the UI.
Still not seeing the payoff? Let’s create a Windows Phone app.
Defining a View for Windows Phone
Now we’ll create a Windows Phone project that references our PCL.
The Windows Phone 8 app contains a single page, MainPage.xaml. First, let’s look at its code-behind. I present the code-behind in its entirety.
I hope you get the point by now that there’s no button1_click, there’s no databinding code, all of that implementation is contained completely within the view, which is the XAML for the MainPage.xaml.
Code Snippet
- <phone:PhoneApplicationPage x:Class="WP8App.MainPage"
- xmlns="https://schemas.microsoft.com/winfx/2006/xaml/presentation"
- xmlns:x="https://schemas.microsoft.com/winfx/2006/xaml"
- xmlns:phone="clr-namespace:Microsoft.Phone.Controls;assembly=Microsoft.Phone"
- xmlns:shell="clr-namespace:Microsoft.Phone.Shell;assembly=Microsoft.Phone"
- xmlns:d="https://schemas.microsoft.com/expression/blend/2008"
- xmlns:mc="https://schemas.openxmlformats.org/markup-compatibility/2006"
- xmlns:viewModels="clr-namespace:ReusableLibrary;assembly=ReusableLibrary"
- mc:Ignorable="d"
- FontFamily="{StaticResource PhoneFontFamilyNormal}"
- FontSize="{StaticResource PhoneFontSizeNormal}"
- Foreground="{StaticResource PhoneForegroundBrush}"
- SupportedOrientations="Portrait"
- Orientation="Portrait"
- shell:SystemTray.IsVisible="True">
- <phone:PhoneApplicationPage.Resources>
- <viewModels:CustomerViewModel x:Key="ViewModel" />
- </phone:PhoneApplicationPage.Resources>
- <!--LayoutRoot is the root grid where all page content is placed-->
- <Grid x:Name="LayoutRoot"
- Background="Transparent">
- <Grid.RowDefinitions>
- <RowDefinition Height="Auto" />
- <RowDefinition Height="*" />
- </Grid.RowDefinitions>
- <!--TitlePanel contains the name of the application and page title-->
- <StackPanel x:Name="TitlePanel"
- Grid.Row="0"
- Margin="12,17,0,28">
- <TextBlock Text="MY PHONE APPLICATION"
- Style="{StaticResource PhoneTextNormalStyle}"
- Margin="12,0" />
- <TextBlock Text="Main Page"
- Margin="9,-7,0,0"
- Style="{StaticResource PhoneTextTitle1Style}" />
- </StackPanel>
- <!--ContentPanel - place additional content here-->
- <Grid x:Name="ContentPanel"
- DataContext="{Binding Source={StaticResource ViewModel}}"
- Grid.Row="1"
- Margin="12,0,12,0">
- <Grid.ColumnDefinitions>
- <ColumnDefinition></ColumnDefinition>
- <ColumnDefinition></ColumnDefinition>
- </Grid.ColumnDefinitions>
- <Grid.RowDefinitions>
- <RowDefinition Height="Auto"></RowDefinition>
- <RowDefinition Height="Auto"></RowDefinition>
- <RowDefinition Height="Auto"></RowDefinition>
- <RowDefinition Height="Auto"></RowDefinition>
- <RowDefinition Height="Auto"></RowDefinition>
- </Grid.RowDefinitions>
- <TextBlock Name="textBlock2"
- Height="23"
- Margin="10,10,10,10"
- HorizontalAlignment="Right"
- Grid.Column="0"
- Grid.Row="0"
- Text="Select a Customer:"
- VerticalAlignment="Top"
- Width="164" />
- <ListBox Name="CustomersComboBox"
- Margin="10,10,10,10"
- HorizontalAlignment="Left"
- Grid.Column="1"
- Grid.Row="0"
- VerticalAlignment="Top"
- DisplayMemberPath="FullName"
- SelectedItem="{Binding Path=CurrentCustomer, Mode=TwoWay}"
- ItemsSource="{Binding Path=Customers}" />
- <TextBlock Name="textBlock4"
- HorizontalAlignment="Right"
- Grid.Column="0"
- Grid.Row="1"
- Text="Customer ID"
- Margin="10,10,10,10" />
- <TextBlock Margin="10,10,10,10"
- HorizontalAlignment="Right"
- Grid.Column="0"
- Grid.Row="2"
- Name="textBlock5"
- Text="Name" />
- <TextBlock Margin="10,10,10,10"
- HorizontalAlignment="Right"
- Grid.Column="0"
- Grid.Row="3"
- Name="textBlock9"
- Text="Phone" />
- <TextBlock HorizontalAlignment="Left"
- Grid.Column="1"
- Grid.Row="1"
- Name="CustomerIDTextBlock"
- Text="{Binding ElementName=CustomersComboBox, Path=SelectedItem.CustomerID}"
- Margin="10,10,10,10" />
- <TextBox HorizontalAlignment="Left"
- Grid.Column="1"
- Grid.Row="2"
- Width="219"
- Text="{Binding Path=CurrentCustomer.FullName, Mode=TwoWay}" />
- <TextBox HorizontalAlignment="Left"
- Grid.Column="1"
- Grid.Row="3"
- Width="219"
- Text="{Binding Path=CurrentCustomer.Phone, Mode=TwoWay}" />
- <Button Command="{Binding UpdateCustomerCommand}"
- Content="Update"
- Height="95"
- HorizontalAlignment="Right"
- Grid.Column="0"
- Grid.Row="4"
- Name="UpdateButton"
- VerticalAlignment="Top"
- Width="180"
- Grid.ColumnSpan="2"
- Margin="0,0,123,-72" />
- </Grid>
- </Grid>
- </phone:PhoneApplicationPage>
Again, it’s kind of hard to picture what this looks like just looking at the XAML, so we run the application to see that we’ve created a completely different view of the data yet still leverage the exact same PCL code.
OK, hopefully by now it’s starting to make sense. We simply define different views per platform, providing optimal code reuse.
Defining a View for a Windows 8 Store App
Now that we’ve seen it’s completely possible to just define a view for each platform (so far, WPF and Windows Phone), let’s create one more just to show off. This time, we’ll create a Windows 8 app. Just like before, we reference the PCL.
We now inspect the MainPage.xaml and see that we can, again, create a view that is platform-specific while referencing the view model, model, and repository classes from the PCL.
Code Snippet
- <Page x:Class="WindowsStoreApp.MainPage"
- xmlns="https://schemas.microsoft.com/winfx/2006/xaml/presentation"
- xmlns:x="https://schemas.microsoft.com/winfx/2006/xaml"
- xmlns:local="using:WindowsStoreApp"
- xmlns:d="https://schemas.microsoft.com/expression/blend/2008"
- xmlns:mc="https://schemas.openxmlformats.org/markup-compatibility/2006"
- xmlns:mylib="using:ReusableLibrary"
- mc:Ignorable="d"
- FontSize="30">
- <StackPanel Background="{ThemeResource ApplicationPageBackgroundThemeBrush}">
- <TextBlock x:Name="pageTitle"
- Text="My Store Application"
- Style="{StaticResource HeaderTextBlockStyle}"
- IsHitTestVisible="false"
- TextWrapping="NoWrap"
- VerticalAlignment="Bottom"
- Margin="0,0,30,40" />
- <Grid>
- <Grid.DataContext>
- <mylib:CustomerViewModel />
- </Grid.DataContext>
- <Grid.ColumnDefinitions>
- <ColumnDefinition></ColumnDefinition>
- <ColumnDefinition></ColumnDefinition>
- </Grid.ColumnDefinitions>
- <Grid.RowDefinitions>
- <RowDefinition Height="Auto"></RowDefinition>
- <RowDefinition Height="Auto"></RowDefinition>
- <RowDefinition Height="Auto"></RowDefinition>
- <RowDefinition Height="Auto"></RowDefinition>
- <RowDefinition Height="Auto"></RowDefinition>
- </Grid.RowDefinitions>
- <TextBlock Name="textBlock2"
- HorizontalAlignment="Right"
- Grid.Column="0"
- Grid.Row="0"
- Margin="10,10,10,10"
- Text="Select a Customer:" />
- <ComboBox Name="CustomersComboBox"
- HorizontalAlignment="Left"
- Grid.Column="1"
- Grid.Row="0"
- VerticalAlignment="Top"
- Width="219"
- Margin="10,10,10,10"
- DisplayMemberPath="FullName"
- SelectedItem="{Binding Path=CurrentCustomer, Mode=TwoWay}"
- ItemsSource="{Binding Path=Customers}" />
- <TextBlock Name="textBlock4"
- HorizontalAlignment="Right"
- Grid.Column="0"
- Grid.Row="1"
- Margin="10,10,10,10"
- Text="Customer ID" />
- <TextBlock Name="textBlock5"
- HorizontalAlignment="Right"
- Grid.Column="0"
- Grid.Row="2"
- Margin="10,10,10,10"
- Text="Name" />
- <TextBlock Name="textBlock9"
- HorizontalAlignment="Right"
- Grid.Column="0"
- Grid.Row="3"
- Margin="10,10,10,10"
- Text="Phone" />
- <TextBlock Name="CustomerIDTextBlock"
- HorizontalAlignment="Left"
- Grid.Column="1"
- Grid.Row="1"
- Margin="10,10,10,10"
- Text="{Binding ElementName=CustomersComboBox, Path=SelectedItem.CustomerID}" />
- <TextBox HorizontalAlignment="Left"
- Grid.Column="1"
- Grid.Row="2"
- Width="219"
- Margin="10,10,10,10"
- Text="{Binding Path=CurrentCustomer.FullName, Mode=TwoWay}" />
- <TextBox HorizontalAlignment="Left"
- Grid.Column="1"
- Grid.Row="3"
- Width="219"
- Margin="10,10,10,10"
- Text="{Binding Path=CurrentCustomer.Phone, Mode=TwoWay}" />
- <Button Name="UpdateButton"
- Command="{Binding UpdateCustomerCommand}"
- Content="Update"
- Height="95"
- Grid.Column="1"
- Grid.Row="4"
- VerticalAlignment="Top"
- Width="180"
- Grid.ColumnSpan="2"
- Margin="10,10,10,10" />
- </Grid>
- </StackPanel>
- </Page>
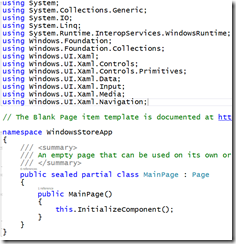
If we inspect the code-behind for this view, we’ll see that there is zero additional code needed. Again, I present the code in all its bareness and glory.
Yet when we run the application, we provide a completely different view over the same exact view model, which then provides the interactions with the model.
By simply leveraging bindings to the view model, we can provide the platform-specific implementation (the view) that interacts with the platform-independent components in the PCL.
The next post in this series shows how to reuse PCL libraries to build an Android app using Xamarin.Android integration with Visual Studio 2013. A future post will take a closer look at the newly announced Universal Apps and see how that plays a part in the whole cross-platform story.
For More Information
Sharing Code between Windows Store and Windows Phone App (PCL + MVVM + OData)
Using Portable Class Library with Model-View-View Model
Build Android Apps With Xamarin Using Portable Class Libraries


