Using OpenID Connect with SharePoint Apps
This post will show how to authenticate a user using OpenID Connect in a SharePoint provider hosted app without prompting the user for additional credentials.
Background
This post is part of a series on building a SharePoint app that communicate with services protected by Azure AD.
- Part 1 - An Architecture for SharePoint Apps That Call Other Services
- Part 2 - Using OpenID Connect with SharePoint Apps (this post)
- Part 3 – Call O365 Exchange Online API from a SharePoint App
- Part 4 – A Sample SharePoint App That Calls a Custom Web API
- Part 5 - The API Economy: Consuming Our Web API from a Single Page App
I very often get questions about identity and authentication using SharePoint O365 apps and Azure AD in general. One of the more popular architectural questions is how to access Exchange Online from an O365 SharePoint provider-hosted app. In my previous post, I showed An Architecture for SharePoint Apps That Call Other Services and pointed out that this could be achieved by splitting the problem into two components: there is a SharePoint app, and an app that calls the O365 Exchange API.
The way to do this is to authenticate your app’s user using the same directory that they are using for SharePoint Online. The first step is to authenticate the user using OpenID Connect.
Your SharePoint App Is Anonymous By Default
When you create a new low-trust app for SharePoint, the app does not perform any authentication. The app is anonymous. This is a revelation for a lot of developers, and can be confusing for IT Pros. I create a new provider-hosted app, give it the URL of my SharePoint Online site, and click OK. Then look at the properties for the web application, notice it is not using Windows Authentication and anonymous is enabled.
To prove this, I am going to change the code in the About action of the Home controller.
HomeController.About
- public ActionResult About()
- {
- if(User.Identity.IsAuthenticated)
- {
- ViewBag.Message = "Welcome " + User.Identity.Name;
- }
- else
- {
- ViewBag.Message = "We are Anonymous. We are Legion.";
- }
- return View();
- }
If I launch the app, I can see that it identifies the user by querying SharePoint.
Now click the About link in the menu where we check the User.Identity.IsAuthenticated… we are not authenticated.
The default page (actually the Home controller’s Index action) uses the SharePointContextFilter, while the About action does not use that filter. Try to view the default page of the app without going to SharePoint first, and you’ll see a message that an error occurred, instructing you to launch the application from SharePoint first.
Yes, the app is available to anonymous users, but an anonymous user can’t do anything with the default page without the user launching the app first from SharePoint. Our index controller action uses the SharePointContextFilter attribute to ensure there is a valid context token. The app doesn’t authenticate the user, it only verifies that SharePoint passed a valid context token, and SharePoint won’t pass a valid context token without the user having first logged into SharePoint.
The SharePointContext code then takes care of creating an access token for me that can only be used to call SharePoint using CSOM or REST. The token can’t be used to call other services such as the O365 Exchange Online API. To enable access to a user’s Exchange Online information, we have to authenticate the user in order to authenticate the user and obtain a token that can be used with the O365 Exchange Online API.
Let’s show how to authenticate the users.
Authenticating Your Users
I am going to authenticate the user using OpenID Connect. This is a protocol built on top of OAuth 2.0 that can authenticate the user and obtain an access token, and we will obtain that access token from the same Azure Active Directory that my O365 tenant is using. We’ll do that by managing the directory using the Azure Management Portal. Just go to the O365 administration site and click on the Admin / Azure AD link then follow the directions to manage the directory.
If you have an existing Azure subscription, you can choose to manage an existing directory as well. I show the steps how to do that in my post Calling O365 APIs from your Web API on behalf of a user.
Once you have the directory open in the Azure management portal (https://manage.windowsazure.com), go to the Applications tab for your directory. The O365 Exchange Online and O365 SharePoint Online applications are already present. Click Add to create a new application.
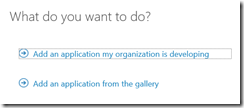
Choose “Add an application my organization is developing”.
Give the app a name, such as “MyProviderHostedApp” and select “Web Application and/or Web API”.
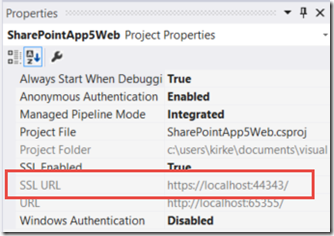
On the next screen, provide the sign-in URL for your application and the app identifier. You can find the sign-in value in your SharePoint app project’s properties in the SSL URL property.
The app identifier is a URI that you choose.
Click OK, and you now have an app registered with Azure Active Directory, and in the same O365 tenant that your SharePoint provider hosted app will communicate with.
Go to the Configure tab for your app.
Go to the NuGet Package Manager Console (Tools / NuGet Package Manager / Package Manager Console). Change the project to the web project:
Now add the following packages:
 Install-Package Microsoft.Owin.Security.OpenIdConnect
Install-Package Microsoft.Owin.Security.Cookies
Install-Package Microsoft.Owin.Host.SystemWeb
The OWIN middleware that enables OpenID Connect authentication uses HTTP cookies. There is a problem in the implementation where cookies are not added to the HTTP response. The workaround is described in the post . We add a class to our project, SystemWebCookieManager.
SystemWebCookieManager
- using Microsoft.Owin;
- using Microsoft.Owin.Infrastructure;
- using System;
- using System.Web;
- namespace SharePointApp5Web.Utils
- {
- public class SystemWebCookieManager : ICookieManager
- {
- public string GetRequestCookie(IOwinContext context, string key)
- {
- if (context == null)
- {
- throw new ArgumentNullException("context");
- }
- var webContext = context.Get<HttpContextBase>(typeof(HttpContextBase).FullName);
- var cookie = webContext.Request.Cookies[key];
- return cookie == null ? null : cookie.Value;
- }
- public void AppendResponseCookie(IOwinContext context, string key, string value, CookieOptions options)
- {
- if (context == null)
- {
- throw new ArgumentNullException("context");
- }
- if (options == null)
- {
- throw new ArgumentNullException("options");
- }
- var webContext = context.Get<HttpContextBase>(typeof(HttpContextBase).FullName);
- bool domainHasValue = !string.IsNullOrEmpty(options.Domain);
- bool pathHasValue = !string.IsNullOrEmpty(options.Path);
- bool expiresHasValue = options.Expires.HasValue;
- var cookie = new HttpCookie(key, value);
- if (domainHasValue)
- {
- cookie.Domain = options.Domain;
- }
- if (pathHasValue)
- {
- cookie.Path = options.Path;
- }
- if (expiresHasValue)
- {
- cookie.Expires = options.Expires.Value;
- }
- if (options.Secure)
- {
- cookie.Secure = true;
- }
- if (options.HttpOnly)
- {
- cookie.HttpOnly = true;
- }
- webContext.Response.AppendCookie(cookie);
- }
- public void DeleteCookie(IOwinContext context, string key, CookieOptions options)
- {
- if (context == null)
- {
- throw new ArgumentNullException("context");
- }
- if (options == null)
- {
- throw new ArgumentNullException("options");
- }
- AppendResponseCookie(
- context,
- key,
- string.Empty,
- new CookieOptions
- {
- Path = options.Path,
- Domain = options.Domain,
- Expires = new DateTime(1970, 1, 1, 0, 0, 0, DateTimeKind.Utc),
- });
- }
- }
- }
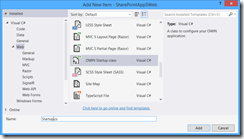
Now that we have the ability to preserve the cookies in the response, we can add the OWIN middleware to handle OpenID Connect authentication. Right-click the web project and choose Add / New Item and choose OWIN Startup Class. Name it Startup.cs.
To be consistent with the rest of Visual Studio’s tooling, we are going to change this to a partial class that calls a method “ConfigureAuth” that we’ll code in a moment.
Startup.cs
- using System;
- using System.Threading.Tasks;
- using Microsoft.Owin;
- using Owin;
- [assembly: OwinStartup(typeof(SharePointApp5Web.Startup))]
- namespace SharePointApp5Web
- {
- public partial class Startup
- {
- public void Configuration(IAppBuilder app)
- {
- ConfigureAuth(app);
- }
- }
- }
Go to the App_Start folder for your web application and add a new class named Startup.Auth.cs.
This is going to be a partial class, so change the namespace to match the namespace of your Startup.cs class, add some using statements, and add the shell of the ConfigureAuth method.
Startup.Auth.cs
- using Microsoft.Owin.Security;
- using Microsoft.Owin.Security.Cookies;
- using Microsoft.Owin.Security.OpenIdConnect;
- using Owin;
- namespace SharePointApp5Web
- {
- public partial class Startup
- {
- public void ConfigureAuth(IAppBuilder app)
- {
- }
- }
- }
The ConfigureAuth code is where the OWIN middleware will handle the OpenID Connect authentication for the ASP.NET MVC web application.
ConfigureAuth
- public void ConfigureAuth(IAppBuilder app)
- {
- app.SetDefaultSignInAsAuthenticationType(CookieAuthenticationDefaults.AuthenticationType);
- app.UseCookieAuthentication(new CookieAuthenticationOptions
- {
- CookieManager = new SystemWebCookieManager()
- });
- string clientID = ConfigurationManager.AppSettings["ida:ClientID"];
- string aadInstance = ConfigurationManager.AppSettings["ida:AADInstance"];
- string tenant = ConfigurationManager.AppSettings["ida:Tenant"];
- string authority = string.Format(CultureInfo.InvariantCulture, aadInstance, tenant);
- app.UseOpenIdConnectAuthentication(
- new OpenIdConnectAuthenticationOptions
- {
- ClientId = clientID,
- Authority = authority
- });
- }
The code reads settings from the Web.Config file. Notice that we still have the ClientId and ClientSecret that the SharePoint app uses, but that is separate from the ClientID that identifies our app to Azure AD.
Web.config appSettings
<!-- SharePoint apps OAuth-->
<add key="ClientId" value="90e6cd36-fd8b-4eda-8123-506398fdf5bc" />
<add key="ClientSecret" value="nUOcOdsalkjsdfglkjsaweoip5ZFhLZMgUw=" />
<!-- Azure AD OAuth -->
<add key="ida:ClientID" value="77d50962-3a4d-461e-976b-cacad345a11c" />
<add key="ida:AADInstance" value="https://login.windows.net/{0}" />
<add key="ida:Tenant" value="kirke3.onmicrosoft.com" />
Change the ida:ClientID value to the Client ID of your app (found in the Azure Management portal on the Configure tab for the application you registered previously). Change the “ida:Tenant” to match the name of your tenant.
The ida:AADInstance configuration indicates which instance of Azure you are using. If you are a user in China, the AAD instance would be different.
The last bit of magic is to add the Authorize attribute to the HomeController’s About action. This ensures that only authenticated users can access the About method of the HomeController class.
You can add the Authorize attribute to the class instead of a single action, ensuring that anybody accessing the app is authenticated. We add it only to the About method here.
Testing… Testing… Is this thing on?
First, let’s test that authentication now works. Hit F5 to run the app. I am asked to log in to O365 in order to access my app.
I am then redirected to my app… and of course no further logon occurs because we haven’t accessed the About action yet.
Now go to the About tab. A redirect occurs, but the user is not prompted a second time for credentials. Let me point this out again, because this is also a popular point of confusion: THERE IS NO ADDITIONAL PROMPT FOR THE USER TO AUTHENTICATE.
If we watch the traffic with Fiddler when that redirect occurred, we can see that it was actually handling the authentication for us. The presence of the cookie from the O365 logon is why we didn’t see an additional logon prompt.
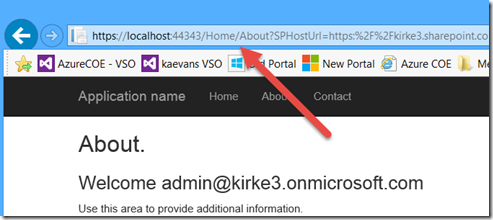
Let’s test what it looks like when we don’t launch from SharePoint first, such as when the user bookmarks a URL to the app. Go to the About link and copy its URL, including all the SPHostUrl stuff in the querystring.
In Internet Explorer, start an In Private browsing session (which starts a new instance and clears existing cookies). When the browser launches, this time you are prompted to sign into Azure Active Directory, not O365.
Log in, and you are redirected to the app. If you watch carefully, you were redirected back to O365 to obtain a valid SharePoint context token, but the user was not prompted for an additional logon.
Now click the Home link in the menu. This will execute the SharePointContextFilter code, which will see the SPHostUrl in the querystring without a valid context token. It then redirects to SharePoint, which responds with a valid context token that can now be used for SharePoint provider-hosted apps.
Caution: During testing, I observed some very odd behavior when signing into Azure AD first… the HTTP cookie was being dropped and I got into an endless loop of redirects. The solution to this is the SystemWebCookieManager that we detailed earlier in this post.
Summary
Using OpenID Connect in this manner opens a huge amount of possibility for our application. Our users are now authenticated, enabling the app to do more than simply interact with SharePoint. We can now use our app to take advantage of the rich ecosystem exposed by Azure Active Directory. In a future post, we’ll show how we can take advantage of the OWIN middleware to provide a custom WebAPI protected by Azure AD bearer authentication that enables access to endpoints such as the O365 Exchange Online API, O365 SharePoint Online API, Azure AD Graph API, and PowerBI API.
For More Information
An Architecture for SharePoint Apps That Call Other Services
Calling O365 APIs from your Web API on behalf of a user
Problem with cookies in Microsoft.Owin.Host.SystemWeb – details the SystemWebCookieManager workaround
Comments
Anonymous
March 23, 2015
Brilliant, thanks for this post! I hope that the need to have two different ClientIDs and ClientSecrets for the same AAD will disappear as ACS and AAD are merged together, though.Anonymous
March 24, 2015
@Robert - thanks! See the first post in the series,blogs.msdn.com/.../an-architecture-for-sharepoint-apps-that-call-other-services.aspx, I show we would still need at least two different tokens because there are multiple resources.Anonymous
April 25, 2015
Kirk, Great walk through! It fit the problem I'm trying to solve perfectly and so saved me a lot of time.Anonymous
May 12, 2015
@Robert - following up, the Office 365 Unified API was recently announced that gets rid of some of the problems highlighted in this series. This was not due to a merge of ACS and Azure AD, but rather a complete redesign of the APIs and a unification of them within a common service endpoint that is a single resource rather than being split into multiple resources. See: msdn.microsoft.com/.../office-365-unified-api-overviewAnonymous
November 23, 2015
The comment has been removedAnonymous
January 11, 2016
Hi Kirk,Great post, thanks.Do you have a version of this that allows anonymous users to continue to access the site, but use an app-only principal to access data in a SharePoint Online site collection?I am thinking for Azure hosted public website that users SPO as the CMS in the background.MarkAnonymous
April 08, 2016
Hi I have a SharePoint provider hosted app that calls a custom web api (Register with Azure AD) I follow your steps to register my provider hosted app in Azure AD.It seem like it authenticate ok, but the About returns blankFor example, From my Office 365 tenant, I open my test app, it opens mysite..azurewebsites.net/Home/Index?SPHost=url.com ok.When I click on Home/About?SPHost=url.com It does the authentication then return mysite..azurewebsites.netThe page is blank. Do you have any idea what I am missing?Thank you for your help


