Creating a SharePoint 2013 App With Azure Web Sites
This post will show how to create a SharePoint 2013 app for Office 365 and publish it to an Azure web site. If you don’t have either today, you can get an Office 365 trial for free and an Azure web site for free. If you are an MSDN subscriber, you have access to free MSDN benefits including Windows Azure and Office 365.
Now we need a web site for our app. Hmm… where to get one? Oh yeah… Azure gives me TEN FREE WEB SITES. Plus, I have an MSDN subscription that gives me $150 per month, I’ll just use that. Free money.
You’ll also need to install the Windows Azure Tools for Microsoft Visual Studio. Go ahead, go do that, then come back when you’re done. I’ll wait.
Creating the Azure Web Site
Since you already installed the Windows Azure Tools for Microsoft Visual Studio, you have a new option in Server Explorer to connect to Windows Azure.
You are prompted to sign into Azure.
Once signed in, expand the tree view. Right-click on Web Sites and choose Add New Site.
Give the site a name (it must be unique) and choose a location nearest to you.
Click Create. OMG, that is so cool. Creating web sites without leaving Visual Studio.
Creating the App
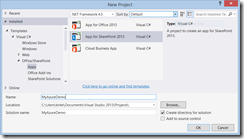
To get started, install the Windows Azure Tools for Microsoft Visual Studio. Once installed, open Visual Studio 2013 and create a new SharePoint provider-hosted app.
In the next screen, provide the URL for your SharePoint site and leave the hosting type as the default “provider-hosted”.
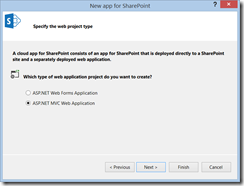
Finally, choose what type of hosting model you want. SharePoint developers have been asking for years for ASP.NET MVC… well, here it is!
Finally, choose how you want your app to authenticate. We are using Office 365 for this example, leave the default “Use Windows Azure Access Control Service”.
That’s it, you now have an app. If you look at the code that was generated by default, you’ll see that it shows how to use the managed client side object model to obtain the user’s Title property, displaying their name.
Creating an O365 SharePoint Developer Site Collection
To enable side-loading of apps, you’ll need a Developer Site Collection in O365. Go to your SharePoint site as a tenant administrator and choose Admin / SharePoint.
In the tenant administration screen, choose New Private Site Collection.
Give the site a name and choose a URL, and choose the site template as “Developer Site”.
Once that’s created, you now have a SharePoint site capable of side-loading apps.
Debugging Locally
To do this, you’ll need a Developer Site Collection in SharePoint to deploy to.
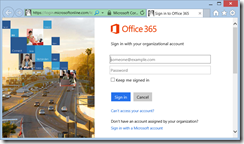
Hit F5 and notice that you first have to log into Office 365. This is because the .app package for the app is being deployed to SharePoint in the cloud while the app runs locally in IIS Express. SharePoint needs the credentials of a user who is authorized to deploy the app package.
You are then prompted to enter your credentials, this time as the user who is installing the app to the site.
Of course you trust MyAzureDemo ![]() Click Trust It. You are then redirected to your web page running on IIS Express that uses the managed client side object model to query data from an O365 SharePoint site.
Click Trust It. You are then redirected to your web page running on IIS Express that uses the managed client side object model to query data from an O365 SharePoint site.
The point here is that you would typically just hit F5 to debug locally until you are ready to publish.
Publishing to Azure Web Sites
We now have a web site and our app, how do we get our app onto the web site? We first download the publish profile for the web site. Right-click the web site and choose “Download Publish Profile”.
A file with the extension “.publishsettings” is now in your downloads folder.
We now need to get a client ID and client secret from SharePoint. Go to your SharePoint site and append the URL “_layouts/15/appregnew.aspx” to the site. Click Generate to create a client ID and a client secret. Give the domain name of your new Azure web site (the one I created was called KirkEAzureDemo.AzureWebSites.net… capitalization doesn’t matter).
Click Create and the app principal is created. Copy the Client ID and Client Secret values, we’ll need those in just a second.
Now, in Visual Studio 2013, right-click the SharePoint app and project (not the web site) and choose Publish.
Create a new publish profile.
Select the .publishsettings file that you downloaded previously.
Provide the client ID and client secret and choose Finish.
You now have a profile that contains your client ID and client secret as well as the location of the Azure web site to deploy to! In the next screen, choose “Deploy your web project”.
You can preview the changes.
Click publish and then watch the Output window to see that the web site was successfully published.
Installing the App in SharePoint
Now, choose “Package the app”
The window will now have a lovely big RED X on it telling you that a valid HTTPS connection is required.
Just change it to HTTPS and it goes away (Azure web sites are nice like that… no futzing with certificates to get this to work).
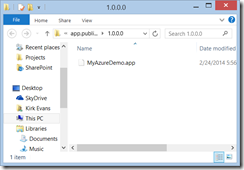
Finally, click FINISH. Windows Explorer comes up to show you the .app package for the app.
Once you have the .app package, you can upload it to an app catalog and then install the app to your site. However, since we are using a Developer Site collection, we can take advantage of side-loading to quickly test our app. Go to your SharePoint developer site collection and choose “Apps in Testing”. Notice that our app package is still there from when we pressed F5 previously.
Before continuing, we need to get rid of that existing app package. Just click the elipses and choose Remove.
Choose “new app to deploy”. On the next screen, click the link to upload an app package.
Browse to the location of your newly published .app package, and leave the checkbox to overwrite existing files.
Click OK, then click Deploy.
Trust the app.
Now click on the app name to launch it. You are redirected, and finally the app shows in the browser. Notice the URL is no longer “localhost”, it is now your Azure web site.
Congratulations, you just published an app to an Azure web site.
Bonus Feature – Editing with Visual Studio “Monaco”
Wanna see something cool? Go to the Azure Management Portal, select your web site, and go to the Configure tab. There’s a new option to enable editing in Visual Studio. Turn that on.
Now go to the dashboard for your web site and choose “Reset your deployment credentials”.
Provide a username and password.
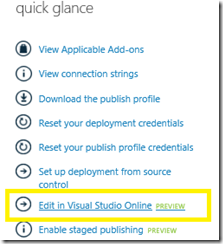
On the Quick Glance menu in the dashboard, you will see a new link to “Edit in Visual Studio Online”.
Click that, and you are prompted for credentials.
Once you log in, you can now EDIT PAGES FOR YOUR WEB SITE ONLINE.
Click the Run button on the left of the screen. You will see output:
Ctrl + Click on the link to your web site, you’ll see an unfriendly error. This is because there is no host URL to redirect to.
Change the URL to “/Home/Contact” to see the page you edited.
Summary
If you are attending SharePoint Conference 2014, make sure to come to my session Building SharePoint Apps with Windows Azure Platform as a Service. I will be showing this and a whole lot more about building apps to take advantage of Azure PaaS.
Comments
Anonymous
August 18, 2014
Hi When I try to add the app to my site after following the steps I get an error "Something went wrong!". It occurs after I trust the app. Any idea what might be causing this?Anonymous
August 18, 2014
Shane - If you are using O365 with a Developer Site Collection, the above steps should work for you just fine. For testing purposes, create a new developer site collection and see if you still have problems in the new site collection.If you are using a self-hosted installation of SharePoint, there may be additional configuration required for that SharePoint farm.Anonymous
August 21, 2014
Kirk - Thank you for this excellent blog post. It indeed helped me to deploy my provider-hosted app to my Azure website. I also tested the VS online feature and I was able to edit my Azure web site content fairly easily.SincerelyAnonymous
November 16, 2014
Hi Kirk, excellent post thank you. Just one question if I access the azure site directly http://<mysite>.azurewebsites.net it trough's an error but when I select the link for the SharePoint app in SharePoint it goes to my azure website successfully but it put a lot of extra stuff https%3A%2F%2Fh<mysite>%2Esharepoint%2Ecom&SPLanguage=en%2DUS&SPClientTag=2&SPProductNumber=16%2E0%2E3417%2E1225 to it. That's not cool for users which want to go to the azure site directly.ThanksFrancoisAnonymous
November 17, 2014
@Francois - then use 2 pages, one for people who want to access it directly, and one for that app's start URL. Alternatively, add some logic into your application that checks if the SharePoint querystring is present and change the UI accordingly. The default template for Visual Studio 2013 ShrePoint ASP.NET MVC apps adds in the SharePointContextFilter which demans the querystring be present, hence the behavior you are seeing. You can add it to a specific controller action that is not the Index action.Anonymous
November 17, 2014
Kirk, I like your second suggestion of adding the querystring to the controller.Thanks for the quick feedback.FrancoisAnonymous
January 25, 2015
Hi Kirk, I just spent a lot of time trying to figure out what is not working and now I'm clueless... Everything seem to work with deployment and registration but, when i get to my site the SPContext is NULL... More precisely, request.Form is empty in tokenHelper.GetContextTokenFromRequest.Any clue ??Anonymous
January 25, 2015
@Patrick - triple-check that you are using HTTPS. I have seen weirdness before that you publish as HTTPS, but the AppRedirect.aspx uses HTTP. I don't have a solution, but it definitely sounds like that's the problem.Anonymous
March 17, 2015
Hey Kirk, Great tutorial. This may be obvious to you and others, but what is the difference between hosting an app with an azure web site vs an azure cloud service? What are the pros cons of each, I am having trouble understanding. Thanks in advance!Anonymous
March 17, 2015
@Nickolas - see azure.microsoft.com/.../choose-web-site-cloud-service-vm. My personal decision matrix is to first choose Azure Websites, then cloud services, then finally virtual machines.Anonymous
May 12, 2015
Hi, I've been able to publish my app to Azure and SharePoint in the past. With some changes to the project, I had to redeploy and now I keep getting "You do not have permission to view this directory or page." I tried deleting all instances of app in site collections and catalog, create new clientId and secret through appregNew, package and upload to sharepoint with new Id/secret. Please suggest how I can fix this.. Thank you in advance.Anonymous
October 13, 2015
The comment has been removedAnonymous
October 22, 2015
You are awesome! This website lead me through every step I needed step by step and was very well written! Thank you so much for putting this together!


