ALM for SharePoint Apps: Implementing Continuous Integration
This post shows how to implement continuous integration for a provider-hosted app in SharePoint 2013.
Overview
This is Part 2 of a series.
-
- Part 1 - ALM for SharePoint Apps: Configuring a TFS Build Server with Team Foundation Service
- Part 2 - ALM for SharePoint Apps: Implementing Continuous Integration (this post)
- Part 3 – ALM for SharePoint Apps: Customizing the Build Process
- Part 4 – ALM for SharePoint Apps: Understanding Provider Hosted App Publishing
In my previous post, ALM for SharePoint Apps: Configuring a TFS Build Server with Team Foundation Service, I talked about configuring an on-premises TFS Team Build 2012 server that connects to Team Foundation Service in the cloud and demonstrated how you could configure a build that creates an app package. In this post, we’ll continue with that same example to implement continuous integration such that when a build completes it will automatically deploy the app to a SharePoint site and will deploy the web application to an IIS server.
Download the Office / SharePoint 2013 Continuous Integration with TFS 2012
There is a fantastic project on CodePlex to help you get started with Continuous Integration with TFS 2012, Office / SharePoint 2013 Continuous Integration with TFS 2012. I highly suggest reading through the Office / SharePoint 2013 CI with TFS 2012 page to get started and understand pre-requisites.
Configure the OfficeSharePointCI Pre-Requisites
For my example, the build server I created in the previous post has SharePoint 2013, Visual Studio 2012, and the Office Developer Tools for Visual Studio 2012 installed. If your server does not have the pre-requisites, there are scripts and instructions available to help you collect dependencies from SharePoint 2013 and Visual Studio 2012 to deploy to your build server.
The scripts use Web Deploy to deploy the web project for your provider-hosted apps to an IIS server. You will need to install and configure Web Deploy. Thankfully this is a painless process that the Web Platform Installer makes much easier for you. Once installed, you will configure Web Deploy on your web site.
In IIS, right-click the web site that you want to deploy to and choose Deploy / Configure Web Deploy Publishing.
That will bring up a dialog where you grant a user to give publishing permissions to. This user should be a member of the local Administrators group.
Click Setup. This will generate a .publishsettings file in the path specified in this wizard.
If you run into any issues, there are some handy troubleshooting tips on the blog post Installing and Configuring Web Deploy.
Configure the Web Deploy Publishing Profile
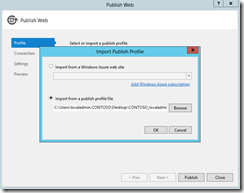
In Visual Studio, open your provider-hosted app project. Right-click the web application and choose Publish.
NOTE: This is not the best way to do this. Instead, you should publish the APP project (not the web). I cover the correct way to do this in my post Part 4 – ALM for SharePoint Apps: Understanding Provider Hosted App Publishing .
The wizard asks if you want to select or import a publish profile. One option is to choose import, and select the file that you created when you set up Web Deploy.
However, when you do that the profile is named “Default Settings *” and I don’t see an option to rename it.
Instead, I prefer to create a new publishing profile with a descriptive name like “ALMDemo – Dev”.
Provide the server, site name, and destination URL. Click Validate Connection and you should see a green check mark indicating success.
Click Next and choose a release or debug version (I chose Debug), then click next. Click the preview button and you’ll get a preview of what’s about to be deployed.
Click Publish.
Now check in all of your changes. This created the publishing profile that you will use with TFS Team Build as part of the build process.
NOTE: This is not the best way to do this. Instead, you should publish the APP project (not the web). I cover the correct way to do this in my post Part 4 – ALM for SharePoint Apps: Understanding Provider Hosted App Publishing .
A Note on AppPrincipals
The CodePlex project that I am using assumes that the app principal for your environment has already been registered, this script does not take care of registering the app principal for you. You could easily add this step into the script, but for now make sure that the app principal has already been registered. For testing, you are likely going to need to navigate to your SharePoint server, _layouts/appregnew.aspx and register the app principal prior to the builds.
Click create, then copy the value for the app ID into your app manifest’s client ID and web.config’s client ID values.
Run the project and make sure that everything works as expected. Once you’ve smoke-tested it, check it into source control. Don’t worry that we've hard-coded the URL for the web server here, we’ll change that in an upcoming blog post.
If you made changes to the web.config, make sure to re-deploy your changes to the IIS site!
Check the OfficeSharePointCI CodePlex Artifacts Into Source Control
The next step is to check the stuff you downloaded from CodePlex into source control. From my previous post, I already have a project called ALMDemo in TFS.
I copied the DeployScripts and BuildProcessTemplates folders from the OfficeSharePointCI download to my Projects folder.
Now that the file structure matches what I want in source control, it makes it easier to map everything in TFS. Right-click the project node (in my case it is called “ALMDemo”) in the Source Control Explorer and choose Add Items to Folder.
TFS then warns me about changing the mapping for the existing project, I say OK, and then I choose the items to add.
Now that everything is mapped and there are pending changes, I check in the changes.
The result is that the two folders are added to source control and my project’s local folder is mapped to the new location and downloaded locally.
Edit the Parameters.ps1 PowerShell Script
In the $ALMDemo\DeployScripts\SharePointApp folder, there is a PowerShell script called Parameters.ps1 that you will need to edit.
This file will let you provide the URL of the SharePoint server that is being deployed to, the credentials of the user deploying the app to SharePoint, the credentials of the user deploying the web site to IIS, and the name of the Web Deploy server. You could deploy to O365 here or to an on-premises SharePoint installation. I am deploying to my Azure IaaS virtual machine, which means I still have a domain user.
Now that you’re done editing, save and check in your changes.
Edit the Build Definition
In Visual Studio 2012, go to the Team Explorer tab and then the Builds menu. Select the build that you previously created (demonstrated in my previous post), right-click and choose Edit Build Definition.
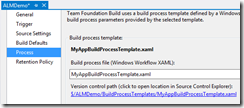
On the process tab, you can choose a process template to use. The template we will use will be a copy of the one just checked into TFS called OfficeToolsAppTemplate.xaml. Rather than edit the one we just downloaded, let’s create a new one based on that existing template. Expand the Build Process Template section and choose New.
I chose to make a copy of the existing file and create a new one called MyAppBuildProcessTemplate.xaml.
Set the MSBuild Arguments to a value of:
/p:ActivePublishProfile="ALMDemo - Dev"
Make sure to replace the name of the publishing profile to the one that you created in the section “Configure the Web Deploy Publishing Profile” above.
Next change the Deployment Script parameter to point to the SharePointAppDeploy.ps1 script in the DeployScripts folder. In my project that value is:
$/ALMDemo/DeployScripts/SharePointApp/SharePointAppDeploy.ps1
The finished product:
Test the Build
Right-click the build and choose Queue New Build. At the end of the build, you should see the following:
Click the link to trust the app.
Now go back to the app and click it, and BOOM! Your app was deployed to SharePoint and to IIS as part of the build.
If you get an error saying that there is not working folder mapping for the SharePointAppDeploy.ps1 file, go into the build and map it.
Summary
There are a few moving pieces, but once you get everything configured you can see that you don’t have to touch it again, you simply check in changes into source control and initiate a build, the provider-hosted app is deployed for you.
For More Information
Office / SharePoint 2013 Continuous Integration with TFS 2012
Microsoft Office Developer Tools for Visual Studio 2012
ALM for SharePoint Apps: Configuring a TFS Build Server with Team Foundation Service


