Create a SharePoint Custom Action to Zip and Download a Document Set
I like writing code, but I love solving problems using the simplest possible approach even more. In this article, I’m going to show you how to enable users to zip and download all documents in a document set with no code. The document set feature already provides the zip and download capability, so you just need to make it easy for users to access it.
Here’s the URL to the built-in document set downloader page: {SiteUrl}/_layouts/DocSetExport.aspx?List={ListId}&ID={ItemId}. It takes in the GUID of the list and the ID of the document set. Here’s an example: https://sharepoint2010/sites/docman/_layouts/DocSetExport.aspx?List={4E2D11F5-7500-476A-B001-62A7BF92FD50}&ID=10
Adding a Custom Action to the Document Set List Item Menu using SharePoint Designer
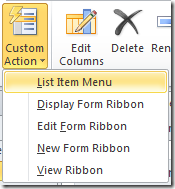
To add a custom action, open the site in SharePoint Designer and navigate to the document set list. Add a new list item menu custom action:
Provide a Name, Description, and Navigate to URL:
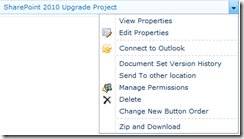
Save the custom action, and test it:
I want to mention that there is a drawback to this approach. The custom action will show up for every list item, not just the document set. The list item menu will appear on documents in the document set as well:
Adding a Custom Action to the Document Set Ribbon using SharePoint Designer
We can also use SharePoint Designer to add a button to the document set ribbon, but the user experience isn’t ideal. You’re better off creating this custom action in a sandboxed (or farm) solution. The reason for this is that custom actions created in SharePoint Designer operate on a list item, so the user has to select a list item before the ribbon button lights up to zip and download the document set. Understanding the limitations, here’s how to do it:
Add a new view ribbon custom action:
Enter a Name and Description as before, but this time use JavaScript for the custom action. We need script to get the ID of the document set rather than the ID of the selected item. Enter the following for the Navigate to URL:
javascript:function getQS(key){var regex=new RegExp('[\\?&]'+key+'=([^&#]*)');var qs=regex.exec(window.location.href);return qs[1];}var url='{SiteUrl}/_layouts/DocSetExport.aspx?List={ListId}&ID='+getQS("ID");window.location.href=url;
Now when you select a document the zip and download button lights up:
Adding Custom Actions to the Document Set List Item Menu using a Sandboxed Solution
Next, I’ll show you how to create a sandboxed solution that provides a better user experience and is reusable across sites. The solution deploys both the list item and document set ribbon and scopes the custom action to just the document set content type. To get started, create a new empty SharePoint project in Visual Studio 2010. Add a feature and name it DocSetDownload. Add a new Elements item named CustomActions. Add the following to the Elements.xml file
<Elements xmlns="https://schemas.microsoft.com/sharepoint/">
<CustomAction
Id="DocSetDownload.Ribbon"
Title="Zip and Download"
Description="Zip all documents in this document set and download."
RegistrationType="ContentType"
RegistrationId="0x0120D520"
Location="CommandUI.Ribbon">
<CommandUIExtension>
<CommandUIDefinitions>
<CommandUIDefinition
Location="Ribbon.ManageDocumentSet.MDS.Share.Controls._children">
<Button
Id="Ribbon.ManageDocumentSet.MDS.Share.Controls.DocSetDownload"
Sequence="20"
Command="Ribbon.ManageDocumentSet.MDS.Share.DocSetDownload"
Alt="Zip and Download"
Image16by16="images/DocSetDownload16x16.png"
Image32by32="images/DocSetDownload32x32.png"
LabelText="Zip and Download"
ToolTipTitle="Zip and Download"
ToolTipDescription="Zip all documents in this document set and download."
TemplateAlias="o1" />
</CommandUIDefinition>
</CommandUIDefinitions>
<CommandUIHandlers>
<CommandUIHandler
Command="Ribbon.ManageDocumentSet.MDS.Share.DocSetDownload"
EnabledScript="true"
CommandAction="javascript:
function getQS(key){
var regex=new RegExp('[\\?&]'+key+'=([^&#]*)');
var qs=regex.exec(window.location.href);
return qs[1];
}
var url='{SiteUrl}/_layouts/DocSetExport.aspx?List={ListId}&ID='+getQS('ID');
window.location.href=url;
" />
</CommandUIHandlers>
</CommandUIExtension>
</CustomAction>
<CustomAction
Id="DocSetDownload.EditControlBlock"
Title="Zip and Download"
Description="Zip all documents in this document set and download."
RegistrationType="ContentType"
RegistrationId="0x0120D520"
Location="EditControlBlock">
<UrlAction Url="{SiteUrl}/_layouts/DocSetExport.aspx?List={ListId}&ID={ItemId}" />
</CustomAction>
</Elements>
Next, add a Module item named images to the project and add the custom images for the ribbon:
Deploy and test the solution. You’ll see the custom action on the ribbon:
The custom action will also appear on the list item menu:
Download the sandboxed solution source Download the wsp file.
Additional Resources
SharePoint 2010 ECM Code Sample: Document Sets Ribbon and Export
Comments
- Anonymous
May 18, 2015
Can this be done without SharePoint Designer?


