Windows 8 Notifications: Leveraging Azure Storage
When incorporating images into your toast and tile notifications, there are three options for hosting those images:
- within the application package itself, using an
ms-appx:///URI, - within local application storage, using an
ms-appdata:///localURI, or - on the web using an HTTP or HTTPS URI.
The primary advantage of hosting images on the web is that it insulates the application from changes to those images. The images hosted on the web can be modified or refined without requiring an update to the application, which both necessitates a resubmission to the Windows Store and relies on users to update the application.
 Windows Azure, Microsoft’s public cloud offering, can be an incredibly convenient and cost effective way to manage the images used in notifications. The easiest way to serve image content from Windows Azure is via blob storage, which provides highly scalable and highly available storage of unstructured data at one of eight Windows Azure data centers worldwide. A Content Delivery Network (currently comprising 24 nodes) is also available to improve performance and user experience for end-users that aren’t located near a data center.
You might be surprised how simple it is to set this up… and did I mention it’s free to try?! This post will take you through all the steps, including:
- Setting up a Windows Azure Storage Account,
- Storing and using notification images hosted directly in Windows Azure blob storage,
- Implementing a custom notification image server to handle custom scale, contrast, and language settings,
- Enhancing the end-user experience using the Content Delivery Network, and
- a wrap-up section reviewing and assessing the options.
Setting up your Windows Azure Storage Account
Apply for a 90-day free Windows Azure subscription, leverage your MSDN benefits, or select one of the other options for Windows Azure access. You will be prompted for a credit card to verify you’re a carbon-based life form, but the free account options come with no risk, and you will not be charged for any usage (unless you specifically opt in to that).
Create a storage account, which is accessible via a unique URL endpoint such as
https://win8apps.blob.core.windows.netand comes with an access key (well, actually two!) which grant administrator level access to that account.

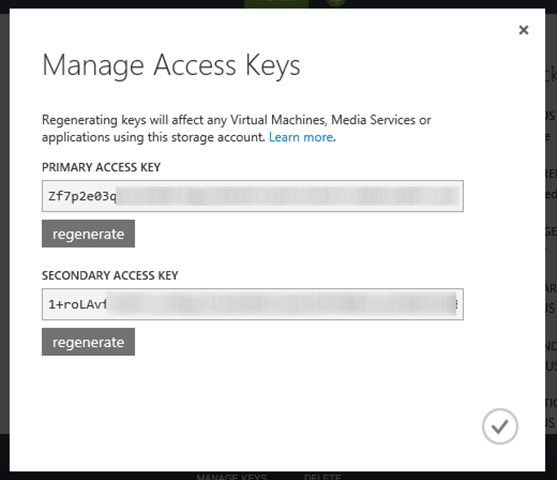
There are two access keys to enable updating keys without incurring downtime for applications that might be referencing Windows Azure storage. If you set your application (typically it’s a cloud application) to read the keys from the configuration file, you can update that file in place (without bringing down the app) to use the secondary access key, then you can regenerate the primary access key. This provides the capability to have ‘rolling key updates,’ which is a good policy in general to mitigate the impact of compromised storage keys.
Storing Images in the Cloud
Now that your account is set up, it’s time to move some images into it. You can’t do that via the Windows Azure portal, but there are many Windows Azure storage utilities available to manage your blob storage assets, including Cloud Storage Studio (free trial), CloudBerry Explorer (freeware), CloudXplorer (free download), or Azure Storage Explorer (open source).
I’ll use CloudBerry Explorer in this post, but you shouldn’t have any trouble figuring out the analogous steps in your Azure storage manager of choice.
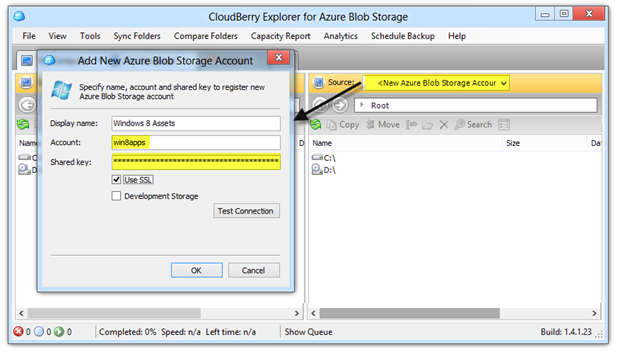
Configure the utility with your storage account and either the primary or secondary access key:
Create a new container (call it whatever you like; images seems reasonable), and set the access container policy to allow public access to blobs but not list the container contents.
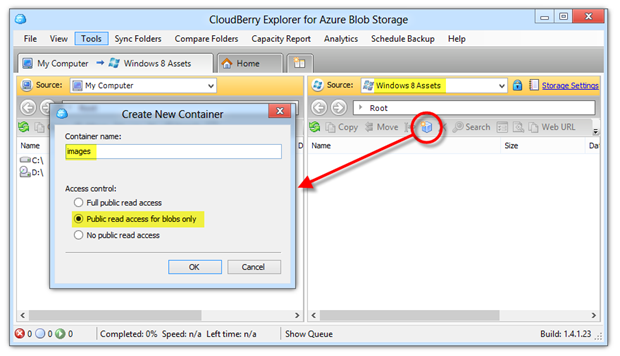
Window Azure blob storage is organized into a two-level hierarchy:
- containers, which govern the access policy for all of the content within them, and
- blobs, which are the individual files or other assets being stored.
You can think of containers like a file folder; however, in blob storage, containers cannot be nested. You can, however, create blob assets with a naming convention that mimics a file path, for instance:

Each blob in storage also has an associated content-type that is set when the blob is uploaded (the default is
application/octet-stream), so filename extensions that are part the blob name itself aren’t really relevant. Most of the storage utilities do manage the content type for you transparently.Copy a tile image being used locally over to the container. With Cloudberry this is a simple drag-and-drop in an Explorer-like interface.

With the image file now in the cloud, the code referencing that image would appear similar to the following, which is a modification of
sendTileLocalImageNotificationWithXmlin thesendLocalImageTile.jsfile within the App tile and badges sample.// get a XML DOM version of a specific template by using getTemplateContent var tileXml = Windows.UI.Notifications.TileUpdateManager.getTemplateContent( Windows.UI.Notifications.TileTemplateType.tileWideImageAndText01); // get the text attributes for this template and fill them in var tileTextAttributes = tileXml.getElementsByTagName("text"); tileTextAttributes[0].appendChild(tileXml.createTextNode( "This tile notification uses Windows Azure")); // get the image attributes for this template and fill them in var tileImageAttributes = tileXml.getElementsByTagName("image"); tileImageAttributes[0].setAttribute("src", "https://win8apps.blob.core.windows.net/images/redWide.png"); // content elided // create the notification from the XML var tileNotification = new Windows.UI.Notifications.TileNotification(tileXml); // send the notification to the app's application tile Windows.UI.Notifications.TileUpdateManager. createTileUpdaterForApplication().update(tileNotification);
While this works fine, it requires that the developer accommodate scaling and contrast themes by explicitly requesting the exact image needed, something that is automatically handled by the resource manager when using images stored within the application package.
Windows Azure can manage this for you too though with just a little bit of code, as you’ll see next!
Implementing a Notification Image Server with Windows Azure Web Sites
When using a web URI as the source for a notification image, you have the option to pass additional information via the HTTP GET request in the form of query parameters:
ms-scale(values: 80, 100, 140, 180) indicates the size of the image needed,
ms-lang(values complying with BCP-47) indicating the culture for the request, and
ms-contrast(value: standard, black, or white) referring to the high-contrast modes available.
These query parameters are sent along with the request whenever the addImageQuery attribute is set within the tile or toast template. That attribute can be set on the visual, binding, or image element of the tile schema or toast schema:
 // get the image attributes for this template and fill them in
var tileImageAttributes = tileXml.getElementsByTagName("image");
tileImageAttributes[0].setAttribute("addImageQuery", true);
tileImageAttributes[0].setAttribute("src",
     "https://win8apps.blob.core.windows.net/images/redWide.png");
And that would result in a query like:
https://win8apps.blob.core.windows.net/images/redWide.png? ms-scale=100&ms-contrast=standard&ms-lang=en-US
Of course, Windows Azure storage has no mechanism to interpret the query string, so you’d need to build a service that does so, and then modify the notification template to use the name of the server rather than Windows Azure storage directly. Essentially the service should proxy each of the requests, strip out the query parameters, and make a new server-initiated request for the image best matching the desired scale, contrast mode, and language.
One could build a service like that in a host of programming languages - ASP.NET, PHP, node.js, or anything that can run on Windows Azure (which is anything you can run on Windows!). In this case, I opted for node.js given its lightweight nature and support via WebMatrix.
Building the Node.js Project in WebMatrix
The first step is to create a new site, which you can do by selecting the Empty Site template for node.js:
Next, replace the entire contents of server.js with the gist I created (do keep in mind this is not production quality code!).
In that code, replace STORAGE_ACCOUNT with the name of your Windows Azure storage account (e.g., win8apps is the name of the account I used in the previous example). Optionally, add a list of BCP-47 language codes for which you are providing unique images. To reduce the number of image searches (and resulting storage transactions), I set the algorithm up to consider the ms-lang value only if it's a language explicitly included in the CUSTOM_LANGUAGES array.
 // Azure Storage Account host
var AZURE_URI = "STORAGE-ACCOUNT.blob.core.windows.net";
var AZURE_PROTOCOL = "http";
var AZURE_PORT = 80;

// only build specific URLs for the following
var CUSTOM_LANGUAGES = []; // e.g.: ["en-US", "fr-FR"];
The implementation assumes that you’ve mimicked a directory structure in Windows Azure blob storage such as the following, where images is the container name (though it can be named anything you like). The links lead directly to my storage account (which will hopefully be active when you read this!). Recall that black, en-US, and fr-FR are virtual directories and don’t actually exist; for instance, the name of the blob corresponding to the last item in the list is really fr-FR/green.scale-180.png.
 images
   green.png
   green.scale-100.png
   green.scale-180.png
   black
      green.png
   en-US
      black
         green.png
      green.png
      green.scale-100.png
   fr-FR
      black
         green.png
      green.png
      green.scale-100.png
      green.scale-180.png
The web service works by inspecting the query string passed in with the image request and transforming the URL and that query string into a direct reference to Windows Azure blob storage as follows (you can access the code gist to reconcile line references here)
The Azure Web Site host name is replaced with the
AZURE_URIvariable defined at Line 20 (usewin8appsforSTORAGE_ACCOUNTif you want to use the square tile files I set up).The incoming URL and query string, if there is one, are parsed in Line 103, and an array of candidate URL images is initialized (Line 107).
If there are no query parameters (i.e., addImageQuery was not set in the template), the only candidate URL is the original path with the host name replaced by the Azure storage account host (Line 127).
If the
ms-langparameter specifies a value of interest (i.e., the value is included in theCUSTOM_LANGUAGESarray initialized in Line 25) then four URLs are built (Lines 116 - 119) in the following patterns (the yellow highlighted segments are replaced with the value of the referenced query parameter, the grey highlighted text is literal, and imagePath, imageName, and imageExt are parsed from the incoming URL in Lines 33ff):- imagePath/ms-lang/ms-contrast/imageName.scale-ms-scale.imageExt
- imagePath/ms-lang/ms-contrast/imageName.imageExt
- imagePath/ms-lang/imageName.scale-ms-scale.imageExt
- imagePath/ms-lang/imageName.imageExt
Four additional URLs are also built without the reference to the language parameter (Lines 121 - 127):
- imagePath/ms-contrast/imageName.scale-ms-scale.imageExt
- imagePath/ms-contrast/imageName.imageExt
- imagePath/imageName.scale-ms-scale.imageExt
- imagePath/imageName.imageExt (this is the original URL path)
The ordered list of up to eight candidate URLs is passed into a recursive function:
retrieveImagedefined in Line 57. This method issues an HTTP or HTTPS GET request to the candidate URLs, replacing the Azure Web Site host name with the Azure blob storage root URL. If the first candidate image isn't found (i.e., the status code is 404), the second is attempted and so on until there's a success code or none of the URLs is found to exist.If an image is found (Line 78), a 307 HTTP redirection response is returned, and the Windows 8 app will use the URL supplied in the Location header to directly access blob storage. If the list of candidate URLs is exhausted without finding an image, a 404 response (Line 61) is returned. All other response codes cause the search to terminate and the response payload returned to Windows 8 application, which will likely balk at the response and not show the notification.
In the worst case success scenario (addImageQuery was specified, but the match was a generic image with no qualifiers), there are eight requests to Windows Azure storage. This comes with both a performance hit and cost implications, since each request to storage is a transaction (billed at $0.01 per 100,000 as of this writing).
Also note that this code does not result in exactly the same resource lookup behavior you get automatically for images stored in the application package itself. That algorithm has additional nuances and flexibility that would be too expensive (time and transaction-wise) to fully implement as a web service; in fact, even the sample code provided might be more general than your needs, but with the source code in hand you should be able to tailor it fairly easily.
Creating an Azure Web Site
Windows Azure Web Sites provide an extremely attractive option (read: free for one year) for hosting web content, and the integration with WebMatrix (as well as TFS and Git) make it extremely simple to use and manage. Because Windows Azure Web Sites is in preview mode as of this writing, you’ll need to make a separate request via the Windows Azure portal to enable that feature before you’ll be able to carry out the following steps.
Within the Windows Azure portal, simply create a new Azure Web Site, by supplying a unique server name – for this blog post I used win8imageserver – and specifying the Azure data center location at which you want to host the site (I selected East US).

It should take less than a minute to have a new server up and running, at which point you can access it by selecting the new site from the list of provisioned sites:

There won’t be much going on there yet, which makes sense because you haven’t deployed anything. To do so, you’ll need to download your Web Deploy publish settings and import them into WebMatrix. The publish profile is an XML document that contains specifics about your Azure Web Site, including a hashed password string granting the ability to deploy code to the server. Save those settings to a local file directly from the Azure Web Sites dashboard; however, note that the file does contain sensitive material, should it be protected or even deleted once the settings have been imported, which is the next step.
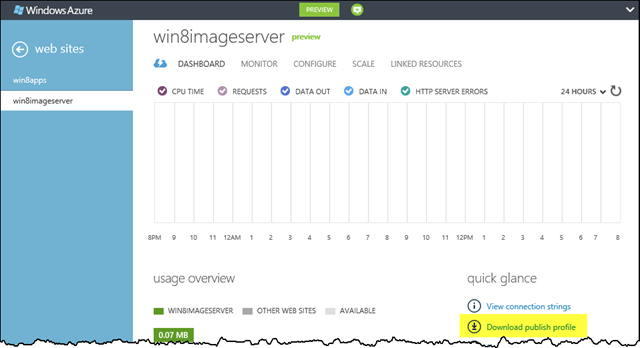
To associate the publish settings with WebMatrix, select the Publish option from the ribbon and import the settings from the file just downloaded from the portal.

A request to test the server compatibility may be presented, and you can just click through the confirmation screens. When the test has completed, you’ll see a list of the files to be deployed. Just hit the Continue button to deploy them all, although in this case the only one really required is server.js.
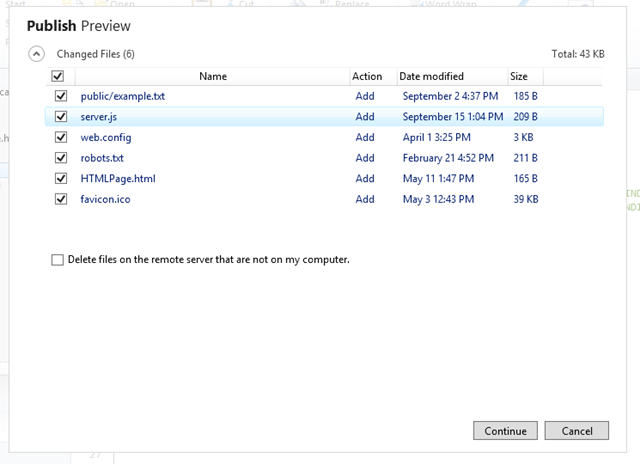
At this point, you should have a fully functional service on Windows Azure ready to respond to image requests. Although it’s the Windows 8 notification infrastructure that will make the request, you can spoof a request by just issuing a request in a browser (along with the query parameters) and you should see the redirection to the specific Windows Azure blob storage URL right in the browser.
Referencing the Server in Windows 8 Notifications
Now comes the easy part – it’s just different URL that needs to be provided as the notification image source! The format of the request is simply the hostname for the web service followed by the default image path, unadorned by scale, contrast or language elements - the same semantics used to reference images in the application package.
Here’s some representative code updating the sendLocalImageTile.js file of the App tiles and badges sample:
 // fill in a version of the square template returned by GetTemplateContent
var squareTileXml = Windows.UI.Notifications.TileUpdateManager.getTemplateContent(
        Windows.UI.Notifications.TileTemplateType.tileSquareImage);
var squareTileImageAttributes = squareTileXml.getElementsByTagName("image");
squareTileImageAttributes[0].setAttribute("src", "/images/green.png");

// include the square template into the notification
var node = tileXml.importNode(
              squareTileXml.getElementsByTagName("binding").item(0), true);
var visual = tileXml.getElementsByTagName("visual").item(0);
visual.appendChild(node);
visual.setAttribute("addImageQuery", true);
visual.setAttribute("baseUri", "https://win8imageserver.azurewebsites.net");

// create the notification from the XML
var tileNotification = new Windows.UI.Notifications.TileNotification(tileXml);

// send the notification to the app's application tile
Windows.UI.Notifications.TileUpdateManager.
     createTileUpdaterForApplication().update(tileNotification);
The most significant lines have been highlighted.
- The image location in the src attribute is now a relative reference, with the addition of the baseUri attribute to the visual element, which points to the new Azure Web Site.
- Don’t forget to set addImageQuery as well, or the scale, contrast, and language query string parameters will not be sent, and you’ll always get the default image!
By the way, both baseUri and addImageQuery are available at multiple levels of the template hierarchy, so you can easily mix the sources of images used in the same template. You can also use baseUri with ms-appx:/// and ms-appdata:///local/ to save some typing and to make it more convenient to modify the source of your image files.
Enhancing the User Experience with the Content Delivery Network
In both of the scenarios I’ve outlined, the Windows 8 application makes a request to Windows Azure blob storage for a given tile (either explicitly or through a redirect from a custom image server). Those images are all located in the single data center at which you’ve set up your Windows Azure account; in my case, it’s East US. That means a user running my Windows 8 program in Washington D.C. will hit that relatively local Azure data center, but so will a user located in Sydney, Australia, or Johannesburg, South Africa. Latency will of course be much greater for those distant users, and that’s what a content delivery network is designed to mitigate.
The Windows Azure Content Delivery Network (CDN) is a collection of edge nodes that cache content at various points around the world (24 as of this writing), each serving users who are in geographical proximity of that node. The first request for an image must be served directly from the data center, but then the image can be cached at the edge node for subsequent visitors to retrieve without incurring the latency involved in going completely back to the data center. 
The mechanism works by leveraging a special URL host name (in lieu of *.blob.core.windows.net) which is able to ascertain the closest CDN edge node and make the appropriate request to either that node or directly back to the main data center depending on the state of the cache.
To obtain that special URL, you’ll need to visit the previous (Silverlight) Windows Azure portal, since at this time the CDN provisioning functionality has not yet been incorporated into the HTML5 version, You can get to the Silverlight portal by clicking the Preview button at the top and selecting Take me to the previous portal.
In the portal, (1) access to the CDN functionality is via the Hosted Services, Storage Accounts, & CDN option on the left sidebar. CDN (2) is last in the list of subcategories that then appears directly above. That allows access the creation (3) and management of CDN endpoints.

When creating a new endpoint, you’re prompted for the Azure storage account to which the CDN applies as well as whether you want to enable HTTPS and query string awareness. I’ve opted into HTTPS capability, which means requests from the client to the CDN endpoint will be secured; however, communication between the CDN edge node and the Windows Azure storage account still occurs via HTTP. The Query String option isn’t relevant here; it’s used to differentiate cached dynamic content served by Windows Azure Cloud (Hosted) Services if you opt to cache such content.

It can take up to an hour for a new CDN configuration to propagate to all of the nodes, but once done, the CDN endpoint address will display in the portal:

The endpoint assigned in my case is https://az307128.vo.msecnd.net, so I can use that anywhere I would previously have used https://win8apps.blob.core.windows.net, and since I enabled HTTPS access, that scheme will work too. That means I can use
tileImageAttributes[0].setAttribute("src", "https://az307128.vo.msecnd.net/images/green.png");
for a direct reference to Windows Azure storage (keeping in mind it foregoes special handling of the scale, contrast, and language), or I can modify the node.js script (Line 20 in the gist) to
var AZURE_URI = "az307128.vo.msecnd.net";
and tap into the CDN with no further changes to the code!
Weighing the Options
In this post I covered several options for hosting notification images in the cloud, so which one is right for you? Well, the answer for questions like this is the overused "it depends," but there are some key considerations that may steer you one way or another.
Is the Cloud for You?
Hosting the images in the cloud decouples them from your application development and the Windows Store marketplace submission and therefore provides some agility in the development lifecycle and application customization. That comes at a price though - not just the monetary consideration for storage and cloud services, but also in the fact that if the application is not connected when a notification image is requested, the notification will not be served at all. For the best experience, an application would need to include explicit fallback functionality, like delivering a text-only notification in cases where there isn't connectivity. That's more code to write and test.
The Cloud isn’t Free.
Cloud services cost money (although you may be able to do quite a bit with the various free allotments available with offers like MSDN and BizSpark).
- For storing and accessing images from Windows Azure Storage, you’ll accrue a cost for the actual storage (as of this writing it’s at most $0.125 GB/month) and a transaction cost for each request to storage (at the rate of $0.01 per 100,000 requests). Chances are that’s much cheaper than the costs you’d accrue for replicating the functionality on-premises.
- If you additionally leverage the CDN, there is a separate schedule of charges, but it adds only a small overhead to the storage charges, with that overhead inversely proportional to the length of time a image can be cached. In other words, CDN becomes more economical the less the data changes and the more it is requested.
- If you leverage Azure Web Sites you can do so free for a year at this point; subsequent pricing has not yet been announced.
- Lastly, you can also leverage Windows Azure Cloud Services, namely a Web Role, to provide similar functionality as an Azure Web Site but with additional support for SSL, a Service Level Agreement (SLA), and more enterprise level features and integration points. The charge for Cloud Services varies with the size of the underlying virtual machine (VM) as well as the number of instances that are running. That said, the minimum configuration meeting the SLA requirements would currently cost 4 cents per hour.
Be Aware of Caching Behavior
Images for notifications are cached on the Windows 8 client automatically, so changes to the image may not be immediately reflected. The management of the local cache is also somewhat opaque to the developer, with images removed from the local cache when
- the cache is full,
- the application is uninstalled,
- the user clears personal information from all her application tiles (via the Settings on the Start screen).
If the CDN is being used, images may also be cached at edge nodes for either an explicitly defined or heuristically determined period. If an image is accessed only once in that expiry period, then the benefits of the CDN are nullified, with the added impact of roughly double the storage transaction and bandwidth charges
You can however exercise some control over the caching behavior: via the BlobProperties.CacheControl property on the blob itself, of if a web service is serving the image content, by setting HTTP response headers to enforce a specific caching policy.