5. Install and configure PowerPivot & PowerView in a scale out environment
This is an article part of a series of articles
- Introduction
- Hardware requirements and sizing [Coming soon]
- Software requirements [Coming soon]
- Database storage requirements [Coming soon]
- Install and configure PowerPivot & PowerView in a scale out environment --> You are here
- Known issues and workarounds
Important Acronyms
Acronym |
Meaning |
SSAS |
SQL Server Analysis Services |
SSRS |
SQL Server Reporting Services |
DB |
Database |
SSS |
Secure Store Service |
Introduction
In this section we highlight the steps for deploying and configuring PowerPivot for SharePoint 2013 for a scale-out environment. It will also explain the service accounts requirements for PowerPivot
This is part of a series of articles about PowerView and PowerPivot. To understand the server architecture and product versions we are targeting in this article please refer to the main article HERE.
Configuring Service Accounts for PowerPivot
To deploy and configure SQL Server Analysis Services for PowerPivot you need to configure two accounts:
- SSAS (PowerPivot) Service Account. Should be a domain account which will be used to run the SSAS (PowerPivot) windows service.
- PowerPivot Service Application app pool account
SharePoint and SSAS configuration wizard\PS scripts will take care of granting the required permissions on SQL Dbs as appropriate. Once the service accounts are set, any changes to either account must be made through SharePoint Central Administration. If you use alternative tools (such as the Services console application, IIS Manager, or SQL Server Configuration Manager), permissions will not be updated for database access in the farm or for local file access on the physical server. There is one exception to the SSAS (PowerPivot) windows service accounts if they reside in standalone servers (No SharePoint bits) you need to update the service accounts from the servers directly not via SharePoint.
Analysis Services for PowerPivot Service Account requirements
Requirement |
Description |
Provisioning requirement |
This account must be specified during SQL Server Setup using the Analysis Services - Configuration page in the installation wizard (or the ASSVCACCOUNT installation parameter in a command line setup). You can modify the user name or password using Central Administration, PowerShell, or the PowerPivot Configuration Tool. Using other tools to change accounts and passwords is not supported. |
Domain user account requirement |
This account must be a Windows domain user account. Built-in machine accounts (such as Network Service or Local Service) are prohibited. SQL Server Setup enforces the domain user account requirement by blocking installation whenever a machine account is specified. |
Permission requirements |
This account must be a member of the SQLServerMSASUser$<server>$PowerPivot security group and the WSS_WPG security groups on the local computer. These permissions should be granted automatically. For more information on how to check or grant permissions, see Grant the PowerPivot Service Account Administrative Permissions Manually in this topic and Initial Configuration (PowerPivot for SharePoint). |
Scale-out requirements |
If you install multiple PowerPivot for SharePoint server instances in a farm, all of the Analysis Services server instances must run under the same domain user account. For example, if you configure the first Analysis Services service instance to run as Contoso\ssas-srv01, then all additional Analysis Services service instances that you deploy thereafter in the same farm must also run as Contoso\ssas-srv01 (or whatever the current account happens to be). Configuring all service instances to run under the same account allows the PowerPivot System service to allocate query processing or data refresh jobs to any Analysis Services service instance in the farm. In addition, it enables the use of the Managed Account feature in Central Administration for Analysis Services server instances. By using the same account for all Analysis Services service instances, you can change account or password once, and all service instances that use those credentials are updated automatically. SQL Server Setup enforces the same-account requirement. In a scale-out deployment where a SharePoint farm already has an instance of PowerPivot for SharePoint installed, Setup will block the new installation if the Analysis Services service account you specified is different from the one already in use in the farm. |
PowerPivot Service Application App Pool Requirements
Requirement |
Description |
Provisioning requirement |
PowerPivot System Service is a shared resource on the farm that becomes available when you create a service application. The service application pool must be specified when the service application is created. It can be specified two ways: using the PowerPivot Configuration Tool, or through PowerShell commands. You might have configured the application pool identity to run under a unique account. But if you didn’t, consider changing it now to run under a different account. |
Domain user account requirement |
The application pool identity must be a Windows domain user account. Built-in machine accounts (such as Network Service or Local Service) are prohibited. |
Permission requirements |
This account does not need local system Administrator permissions on the computer. However, this account must have Analysis Services system administrator permissions on the local Analysis Services service that is installed on the same computer. These permissions are granted automatically by SQL Server Setup or when you set or change the application pool identity in Central Administration. Administrative permissions are required for forwarding queries to the Analysis Services service. They are also required for monitoring health, closing inactive sessions, and listening for trace events. The account must have connect, read, and write permissions to the PowerPivot service application database. These permissions are granted automatically when the application is created, and updated automatically when you change accounts or passwords in Central Administration. The PowerPivot service application will check that a SharePoint user is authorized to view data before retrieving the file, but it does not impersonate the user. There are no permission requirements for impersonation. |
Scale-out requirements |
None. |
Few notes before you deploy PowerPivot
- You can use a local Secure Store Service or connect to a remote Secure Store Service. If you choose to connect to a remote Secure Store Service the configuration wizard of PowerPivot will not work properly. So you would have to use the generated PowerShell script to configure PowerPivot instead. We show you how to do that later in the article.
- The steps in this document assumes knowledge of SharePoint. It also expect that you have installed and configured your SharePoint 2013 farm including a SQL Server engine to host SharePoint databases.
- In this article we are going to deploy SQL Server Analysis Services for PowerPivot on dedicated servers outside the SharePoint farm.
Steps to deploy PowerPivot
A- Get SharePoint farm Ready
- Create or Connect to Secure Store Service
- Start Secure Store Service on the App boxes in your farm
- Make sure that the Secure Store Service has an encryption key created
- Create Excel Services Service Application (if its not created yet). Has to be local in the same farm, so it cannot be hosted on a remote farm.
- Start Excel Services on App Servers
- Start the Claims to Windows Token Service (c2WTS) on all app servers.
- Increase the maximum size of allowed workbook (default is 10 MB) Max is 2000:
- Manage Service Application | Excel Services Application | Trusted File Location | (SELECT DESIRED LOCATION) à Change maximum workbook size:

- ** You might also need to increase the maximum upload limit for your Web applications (default is 250MB) if you are going to use large workbooks.
- Application Management | Manage Web Applications | (SELECT DESIRED APPLICATION) à click General Settings on the ribbon à Change “Maximum upload size”
- Configure an unattended account for Excel Services
- Install SQL Client tools (OLE DB Provider) on all App Servers running Excel Services. Read this: https://technet.microsoft.com/en-us/library/ee210608.aspx
- Install ADOMD.NET for SQL Server 2012 on WFE that hosts CA
B- Install SQL Server Analysis Services for PowerPivot (SQL App servers)
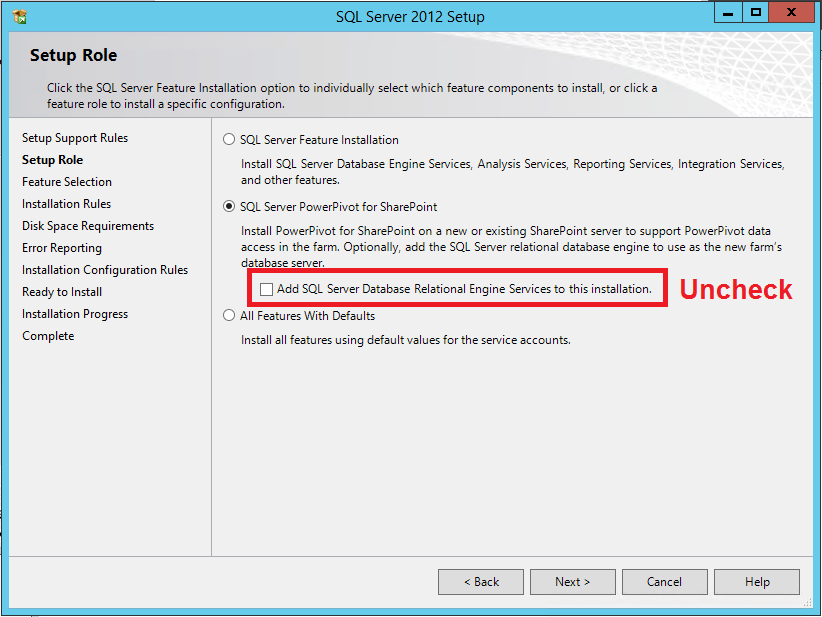
- Install SQL Server PowerPivot for SharePoint without SQL Engine on BI App Servers
- Uncheck the step that creates a database engine as its not required in a multitier deployment where we have a dedicated SQL Engine for all the SharePoint databases
- Make sure you add the account that runs the excel services to be granted “admin” privileges on the SSAS (PowerPivot) instance. All service applications that require access to the Analysis Services server instance need to have Analysis Services Administrative permissions. For example, add the service accounts for Excel Services, Power View, and Performance Point Services. Also, add the SharePoint farm account, which is used as the identity of the web application that hosts Central Administration.
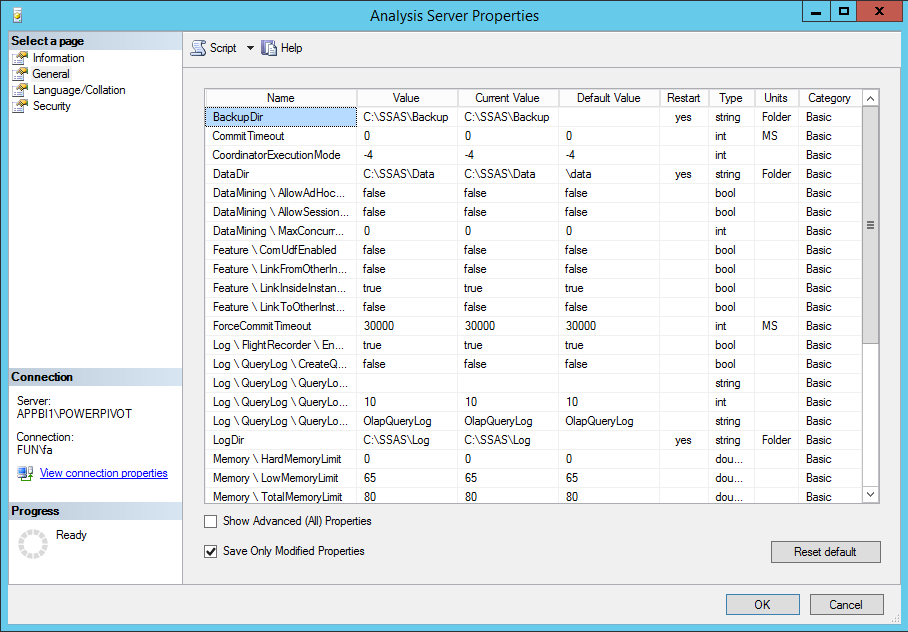
If you missed that step you can do it manually using the properties page of the SSAS (PowerPivot) instance in the SQL Management Studio, refer to the details at the end
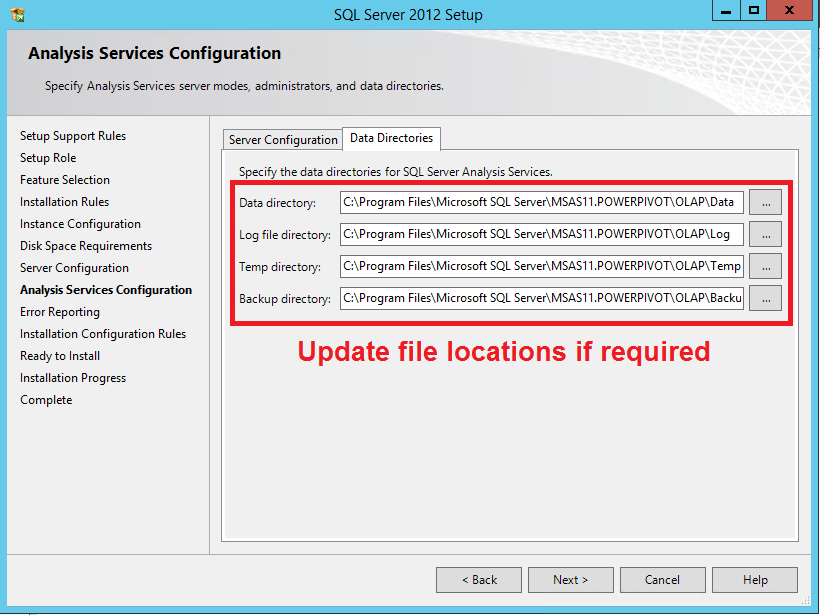
- Make sure you specify a location for the SSAS files storage especially the “Backup Directory” as this folder is expected to have high storage requirements.
You can change these settings after the installation is completed by connecting to the PowerPivot instance and going to the properties page:
2. Download and install spPowerPivot.msi for MS SQL Server 2012 SP1 on all App Servers that will run the PowerPivot Service application. Its recommended to install is on All SharePoint servers in case you decided to host Excel Services and PowerPivot services on different servers than the apps servers. It will also avoid any complaints from PSConfig (SharePoint Configuration Wizard) when ran for applying patches and updates.
3. Configure SSAS using “PowerPivot for SharePoint 2013 Configuration” application installed in the step above by running the “PowerPivot Configuration for SharePoint 2013” from the start menu not the “PowerPivot Configuration tool” as the last one is for SharePoint 2010. It’s important to note that using the configuration tool you can generate PowerShell script that allows you to automate and control the configuration process (like db names …etc.)
First time you run the configuration tool on one of the BI App boxes you will go through all the configuration steps starting with registering the box to host a PowerPivot instance up to creating the PowerPivot Service Application. If you have more than one server that will host the PowerPivot Service Application (recommended for redundancy) you can also run the config tool to add the server to the list of the servers that will host the PowerPivot Service application or you can run the following script:
 # Open PowerShell library from: C:\Program Files\Microsoft SQL Server\110\Tools\PowerPivotTools\SPAddinConfiguration\Resources\ConfigurePowerPivot.ps1

 New-PowerPivotSystemServiceInstance -Provision:$true
You can automate the SSAS for PowerPivot process using the following script:
SETUP.EXE /Q /IACCEPTSQLSERVERLICENSETERMS /ACTION=install /ROLE=SPI_AS_ExistingFarm /INSTANCENAME=POWERPIVOT /ASSVCACCOUNT="BI\BISERVICE" /ASSVCPASSWORD="pass@word1" /ASSYSADMINACCOUNTS="BI\BIAdmin" /PID xxx-xxxx-xxxx
Once the configuration is completed successfully you should see the following:
-
- SQL Server PowerPivot System Service started on all the app servers you configured SSAS (PowerPivot) at.
- The PowerPivot Service application created
- The PowerPivot Service application database created
- The PowerPivot Service Unattended account created and registered in the Secure Store Service
- The Excel Service Application is created (if it wasn’t already created) and configured to work with PowerPivot
4. Open ports for SSAS and SQL Browser Service on the BI App Servers:
https://technet.microsoft.com/en-us/library/ms174937(v=sql.110).aspx
Run the following in an elevated command prompt:
netsh advfirewall firewall add rule name="SQL-2383" dir=in action=allow protocol=TCP localport=2383
5. Add all SSAS BI App servers in the excel services Application Data Model Settings with the following format:
SERVER_NAME\POWERPIVOT
Manage Service Applications | Excel Service Application | Data Model Settings
The changes will take effect in a few minutes or you can Stop and Start the service Excel Calculation Services.
Another option is to open a command prompt with administrative privileges, and type iisreset /noforce.
You can verify the server is recognized by Excel Services by reviewing entries in the ULS log. You will see entries similar to the following:
Excel Services Application |
Data Model |
27 |
Medium |
Check Administrator Access ([ServerName]\POWERPIVOT): Pass. |
Excel Services Application |
Data Model |
27 |
Medium |
Check Server Version ([ServerName]\POWERPIVOT): Pass (11.0.2809.24 >= 11.0.2800.0). |
Excel Services Application |
Data Model |
27 |
Medium |
Check Deployment Mode ([ServerName]\POWERPIVOT): Pass. |
Repeat all the steps on section B to install and configure all your SQL Server Analysis Services servers for PowerPivot.
Steps to verify that PowerPivot is configured correctly
Note: If you already have an advanced workbook with slicers or filters, you can upload it to your SharePoint document library and verify you are able to interact with the slicers and filters from the document library view.
To verify that the SSAS for PowerPivot is running, RDP to the SSAS servers and run the following PowerShell command:
get-service | select name, displayname, status | where {$_.Name -eq "msolap`$powerpivot"} | format-table -property * -autosize | out-default
You should get something like this:
Verify that the PowerPivot Service application existing and started. To do that run the following PowerShell command (in a SharePoint PowerShell Command window):
Get-PowerPivotSystemService | select typename, status, applications, farm | format-table -property * -autosize | out-default
You should see a similar result to the folowing:
For more verification steps go to: CheckList: Use PowerShell to Verify PowerPivot for SharePoint
Steps to test PowerPivot for SharePoint
- Start a new workbook in Excel.
- On the Data tab, click From Other Sources on the ribbon in the Get External Data.
- Select From SQL Server.
- In the Data Connection Wizard, enter the name of the SQL Server instance that has the database you want to use.
- Enter the database instance Log on credentials, and then click Next.
- Select the database you want to use.
- Verify that the Connect to specific table checkbox is selected.
- Click the Enable selection of multiple tables and add tables to the Excel Data Model checkbox.
- Select the tables you want to import.
- Click the checkbox Import relationships between selected tables, and then click Next. Importing multiple tables from a relational database lets you work with tables that are already related. You save steps because you don't have to build the relationships manually.
- In the Save Data Connection File and Finish page of the wizard, type a name for your connection and click Finish.
- The Import Data dialog box will appear. Choose PivotTable Report, and then click Ok.
- A PivotTable Field List appears in the workbook. On the field list, click All tab
- Add fields to the Row, Columns, and Value areas in the field list.
- Add a slicer or a filter to the PivotTable. Do not skip this step. A slicer or filter is the element that will help you verify your Analysis Services installation.
- Save the workbook to a document library on a SharePoint Server 2013 that has Excel Services configured. You can also save the workbook to a file share and then upload it to the SharePoint Server 2013 document library.
- Click the name of your workbook to view it in SharePoint and click the slicer or change the filter that you previously added. If a data update occurs, you know that Analysis Services is installed and available to Excel Services. If you open the workbook in Excel you will be using a cached copy and not using the Analysis Services server.
Steps to install and configure PowerView
1. Install SSRS for SharePoint (Requires about 1.2 GB of disk space)
You need to install SQL Server Reporting Services for SharePoint 2013 to be able to use and display PowerView reports (Create\Open RDLX files).
If you only install the SSRS add-in without the SSRS for SharePoint 2013 itself you will see the icon that enables you to create “PowerView” appeared in the PowerPivot gallery:
but when you click on it, you will get the following error:
This SQL Server Reporting Services (SSRS) functionality is not supported. Use Central Administration to verify and fix one or more of the following issues:
|
Here are the steps to install SQL Server Reporting Services for SharePoint 2013:
The following steps needs to be done on all SharePoint App servers
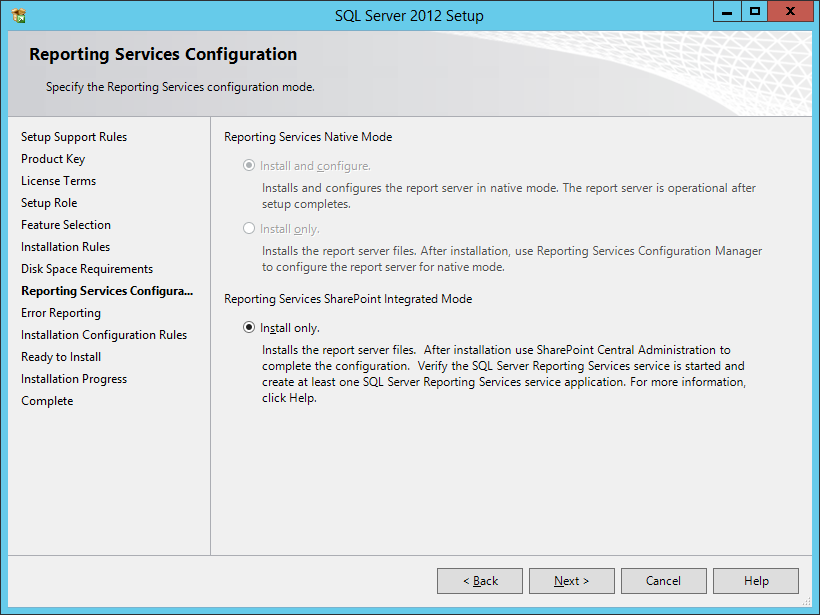
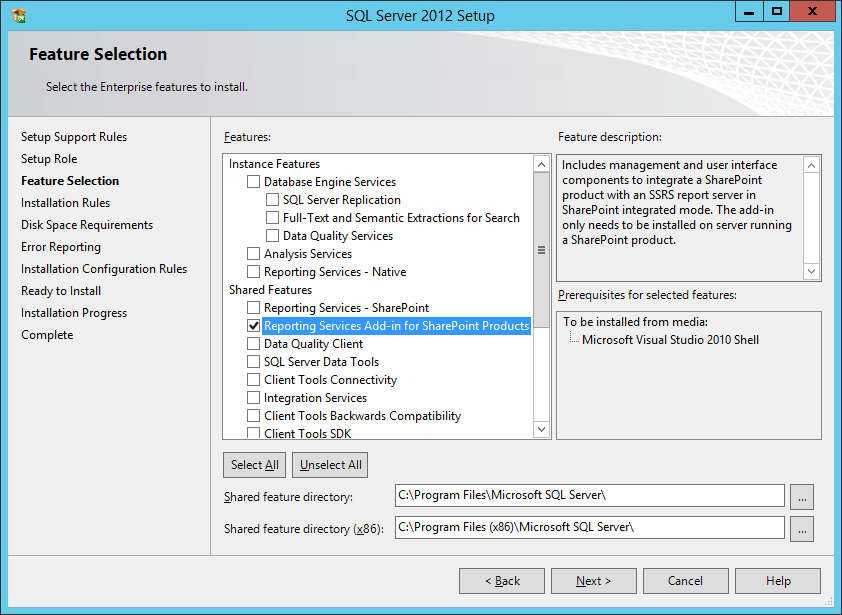
- Run the SQL Server 2012 SP1 Setup media and choose “Reporting Services – SharePoint”
- Create SQL Server Reporting Services Application
You can achieve this using the following script:
  Install-SPRSService

 Install-SPRSServiceProxy

 $appPoolName = "SharePoint Web Services System"

 $serviceAppName = "Reporting Web Service"

 $serviceAppProxyName = $serviceAppName + " Proxy"

 $appPool = get-spserviceapplicationpool $appPoolName

 $serviceApp = New-SPRSServiceApplication $serviceAppName -applicationpool $appPool

 $serviceAppProxy = New-SPRSServiceApplicationProxy -name $serviceAppProxyName -serviceapplication $serviceApp

 get-spserviceapplicationproxygroup -default | Add-SPServiceApplicationProxyGroupMember -Member $serviceAppProxy

 $serviceApp.ServiceInstances | Start-SPServiceInstance
If you have an existing instance of SQL Server Reporting Services and you want to make sure its started on the app servers, run the following PowerShell command on the designated app servers:
get-spserviceinstance -all |where {$_.TypeName -like "SQL Server Reporting*"} | Start-SPServiceInstance
2. Install SSRS Add-in for SharePoint.
Check the supported combination of SharePoint version, SQL Server version and add-in version here … If you don’t pick the right version of the add-in it will fail in the installation. Remember not all add-ins supports all versions of Windows Servers.
Here is the supported combinations that works with SharePoint 2013
Report server |
Add-in |
Add-in Supported OS version |
SharePoint version |
Supported |
|
1 |
SQL Server 2014 |
Windows 7 Service Pack 1, Windows 8, Windows 8.1, Windows Server 2008, Windows Server 2008 R2, Windows Server 2008 R2 SP1, Windows Server 2012, Windows Server 2012 R2 |
SharePoint 2013 |
Yes |
|
2 |
SQL Server 2012 SP1 |
Windows 7 Service Pack 1, Windows 8, Windows 8.1, Windows Server 2008, Windows Server 2008 R2, Windows Server 2008 R2 SP1, Windows Server 2012, Windows Server 2012 R2 |
SharePoint 2013 |
Yes |
|
3 |
SQL Server 2012 SP1 |
Windows 7, Windows 8, Windows Server 2003 Service Pack 2, Windows Server 2008 R2 SP1, Windows Server 2012, Windows Vista Service Pack 2 |
SharePoint 2013 |
Yes |
(rsSharePoint.msi) on All WFEs Servers from here
If you are getting and error during the installation of the add-in, make sure you run the configuration wizard for SharePoint and it runs successfully.
After your are done you should be ready to use PowerView
References
- Install SQL Server BI Features with SharePoint 2013 (SQL Server 2012 SP1)
- Microsoft SQL Server PowerPivot Planning and Deployment
- Plan a PowerPivot Deployment in a SharePoint Farm
- Software requirements for business intelligence in SharePoint Server 2013
- Hardware and Software Requirements (PowerPivot for SharePoint and Reporting Services in SharePoint Mode)
- Plan for PowerPivot Integration with Excel Services
- Hardware and Software Requirements for Analysis Services Server in SharePoint Mode (SQL Server 2012 SP1)
- Hardware and software requirements for SharePoint 2013
- Configure PowerPivot Service Accounts
- Create Your First PowerPivot Workbook (Tutorial)
- How to configure Claim to Windows Token Services in SharePoint 2010 with Kerberos Authentication
- PowerPivot Data Refresh with SharePoint 2013
- Power View Infrastructure Configuration and Installation: Step-by-Step and Scripts (SP 2010)
- CheckList: Use PowerShell to Verify PowerPivot for SharePoint
Comments
Anonymous
August 20, 2014
What's the benefit of adding multiple POWERPIVOT servers in the "Excel Services Application Data Model Settings"? Does this provide a level of resilience? How does this scale out? E.g. Does Excel Services attempt to balance the number of PowerPivot models across all servers? If a server is not available will Excel Services load the model to the next available server?Anonymous
August 21, 2014
@Matt. Correct. That will provide you load balancing and redundancy. So if one is not available the other will take the request. It also distribute the load using round robin technique. If a model is already loaded on one server it will continue to serve it from where its loaded. Here is more detail: Scale-out describes how physical service instances are used in the farm. Within a farm, a request for PowerPivot query and data processing can be allocated to any PowerPivot for SharePoint server that is available, where availability is determined by an allocation methodology. The default is round-robin that allocates requests in sequential order, but you can change the allocation method to use server health instead. Adding more PowerPivot for SharePoint servers to a farm adds processing capacity for all web applications that use that feature. You cannot scale PowerPivot processing for some web applications and not others; you cannot create an affinity between physical service instances and specific Web applications. All web applications that share a connection to any PowerPivot service application can use the processing capability of any new server that you add. from here: technet.microsoft.com/.../ee210603(v=sql.105).aspxAnonymous
September 30, 2014
- Do I need to do step B. on all App servers? If not does it mean It shall be only one instance of Analysis service but just scaling out the service application?
Anonymous
September 30, 2014
Do I need to do step B. on all App servers? If not does it mean It shall be only one instance of Analysis service but just scaling out the service application?Anonymous
October 30, 2014
Can this installation process be scripted? Or does it have to be a manual/wizard based install? We have tried using the PowerShell script it generates but it consistently fails to run.Anonymous
August 06, 2015
Hi Ahmed, Nice article and very helpful. I have few queries on installation of POWERPIVOT. I installed POWERPIVOT (On SP2013) and SSRS on SharePoint mode. Everything was working fine and but was stuck with following errors. 1.Scheduled Managed Data Refresh Error: "A schedule cannot be enabled for a workbook with no external data sources." and giving an error “Call to Excel Services Returned an Error” and Work book loading failed.
- Power View on PowerPivot Gallery: "An error occurred while loading the model for the item or data source 'zzz.com/.../PowerPivot.xlsx&. Verify that the connection information is correct and that you have permissions to access the data source." After few trials I uninstall the POWERPIVOT and Reinstall again. All the mentioned in pervious steps were resolved and everything is working fine. So the question -- What could have gone possibly wrong during the installation for which above mentioned errors appeared? I would appreciate if you can please help understand this installation issue. Regards Sakti
