TFS 2010: Adding Scheduling/Planning Hours to MSF Agile Bug Work Item Template
If you are an agile team, you are going to love TFS 2010 and especially it’s crucial dashboard capabilities that help you better plan and track your time. Software estimates are an art more than a science and it is one of the keys to growth for an individual developer at Microsoft. In short, accurate estimating is one sign of a seasoned developer. The success of projects are directly tied to the team’s accuracy at estimating. I recently received an email from a partner group here at Microsoft who was complaining at our “estimation” – the ironic thing is that this partner developer was making his complaint in a vacuum. He had no insight whatsoever into what our developers had on their plate. Had the developer been interested, they could have reviewed everything on our plate and understood better the overall estimates. The estimates, often, will include not just development of the fix but also testing such as adding a regression test.
The key “gap” we found in using TFS 2010’s MSF Agile template is an issue with the Bug work item type. If you are driving your business on estimation and accuracy of those estimates then you are missing a key component of Agile software development. According to Ken Schwaber and SCRUM for Team System, the concept of “bugs” are non-existent and a bug is simply a block of work that is formed as a “task” for the team to accomplish. In MSF Agile, you can at least effectively assign a bug directly to an individual on your team such as a developer which in our case was a major step up. However, ironically, when we ask the developer to please estimate the cost for the bug as we get closer to release we noticed that we had to keep these outside of TFS (like Excel) due to the lack of scheduling components in the bug work item.
A workaround for the lack of estimates included in the bug template, with TFS 2010’s linking functionality, is to create a “Task” work item that then links to the bug opened by your tester or users. Thus, for each bug you will double your number of items – one for the “work” and the “other” for tracking the bug’s history (build version found, etc.). Lots of work …
It doesn’t make a lot of sense if folks knew how easy it is to add “estimating” & “scheduling” into the bug work item type. In today’s post, I will walk you through this easy process as to maybe help someone out there who doesn’t like the workaround either.
TFS 2010 Power Tools: Your friend to work item template editing
The first step unless you are a seasoned TFS veteran is to grab the TFS 2010 Power Tools as it provides you the ability to utilize the work item template editor. This simple user interface provides you the ability to add fields, visualize the layout, and to some degree offers the ability to validate your update.
Editing Directly from Server versus Offline
The power tool gives you the ability to edit the work items directly (online) or to export/import from a file. For the purposes of this post, I’m going to show this functionality by editing it directly but may I recommend you *not* do this. Instead, my recommendation is that you add a source control entity to store your changes. This allows you all the benefits of source control such as versioning, check-in comments, and history. Very nice when you are editing the templates often like I find myself doing!
First Step: Understand the data you are using – Estimating
The first homework you have to perform is understanding the data you will be “adding” to the template. For example, is it a simple field control or an HTML control or is it a string or integer. The smartest step to take is to always see if you can utilize any of TFS’s built-in data fields. To do this, you can utilize MSDN’s site to determine what is available. The other option is if you know another work item type has the data available then you can open it up and determine its data type. In our case, we know we want to utilize the estimation fields (Original Estimate, Remaining Work, and Completed Work) fields available in the task work item type. Let’s get started there…
- Open Visual Studio
- Click Tools > Process Editor > Work Item Types > Open WIT from Server

- The Collection Connection screen will appear
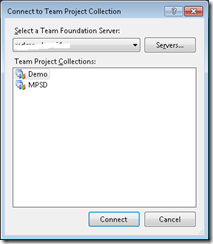
- Select your collection, and then the project you would like to work with
- Select the “Task” work item type
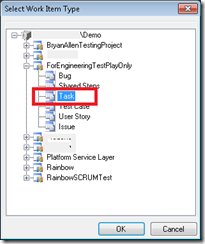
- The work item editor will open and has three tabs – Fields, Layout, and Workflo
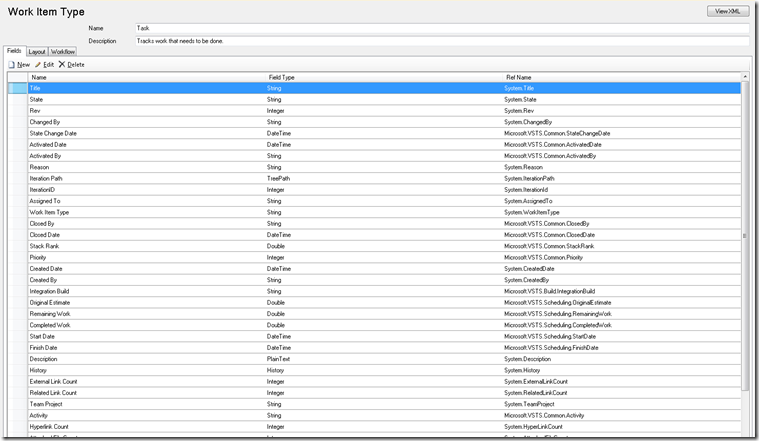
- Half-way down, you will see three items in the ‘Name’ field: Original Estimate | Remaining Work | Completed Work
- Note the following about each:
| Name | Field Type | Ref Name | Reportable |
| Original Estimate | Double | Microsoft.VSTS.Scheduling.OriginalEstimate | Double |
| Remaining Estimate | Double | Microsoft.VSTS.Scheduling.RemainingWork | Double |
| Completed Work | Double | Microsoft.VSTS.Scheduling.CompletedWork | Double |
This table serves as your “Cliff Notes” moving into Step 2 and ensures that any “reports” based on ‘effort’ will automatically pickup the effort data put into these fields and calculate them for an accurate assessment of where your project is based on the iteration start/end dates.
NOTE: It is not required that you “re-use” these fields and you can, in fact, create your own field types. This was only done as an example but also to maintain the quality of the reports created by TFS out of box.
Second Step: Create your fields in the bug work item type
The next step is to close the ‘Task’ and now open the Bug work item type. This is where you will go ahead and start editing the work item type. To do this, close the work item editor for Task. Let’s make changes…
- Click Tools > Process Editor > Work Item Types > Open WIT from Server
- Select Bug (Note: The previous connection should be re-used.
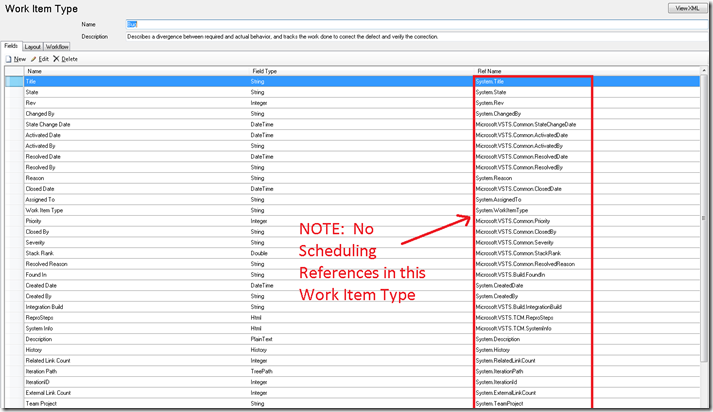
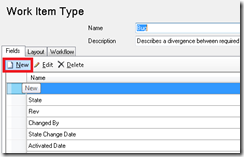
- In the Work Item Type editor screen, under Fields click New
- In the field definition, enter the following using the table provided above:
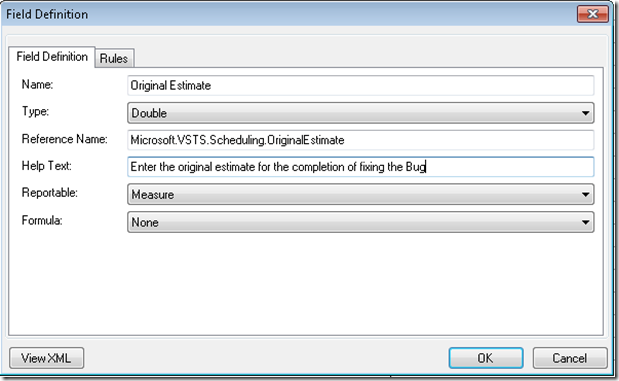
- Click OK
- Click New, add now the Remaining Work using the table provided above:
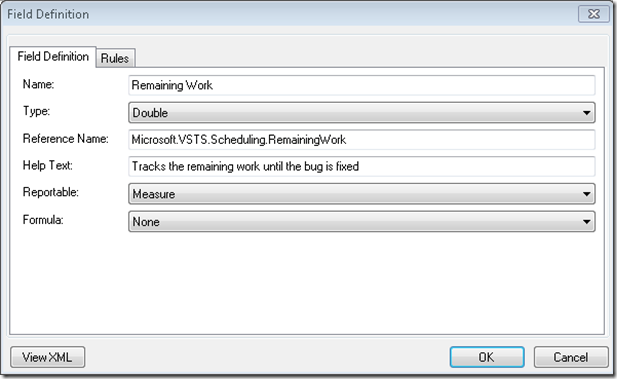
- Click OK
- Click New, add now the Completed Work using the table provided above:
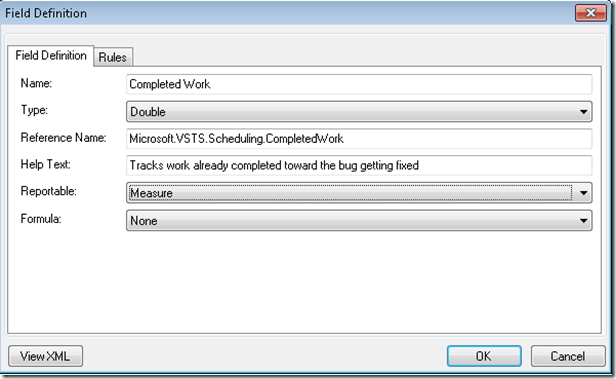
- Click OK
After you’ve done this, you will now should have the three new fields at the cottom of the Work Item Type fields screen like the following -
 You now have the fields to store the data, let’s move to putting them into the view so that your developers will see them.
Third Step: Add to your layout for the bug work item type
The next step gives you, the editor, the most freedom. It really is up to you where you expose the field and how you expose it. For the purposes of this post, I’m going to to use one of them that makes it front & center for the developer to see. Let’s put it into the layout…
- Click Layout
- Click Preview Form (it shows roughly what your bug item looks like)
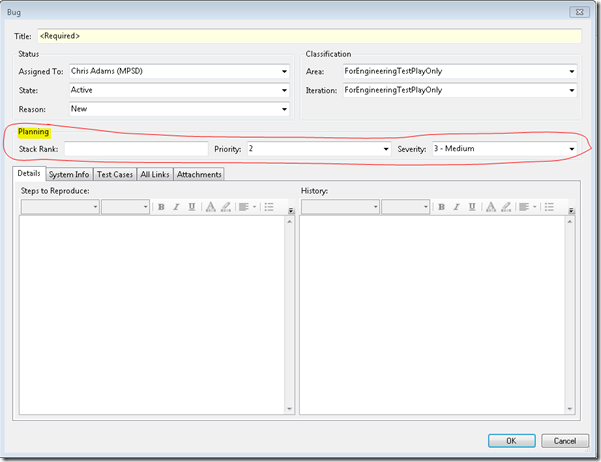
- Select where you are going to add the 3 fields (I’m picking the planning section since a lot of this is related to planning/scoping)
- Click Ok (closes preview)
- In the layout edit, locate the section where it says “Group – Planning”
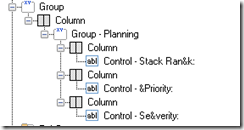
- Right-click on the Column above Group – Planning, select New Group
- Right-click on Group, select New Column
- Do this 1 more times which produces the following:
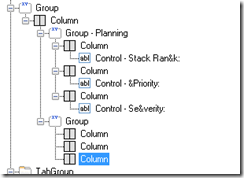
- Highlight the new Group, and in the right-hand pane under Label enter ‘Dev Estimates’

- To add the controls, you now highlight the first column, right-click and select New Control
- In the right-hand pane, lets add the data to bind the control to the field and your first one should look like the following:
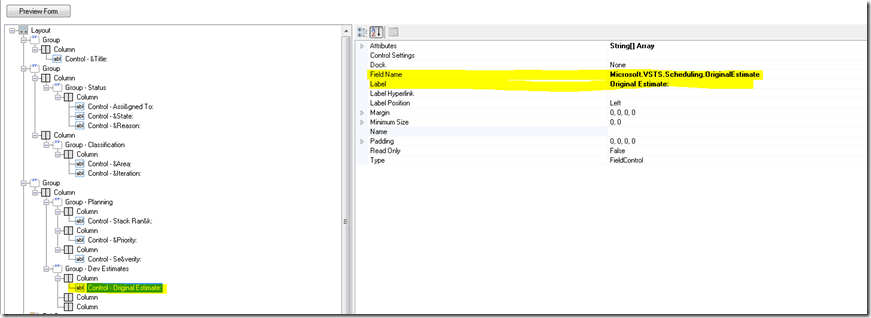
- Do the same thing for Remaining Work & Completed work for the additional columns until it looks like the following:
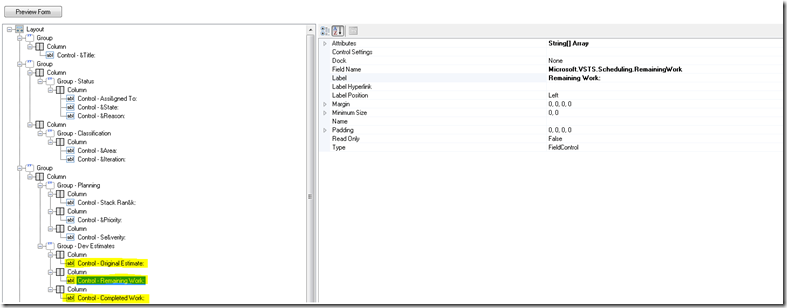
- The last thing to do is to make it pretty (or as much as you can), so to start select the first column with a single-click
- In the right-hand pane, under percent width enter 33 (as in, 33% of the screen)
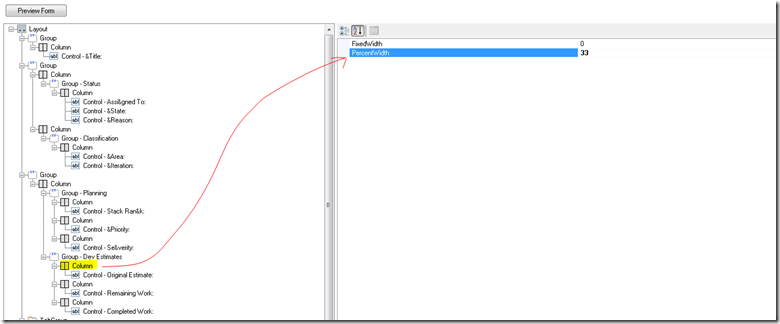
- For the second column, do the same and enter percent width of 33
- The same for the third column that then equals each column will take 1/3 of the layout to equal 99% total of the landscape. This should make it somewhat appealing to the eyes but this is completely subjective…
- Click Preview Form
The final form should come out looking similar to the below unless you missed a step :) … So with that lets show your magic and prepare to make all of your Dev’s angry but your life as the one whose butt is on the line for setting expectations on what can & can’t be accomplished this will save your butt.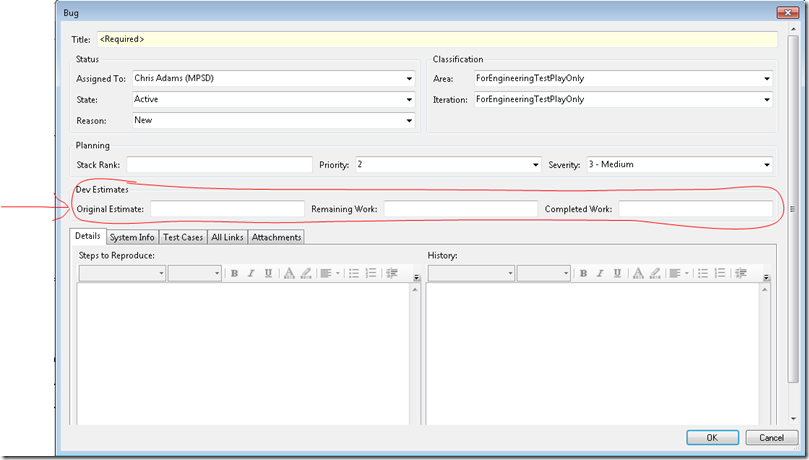
Fourth Step: Upload your changes and Verify
The last step is the easiest though can be the most complicated. I’ve seen instances where you’ve made a slight mistake and your unable to save the work item type back to the server. This can happen for many, many reasons so my suggestion is if you are unable to save and figure out what went wrong just start over. Nonetheless, you can then save it and then your in business.
To save, click File > Save or click the save icon on the toolbar. It does churn sometimes so don’t worry, you will know when it fails.
Testing, Testing, and Testing…
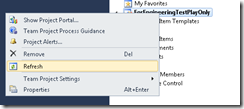
The last step is to simply fire up a new Bug but key thing to know is that you will need to refresh you project. This is required for the new work item type definition to get loaded. After you’ve right-clicked on the project, selected refresh, then right-click on work items and select New Bug.
 The new bug should display your nice new real estate created by you, master TFS man/women (kidding!). I suggest you create a new bug and save it to see it work end-to-end and then let your Devs know to start filling in the blanks on all those bugs opened by Test.
Summary
In today’s post, I hopefully helped you close the gap in your project planning by now allowing you to easily track work on new feature work plus any bugs created against those features. This is a nice thing to do in groups where often bugs are not, by definition, really bugs but instead “design change requests” or DCRs. If they were traditional bugs only then often the time to track the actual estimates isn’t worth the worry but since this isn’t often the case in software engineering, we need to find ways to manage these DCR bugs as well.
It should be noted that you didn’t require these fields to be mandatory and they do not have a default value hence those trivial bugs that are just fixed easily by Developers are not going to cause overhead and make ‘em angry.
Happy TFS’in… and happy Easter for those who celebrate like my family!
Thanks,
-Chris
Comments
Anonymous
January 01, 2003
Hey Dan- Good note and thanks for sharing. If I have time today, I might add a footnote to this blog with the details you outlined. Thanks, -ChrisAnonymous
January 01, 2003
The comment has been removedAnonymous
January 01, 2003
Hey Photologist- This is odd, for sure. Question - when you actually open the WIT from the server do you see the changes? I've seen this behavior before where I've made changes, then published to the project collection level and not to the specific project. This was corrected by ensuring that when I import the template I choose the project level - unsure if that is possibly the issue. I will be interested in what your response is about whether you see it when you open it on the server. Thanks, -ChrisAnonymous
January 01, 2003
Don't repeat my mistake in assuming that after adding the fields that they will appear automatically in the Burndown and Burn Rate reports (even those are designed to show effort). You have to "do some work and trickery" per this additional blog post of Chris': blogs.technet.com/.../reporting-dashboard-for-bugs-tasks-in-tfs-2010-monitor-your-sprints-closely.aspxAnonymous
January 01, 2003
Using Power Tools (VS2010 & TFS 2010), I added a new field to an existing work item type and placed in on the layout. I then upload to the server, but the new field does not appear. There were no errors on the upload and I have refreshed the project. Any ideas or things that I can do to get it to appear?Anonymous
January 01, 2003
Hi Alan- I apologize for the delay in getting back to you. These modifications should survive if you upgrade from one version of TFS to another. However, if you do a "migration" whereby you use the TFS Integration Tool and have parallel environments you would need to move the WITs yourself and they would be lost. Does that help? Thanks, -ChrisAnonymous
September 07, 2010
The comment has been removedAnonymous
January 30, 2014
Sorry for reviving an old post, but I'm contemplating doing this, but concerned about upgrading later. Am I right in assuming that these changes won't carry over automatically if one were to upgrade from TFS 2010 to TFS 2012 or 2013? One would need to make the equivalent changes on the upgraded system, but any existing items would lose their values, true? I'm very hesitant to make "customizations" like this, for fear of being burned on upgrades - but I'm getting a lot of pressure to add estimating fields to bugs and test cases. I'd be really happy if you could assure me my fears are unfounded.
