ZipApp – Can a non-coder use it to create an app with great content?
 ZipApp is a tool that claims to allow non-programmers to build Windows 8 apps quickly. Their claim seems to be accurate!
As Windows 8 matures, more tools and templates are appearing to help developers and non-developers create Windows 8 apps. Two weeks ago, I tested IdeaPress. Today, I will test ZipApp by creating an app for my sister’s running group.
The promise: “Quick, simple and faster than hell”, “You don’t need to be a programmer”
The reality: Yes, a non-programmer can build a useful app in an afternoon.
What will the app be able to do?
ZipApp supports creating apps with the following types of content
- Static content (hardcoded images, formatted text, and hyperlinks)
- YouTube
- RSS
What do you need before you start?
Not much, you should have an idea for a suitable app and the content you want to include in the app.
Will I need anything else to publish the app?
When you finish creating your app, the ZipApp tool will send you a .zip file containing the code for your application. You cannot just take that code and publish it to the store. You will need Visual Studio 2012 and the Windows 8 Software Development Kit (SDK) to build the package that you submit to the store. Installing the Windows 8 SDK requires Windows 8. So all that to say, if you plan to publish the app you need
- Windows 8 installed (find out how to get and install Windows 8)
- Windows 8 SDK installed, this will install Visual Studio Express – find out how to install the Windows 8 SDK
Now let’s dive into the tool and see how it works!
Create an account
Visit ZipApp and create yourself an account by selecting Register

You can use a Twitter, Facebook, Microsoft, or Google account to log in, or you can just create a local account with a username and password of your choice.
Create your first application
Once you log in you are brought to your application screen. The developer of this tool must have a sense of humour, when you first log in you get a message “Yikes! You don’t have any applications…Click the ‘Create New’ link below to create one.”
As per the instructions, select Create New to create your first application

Enter Application Details
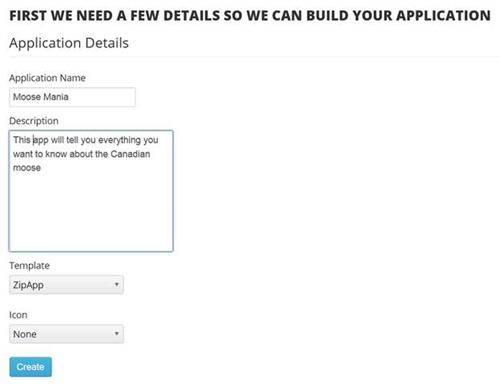
Next you are asked to enter some basic information about your app: a name and a description.
Select one of the predefined templates, they give you a snapshot so you get a sense of how the application will look with each theme.
Select a pre-defined icon. The icon you select will appear as a logo for your app on tiles, and if you have a blog feed with posts that do not have associated pictures, the icon will appear as a default image.
NOTE: I couldn’t find a way to upload my own icon, which was a little frustrating because I had a logo I wanted to use. If this really bugs you, it is possible to open up the application code after you get the package from the tool and replace the logo. Of course that means if I use the tool to update my app later I’ll have to re-do the work of replacing the icon. Maybe down the road they will add a browse to upload your own icon.

When you have entered your information select Create to continue.
NOTE: You can come back later and change any of these settings and values later if you change your mind.
Adding content to your application
Now you are back at the application dashboard and you can see your Application in the list. To add content to the application you need to create groups and articles.
Select View Groups to start adding content.

Since you have no content you see an empty list and a suggestion to create a new group.

What is a group?
There are 5 types of groups you can create

- Static Content – this type of group contains hard coded content that you include. For example you could include a club charter, or a team schedule. One static content group can contain multiple articles. So you could have a Hockey drills group that contains 10 articles each describing a practice drill you can do to become a better hockey player
- Twitter – Twitter groups display the twitter feed for a particular twitter handle or hashtag, you just provide the tag or handle
- Facebook – Facebook groups display the content from a Facebook page. Just specify the URL of the Facebook page to start grabbing the content
- YouTube – YouTube groups add a YouTube playlist. Just specify the YouTube username of the user whose playlists you want included
- RSS – If you have a blog or other content from an RSS feed you want to include in the app, you can specify the RSS feed URL to display that content as a group.
NOTE: You can re-order the groups after you create them by clicking on the arrows icon

Creating a Static Content group
I want to include a calendar of different races. Sadly, there is no RSS feed for that, but I do have a list of them I can provide as static content

A Static group by itself doesn’t display any content, so now I have to define articles to display in the group. For each article I can include formatted text, images, and hyperlinks.
Select View Articles to start adding content to the group.

Now I can add my first article to the group by selecting Create New on the Articles page.

Now I can specify a name, subtitle, and description for the article. I can also specify an image to display above the article.
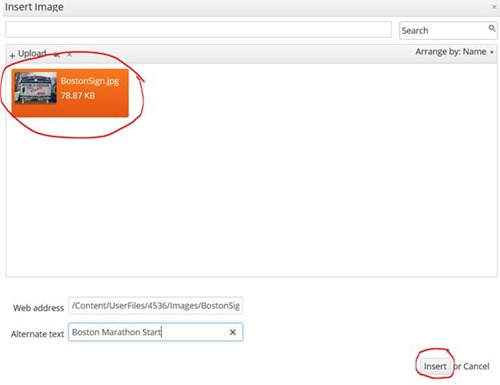
If you decide to upload an image. You must browse to the image you want uploaded, then select the image and choose Insert to add it to your article.

NOTE: The image is optional, if you don’t specify one, the app will display the icon you selected when you created the app as an image. Including images for each article makes for a more attractive application.
NOTE: I found uploading images a bit buggy. It always showed the spinning icon as if it was still uploading, but when I selected Cancel and came back to the image screen, the image was in fact uploaded and I was able to select it and add it to my article.
Continue adding all the articles you want in the group. When you are ready to add a new group just click on Groups in the left hand menu.
Creating a Facebook group
This is really easy, just create a new group. Select the Facebook tab and then enter the page for the Facebook page whose posts you want fed into the application.
NOTE: You don't enter the entire URL just the page name, so for example if the page is at www.facebook.com/MyGreatPage you would just specify MyGreatPage in the Page field. I made the mistake of putting the entire URL and couldn't figure out why my Facebook group wasn't appearing. I didn't get an error message, I just didn't see the Facebook group in the finished app.

Creating a Twitter Group
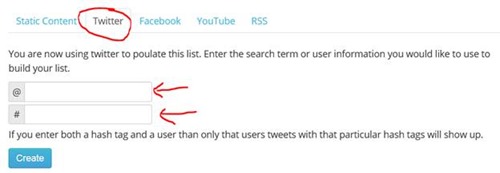
Creating a Twitter group is easy. Create a new group, select Twitter and specify either a twitter handle or a hashtag you want to use as search criteria for tweets to display in your app.

NOTE: Make sure you read the small print here, if you enter a hashtag AND a twitter handle, you will only see tweets from the specified user which use the specified hashtag!
Creating a YouTube Group
Creating a YouTube group is easy. Create a new group, select YouTube and specify either a Username whose YouTube Playlists you would like listed, or the RSS feed for a YouTube feed.

Creating an RSS Feed Group
Creating a RSS Feed group is easy. Create a new group, select RSS and specify the URL for the RSS feed (e.g. a blog feed) whose content you would like listed.

Generating the app
After you have defined all the groups and articles for the content you want to provide in your app, it’s time to download the app. Select Download from the top bar.

At the bottom of your screen (at least in Internet Explorer, that’s where it appears) You will see a pop-up showing a .zip app you can save to your computer.

Save the file to your computer.
Congratulations you have just built an app!
Yeah, I know, seeing a .zip file, or a list of files inside a .zip file isn’t that exciting, so let’s look at how you test and publish the app.
How do you test your app?
You will need to install Windows 8 and the Windows 8 SDK to test your application and see it running.
Once you have the Windows 8 SDK installed, launch Visual Studio 2012.
If you unzip the .zip file you downloaded, you will see the files that make up your Windows 8 app. The file with the extension .jsproj is the file you want to open from Visual Studio.
In Visual Studio on the top menu select File | Open | Project/Solution and then browse to and select the file ZipApp.jsproj
You may be prompted whether you will allow Visual Studio to open projects from untrusted sources. You cannot open the file in Visual Studio unless you select OK.

The project will now be loaded into Visual Studio. You can see the files listed in the Solution Explorer pane on the right hand side.

There are two ways to test the game.
- You can launch it inside a simulator, this pops up a separate windows on your desktop with the game running inside the window. It takes up more memory and will be a bit slower to launch if you run it this way.
- You can launch it on your local machine. If you do this, your PC will actually run the game as if you had clicked on the tile to launch the game from your Start Screen. When you want to exit the game and go back to Visual Studio just use <CTRL>+<D> on your keyboard to return to the desktop.
To test your app, go to the menu and find the drop down arrow beside the play button where it says Local Machine, use that drop down to select either Local Machine or Simulator.
After you select your preferred testing option, select the play button or use <F5> to start the game.

Go ahead and try it!
NOTE: For some reason when I ran my app the first time I got a message telling me “my file content does not conform to specified schema” because my description attribute was invalid. When I double clicked on the error message it opened up the AppxManifest.xml file and when I scrolled over on the line that said started with <VisualElements I noticed some weird characters in the middle of my description string “#A13;D45” stuff like that. When I deleted those extra characters, the error went away.

Once your app is up and running try it out! select different groups and articles to see how it works.
NOTE: Unfortunately Search and Share do not seem to be supported. I suppose that might be difficult to do with all the different content, but it’s a shame, because Search and Share are great features to support in a Windows 8 app. As a programmer I can always add those features after the fact.
When you want to leave the app, return to Visual Studio (<CTRL><D> takes you back to the desktop) and select the Stop button to Stop running the code.

Now that you have seen the app in action, you may wish to go back to the ZipApp website and change the theme, the icon, add additional content, or change titles and subtitles and regenerate a new copy of the app. Do this as often as you want until you are happy with the results.
How do I publish the app?
This How to Publish an app post provides detailed step by step instructions on how to publish your app.
NOTE: If an app connects to the internet that means it gets the IP address from the user’s computer. Since it is accessing information from the user that means you have to provide a privacy policy that declares how you use that information.
The privacy policy has to go in 2 places
- In the About settings of the app
- When you Submit the app to the store under the Description section you have to provide your privacy policy
What’s great about ZipApp is it generates a web page with a privacy policy for you and puts it in the About settings. YOU have to get the URL for that privacy policy and put that in the privacy policy field when you submit your app to the store.
To get the URL for your app’s privacy policy:
- Launch your app
- Bring up charms <Windows>+<C>
- Choose Settings
- Choose Privacy
- It will launch a browser showing the page with your privacy policy.
- Copy the URL from that page and specify that as the privacy policy for your app when you submit it to the store.
In Summary
ZipApp does allow someone with no programming experience to create an nice app with good content. It does not support key Windows 8 features such as Search and Share. You do require Windows 8 and the Windows 8 SDK to publish your application. There appear to be a few minor bugs, but all in all, a very nice tool for those who want to build an app but do not have the coding experience.