Step-by-Step creating an app to find the nearest…
Can you really just take a template, change the data source and have a useful app? If you find the right data source, then the answer is yes.
OpenDat a is an amazing concept. Organizations (especially municipal, provincial, and federal government) give the public access to their data so it can be used for websites and apps.
That’s how we get apps that tell us stuff like how did this restaurant do on the health inspection, or find the hockey arena. I was very excited when I saw the Finder App Template developed by Mark Arteaga because it claims to be a template that allows you to use Open Data to create a useful Windows 8 app.
The promise: A template developed to allow developers to quickly and easily create a location based type application for the Windows 8 store. It allows a developer to easily pull existing point of interest data into the app to visually display on a map.
The reality: It works, but there is little extra homework for the app developer. You have to get a Bing Maps Key so your app can use Bing Maps (details in the section “Creating a Bing Maps developer account”.) It will take you a little while to find a suitable Open Data set (details in the section “finding a data source”), and you’ll have to edit the code to add a privacy policy (details in the section “Adding a privacy policy”) but once you overcome those hurdles, you have an app with very good functionality!
- Map displaying the points of interest
- Ability to show detailed information for a particular point
- Ability to search the data using the search charm
- Ability to share a particular point of interest on the map with the Share Charm
- Ability to get directions from current location to a selected point of interest on the map
What will you need before you start?
- The Windows 8 SDK installed on your PC (which includes Visual Studio 2012 Express)
- The Bing Maps SDK installed on your PC (since this app template uses Bing Maps)
- An Open Data Source, in JSON format, that contains latitude and longitude information (more information on that and how to find it in the explanations below
- A name for your application
Downloading the template
The template is available on github it’s called Win8_FinderApp_Client
You download it by selecting the Zip button from the toolbar
Then you just unzip the file and you will have an Project that shows you a map representing flu data.
Running the project the first time
If you are like me you will want to run the project as is to make sure it works before you start making any changes.
To open the project in Visual Studio, go the folder where you extracted the zip file. Go to the subfolder Win8_Finder_App_Client-master | FinderApp and you will find a file called FinderApp.sln. Double click on the FinderApp.sln file to open it in Visual Studio. 
As always happens when you try to open an open-source project in Visual Studio, you are warned that Visual Studio has no way of knowing if you can trust this source code, you will have to select OK to continue and open the solution.
 Debu
Debu
After the project is open in Visual Studio, launch it by selecting the Debug button on the top menu.

If you have not already installed the Bing Maps SDK the app will not run and you will get the following error message.

You can download the Bing Maps SDK here
The app will launch and ask permission to access your location (that enable the app to provide directions to the locations on the map). But when the app launches you get an error message on the screen
“The specified credentials are invalid. You can sign up for a free developer account at https://www.bingmapsportal.com”
You see this app template uses Bing Maps, and in order to use the Bing Maps API in an app you have to sign up for a Bing Maps developer account. Creating an account is free, so don’t let this stop you from continuing.
Creating a Bing Maps Developer Account
Okay so let’s create a Bing Maps Developer Account and then maybe we’ll be able to get rid of that error message, besides which we’ll need it for our app!
Go to www.bingmapsportal.com and select Create a Bing Maps Account

You will be prompted to log in with a Microsoft account (e.g. live.com account, outlook.com account). If you don’t have one you can create one now by selecting Sign Up Now from the bottom right corner of the log in screen. You will need a Microsoft account to publish your app to the store anyway.
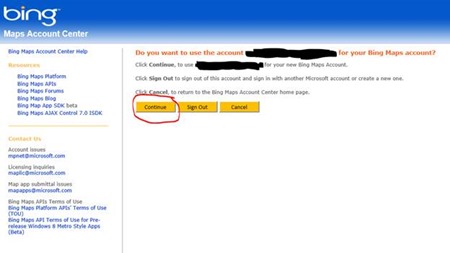
Then you will be asked if you want to use this Microsoft account as your Bing Maps Account.
Select Continue to continue and access your Bing Maps Account.
Now you specify the account details for your Bing Maps Account

Okay you have an account, now what!
Getting a Bing Maps Key
Bing maps offers some great services, and if you start using their services a lot, at some point you end up paying for them, but don’t worry, you won’t reach that point building one Windows 8 app!
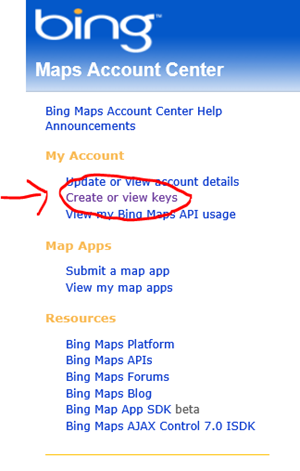
For each app that you build that will access the Bing Maps APIs you have to have key. So the next step is to Create a key. Select Create or view keys from the left hand menu.
If you read the notes under the heading My keys, it says you can create two keys (Trial or Basic) for most application types and one additional Windows Store app Trial key under this account. Trial keys expire after 90 days. If you are just exploring you can create a trial key, but I want to publish my app so I am going to create a Basic Key that will not expire.
So I specify the name of the application I am creating, key type Basic, and Application Type Windows Store App, then I enter the captcha (that’s what they call those combinations of characters used for security), and select submit.
NOTE: If you aren’t sure what app name you want to use, don’t worry. You can come back and change the app name later.

After you hit submit you should see a message Key created successfully and at the bottom of the screen you will see your Key, along with the associated app name and expiry date. If you selected a Basic Key type Expiration Date should be None.
Updating the Finder App to use your Bing Maps account
Now you have a Bing Maps account and a key, we can return to Visual Studio to update the code with our key and get rid of that error message!
In Visual Studio go to the Solution Explorer window, expand the js folder and double click the config.js file to open it in the code editor window.

Now Search through your config.js file <CTRL><F> can be used for search, or you can just scroll down and find bingMapsKey
Change the string “SET-YOUR-KEY-HERE” to the key you just created in your Bing Maps account
bingMapsKey: "SET-YOUR-KEY-HERE"
becomes something like the following
bingMapsKey: "CjPXec5-PjxGZYbhyroKJlNr-eGxSNnB1MG5j-QtvhRYhvxlj7Go67zqnUiMoKiI"
NOTE: Yes you can cut and paste the key from the screen in your browser!
Now run the program again, you should no longer see the error message and you can now try out the app, click on one of the pushpins, choose directions or details, try bringing up the Charms ( <Windows><C> ) and try Search or Share.
Congratulations you now have a valid Bing Maps account, so now all we need to do is change the data displayed in the app!
Finding a data source to display in your app
If you scroll through the config.js file you will find the following code, this is the code that defines what data will be displayed on the map.
/**
Sample Flu Data from server
**/
appName: "Sample Server Flu Data",
staticUrl: "https://finder-server-sample.azurewebsites.net/api/data/flu_data",
pathToArray: "",
latitudeField: "latitude",
longidudeField: "longitude",
nameField: "location",
secondaryField: "address",
detailField: "location",
If you read Mark Arteaga’s Finder App quick start guide, when he describes the point of interest data, he mentions that you have to have JSON data.
NOTE: If you are a coder and comfortable with data, you can of course update the code to read other data formats. But if you are not a coder, I would suggest you find a data source that provides the JSON format to keep it simple for now.
So where do I find Open Data in JSON format that would be good for a Windows 8 app?
There are LOTS of Open Data Catalogues out there, so now it’s time to have some fun doing some pouring through web sites and see what you can find.
Try search terms such as “your city name” “Open data” you may discover your hometown has an open data catalogue ready to use. You can also search for open data for a particular country or region.
I grew up in Fredericton, New Brunswick, so let’s see what I can find for Freddy Beach…

Instantly you see an Open Data Home page for the City of Fredericton, further down there is another promising link called Open Data Sites which appears to provide a catalogue of open data for the government.
Once you select a link, try to look for a list of all the different open data available, it’s often referred to as a Data Catalogue.
Once you find that list, keep an eye out for the Format! You are looking for data that is in JSON format.

Some data catalogues will even let you search by format, which is helpful since we are looking for a specific format.
Unfortunately Fredericton has lots of great data, but none of it is JSON, so let’s try somewhere else!
The City of Vancouver has some JSON, this is interesting, how about data about local playing fields and their status. I might well use an app that I could quickly use to see if my soccer or softball field was open the day after a big rain storm or early in the spring when the snow is still melting.

If I click on the Lync to see the JSON Data, I see the following data for each park:
{
"json_featuretype":"WeekendPlayfieldStatus"
,"weekend_status":"User discretion"
,"park_name":"Adanac Park"
,"closure_notes":"Summer field"
,"site_area":"NW"
,"park_id":65
,"last_updated":"May 3 2013"
}
If you look back at the flu data currently being displayed in the app, you will notice it has a latitude and a longitude field. If I want to display pushpins on a map for each location, I need latitude and longitude data. So Although this data about parks in Vancouver is in the correct format, it doesn’t have the fields I need to use it in this template.
So I’ll keep looking…If I visit the City of Toronto, their Green P Parking data is JSON
Let’s check out the data, at the link
{"carparks":[{"id":"1","address":"20 Charles Street","lat":"43.668997","lng":"-79.385093","rate":"$2.00 \/ Half Hour"
BINGO! We have a winner, the lat & lng fields look like co-ordinates to me!
So you can see part of the challenge when using this template is finding suitable data. It’s out there, you just have to do a little digging to find useful data in the right format.
I do think an app to help someone find a parking lot in Toronto would be useful!
Updating the app to point to your chosen Open Data source
Now I go back to Visual Studio and edit the config.js file. You can find additional instructions in Mark Arteaga’s Quick Start guide in the customization section for these steps as well.
Remember that code we saw for specifying the flu data?
appName: "Sample Server Flu Data",
staticUrl: "https://finder-server-sample.azurewebsites.net/api/data/flu_data",
pathToArray: "",
latitudeField: "latitude",
longidudeField: "longitude",
nameField: "location",
secondaryField: "address",
detailField: "location",
We need to change that to point to our data!
Let’s update the values
- appName should be our app name, in this case “Toronto Parking”
- staticURL should be the URL that points to the JSON data we found in the open data catalogue.
- pathToArray is going to depend on what your JSON data looks like. You see at the start of my data before the open bracket where it starts listing the data for each individual parking lot? Where you see the string “carparks” that is the pathToArray. Here’s another examples, so you can see the pattern. Go to splash parks in Milton JSON, you will see a pathToArray of “items”.
- LatitudeField – should be the label for the field that contains the latitude, for my data that is lat
- longitudeField – should be the label for the field that contains the longitude, for my data that is lng
- nameField – is the field that appears in the table on the left hand side of the screen under the column heading Name. the parking lots don’t have a name field, so I think in my case the address would be useful to display in the table
- secondaryField – is the additional field that appears in the table on the left hand side of the screen. I don’t really have a name field, but I think it might be helpful to indicate if parking is a surface lot or a garage (in winter a garage means you don’t have to brush the snow off your car), so I will choose the carpark_type field to display in the table.
- detailField – this is the extra information displayed when someone selects details for a particular lot. I think the most useful information to display from my data set would be the rate for the parking lot.
So when I update the code to point to my new fields (and update the comments to indicate that this is parking lot data not flu data, my code looks like this.
/**
Toronto Parking Lots
**/
appName: "Toronto Parking",
staticUrl: "https://www1.toronto.ca/City_Of_Toronto/Information_&_Technology/Open_Data/Data_Sets/Assets/Files/greenPParking.json",
pathToArray: "carparks",
latitudeField: "lat",
longidudeField: "lng",
nameField: "address",
secondaryField: "carpark_type",
detailField: "rate",
When I am done and I run my app it looks like this

If I select a pin on the map and choose details you can see the detail pane with the parking rate

So now I have a working app that displays the location and information about parking lots in Toronto. Now I just have a little tidying up.
I don’t like the title Location for my garage type, so I want to change that header.
I did a quick search of all the files in the project for the word “Location” using <CTRL><SHIFT><F> or you can go to Edit | Find and Replace | Find in Files. I found a declaration of the table header in the file home.html.
<thead>
<tr>
<th class="hidden"></th>
<th><span id="distanceHead" class="header">Distance</span></th>
<th><span id="nameHead" class="header">Name</span> <span id="nameFilter" class="filter win-answerButtonGuide win-replayWriting"></span></th>
<th><span id="addressHead" class="header">Location</span> <span id="addressFilter" class="filter win-answerButtonGuide win-replayWriting"></span></th>
</tr>
You can change the string “location” to “type” to change the column heading.
Updating the messages and text in the app
Okay now back to Mark’s starter guide to see what other messages I should customize so the app better represents the data I selected. Scroll down to the Config.JS section where he mentions Helper Text. These are messages that would be displayed to the user, so I should make sure they are suitable for my data.
/***************************************************
* Various helper text
***************************************************/
waitText: "Finding parks near you ...",
poiDataAvailable: "Found {0} parks!",
noPoiData: "Unable to find parks :(",
noPoiDataMessage: "We could not locate any parks near your location.",
noPoiDataMessageTitle: "Parks Unavailble",
includeUserLocationOnPoiSelected: false,
includeUserLocationOnPoiDisplayed: false,
Here’s a description of the above data
- waitText – the text to display while a search is in progress
- poiDataAvailable – text to display when data is found
- noPoiData – text to display when no data is found
- noPoiDataMessage – text to display in message box when no data is found
- noPoiDataMessageTitle – the title of the message box for noPoiDataMessage
- includeUserLocationOnPoiSelected – determines if the users current location should be included in the map bounds when a POI item is selected
- includeUserLocationOnPoiDisplayed – determines if the users location should be included in the map bounds when all the POI data is displayed on the map
Let’s update the values for our data
/***************************************************
* Various helper text
***************************************************/
waitText: "Finding parking lots near you ...",
poiDataAvailable: "Found {0} parking lots!",
noPoiData: "Unable to find parking lots :(",
noPoiDataMessage: "We could not locate any parking lots near your location.",
noPoiDataMessageTitle: "Parking lots Unavailble",
includeUserLocationOnPoiSelected: false,
includeUserLocationOnPoiDisplayed: false,
Mark also mentions that the config.js file allows you to configure the information that is shared from your app if a user selects the share charm for a particular location. You can configure the data that will be shared.
/**************************************************
* SHARING CONFIGURATION
*
* available tokens:
* nameField: this is the nameField element of the given point.
***************************************************/
shareTitle: "Finder App",
shareText: "I'm at {{nameField}}",
shareDescription: "Finder Share Description",
Since the nameField contains the address of my parking lot, and I think that’s useful information to share, I only need to update the wording.
shareTitle: "Find a Toronto Parking Lot",
shareText: "I'm parking at {{nameField}}",
shareDescription: "Sharing selected parking lot",
Below you can see how the shared data appears if you choose to share it by email.

Next I should update the text that appears if someone brings up the About page under the Settings Charm
/***************************************************
* About Flyout text
***************************************************/
aboutText: "This application is built on top of the <b>Finder App Template</b>",
copyright: "RedBit Development © {0}".format(new Date().getFullYear()),
version: RedBit.Utilities.appVersion(),
versionFriendly: RedBit.Utilities.appVersionFriendly(false),
contactUsText: 'If you have any comments or suggestions for {0}, email us at <a href="mailto:support@redbitdev.com">support@redbitdev.com</a>'.format('Finder.Config.appName'),
So if I update the fields
aboutText: "This application is built on top of the <b>Finder App Template</b>",
copyright: "HockeyGeekGirl © {0}".format(new Date().getFullYear()),
version: RedBit.Utilities.appVersion(),
versionFriendly: RedBit.Utilities.appVersionFriendly(false),
contactUsText: 'If you have any comments or suggestions for {0}, email me at <a href="mailto:xyz@microsoft.com">HockeyGeekGirl</a>'.format('Toronto Parking Lots'),
Now my About page looks like the screenshot below.

Customizing logos and the splash screen
Setting logos
If you expand the images subfolder you will see the files used for the logos and splash screen. If you replace these files with new images with the sizes specified below, you can display your logo for the tiles and splash screen.
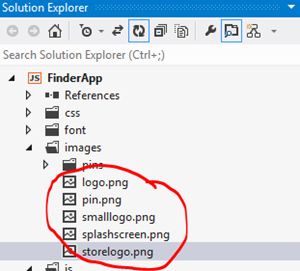
- Logo.png - 150x150 pixels - displays on the tile on the start screen
- Smalllogo.png – 30x30 pixels – displays on the tile on the start screen if you zoom out
- Splashscreen.png – 620x300 pixels – displays on the screen when you start up your app
- Storelogo.png – 50x50 pixels – displays in the windows store when someone is looking for your app
- Pin.png is the image used for the pushpin, you can change this if you want, or leave it as is.
You can use a tool like Paint or Paint.NET to resize your logo. Paint .NET will keep transparency.
Setting names and colors
If you open the file package.appxmanifest in Solution explorer.
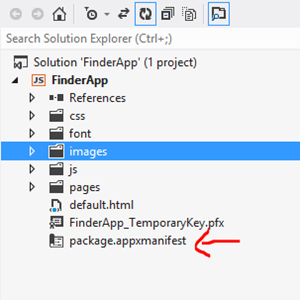
Navigate to the tab called Application UI and specify your own values for fields that affect the appearance and name of the application.

Display Name – the name you want displayed in the store for your app
Description – the description of your app
Scroll down to the Tile fields and specify a Short name for your app to display on the Start Screen tile.
You can also specify a background color for the tile and whether you want the text on the tile to be dark or light.
Scroll down to the splash screen fields, you can change the background color here so it better matches the image you selected for your splash screen.
Navigate to the Packaging Tab
Set the Package Display name to the name you have given your app
Set the Publisher Display name to the name of your Windows 8 store account
Adding a privacy policy to the app
Because your app accesses used location and connects to the internet you require a privacy policy. The privacy policy explains to the user what data your app collects and how the data is used.
The easiest way to support privacy policy is to create a web page with your privacy policy and then navigate to the folder js and open the file default.js
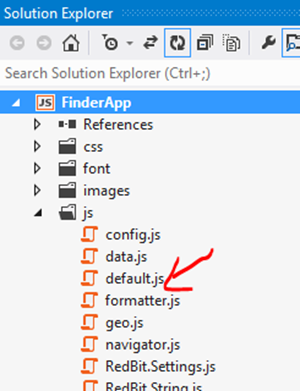
Find the code that defines the settings page for the application
app.onsettings = function (e) {
e.detail.applicationcommands = {
"settingsDiv": { href: "/pages/settings/settings.html", title: "Options" },
"about": { href: "/pages/about/aboutflyout.html", title: "About" },
"privacyDiv": { href: "/pages/privacy/privacy.html", title: "Privacy Policy" },
};
Now comes the fun part, because you need to create a page in your app for the privacy policy. You can do a little cut and paste and create a page based on the files used for the About page (AboutFlyout.html) and so on. Then update the HTML to contain text that describes your privacy policy. You will also need to make sure the <div> tag in your HTML page matches the <div> tag after the <body> statement of your HTML file. There is a blog that explains where this code is located here.
Here is the code after I added the privacy policy flyout to my app.
app.onsettings = function (e) {
e.detail.applicationcommands = {
"settingsDiv": { href: "/pages/settings/settings.html", title: "Options" },
"about": { href: "/pages/about/aboutflyout.html", title: "About" },
"priv": { href: "/pages/privacy/privacyflyout.html", title: "Privacy Policy" },
};
Here is the relevant code from inside my HTML page showing the div tag that matches the label I specified in the javascript code.
<body>
<!-- BEGINPRIVACYFLYOUT -->
<div id="priv" data-win-control="WinJS.UI.SettingsFlyout" aria-label="Privacy settings flyout">
I wasn’t exactly sure what to put in my privacy policy, so I looked at a few similar apps in the store and used their privacy policies as a starting point.
NOTE: When you publish your app to the store, in the Decription section you will be asked for a URL to your privacy policy. So you will need to set up a web page with the same privacy policy you included in your app and provide the URL that points to that page when you submit your app to the store. I had a wordpress blog so I just added an extra page to my blog with the privacy policy. You can also create a free website using Azure if you don’t have a site set up already. Tim Heuer wrote a blog post about how to do it https://timheuer.com/blog/archive/2012/09/26/use-azure-free-web-site-for-windows-store-app-content.aspx
Now I can publish my app to the store!
So in summary, the template works, and creates an app with very good functionality, you don’t have to be an experienced programmer, but you do have to be comfortable opening up and editing the code in the files. An experienced programmer could do a lot more in terms of customizing the data displayed and the types of data sources supported.
NOTE: The WACK test told me my launch time was too slow for some devices. So in order to pass I was unable to support ARM devices. I selected x86 and x64 packages instead. Disappointing because I think this sort of app would be popular on the smaller tablets. I will pass this along to the team who built the template in case it can be fixed. It is also possible that this performance issue varies depending on the data source you select for your app.
Comments
Anonymous
May 20, 2013
I need C#/XAML version, can you please post it ?Anonymous
May 20, 2013
The comment has been removed
