Monitoring Windows Azure with System Center Operations Manager 2012 – GET ME STARTED!
OK, you’ve installed System Center Operations Manger 2012 (OM 2012) and need to monitor Windows Azure services and VMs how do you do that?
I’ll outline how to connect System Center Operations Manager 2012 to Windows Azure, add Windows Azure monitors, and create views to view the status of your Windows Azure infrastructure.
Assumptions:
- System Center Operations Manager 2012 SP1 is installed and the console is launched.
- You have some knowledge of what OM 2012 does.
- Knowledge of what a Management Pack is (if not review the appendix at the bottom of this page).
- We’re not going to boil the ocean here, I’m going to keep it very simple :-).
Let’s get started!
QUICK OVERVIEW OF SYSTEM CENTER OPERATIONS MANAGER 2012
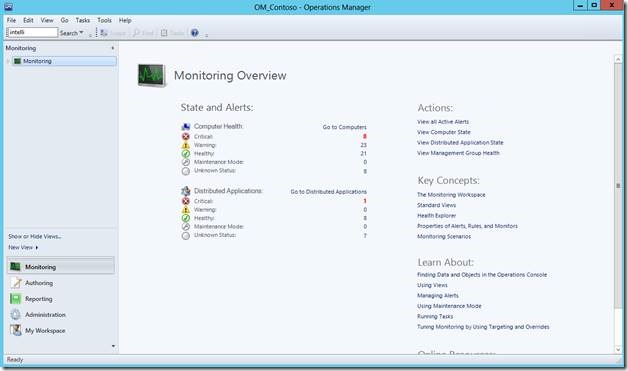
The image below shows the OM console. On the left hand side of the OM 2012 console below there are five categories:
1. Monitoring: were you’ll view alerts, system/service health, performance, and configure views.
2. Authoring: this where you’ll configure what will be monitored.
3. Reporting: this is where you’ll run reports on the state of your systems.
4. Administration: this is where you’ll configure OM 2012, e.g. deploy agents, discover systems, setup role based access, etc.
5. My Workspace: this is where you’ll save views, searches, create notification subscriptions.
The right hand side contextual and there will be actions and tasks associated with each category and sub-category.
INSTALLING THE WINDOWS AZURE MANAGEMENT PACK
Dependencies
- System Center 2012 SP1
- Windows Azure Subscription with VMs, Storage, and Services running.
Download the System Center Management Pack for Windows Azure: https://www.microsoft.com/en-us/download/details.aspx?id=38414 and execute the .msi on the server where Operations Manager 2012 w/SP1 is installed. Install files either in the default directory specified or another directory of your choice.
OBTAINING MANAGEMENT CERTIFICATES
You’ll need to create and upload a management certificate to work with Windows Azure. All communication between Windows Azure and System Center requires a certificate and is secured.
If you don’t have a management certificate already, start here: https://msdn.microsoft.com/en-us/library/windowsazure/gg551722.aspx then go here: https://msdn.microsoft.com/en-us/library/windowsazure/gg432987.aspx).
Navigate to https://manage.windowsazure.com/ and Log into your Windows Azure account
ADDING A WINDOWS AZURE SUBSCRIPTION TO OPERATIONS MANAGER
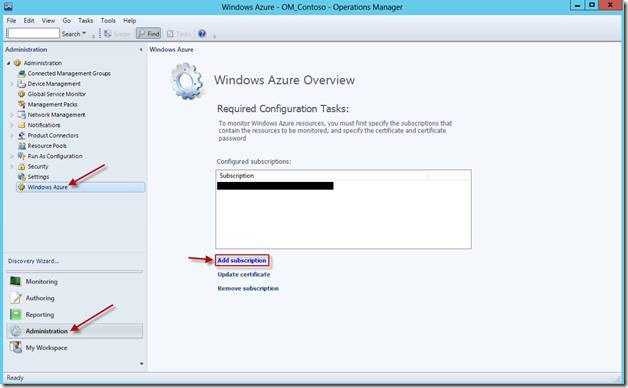
In the Operations Manager console select “Administration”. Then select “Windows Azure” and finally select “Add subscription”
Note: you must have System Center Service Pack 1 installed to see Windows Azure.
Type in the name of your Windows Azure subscription as it’s displayed in the Windows Azure management portal. Add the management certificate and the certificate password.
If you don’t have a management certificate start here: https://msdn.microsoft.com/en-us/library/windowsazure/gg551722.aspx then go here: https://msdn.microsoft.com/en-us/library/windowsazure/gg432987.aspx ).
Select “Next > ” or “Add subscription” to finish up the process. Once the subscription is added it will populate under Configured Subscription in Operation Manager (as shown in the preceding screenshot above the subscription information).
WORKING WITH THE WINDOWS AZURE MANAGEMENT PACK
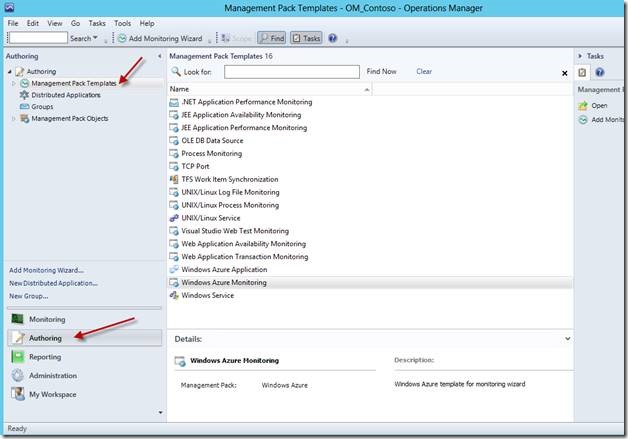
1. Launch the Operations Manager 2012 console
2. Click on Authoring
3. Next click Management Pack Templates
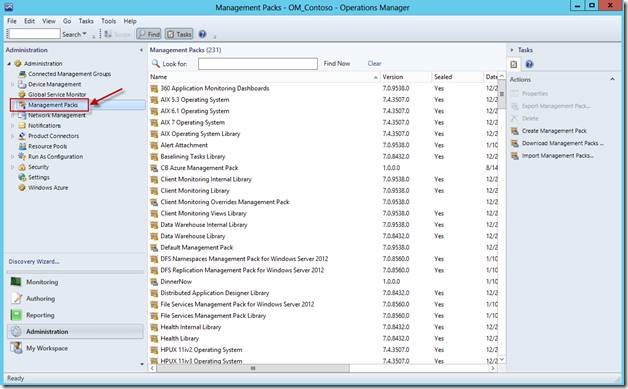
Select “Administration” and expand Administration if it isn’t already then select “Management Packs”:
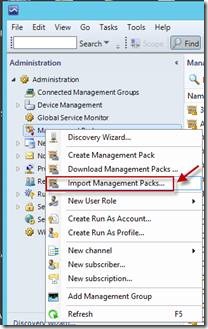
Right click and select “Import Management Packs… ”
Select “Add” and then “Add from disk … ”
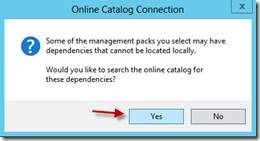
You may see the following dialog box, select “Yes”
Navigate to where the management pack files were extracted, select the .mpb files, and select “Open”:
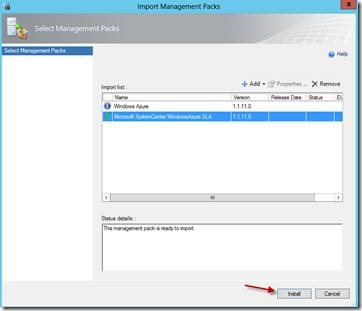
Select “Install” to install the Windows Azure Management Packs:
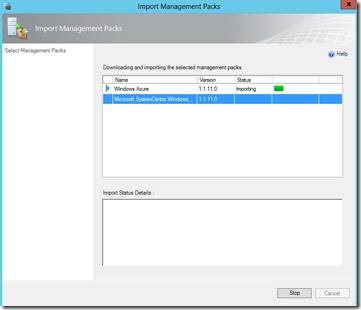
Install status screen:
Once the management packs are installed close out the dialog.
SETTING UP WINDOWS AZURE MONITORING
In the console select “Authoring” from the left hand navigation and then “Management Pack Templates”:
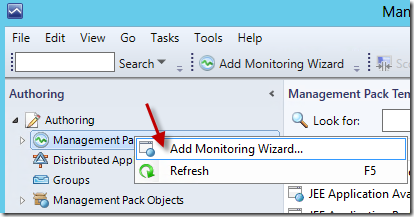
Right click on “Management Pack Templates” and select “Add Monitoring Wizard… ”:
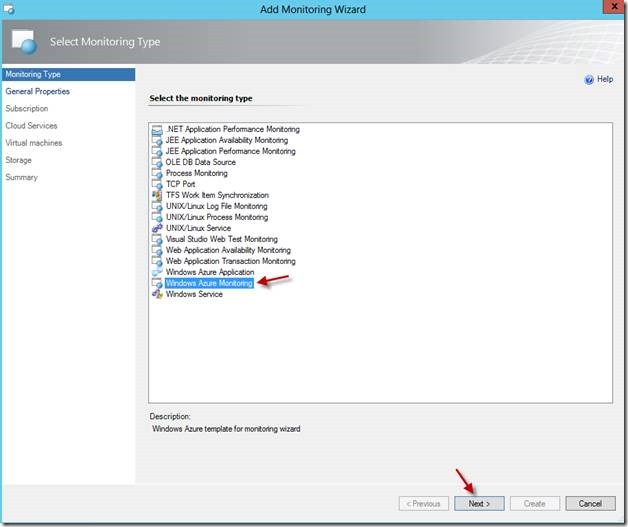
When the Add Monitoring Wizard opens select “Windows Azure Monitoring” and select “Next > ”:
You have a couple options on this screen, either use an existing management pack create a new management. See the note below and appendix for guidance on working with management packs.
Management packs can be sealed or unsealed. A sealed management pack cannot be modified directly. Any changes to the workflows in the sealed management pack, such as an override for a monitor, must be saved to an unsealed management pack. The unsealed management pack references the sealed management pack that it modifies.
It's good practice not to use the management packs that are installed with Operations Manager to save any settings that you change or elements that you create. When you have to select a destination management pack, always select a management pack that you create.
I will create a new management pack to save to.
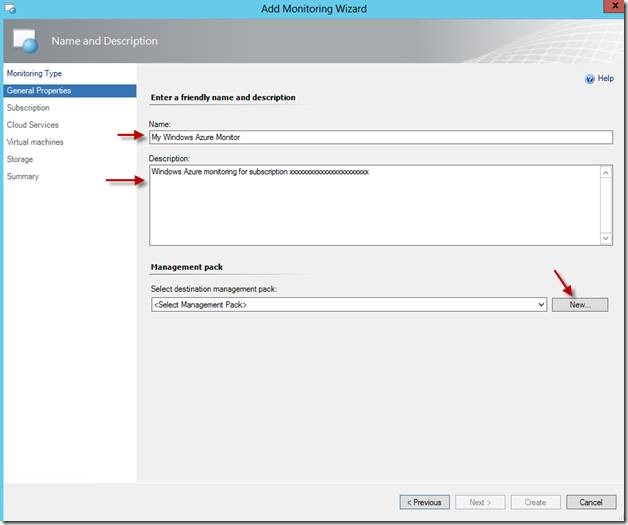
Add a name and description and using the recommended approach above, select “New… ”:
Add a Name, Version, Description, and select “Next > ”:
Add a Knowledge Article if you wish, I’m going to skip it and select “Create”:
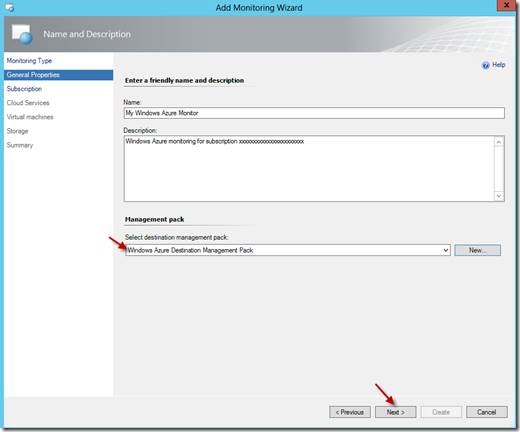
Once the destination Management Pack is created the dialog will close and you’ll be back to the Add Monitoring Wizard screen where you will continue to create the Windows Azure monitor. Make sure the newly created destination management pack is selected from the drop down box and select “Next > ”:
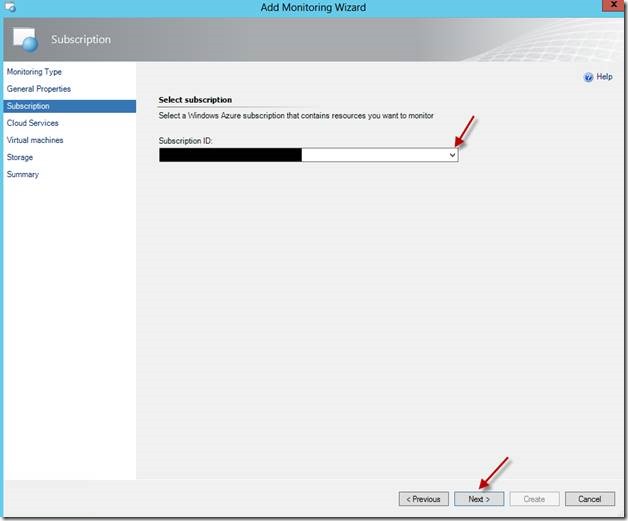
On the Subscription dialog select the Windows Azure subscription you wish to monitor and select “Next > ”:
These next few dialogs are we’re you’ll select which Windows Azure Cloud services, VMs, and Storage you’d like to monitor. Select “Add… ” to add services:
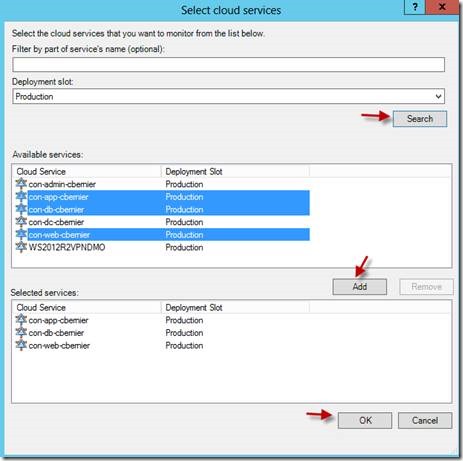
The following dialog will open. You have the option to filter by names and type of deployment (Staging or Production). I have SharePoint 2013 farm deployed in Windows Azure and distributed across several clouds (known as cloud service) and I’ve selected a few of the servers that I’d like to monitor. Select the cloud service you’re interested in monitoring and select “OK”.
If you’re new to Windows Azure, you may be wondering what a “Cloud Service” is. A Cloud Service (not to be confused with Windows Azure Cloud Services, more in line with Platform as a Service (PaaS)) that pertains to this tutorial, is defined by a grouping of Virtual Machines where you can configure options such as load balancing and high availability. The following provides a little more detail about what a cloud service is:
Grouping VMs into a cloud service lets you use other options as well. Windows Azure provides load balancing for VMs in the same cloud service, spreading user requests across them. VMs connected in this way can also communicate directly with one another over the local network within a Windows Azure datacenter.
VMs in the same cloud service can also be grouped into one or more availability sets. To understand why this is important, think about a web application that runs multiple front-end VMs. If all of these VMs are deployed on the same physical machine or even in the same rack of machines, a single hardware failure can make them all inaccessible. If these VMs are grouped into an availability set, however, Windows Azure will deploy them across the datacenter so that none of them share a single point of failure.
Source: https://www.windowsazure.com/en-us/develop/net/fundamentals/compute/#CloudServices
You’ll be taken back to the “add monitoring” wizard where you’ll see he cloud services you selected, from there select “Next > ”:
Within my cloud service(s) live Virtual Machines (VMs). This is where you’ll select the VMs you wish to monitor. Select “Search” and choose the VMs you wish to monitor, select “Add”, and then “OK”:
You’ll be taken back to the “add monitoring” wizard, review you selections and select “Next > ”:
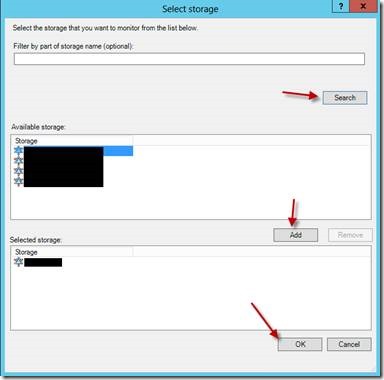
Select the storage accounts you wish to monitor, select “Add”, and then select “OK”:
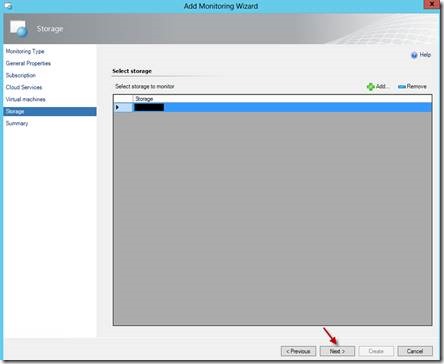
Review your selections and select “Next > ”:
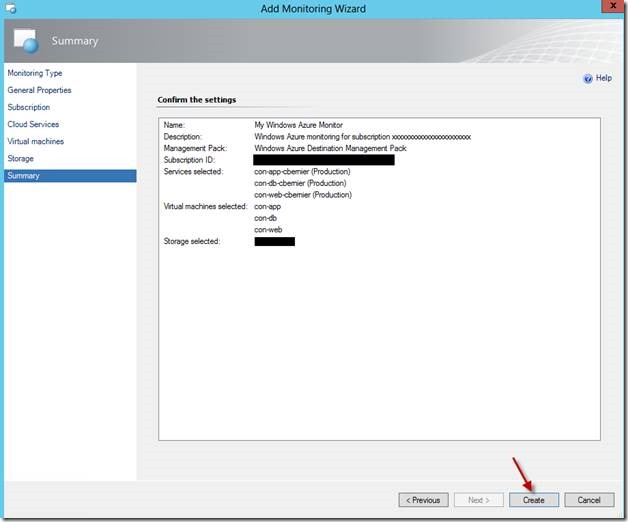
On the summary dialog, review your selections and select “Create”:
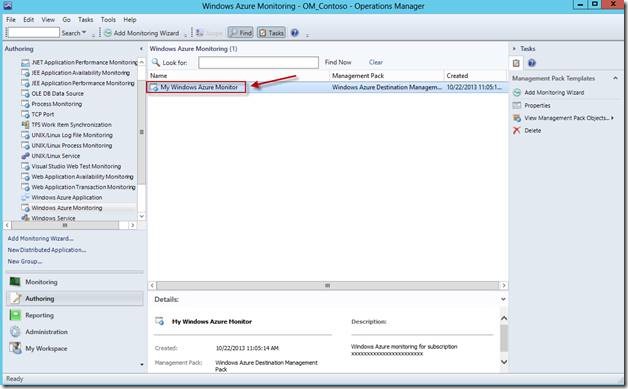
Once the add monitoring wizard closes you’ll be taken back to the Operations Manager console where you’ll see your newly created Windows Azure Monitor:
WORKING WITH MONITORS
OK, now that we have the Windows Azure monitor created let’s view some monitoring data.
You may find a pre-existing category of information for Windows Azure however you won’t be able to anything with it because it is locked (as depicted by a little lock over the folder  ). However you should see a new (empty) folder named after the management pack you created. Mine is called “Windows Azure Destination Management Pack”.
Find and select the new management pack folder in the console and right click on it. There are a variety of types (views) available to create. I’ll briefly explain them:
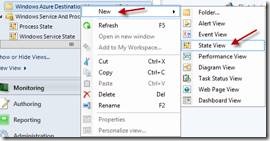
Right click on the new management pack folder, select “New” and select the desired view you wish to create. I’ll add two views for example purposes.
STATE VIEW
Select “State View” :
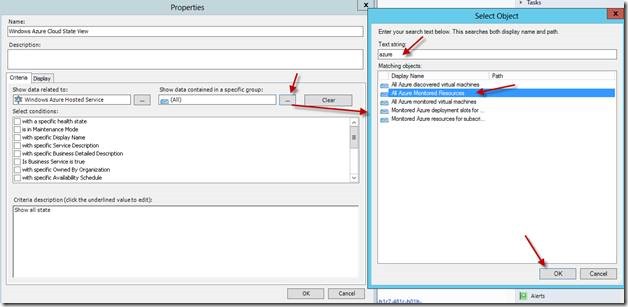
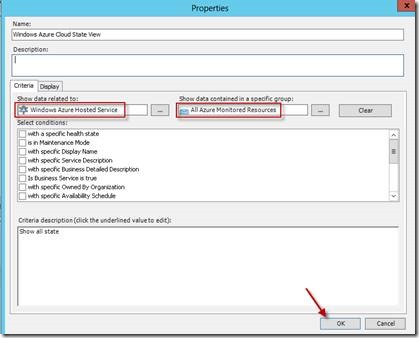
Once the properties dialog opens to add the state view, type in a name and select the ellipsis. Another window will open, select “View all targets” radio button and search for “azure”. Locate the targets that align with the management pack you created earlier and select the one that states “Windows Azure Hosted Service” in the name. When you’re satisfied with your selection, select “OK”:
Now we need to show data from a group. Select the ellipsis for “Show data contained in a specific group”. After the Select Object dialog opens, search for “azure” and select the object “All Azure Monitored Resources”:
Review the data point selected and select “OK”:
Once the state view is created select it (if not selected already) to view the state of your Windows Azure instances:
Diagram View
Right click the management pack folder, select “New” and then select “Diagram View”:
Add a name, select “Browse”, filter by “azure”, then select “Search”, select “All Azure Monitored Resources”, select “Add”, then select “OK” to go back to the Create Diagram View dialog:
Since I don’t have a template I’m going to create a new one and leave everything else default then select “Create”:
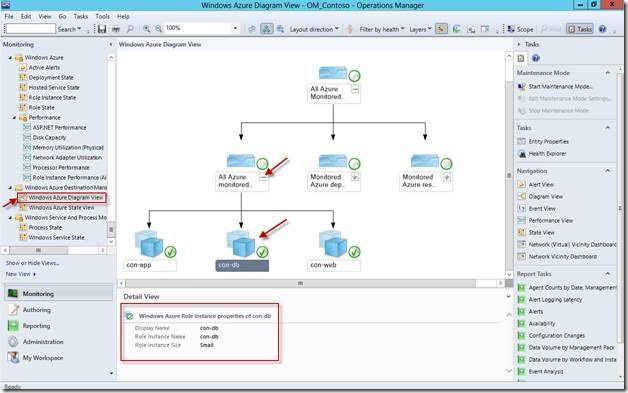
After the diagram view is created you’ll be taken back to the Operations Manager console. From there select (if not selected already) the diagram view you just created (it will reside under the management pack folder created earlier).
The following is my diagram view. Note, the resources are identical to what I selected to monitor earlier in this tutorial:
Congratulations, you’ve connected System Center Operations Manager 2012 to Windows Azure, added Windows Azure monitors to a custom management pack, and created views to view the status of your Windows Azure infrastructure.
APPENDIX
If you want to get creative you can split off your views to mimic the following:
Note: these views and others may exist already with the default management pack entries.
Management Packs
Let’s define what a Management Pack is and the options you have to work with them:
Management packs typically contain monitoring settings for applications and services.
Sealed and Unsealed Management Packs
Management packs are either sealed or unsealed. A sealed management pack is a binary file that cannot be edited. An unsealed management pack is an XML file that can be edited. Sealed management packs should have an .mp extension, while unsealed management packs should have an .xml extension.
In general, management packs obtained from an application or hardware device vendor are sealed.
Although you cannot change the settings in a sealed management pack, you can still customize the applied settings of a management pack after it is imported by using overrides or by creating additional settings such as rules, monitors, and tasks that supersede the management pack's default settings. All customizations that you create are saved to a separate management pack file.
For a list of what MPs are installed with OM 2012 visit: https://technet.microsoft.com/en-us/library/hh212701.aspx
OPERATIONS MANAGER 2012 DEPLOYMENT
If you haven’t set up Operations Manager 2012 to discover systems and deployed agents yet refer to this link: https://technet.microsoft.com/en-us/library/hh212772.aspx
Comments
- Anonymous
May 31, 2014
Pingback from Azure???System Center 2012 R2 App Controller???Operations Manager | ?????????????????????????????????2 - Anonymous
May 31, 2014
Pingback from Azure???System Center 2012 R2 App Controller???Operations Manager | ?????????????????????????????????2 - Anonymous
May 31, 2014
Pingback from Azure???System Center 2012 R2 App Controller???Operations Manager | ?????????????????????????????????2 - Anonymous
May 31, 2014
Pingback from Azure???System Center 2012 R2 App Controller???Operations Manager | ?????????????????????????????????2 - Anonymous
March 27, 2015
本文大綱如下:
說明
學習目標
準備工作
安裝 Windows Azure SQL Database Management Pack for System Center 2012 - Anonymous
March 29, 2015
本文大綱如下:
說明
學習目標
準備工作
安裝 Windows Azure SQL Database Management Pack for System Center 2012 - Anonymous
March 29, 2015
本文大綱如下:
說明
學習目標
準備工作
安裝 Windows Azure SQL Database Management Pack for System Center 2012 - Anonymous
January 21, 2016
Excelent, thanks a lot
