Step-By-Step: Setting up the new Azure Active Directory Connect
A while back we covered using the Active directory Sync Tool. That tool as now been updated and is now called Azure Active Directory Connect. In this post we will cover installing Azure AD Connect that became Generally Available on June 24, 2015, but you can do a straight upgrade of your environment if you’re already using DirSync. (We’ll cover that in another post).
Integrating your on-premises directories with Azure AD will allow you and your users to take advantage of a common identity when accessing both your on-premises and your cloud environments.
And by the same token have the following benefits:
- integrated identities managed in your own environment and replicated securely to your cloud environment.
- you will be able to provide conditional access based on application resource, device and user identity, network location and multi-factor authentication.
- Users will be happy that the unique identity will enable them to access Office 365, Intune, SaaS apps and third-party applications without having to remember and manage a separate set of credentials.
- your dev teams can build solutions leveraging that common identity model, integrating applications into Active Directory on-premises or Azure for cloud-based applications
Azure AD Connect makes this easy and simple and it offers more flexibility and features then DirSync provided. for a complete feature comparison between them see here.
To get started using Azure AD Connect you can download the latest version using the following: Download Azure AD Connect
Further details can be viewed here:
Before you install Azure AD Connect , there are a few prerequisites:
- An Azure subscription or an Azure trial subscription - This is only required for accessing the Azure portal and not for using Azure AD Connect. If you are using PowerShell or Office 365 you do not need an Azure subscription to use Azure AD Connect.
- An Azure AD Global Administrator account for the Azure AD tenant you wish to integrate with
- An AD Domain Controller or member server with Windows Server 2008 or later (see below for appropriate sizing for that machine)
- An Enterprise Administrator account for your local Active Directory
The DC or member server you will be using as the Azure AD Connect machine in your environment must meet the following minimum specs.
Number of objects in AD |
CPU |
Memory |
Hard drive size |
Fewer than 10,000 |
1.6 GHz |
4 GB |
70 GB |
10,000–50,000 |
1.6 GHz |
4 GB |
70 GB |
50,000–100,000 |
1.6 GHz |
16 GB |
100 GB |
For 100,000 or more objects the full version of SQL Server is required |
|||
100,000–300,000 |
1.6 GHz |
32 GB |
300 GB |
300,000–600,000 |
1.6 GHz |
32 GB |
450 GB |
More than 600,000 |
1.6 GHz |
32 GB |
500 GB |
Installing and configuring Azure AD Connect.
Before you start the installation/configuration, make sure you have an Azure AD Global Administrator account for the Azure AD tenant you wish to integrate with. In our case the directory in Azure is called CANITPRO and I have a global administrator configured.
Now that we have verified the account, we can execute the Azure AD Connect we have already downloaded. (see link above). Once we get to the Welcome page we can agree to the terms and continue.
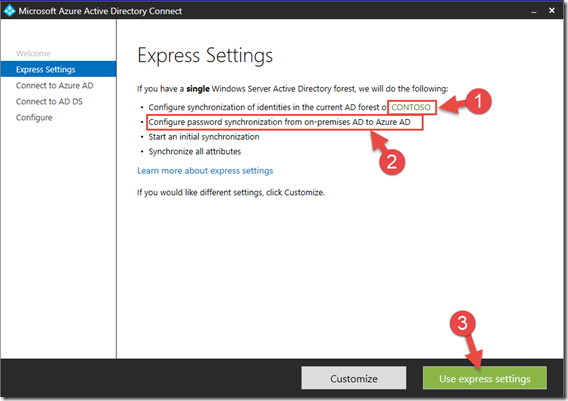
We will for this post the express settings. The express settings are appropriate if you have a single forest (1) and you wish to configure the password synchronization (2) . We start the process by clicking Use Express Settings (3)
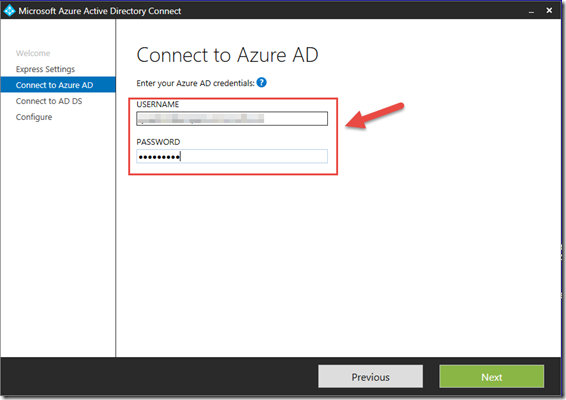
In the next step we will connect the tool to the cloud by entering our Global Administrator credentials we validated earlier. and click Next.
The Global Administrator credentials are used to create a service account that will take care of the synchronization and nothing else.
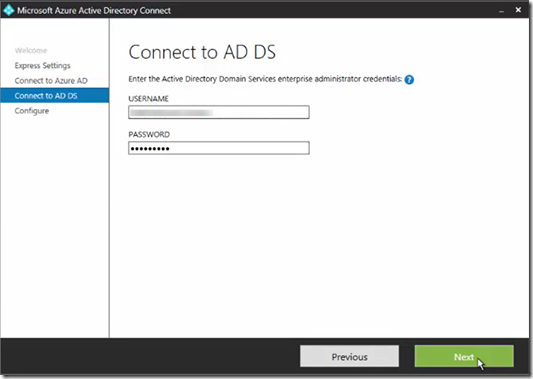
In the next page we will enter our enterprise administrator credentials which again are only used to create a service account and grant proper permissions.
After clicking Next, we will get to the “Ready to configure” page where you will be able to verify that the settings are the ones you intended before we click the checkbox to start the sync process after the configuration is complete.
As part of the configuration the Installer\Configuration tools will install a local instance of SQL Express to support the sync process and the Sync service.
When the install is complete you will get a confirmation page. Now, just wait a few minutes for the sync to take place, logon your Azure portal and verify that all your accounts have been synchronized.
I hope this was useful!
To learn more on the subject I recommend the following MVA course. Support Corner: Directory Synchronization in Office 365. It’s free and available online.
Cheers!
Pierre Roman
@pierreroman


