Step-By-Step: Protect physical servers with Azure Site Recovery
Last week I was reading about the devastating fires in western Canada. I happen to come across a post from Dave Kawula a Canadian MVP who has been a collaborator to the CANITPRO team and Microsoft Canada for a long time. It was about how a group of MVP were able to help the Northern Lights School District of La Ronge in Northern Saskatchewan, when the town was threatened by a massive forest fire. An estimated 7,000 people who were forced to leave their communities in the La Ronge area of Saskatchewan.
I'm so proud of the MVPs who gave their time and efforts to help communities in need. When I asked Dave about it he said:
"It was a no brainer. Now we will setup something official for MVP's around the world to help out when called on. Not just to speak at conferences and user groups but to really help out when needed. It is a great honour to be able to help out those in their time of need."
That story reminded me that it's important for any organization to ensure they have a proper DR (Disaster Recovery) plan. In Azure, the Site Recovery service is a part of a robust business continuity and disaster recovery (BCDR) solution, that helps protects your on-premises physical servers and virtual machines. It does so by orchestrating and automating the replication and the failover of your on-premises workloads to Azure, or to a secondary datacenter.
Learn More here:
- Hybrid Cloud Workloads: Disaster Recovery and High Availability
- Enterprise level Disaster Recovery with Azure Site recovery for fraction of the cost
- Best Practices for Deploying Disaster Recovery Services with Microsoft Azure Site Recovery
- Azure Site Recovery: Microsoft Azure As a Destination for Disaster Recovery
Azure Site Recovery works in the following scenarios:
Replicate to |
Replicate from (on-premises) |
Details |
Azure |
Hyper-V site |
Replicate virtual machine on one or more on-premises Hyper-V host servers that are defined as a Hyper-V site to Azure. No VMM server required. |
Azure |
VMM server |
Replicate virtual machines on one or more on-premises Hyper-V host servers located in a VMM cloud to Azure. |
Azure |
Physical Windows server |
Replicate a physical Windows or Linux server to Azure |
Azure |
VMware virtual machine |
Replicate VMware virtual machines to Azure |
Secondary datacenter |
VMM server |
Replicate virtual machines on on-premises Hyper-V host servers located in a VMM cloud to a secondary VMM server in another datacenter |
Secondary datacenter |
VMM server with SAN |
Replicate virtual machines on on-premises Hyper-V host servers located in a VMM cloud to a secondary VMM server in another datacenter using SAN replication |
Secondary datacenter |
Single VMM server |
Replicate virtual machines on on-premises Hyper-V host servers located in a VMM cloud to a secondary cloud on the same VMM server |
Today we'll look at how we can setup Azure to facilitate the replication on a physical server from my Datacenter (the closet in my basement) to Azure.
![]() Please note: We will do this in 2 parts today the Azure side config. Next Monday, the On-Prem side config.
Please note: We will do this in 2 parts today the Azure side config. Next Monday, the On-Prem side config.
But before we start. Protected physical servers or VMware virtual machines running Windows have a number of requirements.
- A supported 64-bit operating system: Windows Server 2012 R2, Windows Server 2012, or Windows Server 2008 R2 with at least SP1.
- The host name, mount points, device names, Windows system path (eg: C:\Windows) should be in English only.
- The operating system should be installed on C:\ drive.
- Only basic disks are supported. Dynamic disks aren't supported.
You'll need to provide an administrator account (must be a local administrator on the Windows machine) to push install the Mobility Service on Windows servers.If the provided account is a non-domain account you'll need to disable Remote User Access control on the local machine.
To do this add the LocalAccountTokenFilterPolicy DWORD registry entry with a value of 1 under HKEY_LOCAL_MACHINE\SOFTWARE\Microsoft\Windows\CurrentVersion\Policies\System.
You will also need a pre-configure virtual network configure in your Azure subscription. Pleas ensure that this is done ahead of time since it will take a few minutes to populate throughout the system.
Step 1: Create a Site Recovery Vault
From the Azure management Portal. Click New, Expand Data Services (1) Recovery Services (2) and click Site Recovery Vault (3).
Then Click Quick Create (1) . In Name, enter a friendly name to identify the vault (2) . In Region, select the geographic region for the vault where you want it located (3) and click Create vault (4).
Step 2: Deploy a configuration server
The configuration server coordinates communication between protected machines, the process server, and master target servers in Azure. It sets up replication and coordinates recovery in Azure when failover occurs.
Once the vault is created, in the Recovery Services page, click it to open the Quick Start page. and in the dropdown list, select Between an on-premises site with VMware/physical servers and Azure
Once you selected the right item in the list above the Quick Start page will change and in the Prepare Target(Azure) Resources section, click Deploy Configuration Server
you will then be prompted to fill in the information in the following dialogue box. (this is where the pre-configure Vnet comes into play) and click the checkbox to start the process. A standard A3 vm based on an Azure Site Recovery Windows Server 2012 R2 gallery image will be created in your subscription for the configuration server.
After the configuration server is deployed. please note the public IP address assigned to it on the Virtual Machines page in the portal and note the configuration of the ENDPOINTS for the public HTTPS port mapped to private port 443. You'll need this information later when you register the master target and process servers with the configuration server.
The configuration server is deployed with these endpoints:
- HTTPS: used to coordinate communication between component servers and Azure over the internet.
- Custom: Public port is used for failback tool communication over the internet.
- the PowerShell: Private port 5986 and Remote desktop: Private port 3389 are self explanatory.
Step 3: Register the configuration server in the vault
In your Recovery Services Quick Start page click Download a registration key. The key file is generated automatically. It's valid for 5 days after it's generated. Copy it to the configuration server. ( I saved the key file to my “Onedrive for Business” cloud storage)
Connect to the VM we created during the Configuration Server step, The Azure Site Recovery Configuration Server Setup Wizard will runs automatically when you log on for the first time. click Next In the Azure Site Recovery Configuration Server Setup Wizard.
Accept the license for the installation of MySQL Community Server 5.5.37.
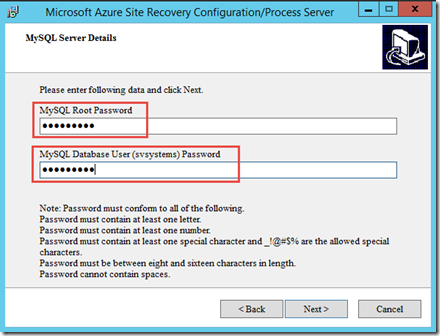
Provide passwords for the configuration of the MySQL server and click Next.
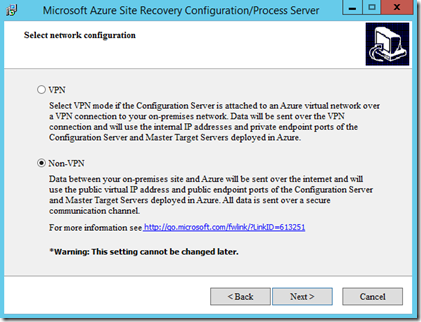
In the next dialogue box we are asked to pick whether we will connect over a VPN connection or over the Internet. In my case I will connect over the internet. note that this CANNOT be changed later so you need to be sure. and click Next. you will need to confirm that your selection is appropriate.
configure whether you are using existing Proxy settings, without a proxy or with custom proxy settings. In my case I will use to connect directly.
select the language you will be using. (I don’t think we need a screenshot for that one) click Next and in the following dialogue Box click browse and navigate to the location where you saved the Vault registration key generated earlier. (I copied the key file from my “OneDrive for Business” to a local directory on the C: drive of the configuration server). once that’s done, click Install (the process will take about 10 minutes)
Please note that after completing the setup you will be provided with a connection Passphrase. COPY IT!! . You will need it later.
Step 4: Set up and manage accounts
During deployment, Site Recovery requests credentials for the following actions:
- When you register a vCenter server for automation discovery of virtual machines.
- When you add machines for protection, so that Site Recovery can install the Mobility service on them.
While we’re still connected to our configuration server, open the Manage Accounts dialog to add and manage accounts that should be used for these actions
Open the shortcut you created for the dialog on the last page of setup for the configuration server (cspsconfigtool) and click Add Account.
Fill out the required info. And click OK
Step 5: Deploy the master target server
Back in the Azure Portal. In the Recovery Services page, click your vault to open the Quick Start page. and In Prepare Target(Azure) Resources, click Deploy master target server
The Master Target Server virtual machine is created using a predefined gallery image.
Log on to the virtual machine in Azure to complete installation and to register it with the Configuration Server. The first time you log on a script will run in a PowerShell window. Don't close it. When it finishes the Host Agent Config tool opens automatically to register the server
In Host Agent Config specify the internal IP address of the configuration server (10.0.0.10 in my case) and port 443. You can use the internal address and private port 443 even if you're not connecting over VPN mode because the virtual machine is attached to the same Azure network as the configuration server.
Leave Use HTTPS enabled. Enter the passphrase for the configuration server that you noted earlier. Click OK to register server. Note that you can ignore the NAT options on the page. They're not used.
Wait for a few minutes and in the portal, in the Recovery Services page (1), in the Vault we created (2) on the Servers tab (3) , in the Configuration Servers page (4) click the configuration server (5) and check that the master target server is listed as registered on the Server Details tab
as below.
That is it for tonight. Join me next Monday when we complete the setup.
Cheers!
Pierre Roman
@pierreroman


