How to write to and read from Windows Azure tables within Web Applications
Overview
In this module we learn about writing to *Windows Azure Tables (version 2.1). It will demonstrate simple insertions as well as batch oriented insertions. It will also explore reading from Windows Azure Tables using LINQ.
Tables store data as collections of entities. Entities are similar to rows. An entity has a primary key and a set of properties. A property is a name, typed-value pair, similar to a column. The Table service does not enforce any schema for tables, so two entities in the same table may have different sets of properties. Developers may choose to enforce a schema on the client side. A table may contain any number of entities.
Using the Windows Azure Storage SDK
NuGet will be used to install the necessary assemblies and references. It represents the fastests and easiest way to support Windows Azure Storage from a web application.
Information about Windows Azure Tables
Here is some basic vocabulary relating to Windows Azure Tables
| Table | Contains a set of entities. |
| Entity (Row) | Entities are the basic data items stored in a table. |
| PartitionKey | The first key property of every table. The system uses this key to automatically distribute the table’s entities over many storage nodes. |
Here are some more basic facts:
| Massive scale at a low cost |
| Structured storage with entities and properties |
| Non-relational (no joins, foreign keys) |
| You define how to partition the data |
| Fabric controller automatically balances partitions across storage nodes |
| REST or WCF Data Services w/LINQ |
| Billions of entities (rows) and TBs of data |
| Can use thousands of servers as traffic grows |
| Replicated 3 times |
Setup
In order to execute the exercises in this hands-on lab you need to set up your environment.
- Start Visual Studio
- Signed up with a Window Azure Account
Task 1 – Creating a web app that leverages Windows Azure Tables
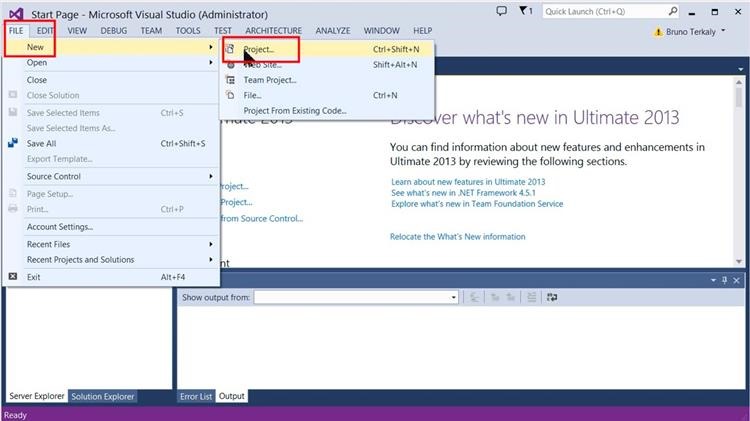
From the File menu, choose New Project
Starting a new cloud project
Select Visual C# | Cloud | Windows Azure Cloud Service and provide a name (WebAppWritesToAzureStorage). Use the same name because we will paste in code that relies on the same namespace.
Selecting the cloud template and naming the project
Select ASP.NET Web Role and then click the > to add the web role to the solution.
Adding an ASP.NET Web Role
Rename the web role as seen below.
Naming the web role WebAppWritesToAzureTables
Select the web forms template.
Selecting Web Forms
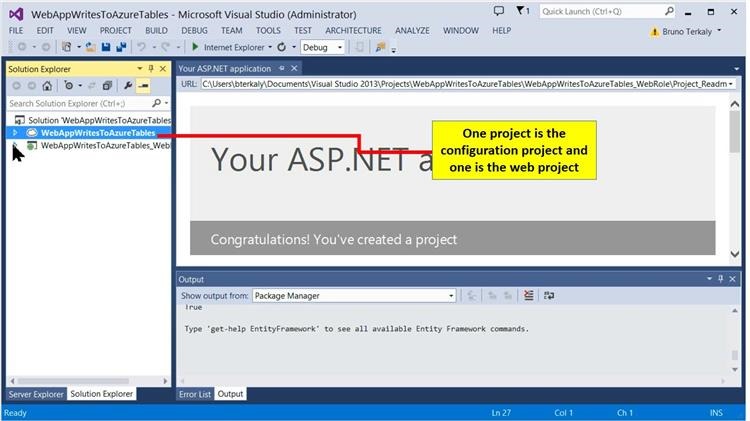
Notice that there are two projects. In a future post we will deploy this cloud solution. We will edit the Web Role in this post.
Viewing 2 projects in Solution Explorer
We will incorporate the Windows Azure Storage libraries into our solution. This will enable us to perform CRUD operations with Windows Azure tables.
Starting the Package Manager Console (NuGet)
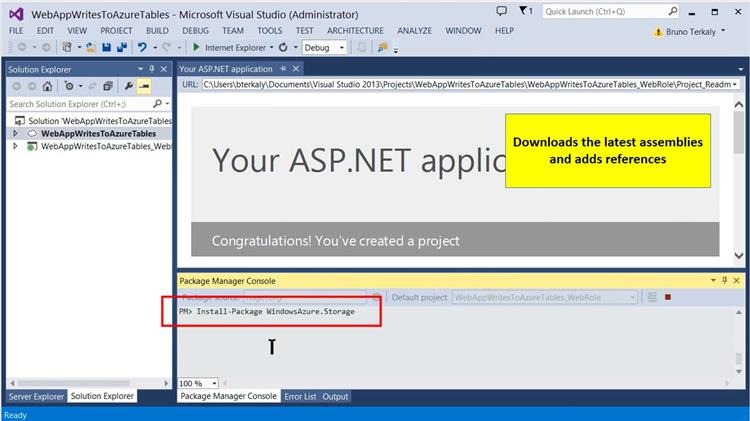
Issue the command at the PM> prompt.
Issuing the NuGet command Install-Package WindowsAzure.Storage
You can validate success. It should say installed not uninstalled. I probably ran it twice.
Verifying success
You will replace all the code in Default.aspx.
Replacing the existing code in Default.aspx
Review the code in default.aspx
default.aspx 1 2 3 4 5 6 7 8 9 10 11 12 13 14 15 16 17 18 19 20 21 22 23 24 25 26 27 28 29 30 31 32 33 34 35 36 37 38 39 40 41 42 43 44 45 46 47 48 49 50 51 52 53 54 55 56 57 58 59 60 61 62 63 64 65 66 67 68 69 70 71 72 73 74 75 76 77 78 79 80 81 82 <%\@ Page Title="Home Page" Language="C#" MasterPageFile="~/Site.Master" AutoEventWireup="true" CodeBehind="Default.aspx.cs" Inherits="WebAppWritesToAzureTables_WebRole._Default" %> <asp:Content ID="BodyContent" runat="server" ContentPlaceHolderID="MainContent"> <div class="jumbotron"> <br /> <asp:Table ID="Table1" runat="server" GridLines="Both" CellPadding="10" CellSpacing="10"> <asp:TableRow VerticalAlign="Top"> <asp:TableCell> <h1>Great Quotes</h1> <asp:Label ID="lblMessage" Text="" runat="server" /><br /> <asp:Label Text="The Quote" runat="server" /> <br /> <asp:TextBox ID="txtQuote" Text="You only live once." runat="server" Height="52px" Width="695px"> </asp:TextBox> <br /> <asp:Label Text="Author" runat="server" /> <br /> <asp:TextBox ID="txtAuthor" Text="Anonymous" runat="server" Height="53px" Width="420px"> </asp:TextBox> <br /> <asp:Label Text="Submitter" runat="server" /> <br /> <asp:TextBox ID="txtSubmitter" Text="Submitter" runat="server" Height="43px" Width="420px"> </asp:TextBox> <br /> <asp:Button ID="cmdAddQuote" runat="server" Text="Add Quote" OnClick="cmdAddQuote_Click" /> </asp:TableCell> <asp:TableCell> <asp:Label Text="Insert a Batch" runat="server" /> <br /> <asp:Button ID="cmdAddBatch" runat="server" Text="Add Batch" OnClick="cmdAddBatch_Click" /> </asp:TableCell> </asp:TableRow> <asp:TableRow VerticalAlign="Top"> <asp:TableCell> <br /> <asp:Button ID="cmdGetOscarWildeQuotes" runat="server" Text="Get Oscar Wilde Quotes" OnClick="cmdGetOscarWildeQuotes_Click" /> <br /> <asp:ListBox ID="lbQuotes" runat="server" Visible="false"></asp:ListBox> </asp:TableCell> </asp:TableRow> </asp:Table> </div> </asp:Content> Reviewing the code
There are 3 text boxes txtQuote, txtAuthor, txtSubmitter There are 3 buttons cmdAddQuote, cmdAddBatch, cmdGetOscarWildeQuotes Each button has a corresponding event procedure cmdAddQuote_Click, cmdAddBatch_Click, cmdGetOscarWildeQuotes_Click We have added 3 buttons, as explained previously. The first button is for doing a simple add. The second button demonstrates the batch insertion of data. The third button queries Windows Azure Table Storage to retrieve records.
Noticing the 3 buttons added
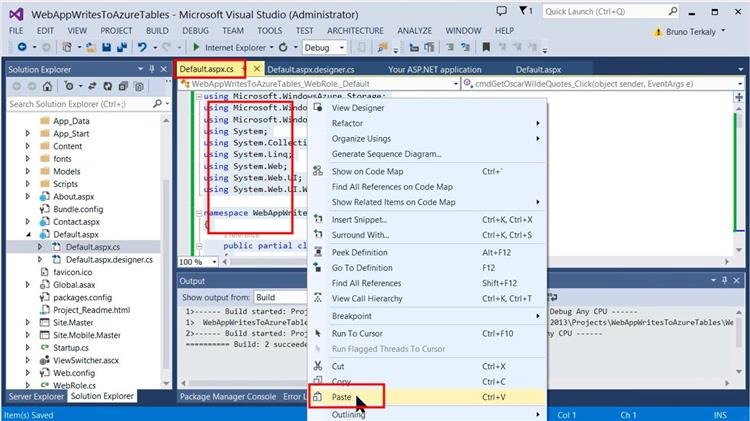
We will now paste in code, completely replacing Default.aspx.cs.
Pasting in the code-behind into Default.aspx.cs
Review the code in default.aspx.cs
default.aspx.cs 1 2 3 4 5 6 7 8 9 10 11 12 13 14 15 16 17 18 19 20 21 22 23 24 25 26 27 28 29 30 31 32 33 34 35 36 37 38 39 40 41 42 43 44 45 46 47 48 49 50 51 52 53 54 55 56 57 58 59 60 61 62 63 64 65 66 67 68 69 70 71 72 73 74 75 76 77 78 79 80 81 82 83 84 85 86 87 88 89 90 91 92 93 94 95 96 97 98 99 100 101 102 103 104 105 106 107 108 109 110 111 112 113 114 115 116 117 118 119 120 using Microsoft.WindowsAzure.Storage; using Microsoft.WindowsAzure.Storage.Auth; using Microsoft.WindowsAzure.Storage.Table; using System; using System.Collections.Generic; using System.Linq; using System.Web; using System.Web.UI; using System.Web.UI.WebControls; namespace WebAppWritesToAzureTables_WebRole { public partial class _Default : Page { CloudStorageAccount account = new CloudStorageAccount( new StorageCredentials("favouritequotes", " GET THIS FROM THE PORTAL "), true); protected void Page_Load(object sender, EventArgs e) { } protected void cmdAddQuote_Click(object sender, EventArgs e) { string quote = txtQuote.Text; string author = txtAuthor.Text; string submitter = txtSubmitter.Text; AddNewQuote(quote, author, submitter); } public void AddNewQuote(string quote, string author, string submitter) { // You could use local development storage // account = CloudStorageAccount.DevelopmentStorageAccount; // Create the table client. CloudTableClient tableClient = account.CreateCloudTableClient(); // Create the table if it doesn't exist. CloudTable table = tableClient.GetTableReference("quotes"); table.CreateIfNotExistsAsync(); QuoteEntity quoteEntity = new QuoteEntity(quote, author); quoteEntity.Submitter = submitter; // Create the TableOperation that inserts the customer entity. TableOperation insertOperation = TableOperation.Insert(quoteEntity); // Execute the insert operation. table.Execute(insertOperation); lblMessage.Text = "Done with one row insert"; } public class QuoteEntity : TableEntity { public QuoteEntity(string quote, string author) { this.PartitionKey = author; this.RowKey = quote; } public QuoteEntity() { } public string Submitter { get; set; } } protected void cmdAddBatch_Click(object sender, EventArgs e) { // Create the table client. CloudTableClient tableClient = account.CreateCloudTableClient(); // Create the CloudTable object that represents the "quotes" table. CloudTable table = tableClient.GetTableReference("quotes"); table.CreateIfNotExistsAsync(); // Create the batch operation. TableBatchOperation batchOperation = new TableBatchOperation(); // Create a quote entity and add it to the table. QuoteEntity quote1 = new QuoteEntity("The critic has to educate the public. The artist has to educate the critic.", "Oscar Wilde"); quote1.Submitter = "Bruno"; //// Create a quote entity and add it to the table. QuoteEntity quote2 = new QuoteEntity("I have the simplest tastes. I am always satisfied with the best", "Oscar Wilde"); quote1.Submitter = "Bruno"; // Add both customer entities to the batch insert operation. batchOperation.Insert(quote1); batchOperation.Insert(quote2); // Execute the batch operation. table.ExecuteBatch(batchOperation); lblMessage.Text = "Done with batch"; } protected void cmdGetOscarWildeQuotes_Click(object sender, EventArgs e) { lbQuotes.Visible = true; // Create the table client. CloudTableClient tableClient = account.CreateCloudTableClient(); // Create the CloudTable object that represents the "quotes" table. CloudTable table = tableClient.GetTableReference("quotes"); // Construct the query operation for all customer entities where PartitionKey="Oscar Wilde". TableQuery<QuoteEntity> query = new TableQuery<QuoteEntity>() .Where(TableQuery.GenerateFilterCondition("PartitionKey", QueryComparisons.Equal, "Oscar Wilde")); // Print the fields for each customer. foreach (QuoteEntity entity in table.ExecuteQuery(query)) { lbQuotes.Items.Add(new ListItem { Text = entity.RowKey }); } lblMessage.Text = "Done with select"; } } } Reviewing the code
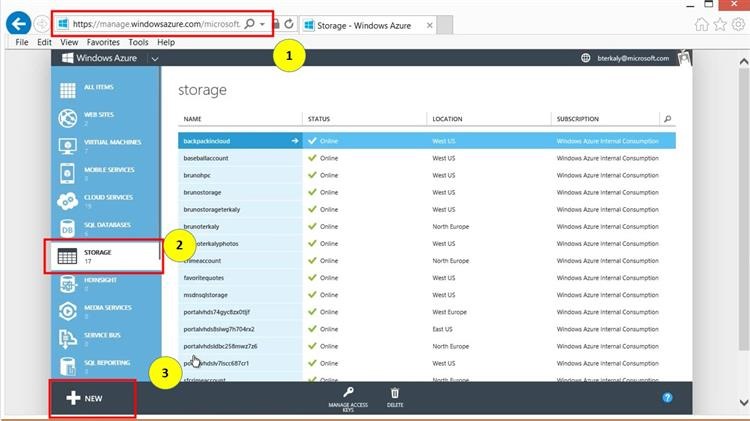
Lines Description 15-17 Represents the Windows Azure Storage Account (shown previously). 26-29 Grabs the data typed in by the user and calls AddNewQuote() 32-51 Creates a table called <strong>quotes</strong>, if it does not exist. Line 42 builds a QuoteEntity object and then populates it with Quote, Author, and Submitter. Line 45 does the insert and line 49 executes the insert. 53-62 Represents the QuoteEntity object. Afterall, tables are just collection of objects. Special note to partition key and row key. You should read more about how important partition keys and rowkeys are. 67-90 Performs a batch operation of data. 96-115 Performs a query against the table. Looks for Oscar Wilde and populates the listbox with the results. Login into the Windows Azure Portal. Select Storage from the left menu bar. Then select +New to add a new Storage Account.
Adding a Storage Account at the Windows Azure Management Portal
The URL needs to be globally unique. You will need to pick a different URL. You will also select a Location for your Storage Account. When you have done this, choose CREATE STORAGE ACCOUNT to create the storage account.
Providing a unique url and location for the storage account
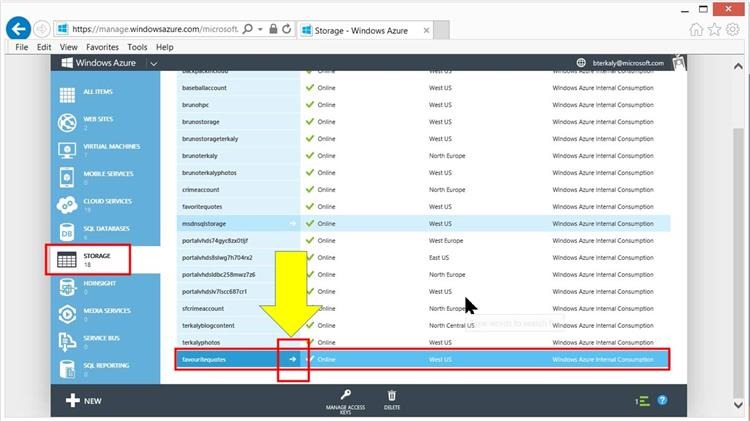
Once we have created the storage account, we will need to get the access key, which will be copied into our code. This information is needed to be able to communicate with the Windows Azure tables and Storage in general.
Getting the access key
Be sure to select the correct storage account name and then choose Manage access keys.
Getting the Access Key
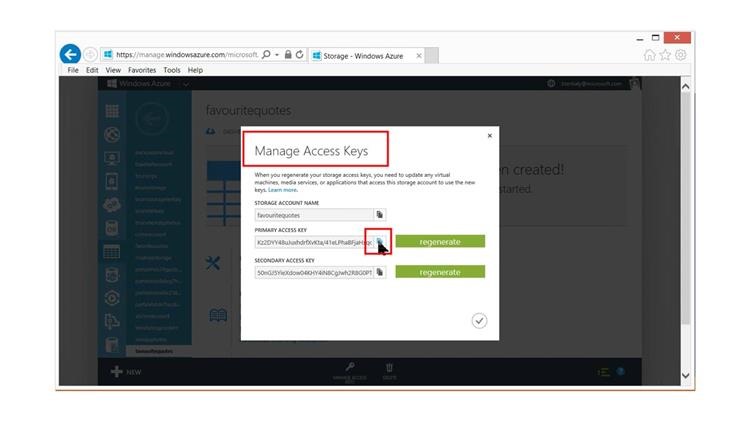
Click on the copy button.
Copying the Access Key to the clipboard
You will return to default.aspx.cs and paste in the access key to the appropriate place in the code, as seen below.
Pasting in the Access Key into Default.aspx.cs
Server Explorer can be used to view our Storage Account. Choose View | Server Explorer.
Starting Server Explorer
Navigate the red boxes as seen below. We haven?t yet run the code to add the data. There is no data yet.
Viewing the Storage Account we just created
Simply note that Blobs, Tables, and Queues are available.
Viewing the Tables portion of storage
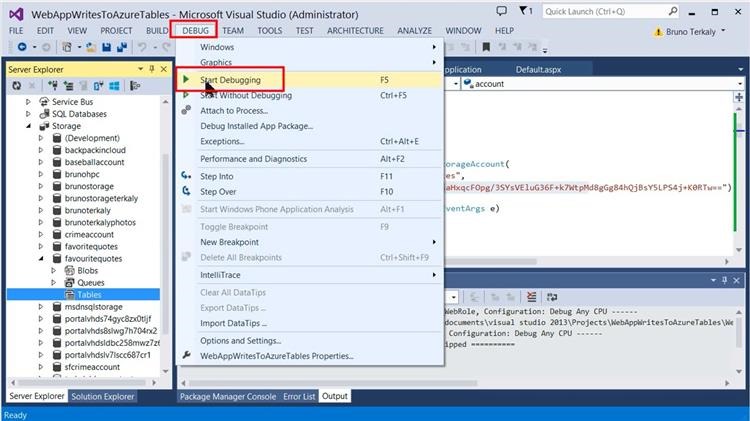
From the Debug menu choose Start Debugging.
Running the application
Start by clicking Add Quote followed by Add Batch.
Viewing 2 of the 3 buttons
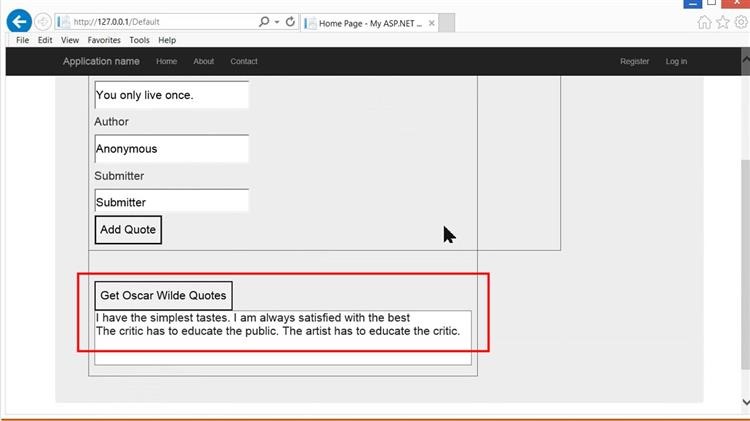
The previous 2 buttons added data. So now you can choose Get Oscar Wilde Quotes to query the data and load the quotes into the list box, as seen below.
Viewing the 3rd button
Return back to Server Explorer and click on Tables. You should be able to see the data that was just added.
Viewing the data in the storage account
Summary
In this post, you learned a few things:
- How to write and read objects to and from Windows Azure Tables
- How to use the Windows Azure Portal to create a Storage Account
- How to use Server Explorer to view Auzre Tables in storage
- How to use NuGet to add support for Windows Azure Storage
Comments
Anonymous
January 15, 2016
Very Useful article. Thank you very muchAnonymous
January 16, 2016
Is Insert and Query operations here are using REST APIs?
